Sukhdev Kamboj
Every time your browser shows a padlock icon, or your operating system silently confirms that a downloaded application, a driver, or an email sender is legitimate, it is relying on a hidden layer of trust called the certificate store. At the heart of this system sit Trusted Root Certification Authorities — a curated list of organizations (like DigiCert, Sectigo, Microsoft, or your own company’s internal Certificate Authority) that Windows treats as unquestionably trustworthy. Any certificate issued by one of these root authorities, or by an intermediate authority that chains back to one of them, is automatically accepted as valid.
This makes the Trusted Root Certification Authorities store one of the most security-critical components of Windows 11 and Windows 10. If a malicious or compromised certificate ends up in that store, an attacker could potentially impersonate secure websites, sign malware so it looks legitimate, or intercept encrypted traffic without triggering any warnings. On the other hand, expired, outdated, or unnecessary root certificates can cause connectivity errors, failed software installations, VPN authentication problems, and browser warnings that have nothing to do with an actual security threat — just a stale entry in the store.
Managing these certificates is a routine task for IT administrators who deploy internal Certificate Authorities across an organization, but it’s equally useful for everyday users who need to install a certificate for a home VPN, resolve an “untrusted certificate” browser error, or clean out old entries that no longer serve any purpose. Fortunately, Windows 11 and Windows 10 provide several built-in ways to view, add, export, and remove trusted root certificates — no third-party software required.
This guide walks through the most reliable methods for managing trusted root certificates, using tools already built into Windows: the Certificate Manager console, PowerShell, the Certutil command-line utility, and Group Policy for domain environments. It also answers some of the most common questions users have about certificate trust, safety, and troubleshooting.
Before making any changes, it’s worth noting that modifying the root certificate store is a sensitive operation. Removing the wrong certificate can break secure connections to legitimate websites and services, while adding an untrusted certificate can expose your system to security risks. Always confirm the source and legitimacy of a certificate before installing it, and consider exporting your current certificate list as a backup before making bulk changes.
Methods to Manage Trusted Root Certificates
Method 1: Using the Certificate Manager (certmgr.msc)
The Certificate Manager snap-in is the most user-friendly way to view and manage certificates on a Windows machine, and it doesn’t require any command-line knowledge.
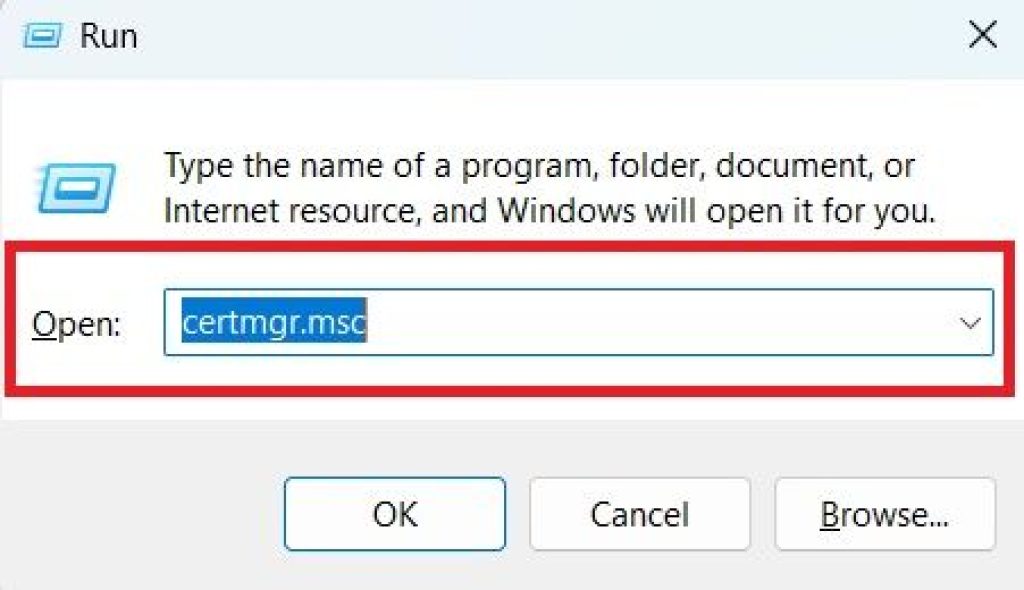
Press Windows + R to open the Run dialog, type certmgr.msc, and press Enter. This opens the Certificate Manager for the current user account.
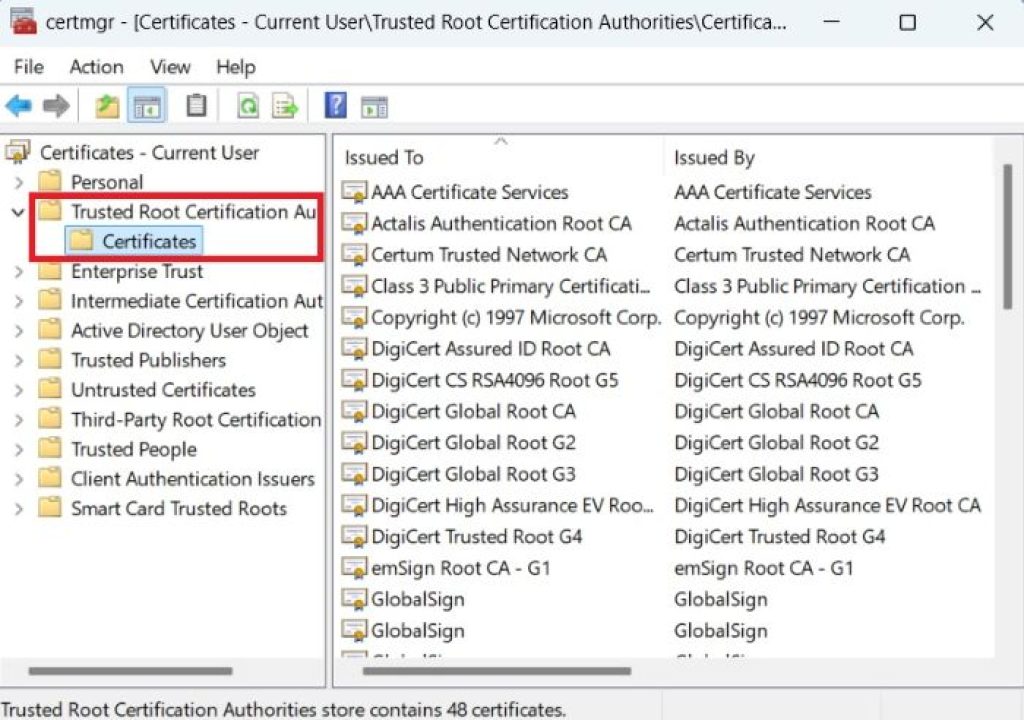
In the left pane, expand Trusted Root Certification Authorities, then click Certificates to see the full list of installed root certificates in the middle pane.
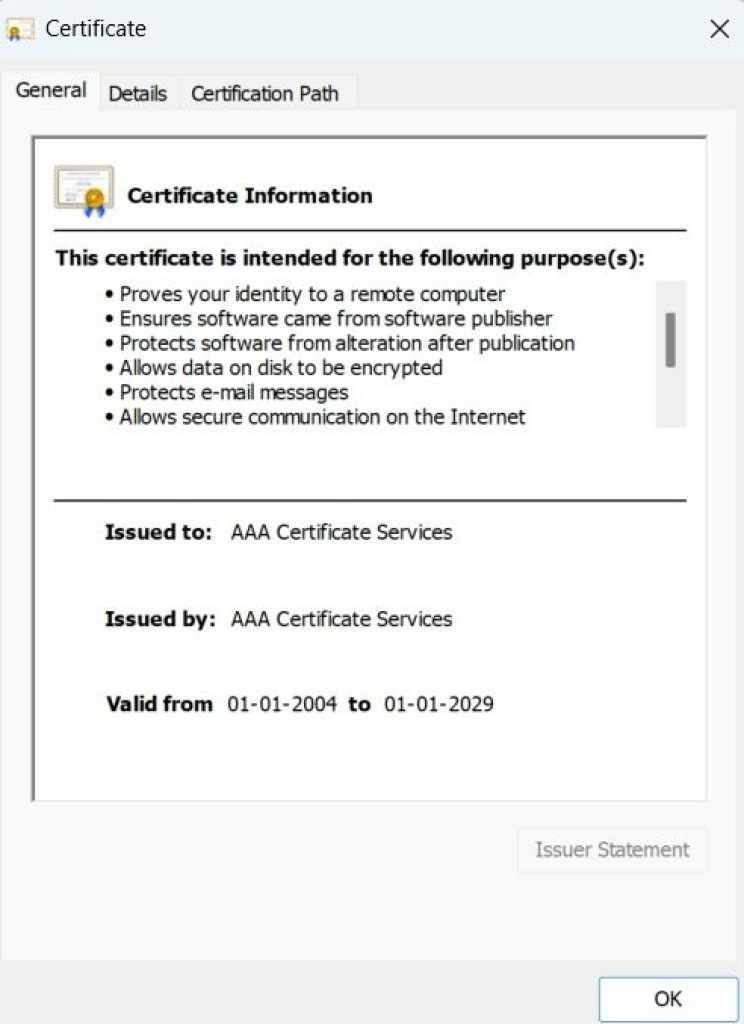
To view details of a certificate, double-click it. This shows the issuer, validity period, intended purposes, and the certification path.
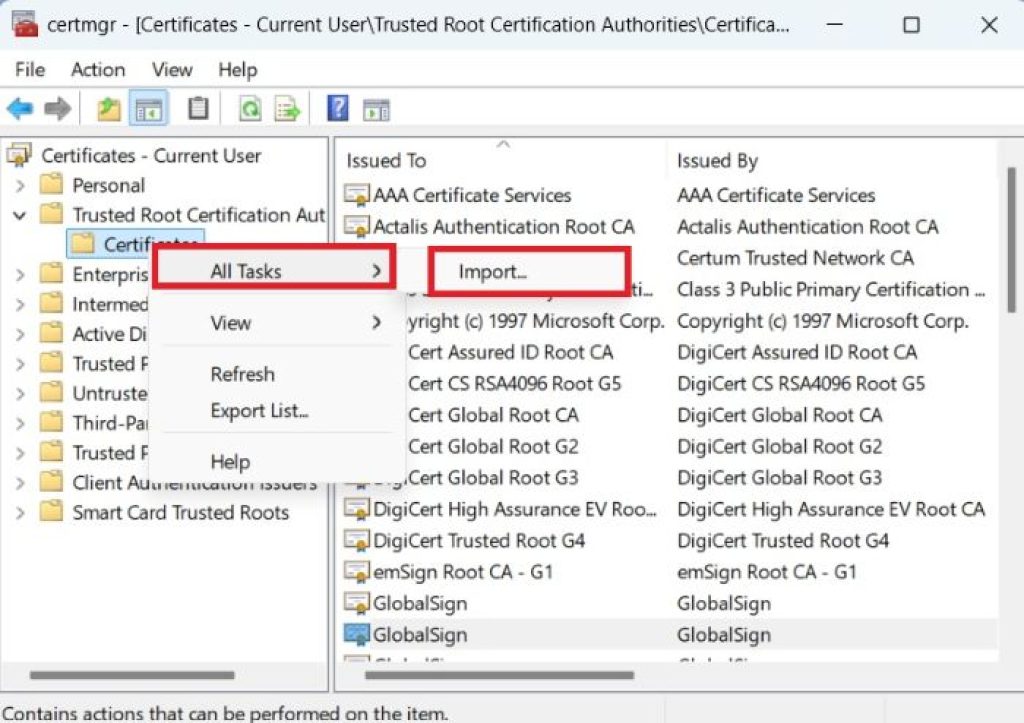
To import a new certificate, right-click Certificates under Trusted Root Certification Authorities, choose All Tasks > Import, and follow the Certificate Import Wizard. Browse to the .cer, .crt, or .pfx file you want to add, confirm the store location is set to Trusted Root Certification Authorities, and finish the wizard.
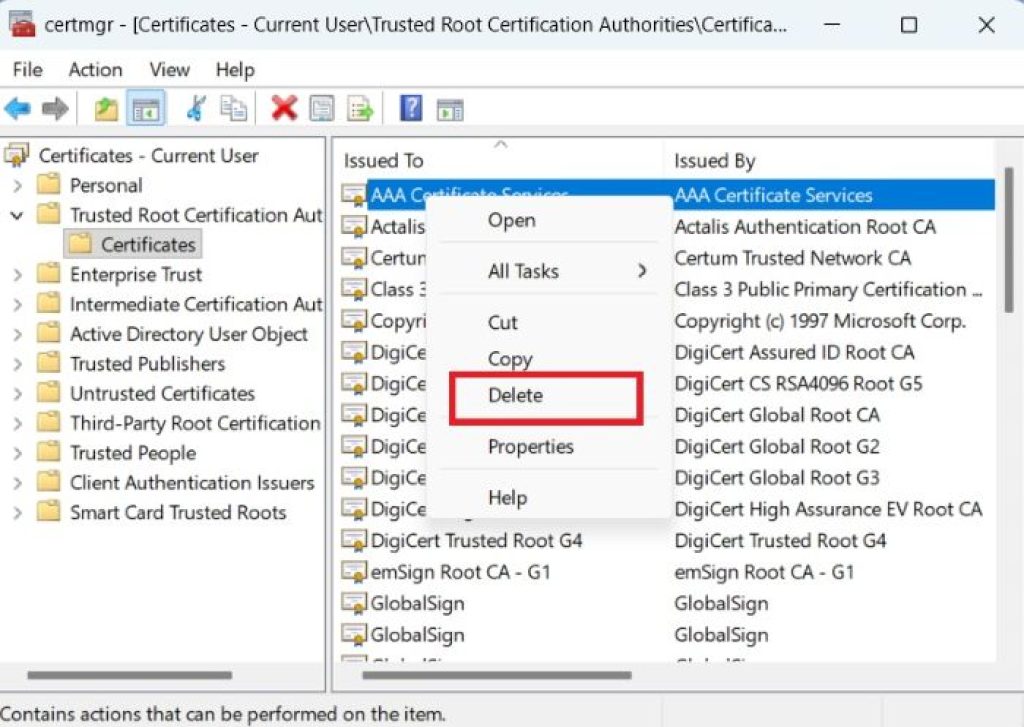
To remove a certificate, right-click it in the list and select Delete. Windows will show a warning before removal since deleting a root certificate can affect trust relationships with services that rely on it.
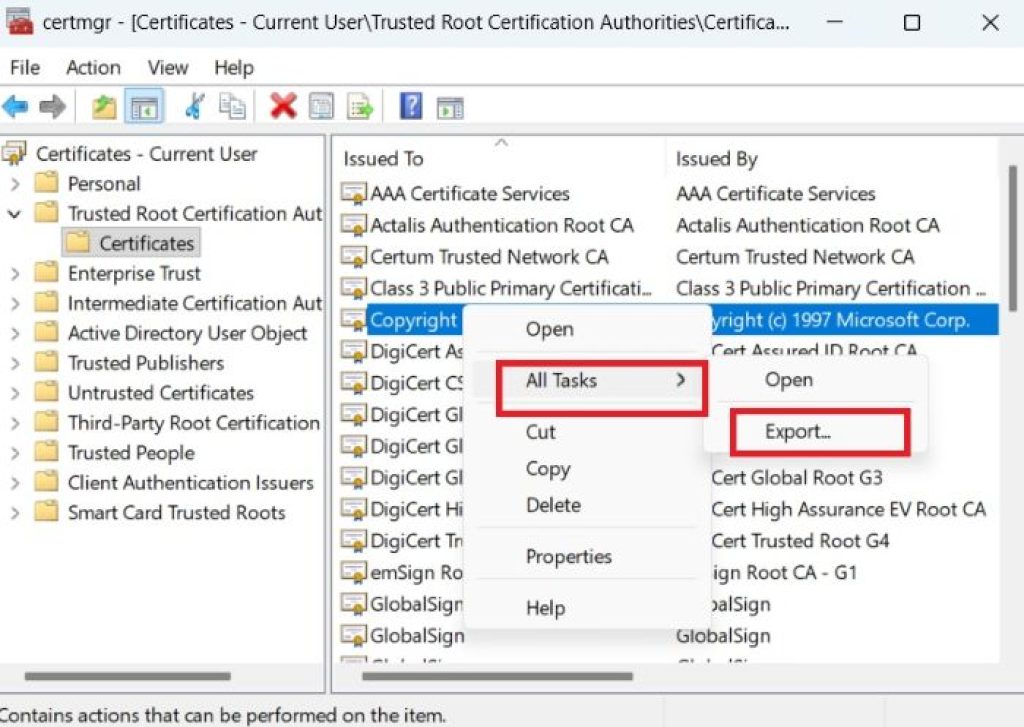
To export a certificate for backup or transfer to another machine, right-click it, choose All Tasks > Export, and follow the Certificate Export Wizard, selecting a format such as Base-64 encoded X.509 (.cer).
For machine-wide changes affecting all user accounts (rather than just the currently signed-in user), open the Microsoft Management Console instead:
Press Windows + R, type mmc, and press Enter.
Go to File > Add/Remove Snap-in, select Certificates, click Add, choose Computer account, then Local computer, and click Finish, followed by OK.
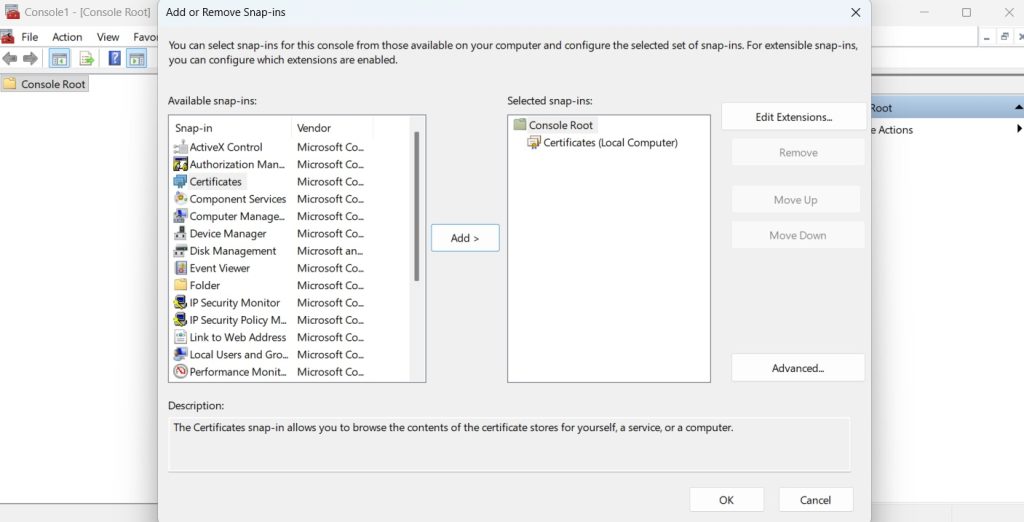
Navigate to Trusted Root Certification Authorities > Certificates and manage entries the same way as described above.
This distinction matters: certificates added through the user-account certmgr.msc only apply to that specific Windows user profile, while certificates added through the computer-account console in MMC apply system-wide to every account on the device.
Method 2: Using PowerShell
PowerShell offers a faster, scriptable way to manage certificates, which is especially useful for administrators handling multiple machines or automating repetitive tasks.
Viewing installed root certificates:
powershell
Get-ChildItem -Path Cert:\LocalMachine\RootThis lists every certificate in the local machine’s Trusted Root store, including its thumbprint, subject, and expiration data. Replace LocalMachine with CurrentUser to view certificates scoped to your user profile instead.
Importing a certificate:
powershell
Import-Certificate -FilePath "C:\Certificates\mycert.cer" -CertStoreLocation Cert:\LocalMachine\RootThis command adds the specified certificate file directly into the local machine’s Trusted Root store without needing to open a GUI wizard.
Removing a certificate: First, locate the exact thumbprint of the certificate you want to remove:
powershell
Get-ChildItem -Path Cert:\LocalMachine\Root | Where-Object {$_.Subject -like "*YourCertName*"}Then remove it using its thumbprint:
powershell
Remove-Item -Path "Cert:\LocalMachine\Root\<Thumbprint>"Always double-check the thumbprint before deleting, since certificate subjects can look similar across different issuers.
Exporting a certificate for backup:
powershell
Export-Certificate -Cert Cert:\LocalMachine\Root\<Thumbprint> -FilePath "C:\Backup\mycert.cer"PowerShell’s scriptability makes it ideal for bulk operations, such as pushing a custom internal CA certificate to hundreds of machines through a login script or remote management tool.
Method 3: Using Certutil (Command Prompt)
Certutil is a built-in command-line utility that predates PowerShell’s certificate cmdlets and remains widely used in scripts and legacy documentation.
Listing root certificates:
certutil -store rootThis displays all certificates currently in the Trusted Root store along with their serial numbers and thumbprints.
Adding a certificate:
certutil -addstore root C:\Certificates\mycert.cerThis command must be run from an elevated Command Prompt (Run as Administrator) since it modifies the machine-wide store.
Removing a certificate:
certutil -delstore root <SerialNumber>You’ll need the exact serial number, obtainable from the -store root output, to target the correct certificate for deletion.
Certutil is particularly handy in scripted deployment scenarios, batch files, or when working on a system where PowerShell execution policies are restricted.
Method 4: Using Group Policy (Domain Environments)
In managed business or enterprise environments, administrators typically don’t want to manually configure certificates on every device. Group Policy allows an internal root certificate (such as one from an Active Directory Certificate Services deployment) to be pushed automatically to all domain-joined computers.
- Open the Group Policy Management Console on a domain controller or admin workstation.
- Create or edit a Group Policy Object (GPO) linked to the organizational unit containing the target computers.
- Navigate to Computer Configuration > Windows Settings > Security Settings > Public Key Policies.
- Right-click Trusted Root Certification Authorities and choose Import.
- Follow the wizard to select the certificate file and complete the import.
- Once the GPO is linked and applied, run
gpupdate /forceon client machines (or wait for the next automatic refresh cycle) to have the certificate propagate across the domain.
This method ensures consistency across an entire organization and avoids the need to manually touch each individual workstation, which is invaluable for large-scale internal CA deployments or ensuring specific partner certificates are trusted enterprise-wide.
Conclusion
The Trusted Root Certification Authorities store is a small but foundational piece of how Windows 11 and Windows 10 establish digital trust — deciding which websites, applications, and signed files are considered safe without further scrutiny. Whether you’re a home user resolving a certificate warning, an IT professional deploying an internal CA, or someone troubleshooting a VPN connection that depends on a specific root certificate, Windows gives you several reliable built-in paths to get the job done. The Certificate Manager console (certmgr.msc) offers the simplest visual approach for occasional changes, PowerShell provides speed and scriptability for administrators managing many systems, Certutil remains a dependable command-line option supported across legacy and modern systems alike, and Group Policy enables centralized, automated distribution across an entire domain.
Regardless of which method you choose, the golden rule remains the same: only add certificates from sources you trust and can verify, back up your existing certificate configuration before making sweeping changes, and periodically review the store for outdated or unnecessary entries. Treating certificate management with the same care as any other security-sensitive system setting will help keep your Windows device — and the encrypted connections it relies on every day — genuinely trustworthy.
FAQ
1. Is it safe to delete a trusted root certificate? It can be, but only if you’re certain the certificate is no longer needed. Deleting a root certificate that’s actively used by a website, VPN, or internal service can cause connection failures or “untrusted certificate” errors. It’s good practice to export a copy before deleting, so you can restore it if something breaks unexpectedly.
2. How do I know if a root certificate is legitimate? Check the issuer name, validity dates, and intended purpose in the certificate details (via certmgr.msc). Certificates from major recognized authorities like DigiCert, Sectigo, GlobalSign, or Microsoft itself are generally legitimate by default. If a certificate was provided by your workplace IT department or a VPN provider, verify the source directly with them before installing it, rather than trusting a certificate downloaded from an unfamiliar link.
3. What’s the difference between the CurrentUser and LocalMachine certificate stores? Certificates added to the CurrentUser store only apply to the Windows profile that installed them, while certificates added to the LocalMachine store apply to every user account on that device. Enterprise deployments almost always target LocalMachine so the trust setting is consistent across all users of a shared or managed computer.
4. Why does Windows show a certificate as untrusted even after I imported it? This usually happens if the certificate was imported into the wrong store (such as “Personal” instead of “Trusted Root Certification Authorities”), if it was imported only to the CurrentUser store while the application checking it reads from LocalMachine, or if the certificate’s chain is incomplete because an intermediate certificate is missing. Reimporting the certificate into the correct store, including any accompanying intermediate certificates, typically resolves the issue.