Microsoft Edge, the default browser on Windows 11, has evolved into a powerful, fast, and feature-rich browser built on the Chromium engine—the same platform that powers Google Chrome. One of its most useful capabilities is support for extensions, which are small add-on tools designed to enhance your browsing experience. Whether you want to block ads, manage passwords, boost productivity, or improve online shopping, extensions can transform Edge into a truly personalized browser.
If you’re new to Microsoft Edge or just upgraded to Windows 11, you might be wondering how to get started with extensions. The good news is that it’s easy! Edge not only supports its own Add-ons store but also allows installation of Chrome extensions from the Chrome Web Store.

In this guide, you will learn step-by-step how to enable, install, manage, and remove Edge extensions—all in simple terms, whether you’re a beginner or advanced user.
What Are Microsoft Edge Extensions?
Microsoft Edge extensions are small software add-ons that enhance and expand the functionality of your web browser. Think of them as mini apps that integrate directly into your browser to help you get more done, streamline your tasks, and customize your internet experience.
These extensions can perform a wide range of functions, such as:
- Blocking ads and pop-ups
- Checking grammar and spelling (like Grammarly)
- Saving articles for offline reading
- Capturing screenshots or videos
- Autofilling passwords and forms
- Integrating with cloud storage or productivity tools (like OneNote, Evernote, or Trello)
Edge extensions are similar to Chrome extensions since both browsers are built on the Chromium engine. This means you’re not just limited to Microsoft’s own Add-ons store—you can also install thousands of extensions from the Chrome Web Store. By using extensions, you can turn Microsoft Edge into a powerful, personalized browser tailored to your specific needs and browsing habits.
How to Enable Extensions in Microsoft Edge
By default, Microsoft Edge allows you to use extensions. However, if you’re using a work or school device, extensions might be restricted by system policy. If you’re using a personal Windows 11 PC, follow these steps to ensure extensions are enabled:
Step 1: Launch Microsoft Edge
- Click the Start Menu.
- Search for Microsoft Edge.
- Click to open it.
Step 2: Go to Extensions Page
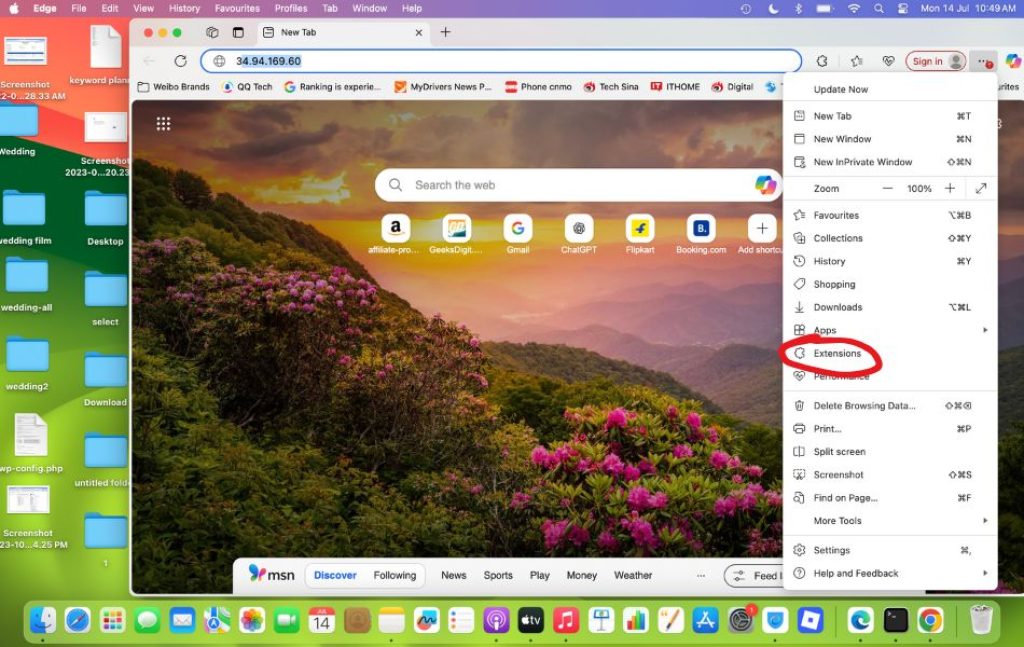
- Click the three-dot menu (⋯) in the top-right corner of the Edge window.
- Select Extensions from the drop-down menu.
This opens the Extensions panel where you can manage, install, remove, or disable extensions.
Step 3: Check Extension Settings
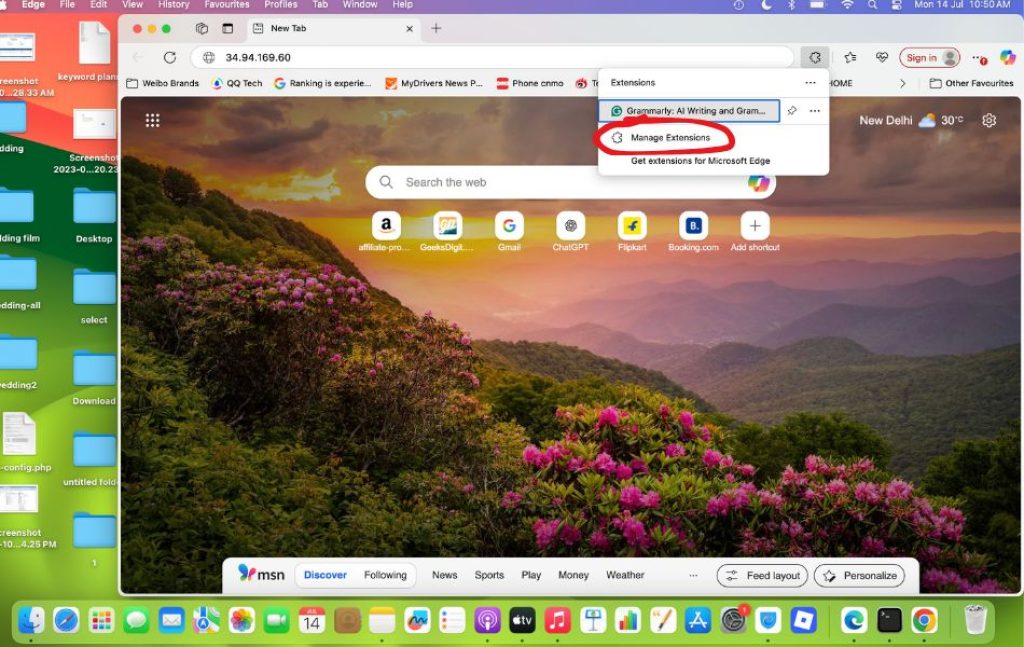
- At the bottom of the Extensions panel, click “Manage extensions”.
- You’ll be taken to
edge://extensions, the main extension management page. - At the top right, ensure that the toggle for “Allow extensions from other stores” is enabled if you want to install extensions from the Chrome Web Store.
- If you don’t see this option, skip it. Extensions from the Edge store are always allowed.
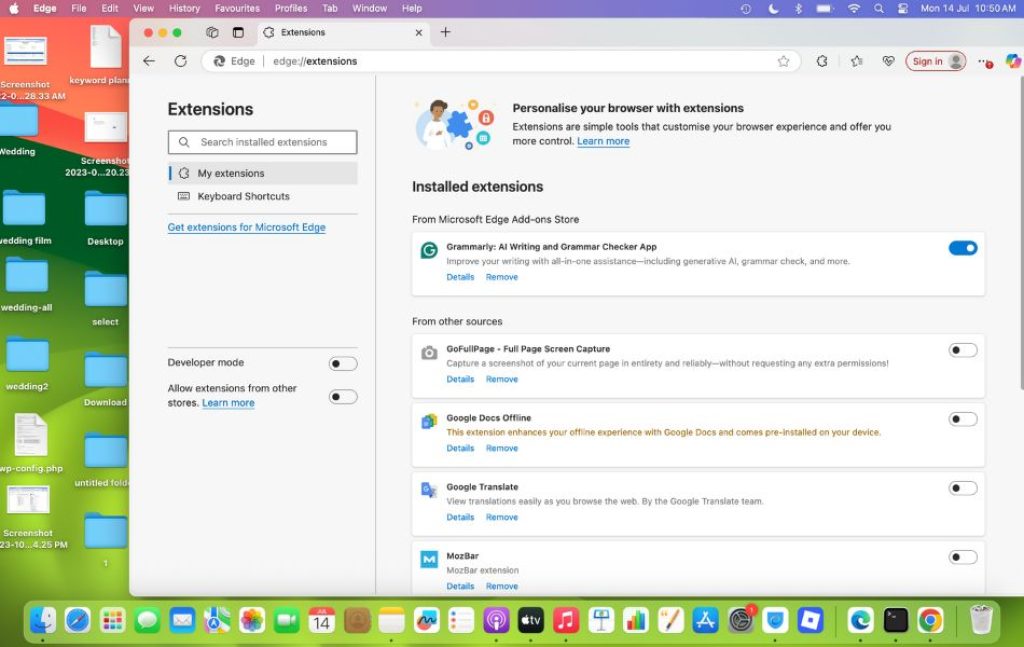
That’s it—your Edge browser is now ready to install extensions!
How to Use Installed Extensions

Once you’ve installed extensions in Microsoft Edge, using them is easy. These tools are designed to integrate smoothly into your browser and help you access their features quickly. Whether it’s blocking ads, saving articles, or checking your grammar, here’s how to manage and make the most of your installed extensions.
Accessing Your Extensions
After installation, most extensions will display a small icon in the top-right corner of the Edge browser, next to the address bar.
- Extension Icon: Click on the extension’s icon to open its interface, toggle its features, or access settings.
- Puzzle Icon (Extensions Menu): If you don’t see an extension’s icon, click the puzzle piece 🧩 to open the full list of installed extensions.
Tip: From here, you can pin or unpin extensions to keep them visible or hidden from the toolbar.
Pinning and Unpinning Extensions
You can choose which extensions appear on the toolbar for quick access.
To pin an extension:
- Click the puzzle icon (Extensions menu).
- Find the extension you want to pin.
- Click the pin icon next to it. It will now be visible on the toolbar.
To unpin an extension:
- Click the puzzle icon again.
- Click the filled pin icon next to the extension to remove it from the toolbar.
Accessing Extension Settings
Each extension has its own configuration options.
To access extension settings:
- Right-click on the extension icon in the toolbar.
- Click “Manage extension” to open its settings page.
- From here, you can:
- Turn the extension on or off
- Allow it in InPrivate mode
- View or edit permissions
- Remove it entirely
You can also access the same settings by visiting:
edge://extensions/
Interacting with Extensions
Some extensions work in the background (like ad blockers), while others need to be manually activated (like note-taking tools or screen capture extensions).
- For visible tools: Click the icon to activate or use features like saving a web clip or starting a screen recording.
- For background tools: You may only need to configure them once. After that, they run automatically (like dark mode togglers or cookie managers).
Managing Permissions
Some extensions request access to your browsing data or websites you visit. You can control this:
- Go to
edge://extensions - Click “Details” under the extension
- Scroll to “Site access”
- Choose:
- On click (only runs when you click it)
- On specific sites (you choose the sites)
- On all sites (runs everywhere)
Being mindful of these settings helps you protect your privacy.
How to Disable an Extension in Microsoft Edge
Disabling an extension keeps it installed on your browser, but it stops the extension from running in the background or affecting your browsing session. This is a good option if you want to temporarily turn off a tool without uninstalling it completely.
Steps to Disable an Extension:
- Open Microsoft Edge.
- In the address bar, type: arduinoCopyEdit
edge://extensionsand press Enter. - You’ll see a list of all your installed extensions.
- Find the extension you want to disable.
- Toggle the blue switch next to it to the Off position.
That’s it! The extension is now disabled. You can enable it again later by switching the toggle back to On.
How to Remove (Uninstall) an Extension in Microsoft Edge
If you no longer need an extension and want to completely delete it from Edge, you can uninstall it in a few clicks.
Method 1: From the Extensions Page
- Open Microsoft Edge and go to:
edge://extensions - Scroll to the extension you want to remove.
- Click the Remove button beneath the extension’s name.
- A confirmation popup will appear. Click Remove again to confirm.
Method 2: From the Toolbar (Shortcut Method)
- Locate the extension icon in the top-right corner of Edge.
- Right-click on the icon.
- Click “Remove from Microsoft Edge.”
- Confirm the removal in the popup that appears.
Once removed, the extension will no longer be active or appear in your extension list. If needed, you can always reinstall it later from the Edge Add-ons store or Chrome Web Store.
Tips for Efficient Usage
Extensions can significantly improve your productivity and browsing experience—but too many or mismanaged ones can do more harm than good. To ensure you’re getting the best performance, security, and usability from your Microsoft Edge extensions, follow these smart and efficient usage tips:
1. Limit the Number of Extensions
While it may be tempting to install multiple extensions, having too many active at once can slow down your browser.
- Only keep the extensions you use regularly.
- Disable or remove the ones you rarely use.
- Too many background-running tools can consume memory and affect Edge’s performance.
2. Pin Only Important Extensions
Don’t clutter your toolbar with every installed extension.
- Use the puzzle icon to access your full list.
- Pin only the ones you use daily, such as ad blockers or note-taking tools.
- This keeps your browser clean and focused.
3. Review Permissions Before Installing
Each extension requests specific permissions—some may need access to your browsing history, visited sites, or personal data.
- Always review these permissions during installation.
- Avoid extensions that ask for more access than necessary.
- Only install tools from trusted developers with good ratings.
4. Keep Extensions Updated
Most updates are automatic, but it’s still a good idea to check occasionally.
- Updated extensions offer improved security and bug fixes.
- Visit
edge://extensionsand click “Update” to check manually.
5. Group Extensions by Purpose
Organize extensions based on categories such as:
- Productivity (e.g., Trello, Notion Web Clipper)
- Privacy (e.g., uBlock Origin, Privacy Badger)
- Media (e.g., video downloader, screenshot tools)
This makes it easier to enable or disable groups depending on your tasks.
6. Use Extensions in InPrivate Mode (Cautiously)
Not all extensions are enabled in InPrivate (incognito) mode by default.
- Go to
edge://extensions→ click Details on an extension → enable “Allow in InPrivate”. - Only enable trusted extensions in this mode to ensure your private data isn’t compromised.
7. Sync Extensions Across Devices
If you’re signed into your Microsoft account:
- Enable sync in Edge to automatically carry your extensions to other devices.
- Great for users who switch between work PCs, laptops, and tablets.
8. Test Before You Trust
Trying a new extension? Don’t go all-in right away.
- Test its performance for a few days.
- Monitor any slowdowns or unusual browser behavior.
- Read recent user reviews to stay updated on any issues.
9. Perform Extension Cleanups Monthly
Like spring cleaning for your browser!
- Once a month, go to
edge://extensions - Review each tool—ask yourself: Do I still use this?
- Disable or remove as needed to keep your browser lean and fast.
10. Learn Extension Shortcuts
Many extensions support keyboard shortcuts. To see or customize them:
- Go to
edge://extensions/shortcuts - Assign custom keyboard commands for tools like screenshot, clipping, or launching specific extensions
It’s a huge time-saver for power users.
Frequently Asked Questions (FAQs)
Are Microsoft Edge extensions free?
Yes, most Edge extensions are free to install and use, though some may offer premium features or subscriptions.
Can I sync my extensions across devices?
Yes. If you’re signed into Edge with your Microsoft account and sync is enabled, your extensions can sync across all devices.
Final Thoughts
Microsoft Edge extensions are a fantastic way to enhance your browsing experience. Whether you’re looking to improve productivity, block ads, or get custom tools tailored to your needs, the extension ecosystem has something for everyone. Thanks to its Chromium base, Edge offers compatibility with both Microsoft’s own add-ons store and the Chrome Web Store, dramatically expanding your customization options.
Installing, managing, and removing extensions is incredibly straightforward in Windows 11. Whether you’re a beginner or a power user, using extensions can transform Edge into a powerful, personalized browser that adapts to your daily workflows.
Just remember to always prioritize security—install trusted extensions, monitor permissions, and disable what you don’t need. With the right setup, Microsoft Edge becomes more than just a browser—it becomes your digital toolbox.
![[How to] Enable and Install Microsoft Edge Extensions in Windows 11/MacOS](https://www.geeksdigit.com/wp-content/uploads/2025/10/gaming-pc-requirments.jpg)
![[How to] Enable and Install Microsoft Edge Extensions in Windows 11/MacOS](https://www.geeksdigit.com/wp-content/uploads/2025/07/open-windows-security-thumb.jpg)