Microsoft introduced Copilot in Windows 11 as an AI-powered assistant designed to help users with tasks, settings, web searches, and productivity features. While some people find it useful, others prefer a cleaner desktop experience without AI tools running in the background. Many users choose to turn off Copilot due to privacy concerns, system simplicity, workplace restrictions, or because they simply do not use it.
The good news is that Windows 11 gives you several ways to disable or hide Copilot depending on your version of Windows and personal preferences. You can remove the taskbar button, disable it through Group Policy, use Registry Editor for a more permanent solution, or block shortcuts that launch it.

This guide explains all major methods in simple language so you can safely turn off Copilot and regain full control over your Windows 11 experience.
What Is Microsoft Copilot in Windows 11?
Windows Copilot is Microsoft’s built-in AI assistant integrated directly into Windows 11. It can assist users by answering questions, changing settings, summarizing content, generating text, and integrating with Microsoft services.
Copilot usually appears as:
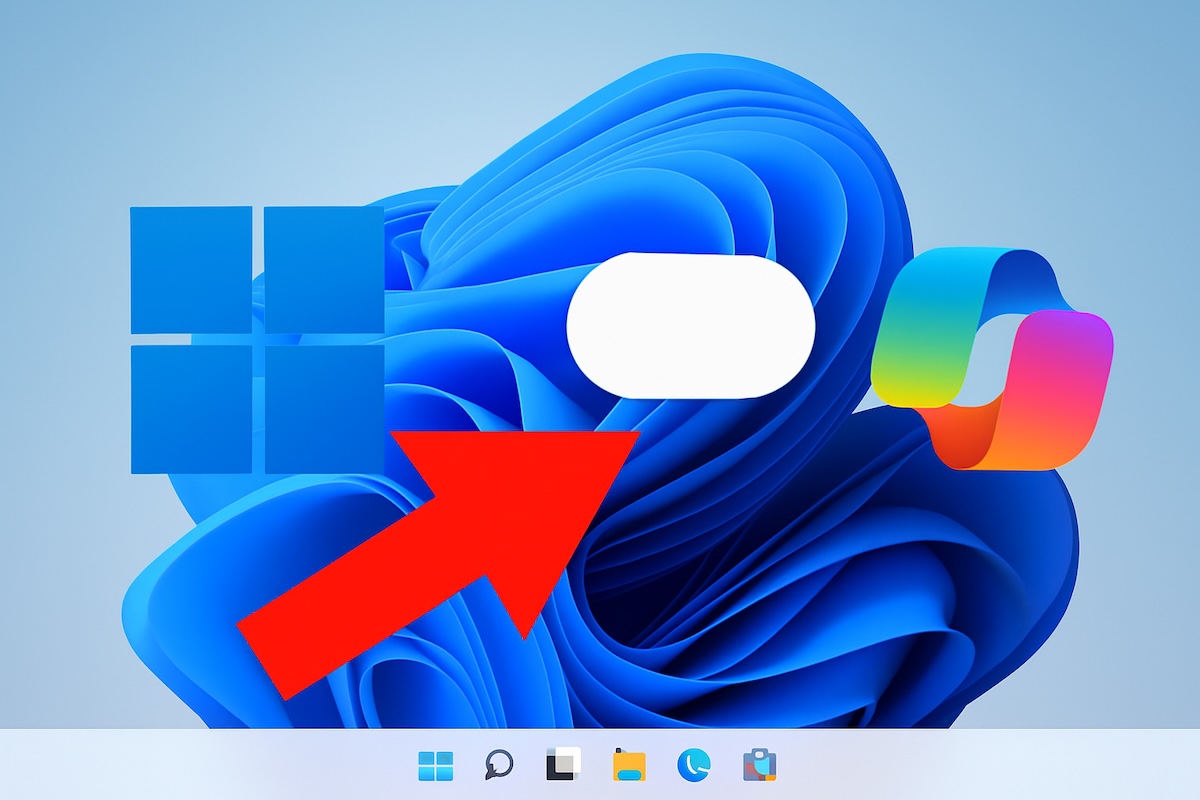
- A taskbar button
- A sidebar panel
- A keyboard shortcut using Win + C
- Integration with Microsoft Edge and other apps
Although it can be helpful, not every user wants constant access to AI features on their PC.
Why Turn Off Copilot?
There are several common reasons why users disable Copilot:
Privacy Concerns
Some users are uncomfortable with AI tools accessing data, browsing activity, or cloud-based services.
Reduced Distractions
Removing Copilot can simplify your desktop and reduce accidental openings.
Better Performance on Older PCs

While Copilot is not extremely resource-heavy, disabling unnecessary features may help improve system responsiveness.
Workplace or School Policies
Many organizations prefer disabling AI assistants for security or compliance reasons.
Personal Preference
Some users simply do not need or want AI integration in their operating system.
Before You Disable Copilot
Before making changes, it is important to understand the difference between available options:
- Hide Copilot: Removes the icon but keeps the feature installed
- Disable Copilot: Prevents it from launching
- Remove Copilot: More advanced and may not always be fully possible
Also consider:
- Some methods require administrator access
- Registry edits should be done carefully
- System updates may occasionally restore Copilot settings
Creating a restore point before major system changes is recommended.
Method 1: Disable Copilot Through Windows Settings
The easiest and most straightforward method to turn off Copilot is through the Windows Settings application. This method is user-friendly and doesn’t require advanced technical knowledge.
Open Windows Settings: Press the Windows key + I on your keyboard, or click the Start button and select the Settings gear icon.
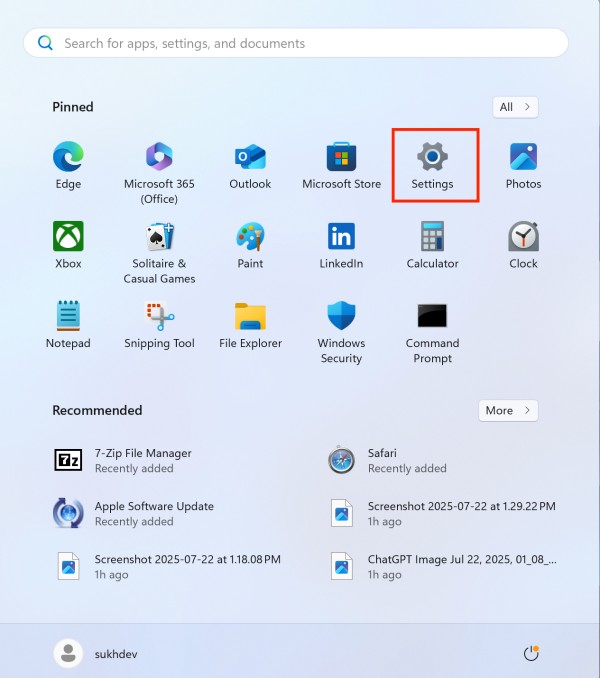
Navigate to Personalization: In the Settings window, click on Personalization from the left sidebar menu.
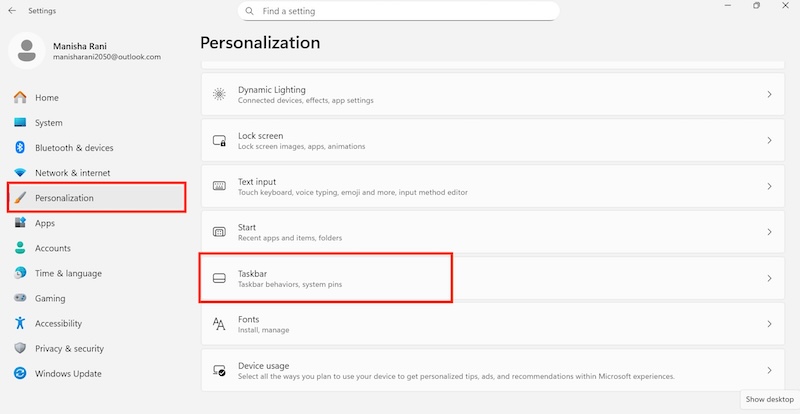
Access Taskbar Settings: Under the Personalization section, click on Taskbar to open taskbar customization options.
Locate Copilot Option: Scroll down in the Taskbar settings until you find the Copilot option. This might be listed under “Taskbar items” or a similar section.
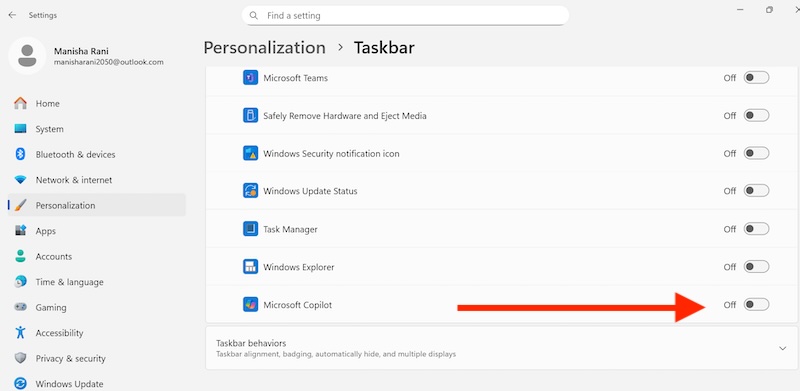
Toggle Off Copilot: Click the toggle switch next to Copilot to turn it off. The switch should change from blue (on) to gray (off).
Verify Changes: The Copilot button should immediately disappear from your taskbar. If it doesn’t, try restarting your computer.
Method 2: Use Group Policy Editor (Windows 11 Pro and Enterprise)
For users running Windows 11 Pro, Enterprise, or Education editions, the Group Policy Editor provides a more permanent solution to disable Copilot system-wide.
- Open Group Policy Editor: Press Windows key + R to open the Run dialog, type “gpedit.msc” and press Enter. If prompted by User Account Control, click “Yes.”
- Navigate to User Configuration: In the Group Policy Editor window, expand “User Configuration” in the left panel.
- Access Administrative Templates: Under User Configuration, expand “Administrative Templates.”
- Find Windows Components: Expand “Windows Components” to see various system components.
- Locate Windows Copilot: Look for “Windows Copilot” in the list of components. If you don’t see it, you may need to update your system or check if your Windows version supports this policy.
- Configure the Policy: Double-click on “Turn off Windows Copilot” policy.
- Enable the Policy: In the policy window, select “Enabled” and click “OK” to apply the changes.
- Apply Changes: Close the Group Policy Editor and restart your computer for the changes to take effect.
Method 3: Registry Editor Method
For users who don’t have access to Group Policy Editor (Windows 11 Home users), the Registry Editor provides an alternative method to disable Copilot.
Important Warning: Editing the Windows Registry can be risky if done incorrectly. Always create a backup of your registry before making changes, and follow these steps carefully.
Create Registry Backup: Before proceeding, create a system restore point or backup your registry by going to File > Export in Registry Editor.
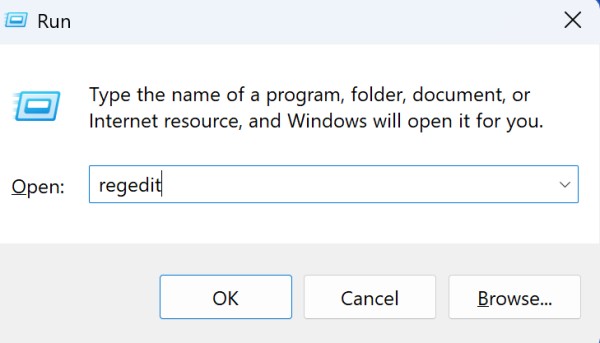
Open Registry Editor: Press Windows key + R, type regedit and press Enter. Click “Yes” if prompted by User Account Control.

Navigate to the Correct Key: Navigate to the following registry path: HKEY_CURRENT_USER\Software\Policies\Microsoft\Windows
Create WindowsCopilot Key: If you don’t see a WindowsCopilot folder, right-click on “Windows,” select “New” > “Key,” and name it “WindowsCopilot.”
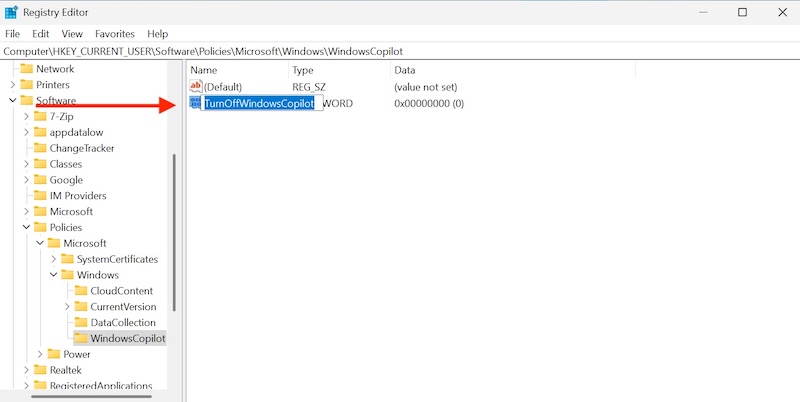
Create DWORD Value: Right-click inside the WindowsCopilot folder, select “New” > “DWORD (32-bit) Value,” and name it “TurnOffWindowsCopilot.”

Set Value Data: Double-click on “TurnOffWindowsCopilot” and set its value data to “1,” then click “OK.”
Restart Your Computer: Close Registry Editor and restart your computer for the changes to take effect.
Method 4: PowerShell Command Method
Advanced users can use PowerShell commands to disable Copilot quickly and efficiently.
Open PowerShell as Administrator: Right-click on the Start button and select “Windows PowerShell (Admin)” or “Windows Terminal (Admin).”
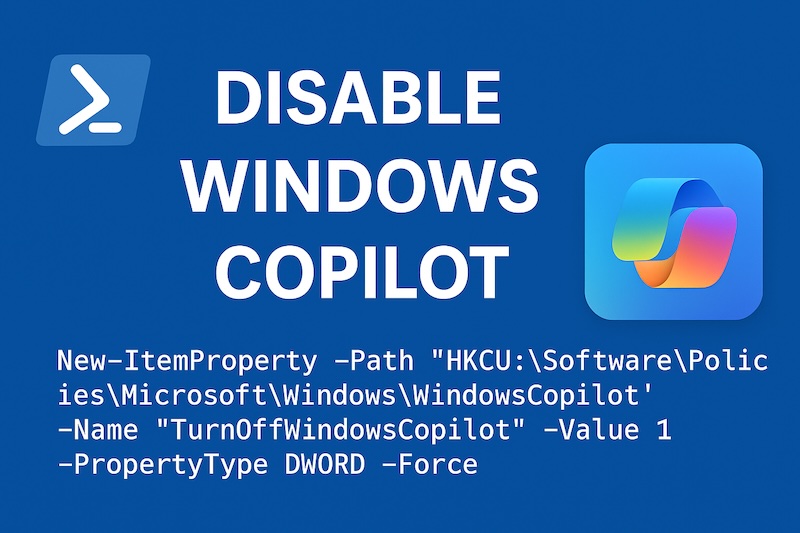
Run the Disable Command: Type the following command and press Enter: New-ItemProperty -Path "HKCU:\Software\Policies\Microsoft\Windows\WindowsCopilot" -Name "TurnOffWindowsCopilot" -Value 1 -PropertyType DWORD -Force
Restart Your System: Restart your computer for the changes to take effect.
Method 5: Third-Party Tools
Several third-party tools can help disable Copilot and other Windows features you might not want. Tools like O&O ShutUp10++ or Winaero Tweaker provide user-friendly interfaces for advanced Windows customization.
Using O&O ShutUp10++:
- Download the Tool: Visit the official O&O Software website and download ShutUp10++.
- Run the Application: Launch the tool (no installation required).
- Find Copilot Settings: Look for Copilot-related settings in the application.
- Disable Copilot: Toggle off the Copilot options and apply the changes.
Troubleshooting Common Issues
If Copilot doesn’t disappear after following these methods, try these troubleshooting steps:
Clear Windows Cache:
- Press Windows key + R, type wsreset.exe and press Enter.
- Wait for the process to complete and restart your computer.
Update Windows:
- Go to Settings > Windows Update.
- Check for and install any available updates.
- Restart your computer after updates are installed.
System File Checker:
- Open Command Prompt as administrator.
- Type “sfc /scannow” and press Enter.
- Wait for the scan to complete and restart if necessary.
Re-enabling Copilot
If you change your mind and want to re-enable Copilot, simply reverse the steps in any of the methods above:
- In Settings: Toggle the Copilot option back on
- In Group Policy: Set the policy to “Not Configured” or “Disabled”
- In Registry: Delete the DWORD value or set it to “0”
- In PowerShell: Run the same command but change the value from 1 to 0
Privacy and Performance Considerations
Disabling Copilot offers significant benefits across privacy, performance, and user experience domains, making it an attractive option for many Windows 11 users.
Data Collection Reduction: Copilot continuously processes system usage, queries, and interactions, transmitting this information to Microsoft’s servers. Disabling it significantly reduces data sharing, including voice commands, search patterns, system statistics, file metadata, and application usage habits. This enhanced privacy is particularly valuable for business users handling confidential information or individuals concerned about digital footprint management.
Network Traffic Minimization: The AI assistant requires constant internet connectivity, generating background network activity. Disabling Copilot eliminates these server communications, reducing bandwidth usage and improving privacy by preventing inadvertent data transmission to cloud services.
System Resource Optimization: Copilot consumes 50-150MB of RAM as a background service, even when inactive. On systems with limited memory (8GB or less), disabling it frees valuable resources for other applications. The AI assistant also requires CPU cycles for monitoring and processing, creating computational overhead that particularly impacts older or budget systems.
Startup and Responsiveness: Disabling Copilot reduces Windows boot time by several seconds, especially on traditional hard drives. Users experience improved overall system responsiveness, better battery life on laptops, lower system temperatures, and reduced fan noise due to decreased background processing.
Interface Simplification: Removing the Copilot taskbar button creates a cleaner, more focused desktop environment. This benefits users who prefer minimalist interfaces or work on smaller screens where space is premium. It also eliminates accidental activation through keyboard shortcuts (Windows + C) or unintentional clicks that interrupt workflow.
Reduced Attack Surface: Disabling Copilot eliminates one potential vector for security exploits and reduces outbound network connections, beneficial in highly secure environments. For businesses, this helps ensure compliance with regulations like GDPR or HIPAA and aligns with corporate policies against cloud-based AI services.
While disabling Copilot provides substantial benefits, users lose access to AI-powered assistance, Microsoft service integrations, and future feature updates. However, for privacy-conscious users or those seeking optimal system performance, these trade-offs are often acceptable given the significant advantages gained.
Conclusion
Turning off Copilot in Windows 11 is a straightforward process that can be accomplished through multiple methods, depending on your Windows edition and comfort level with system modifications. Whether you use the simple Settings toggle, Group Policy Editor, Registry Editor, or PowerShell commands, you can successfully remove Copilot from your Windows 11 experience.
Remember that Microsoft regularly updates Windows 11, and these methods may need to be reapplied after major system updates. Always ensure you have a backup of important data and consider creating a system restore point before making significant system changes.
Choose the method that best suits your technical expertise and Windows 11 edition. The Settings method is perfect for most users, while advanced users might prefer the Registry or PowerShell approaches for their permanence and precision.
Frequently Asked Questions (FAQs)
1. Does disabling Copilot affect Windows updates?
No. Turning off Copilot doesn’t interfere with Windows Update or any other system features.
2. Can I turn off Copilot temporarily?
Yes. Using Taskbar Settings hides Copilot without fully disabling it. You can toggle it back on anytime.
3. Is there a difference between disabling Copilot and uninstalling it?
Yes. Disabling hides or blocks it, while uninstalling removes related files (which may not be possible in all builds).
4. Can I remove Copilot from Windows 11 Home Edition?
Yes. Although Group Policy isn’t available, you can use the Registry Editor method explained above to disable Copilot completely.