Windows 11, with its sleek interface and performance enhancements, is a powerful operating system. However, over time, your PC can accumulate unnecessary files such as system logs, temporary internet files, thumbnails, and leftover Windows updates. These files not only take up valuable storage space but can also slow down system performance. This is where Disk Cleanup, a built-in Windows utility, becomes essential. It provides a simple and effective way to remove junk files and free up storage, all without the need to install third-party software.
Whether you’re running low on space or just want to maintain a tidy system, learning how to use Disk Cleanup is a smart move. In this guide, we will walk you through everything—from launching the tool to understanding the options it presents and safely removing clutter from your computer. Let’s dive into how you can reclaim precious disk space and keep your Windows 11 PC running at peak performance.
Why Disk Cleanup Still Matters in Windows 11

Windows 11 includes modern storage management tools—Storage Sense, Cleanup Recommendations, and detailed Storage usage charts in Settings. Yet the classic Disk Cleanup utility (the program behind cleanmgr.exe) remains a reliable, lightweight, and direct way to purge unnecessary files fast. It’s built into Windows, requires no download, and lets you target system junk that accumulates over time: temporary files, leftover Windows Update packages, old error reports, and more.
If you’re running low on storage—especially on smaller SSDs common in laptops—regular cleanups can reclaim gigabytes. Disk Cleanup is also useful after major Windows updates, driver installs, or app removals. Even power users who prefer command-line tools often return to Disk Cleanup’s dependable engine for space recovery scripts.
What Disk Cleanup Can Remove
Disk Cleanup scans for data Windows considers safe (or reasonably safe) to delete. Depending on what’s present, you may see some or all of these categories:
- Temporary Internet Files (legacy browser cache; mostly relevant for older IE-based components)
- Downloaded Program Files (ActiveX/Java applets—rarely useful today)
- Temporary Files (general temp data created by apps)
- Thumbnails (rebuildable image/video previews)
- Microsoft Defender Antivirus temporary files
- Delivery Optimization Files (cached updates shared across devices)
- Windows Update Cleanup (leftover update packages)
- Previous Windows Installation(s) (Windows.old folder after an upgrade)
- Device Driver Packages (old versions retained for rollback)
- System Error Memory Dump Files (crash dumps—large)
- System Error Minidump Files (smaller crash logs)
- Recycle Bin (files you’ve “deleted” but not permanently removed)
- Temporary Windows Installation Files
Tip: Not every item will appear every time. Disk Cleanup shows only what it finds on the drive you scan.
Before You Begin: Quick Safety Checklist
Deleting the wrong files can be frustrating if you later need them. Follow this quick checklist to stay safe:
- Back up important documents first. Use OneDrive, an external drive, or cloud storage.
- Empty Recycle Bin manually if you want full control. Disk Cleanup can do it for you—but you might want to double-check first.
- Note whether you recently upgraded Windows. If so, Previous Windows Installation(s) lets you roll back. Delete only if you’re sure the upgrade went well and you won’t revert.
- Close open apps. Some temp files are skipped if they’re in use.
- Run as administrator for full cleanup options. Especially needed to remove system files like Windows Update leftovers.
How to Open Disk Cleanup in Windows 11
There are multiple ways to access Disk Cleanup in Windows 11. Here are the most common methods:
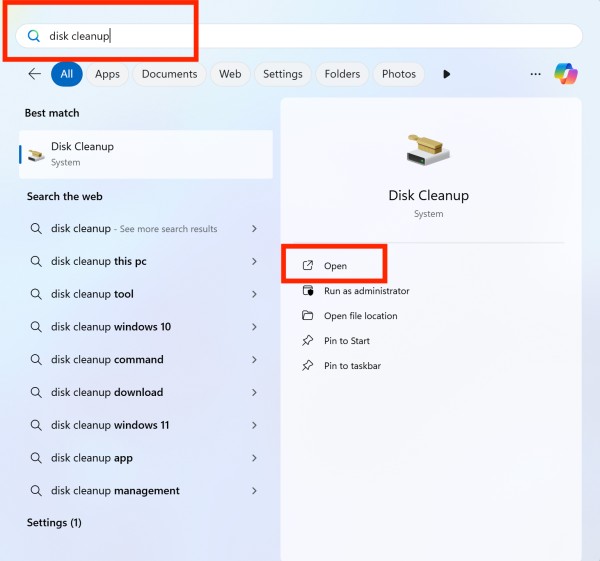
Method 1: Use the Search Menu
- Click the Start button or press the Windows key.
- Type Disk Cleanup in the search bar.
- Click on the Disk Cleanup app from the results.
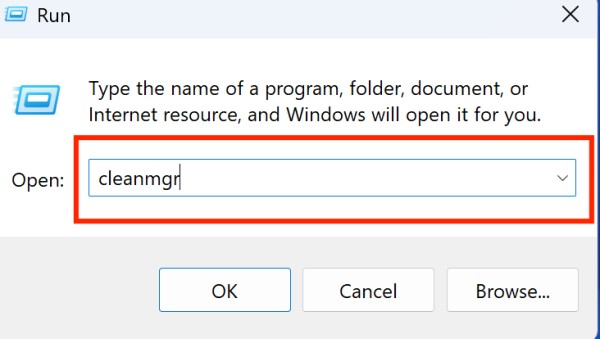
Method 2: Use the Run Dialog Box
- Press Windows + R to open the Run dialog.
- Type
cleanmgrand press Enter. - The Disk Cleanup tool will open.
Method 3: Through File Explorer
- Open File Explorer.
- Right-click the C: drive (or any other drive you want to clean).
- Select Properties.
- In the General tab, click on Disk Cleanup.
Step-by-Step Guide to Using Disk Cleanup in Windows 11
Once you’ve opened the tool, here’s how to proceed:
Step 1: Select Drive to Clean

If you have multiple drives, the tool will ask you to choose one.
- Choose the drive (commonly
C:) and click OK.
Step 2: Scanning for Files
Disk Cleanup will scan the selected drive for unnecessary files. This may take a few moments.
Step 3: Select Files to Delete
You’ll now see a list of file categories with checkboxes. Common options include:
| File Type | Description |
|---|---|
| Downloaded Program Files | ActiveX controls and Java applets downloaded. |
| Temporary Internet Files | Cache files from your browser. |
| Delivery Optimization Files | Windows update cache from other PCs. |
| Recycle Bin | Deleted files waiting for permanent removal. |
| Temporary Files | Leftover app installation and usage files. |
| Thumbnails | Cached image thumbnails. |
Tip: Hover over each file type to see how much space it uses.
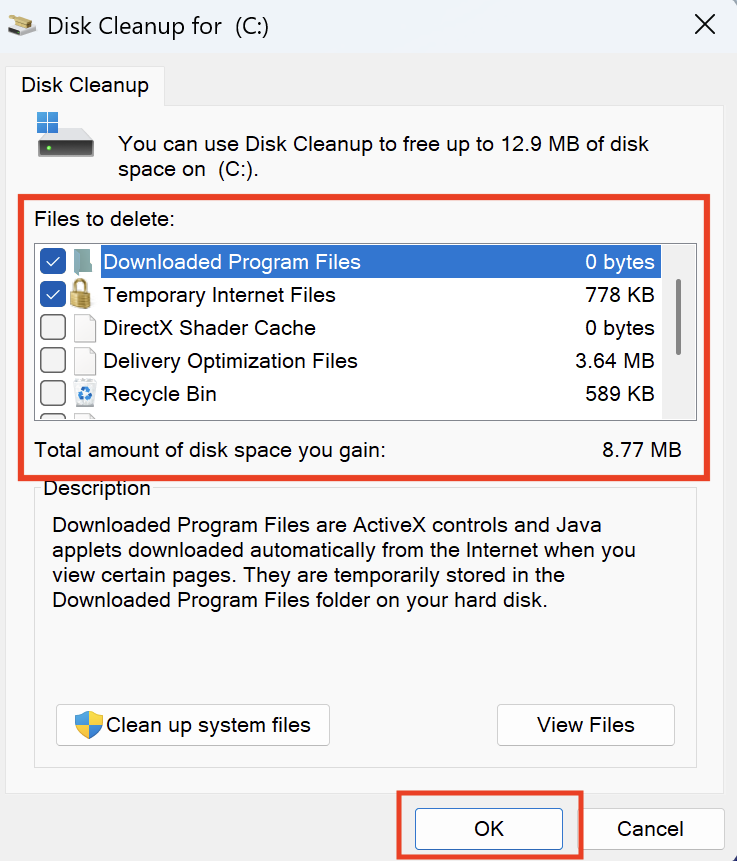
Step 4: Confirm and Delete
- Check the boxes next to the file types you want to delete.
- Click OK.
- A confirmation box will appear. Click Delete Files.

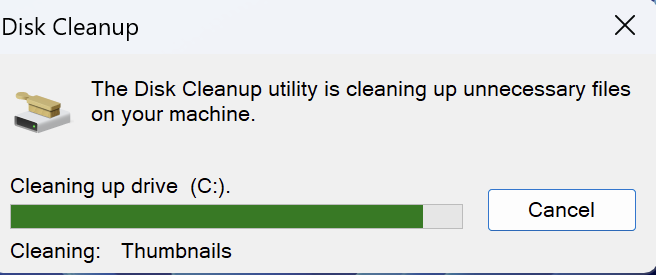
The system will now clean the selected files.
Advanced: Clean System Files
Want to go deeper? Here’s how to remove additional system-level files.
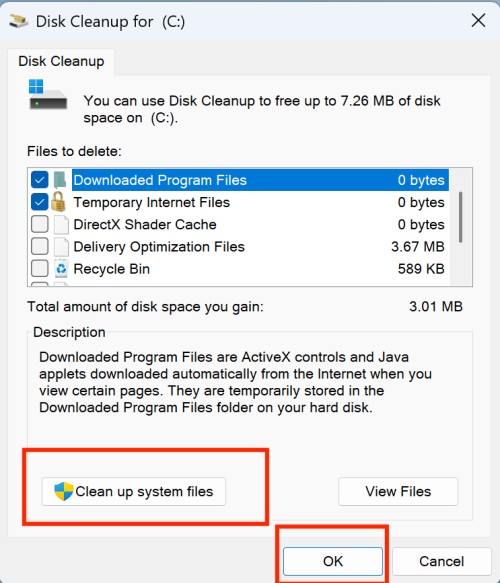
Step 1: Click “Clean up system files”
- In the Disk Cleanup window, click the “Clean up system files” button.
- It will prompt you for administrator access. Click Yes.
Step 2: Select the Drive Again
Choose the system drive again (usually C:) and press OK.
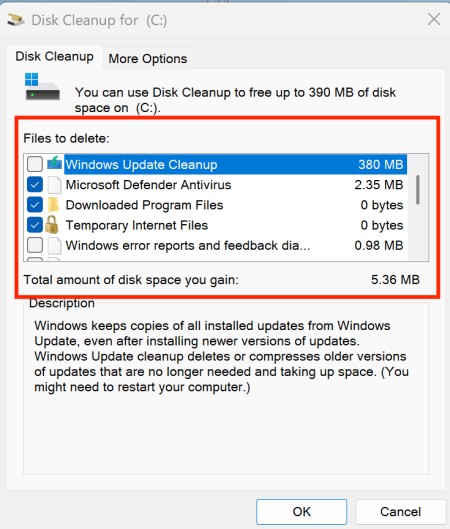
Step 3: Wait for Re-scan
This time, the tool will include system files, like:
- Windows Update Cleanup
- System error memory dump files
- Device driver packages
- Old Windows installation files (Windows.old)
These are safe to remove, especially after a major update, but only if you are not planning to roll back to an earlier version.
Step 4: Check and Delete
- Review the new list of file types.
- Check the appropriate boxes.
- Click OK, then Delete Files.
Automate Disk Cleanup with Storage Sense
If you’d rather not run Disk Cleanup manually, try Storage Sense:
How to Enable Storage Sense:
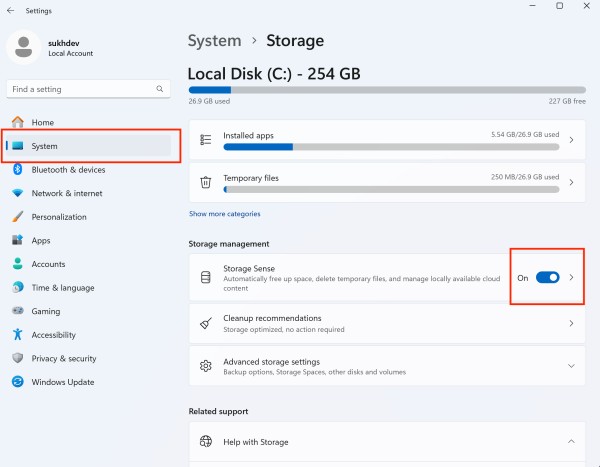
- Open Settings.
- Go to System > Storage.
- Click on Storage Sense.
- Toggle On under Storage Sense.
- Click Run Storage Sense now to clean instantly or set it to run automatically.
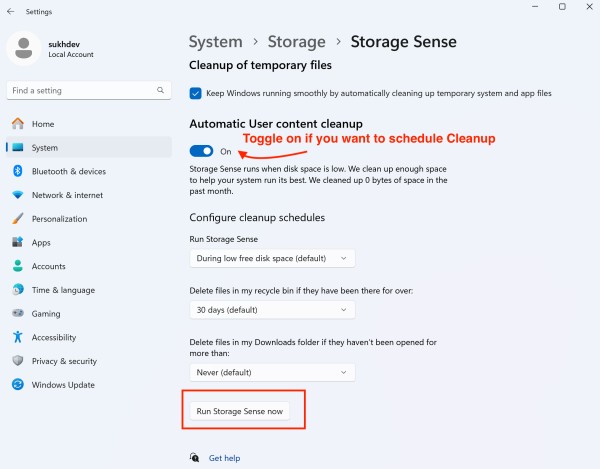
Bonus: You can schedule cleanup for temporary files, Recycle Bin, and Downloads.
What Files Are Safe to Delete?
It’s generally safe to remove:
- Temporary files
- Recycle Bin contents
- Thumbnails
- Downloaded Program Files
- Delivery Optimization Files
Be cautious with:
- Windows Update Cleanup (only delete if your system is stable)
- Previous Windows Installations (
Windows.old) – delete only if you don’t plan to roll back - System Error Memory Dump Files – delete if you no longer need to diagnose errors
Benefits of Using Disk Cleanup in Windows 11
- Frees up valuable storage space
- Improves system speed and responsiveness
- Removes outdated cache and log files
- Reduces clutter
- Helps in troubleshooting by clearing error logs
- Safe and easy to use with no third-party installations
Difference Between Disk Cleanup and Storage Sense
| Feature | Disk Cleanup | Storage Sense |
|---|---|---|
| Manual Cleanup | Yes | No (unless forced) |
| Automated Cleanup | No | Yes |
| User Control | High | Medium |
| Deletes System Files | Yes | Yes (with limitations) |
| Best For | Advanced users | Casual users |
Use both together for best results!
Frequently Asked Questions (FAQs)
Can I undo Disk Cleanup?
No. Once files are deleted using Disk Cleanup, they’re permanently removed. Always review selections before confirming.
Does Disk Cleanup remove viruses or malware?
No. It only deletes temporary and system files. Use antivirus software for malware removal.
How often should I use Disk Cleanup?
Every 2–4 weeks is ideal for regular users. Heavy users may want to run it weekly or use Storage Sense automation.
Bottom Line
Disk Cleanup is one of the most underappreciated tools in Windows 11, offering users a fast, free, and reliable method for keeping their systems clean and efficient. Whether you’re freeing up space after a big update or just doing routine maintenance, the tool simplifies the process of deleting unnecessary files while maintaining system stability. With advanced options for system file cleanup and integration with Storage Sense for automation, users can confidently manage their PC’s storage without third-party tools.
Understanding what each file type represents ensures you delete only what’s safe, while built-in features provide reassurance that you’re not accidentally removing anything critical. As your Windows 11 machine continues to accumulate temporary files over time, making Disk Cleanup a regular habit will go a long way in improving performance, longevity, and storage management.
So the next time your device feels sluggish or you’re running out of space—open Disk Cleanup and let it work its magic. It’s simple, safe, and effective.