Taking quick, clear screenshots has become an essential part of modern computing—whether you’re collaborating on a project, saving an important moment, or simply recording information for later reference. In Windows 11, Microsoft has polished the Snipping Tool to be faster, sleeker, and more intuitive than ever before. A key part of that convenience lies in the keyboard shortcuts that supercharge your screenshot-taking process.
Snipping Tool shortcuts in Windows 11 make it possible to capture and annotate your screen without lifting your fingers off the keyboard. With just a few key combinations, you can access different capture modes, delay captures, and even launch the Snipping Tool instantly. Whether you’re a power user or just someone who wants to work more efficiently, mastering these shortcuts can save you time and effort.
Understanding the Snipping Tool in Windows 11

The Snipping Tool in Windows 11 is Microsoft’s go-to utility for capturing screenshots. It has evolved significantly from earlier versions in Windows Vista, 7, and 10. In Windows 11, Microsoft combined two legacy tools — the classic Snipping Tool and Snip & Sketch — into one streamlined, modern application simply named Snipping Tool.
This built-in screenshot utility is not just about taking pictures of your screen; it’s a full-featured application that allows you to capture, annotate, save, and share images in a clean and intuitive way.
Key Features of the Windows 11 Snipping Tool
- Modern Interface: Clean design consistent with Windows 11’s aesthetics.
- Multiple Snip Modes: Offers Rectangular, Freeform, Window, and Fullscreen captures.
- Delayed Capture Options: Delay your snip by 3, 5, or 10 seconds to capture transient UI elements like dropdowns or tooltips.
- Built-in Editing Tools: Use pen, highlighter, ruler, and cropping options directly after snipping.
- Clipboard Integration: Automatically copies the snip to your clipboard for instant pasting.
- Auto-save Prompt: Reminds you to save unsaved snips before closing.
- Dark Mode Support: Matches your system theme preferences.
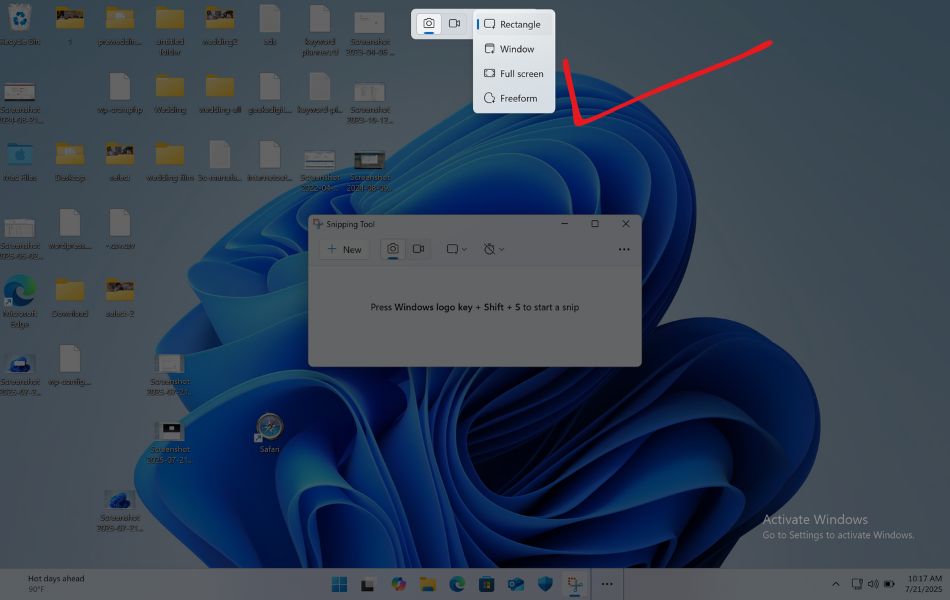
Snip Modes Explained
| Snip Mode | Description |
|---|---|
| Rectangular Snip | Click and drag to form a rectangle around the area you want to capture. |
| Freeform Snip | Draw any shape with your mouse or stylus to capture a custom-shaped screenshot. |
| Window Snip | Click on a specific app window to capture it, including its borders. |
| Fullscreen Snip | Captures your entire screen, including all monitors if you’re using multiple displays. |
Why Use Keyboard Shortcuts for Snipping Tool?
Keyboard shortcuts save time and effort. Instead of navigating menus, you can instantly open the Snipping Tool or capture a specific area. Here are some reasons why using shortcuts is better:
- Speed: Take screenshots instantly without opening the Start menu.
- Convenience: No need to use a mouse or open additional windows.
- Consistency: Perfect for repetitive tasks like creating tutorials or documentation.
- Multitasking: Capture and annotate quickly while working on other apps.
- Accuracy: Capture the exact window or section without moving your cursor too much.
Snipping Tool vs. Print Screen Key in Windows 11
In Windows 11, the Print Screen (PrtScn) key has been integrated with the Snipping Tool by default. This means when you press PrtScn, the Snipping Tool automatically opens, allowing you to select your screenshot mode.
However, this function can be customized in the Settings app under Accessibility → Keyboard → Use the Print screen button to open Snipping Tool.
If enabled, the Snipping Tool launches instantly with the snipping overlay. If disabled, it takes a full-screen screenshot instead.
This feature alone makes the Snipping Tool much more powerful and integrated than in previous Windows versions.
Snipping Tool Editing Shortcuts

Once you’ve captured a screenshot, the Snipping Tool offers several editing options, and you can use shortcuts to speed up editing.
| Function | Shortcut | Description |
|---|---|---|
| New Snip | Ctrl + N or Alt + N | Start a new capture |
| Save | Ctrl + S | Save the screenshot |
| Copy | Ctrl + C | Copy to clipboard |
| Paste | Ctrl + V | Paste from clipboard |
| Ctrl + P | Print the screenshot | |
| Undo | Ctrl + Z | Undo the last change |
| Redo | Ctrl + Y | Redo the previous change |
| Zoom In | Ctrl + + | Zoom in for details |
| Zoom Out | Ctrl + – | Zoom out to fit view |
| Select All | Ctrl + A | Select entire image |
| Close | Alt + F4 | Exit Snipping Tool |
| Cancel Snip | Esc | Cancel snipping overlay |
Snipping Overlay Toolbar Shortcuts
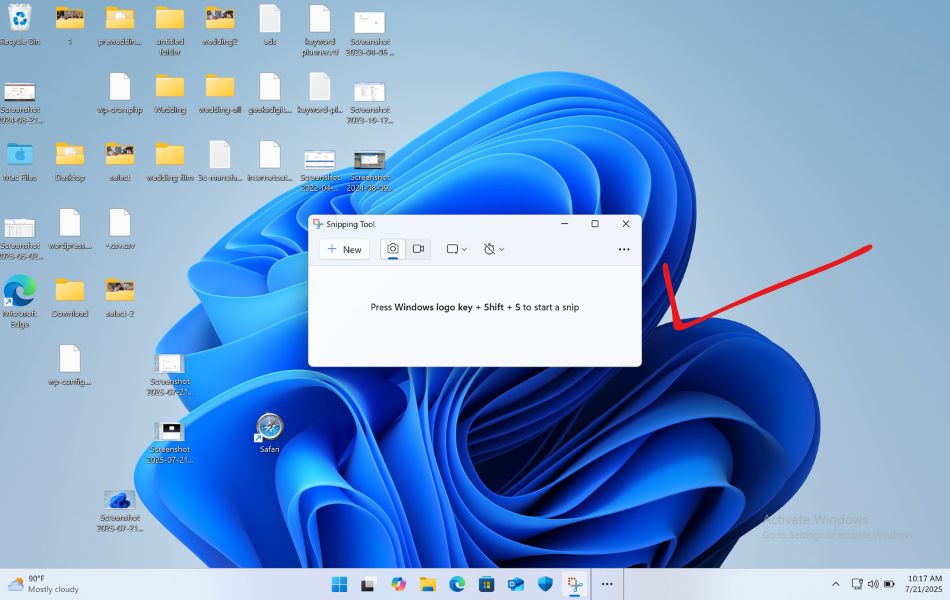
While the overlay itself doesn’t have dedicated keyboard shortcuts for each snip mode, here’s what appears when you use Windows + Shift + S:
- 🟦 Rectangular Snip – Default mode (click and drag to capture)
- 🔵 Freeform Snip – Draw a custom shape with your mouse
- 🪟 Window Snip – Click a specific window to capture it
- 🔲 Fullscreen Snip – Automatically captures the entire screen
Use mouse or arrow keys + Enter to select one.
How to Customize Snipping Tool Shortcuts in Windows 11
By default, most Snipping Tool shortcuts are fixed, but you can customize the main shortcut that opens the tool using the Print Screen key.
To customize:
- Open Settings → Accessibility → Keyboard.
- Enable Use the Print screen button to open Snipping Tool.
- You can also remap keys using a tool like PowerToys Keyboard Manager to assign custom shortcuts.
For example, you can map Ctrl + Alt + S to open the Snipping Tool if you prefer.
How to Use Snipping Tool Shortcuts Effectively
Knowing shortcuts is good, but using them smartly can make you far more productive. Here are some practical scenarios:
- Quick Annotations for Work: If you’re creating reports or explaining something visually, press Windows + Shift + S, take a snip, then open it in Snipping Tool to highlight important details using the pen or highlighter tools.
- Copy and Paste Instantly: After taking a screenshot, just press Ctrl + V to paste it directly into Outlook, Word, or chat apps — no need to save first.
- Capture Menus or Tooltips: If you want to capture a dropdown menu, open it first, then press Windows + Shift + S. The overlay won’t close your menu, allowing perfect timing for capture.
- Multiple Screenshots in a Row: When you need several captures, use Alt + N or Ctrl + N inside the Snipping Tool to take new snips instantly without reopening the app.
Troubleshooting Snipping Tool Shortcuts
Sometimes, Snipping Tool shortcuts might not work as expected. Here’s how to fix them:
- Restart Windows Explorer
Sometimes shortcut functions depend on Explorer running properly. Restart it from Task Manager. - Check Keyboard Settings
Go to Settings → Accessibility → Keyboard and verify shortcut toggles. - Update Windows
Ensure your system is running the latest version of Windows 11 for bug fixes. - Reset Snipping Tool App
Open Settings → Apps → Installed apps → Snipping Tool → Advanced options → Reset. - Re-enable Print Screen Shortcut
If PrtScn doesn’t open Snipping Tool, re-enable it in accessibility settings.
Frequently Asked Questions (FAQs)
Can I customize Snipping Tool shortcuts in Windows 11?
Not directly. While you can reassign the Print Screen button, the default keyboard shortcuts like Windows + Shift + S are hardcoded and not changeable via Windows settings. However, third-party software like AutoHotKey can remap keys if needed.
Where are Snipping Tool screenshots saved by default?
When using Windows + Shift + S, the screenshot is saved to your clipboard, not as a file. You’ll need to paste it manually (e.g., in Paint or Word) or open the Snipping Tool app and use Ctrl + S to save it as an image.
Can I take a scrolling screenshot with the Snipping Tool?
As of now, the Snipping Tool in Windows 11 does not support scrolling screenshots natively. For that feature, third-party tools like ShareX, Greenshot, or Snagit are better alternatives.
Does Snipping Tool work in full-screen games or protected content?
No, the Snipping Tool cannot capture full-screen games or DRM-protected content (like Netflix) due to privacy restrictions. For game screenshots, use Windows + G to access the Xbox Game Bar.
Final Thoughts
The Snipping Tool in Windows 11 has become a powerful ally for anyone needing quick, efficient screen captures. While the app itself is intuitive, the real magic lies in learning the keyboard shortcuts that allow you to navigate its features seamlessly. From the essential Windows + Shift + S combo to practical tools like Ctrl + S for saving and Ctrl + C for copying, each shortcut contributes to a faster, smarter workflow.
Whether you’re documenting bugs, creating presentations, or simply capturing moments on your screen, mastering these shortcuts can make your life significantly easier. For heavy users, it’s worth customizing your workflow—pinning the app, enabling clipboard history, and considering delay options.
Now that you’re armed with the best Snipping Tool shortcuts Windows 11 has to offer, try integrating them into your daily computing habits. It’s a small effort that yields big productivity gains.
![Best Snipping Tool Shortcuts to Try on Windows 11 [2026]](https://www.geeksdigit.com/wp-content/uploads/2025/11/Photo-Organizers-Windows-11.jpg)
![Best Snipping Tool Shortcuts to Try on Windows 11 [2026]](https://www.geeksdigit.com/wp-content/uploads/2025/11/enable-disable-dark-mode-windows-11.jpg)