Backing up your computer is one of the smartest things you can do to keep your files safe. In Windows 11, you have several easy ways to protect your data. Whether it’s your family photos, school or work documents, or favorite apps and settings—losing them can be very stressful. That’s why knowing how to back up and restore your system is so important.
Windows 11 comes with built-in tools like File History, Backup and Restore (Windows 7), System Image Backup, and OneDrive. Each of these helps you save your data and get it back if something goes wrong. Even if you’re not very tech-savvy, these steps are simple to follow.

In this guide, we will explain everything step by step. You’ll learn how to back up your files and restore them when needed—so your important information stays safe no matter what happens.
Why Backup Is Important in Windows 11
Backing up your data may not seem urgent—until something goes wrong. Many people only think about backups after they’ve already lost important files. That’s why it’s better to stay prepared. In Windows 11, backing up your data is quick, easy, and can save you from big problems later on.
Here are some simple reasons why creating regular backups is so important:
- Accidental File Deletion: We all make mistakes. You might delete a file by accident or overwrite it without realizing. With a backup, you can easily recover it.
- System Crashes or Hardware Failures: Sometimes, your computer might stop working due to hardware problems, software issues, or sudden crashes. Backups help you restore your files even if the system doesn’t boot properly.
- Protection from Viruses and Ransomware: Malware and ransomware can corrupt or lock your files. A clean backup lets you wipe your system and restore your files safely.
- Easy PC Reset or Upgrade: If you’re planning to reset your PC or upgrade to a new one, having a backup helps transfer your files and settings easily.
- Data Recovery After Windows Updates: While rare, some updates might cause issues or remove personal files. A backup ensures you can roll back or retrieve your lost data.
- Version Control: Some backup methods, like File History, save different versions of your files over time. This helps if you want to go back to an earlier version of a document or project.
Built-in Backup Options in Windows 11
Windows 11 provides multiple tools for backup and restore. These include:
- File History
- OneDrive Cloud Backup
- System Restore Point
Each tool serves a different purpose. Below, we will walk through how to set up and use each one.
Method 1: Backup Your Files Using File History
File History is one of the easiest and most helpful tools in Windows 11 for backing up your personal files. It automatically saves copies of your files so you can restore them if they’re lost, damaged, or deleted.
What Does File History Back Up?
File History backs up common folders like:
- Desktop
- Documents
- Downloads
- Pictures
- Music
- Videos

You can also add other folders manually if needed.
How to Set Up File History in Windows 11
File History helps you automatically back up important files like Documents, Pictures, and Desktop items. You don’t need to dig deep in settings—just search and set it up in minutes.
Follow these simple steps:
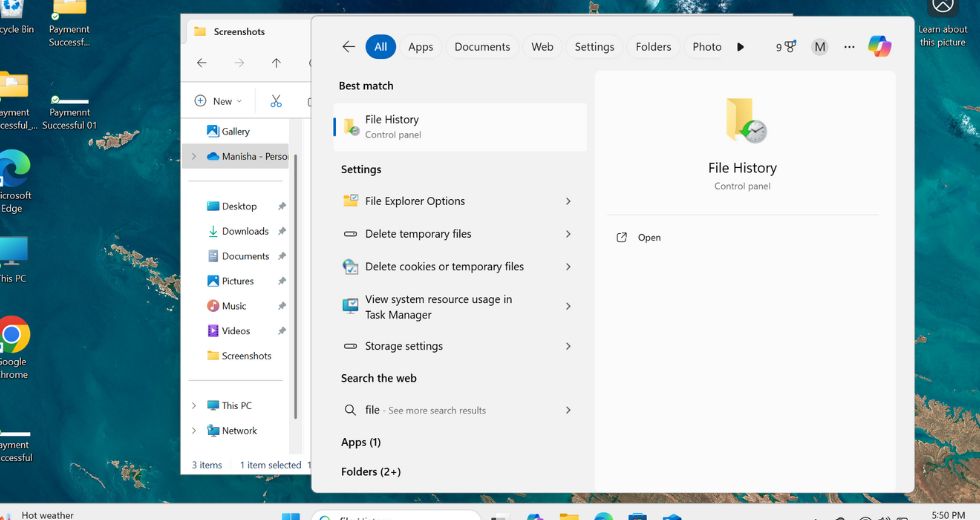
Step 1: Search for File History
- Click on the Start Menu or press the
Windowskey. - In the search box, type File History.
- Click on File History or Restore your files with File History from the results.
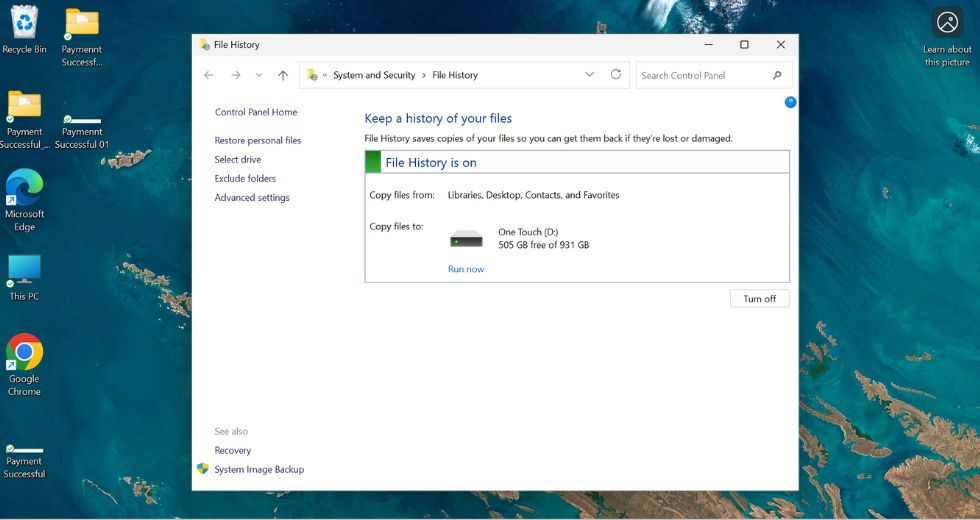
Step 2: Connect a Backup Drive
- Plug in a USB flash drive, external hard drive, or choose a network drive (if available).
- File History will automatically detect it and show the drive in the window.
Step 3: Turn On File History
- Click Turn on to start backing up your files.
- Windows will now start saving copies of your files automatically to the selected drive.
Step 4: Customize Backup Options (Optional)
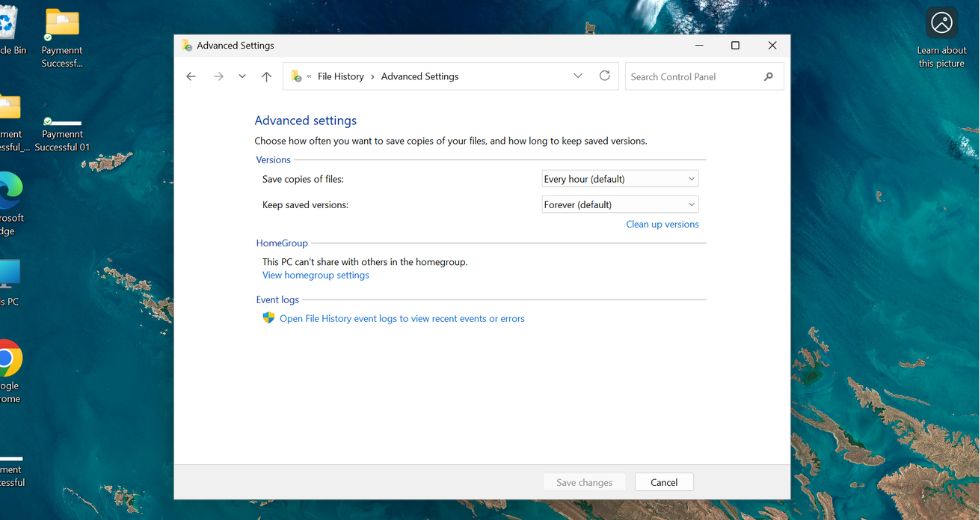
- On the left, click Advanced settings to:
- Change how often files are backed up (every hour, daily, etc.)
- Choose how long to keep saved versions
- See recent errors or issues
- You can also click Exclude folders to stop backing up specific folders.
How to Restore Files from File History
If you ever need to recover lost or previous versions of your files, here’s how to do it:
- Search for Restore your files with File History in the Start menu
- Click the result to open the File History window
- Browse through folders to find the file or folder you want to restore
- Use the left and right arrows at the bottom to browse through different backup dates
- Select the file or folder
- Click the green restore button to bring it back to its original location
- Or right-click and choose Restore to if you want to restore it elsewhere
Tips for Using File History
- Always keep your backup drive connected or reconnect it regularly so File History can run.
- Check the “Last backup” date to ensure everything is up to date.
- If your external drive fills up, delete old backups or use a larger drive.
File History is perfect for anyone who wants a simple, automatic way to protect personal files without needing technical knowledge. Just set it once and let Windows handle the rest!
Create and Use a Restore Point in Windows 11
A Restore Point is like a snapshot of your system’s settings and configurations. It lets you roll back your PC to an earlier time if something goes wrong—like after a bad update or software installation. It doesn’t affect your personal files like photos or documents, but it can undo changes to system settings, drivers, and apps.
This is one of the safest and fastest ways to fix problems without reinstalling Windows.
How to Create a Restore Point in Windows 11
Follow these simple steps to create a restore point manually:
Search Create a restore point
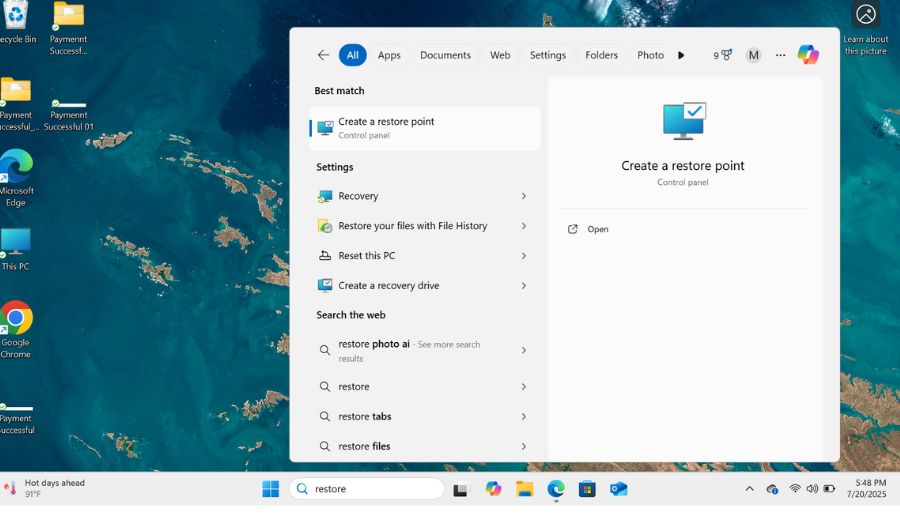
Click the Start button and type Create a restore point.
Select the result from the list to open the System Properties window.

Choose Your System Drive
Under the System Protection tab, you’ll see a list of drives.
Select the drive where Windows is installed (usually C:) and click Configure.

Turn On System Protection
If it’s turned off, select Turn on system protection.
Use the slider to set disk space (5–10% is usually enough). Click Apply, then OK.
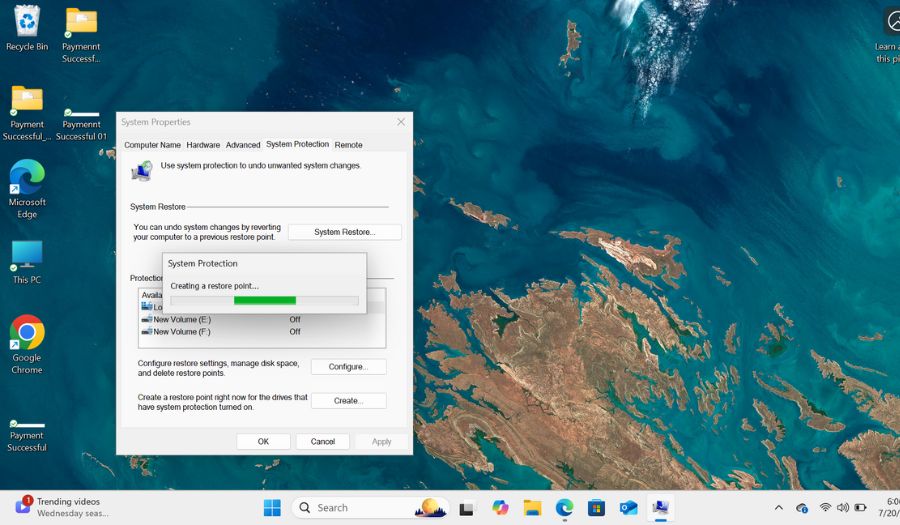
Create a Restore Point
Now click the Create button.
Type a name for your restore point like “Before driver update” or “July 2025 Restore”.
Click Create again and wait a few seconds.

You’ll see a success message once it’s done.
How to Use a Restore Point (Restore Your PC)
If your system starts acting up after an update or software installation, you can restore it to an earlier point.
Here’s how:
Search Create a restore point again and open it.
In the System Protection tab, click System Restore.
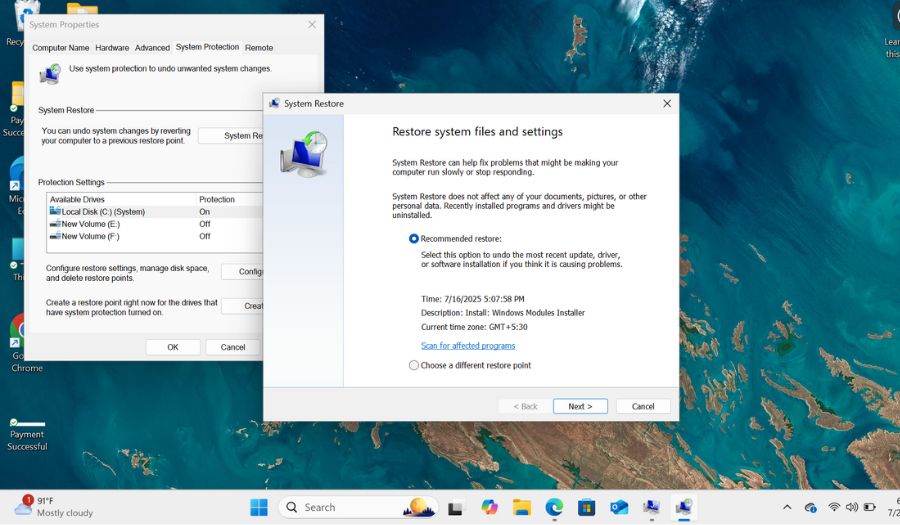
Choose the restore point you want to go back to and click Next, and you’ll see a list of restore points with dates and descriptions.
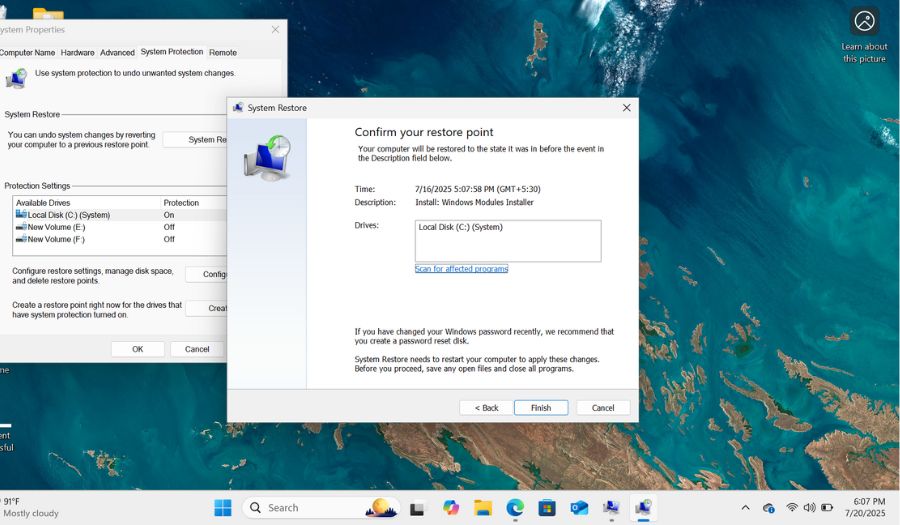
Confirm your selection, then click Finish.
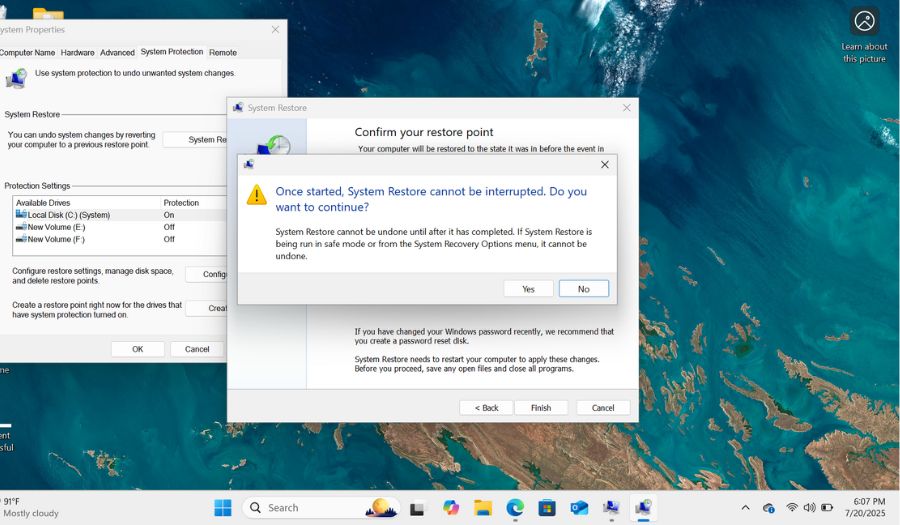
Your computer will restart and restore system settings to the chosen point.
Tips for an Effective Backup Strategy
- Schedule backups to run automatically at regular intervals (daily or weekly)
- Keep at least one copy of your backup on an external drive
- Use both local (File History) and cloud (OneDrive) backup methods for better protection
- Store your backup drive in a safe place and disconnect it when not in use
- Label your backups clearly with dates or version names
- Regularly check your backups to make sure files are being saved correctly
- Create a system image backup every few months or after major system changes
- Test your restore options occasionally to ensure they work when needed
- Avoid saving backups on the same drive as your original files
- Back up your most important folders first if you have limited storage space
What to Do If Backup or Restore Fails
- Check if your external drive is connected properly and has enough free space
- Restart your computer to clear temporary system glitches
- Run the built-in Windows Troubleshooter for backup or storage issues
- Use the System File Checker by running
sfc /scannowin Command Prompt - Free up disk space using Disk Cleanup to avoid space-related errors
- Try restoring your system in Safe Mode using Advanced Startup Options
- Make sure Windows is fully updated by checking for updates in Settings
- Switch to a different backup method if one tool isn’t working
- Ensure that System Protection is turned on for restore point usage
- Review error messages carefully to search for specific solutions online
FAQs – Backup and Restore in Windows 11
Can I back up only selected folders in Windows 11?
Yes. Using File History, you can manually choose which folders to include or exclude from your backup.
Does OneDrive backup all files on my PC?
No. OneDrive typically backs up only folders like Desktop, Documents, and Pictures. You can manually move files into these folders or use OneDrive settings to add more.
How much space do I need for a system image?
A system image usually requires at least the size of your system drive, often 30 GB or more, depending on what’s installed.
Can I use both OneDrive and File History together?
Absolutely. OneDrive is best for cloud backup, while File History protects your data on a local drive. Using both gives you the best of both worlds.
Final Thoughts
Backing up your data in Windows 11 is one of the best ways to protect yourself from unexpected data loss. Whether it’s accidental deletion, a system crash, or malware, having a backup can save you hours of frustration and keep your important files safe. Windows 11 offers easy-to-use tools like File History, Backup and Restore, System Image Backup, and OneDrive, giving you plenty of options to choose from based on your needs.
Setting up backups may seem like extra work, but it only takes a few minutes and can prevent major headaches later. Remember to create restore points regularly too, so you can quickly fix system issues without losing your personal files. Always keep your backup drive safe and disconnected when not in use to avoid any damage or ransomware threats.
![How to Backup and Restore in Windows 11 [Easy Guide]](https://www.geeksdigit.com/wp-content/uploads/2025/11/best-web-browsers-windows-11.jpg)
![How to Backup and Restore in Windows 11 [Easy Guide]](https://www.geeksdigit.com/wp-content/uploads/2025/07/disk-cleanup-windows-11.jpg)