Running out of space on your C drive is one of the most common computer problems that can significantly impact your system’s performance. When your primary drive becomes cluttered with temporary files, outdated software, duplicate files, and unnecessary system data, your computer may slow down, freeze, or even crash. The good news is that you can reclaim substantial disk space without losing any important data by following systematic cleanup procedures.
This guide will walk you through proven methods to safely clean your C drive while preserving all your valuable files, documents, photos, and applications. Whether you’re dealing with a nearly full hard drive or simply want to optimize your system’s performance, these techniques will help you identify and remove unnecessary files that are consuming precious storage space.
Why It’s Important to Clean Up the C Drive

Before jumping into the methods, let’s understand why cleaning up your C drive is crucial:
- Improves performance: A cluttered drive slows down your computer because Windows has less room to store temporary system files.
- Prevents errors: Low disk space can cause Windows updates or applications to fail.
- Frees up storage: Helps you save more photos, videos, and documents without adding an external drive.
- Increases lifespan of SSDs: Regular cleanup reduces unnecessary read/write operations.
C Drive Cleanup Process without losing your data
1. Use Windows Built-in Disk Cleanup Tool
The Windows Disk Cleanup tool is your first line of defense against storage bloat. This built-in utility safely identifies and removes various types of unnecessary files that accumulate over time. Temporary files, which are created by applications and the operating system for short-term use, can consume gigabytes of space if left unchecked.
The Recycle Bin, while serving as a safety net for deleted files, can also grow quite large over time. System error dump files, created when your computer crashes, are primarily useful for technical debugging and can be safely removed in most cases.
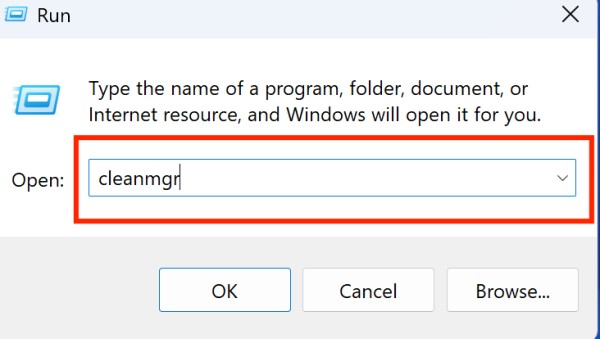
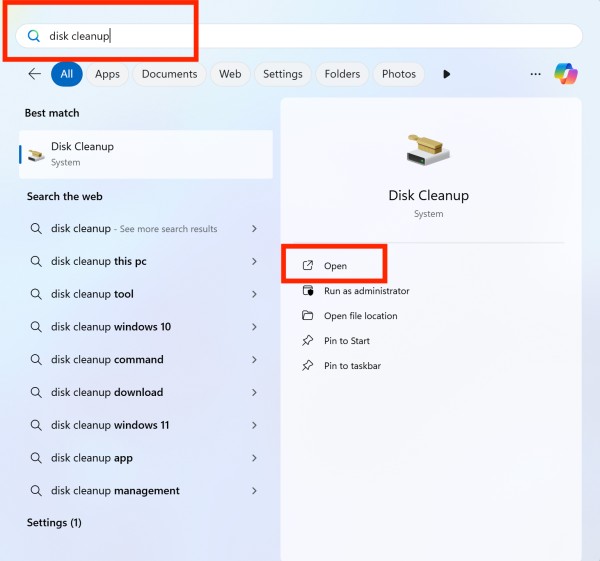
Access Disk Cleanup: Press Windows + R, type cleanmgr and press Enter, or search for Disk Cleanup in the Start menu
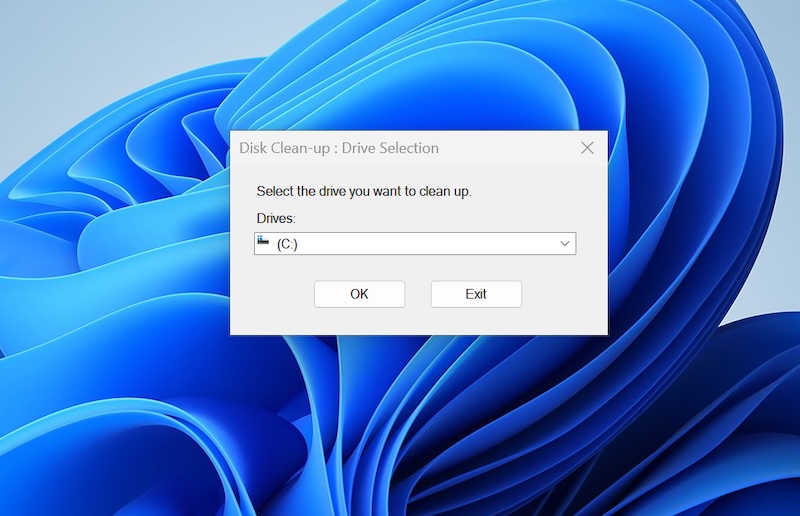
Select C Drive: Choose your C drive from the dropdown menu and click OK
Wait for Analysis: Allow the tool to scan and calculate how much space can be freed
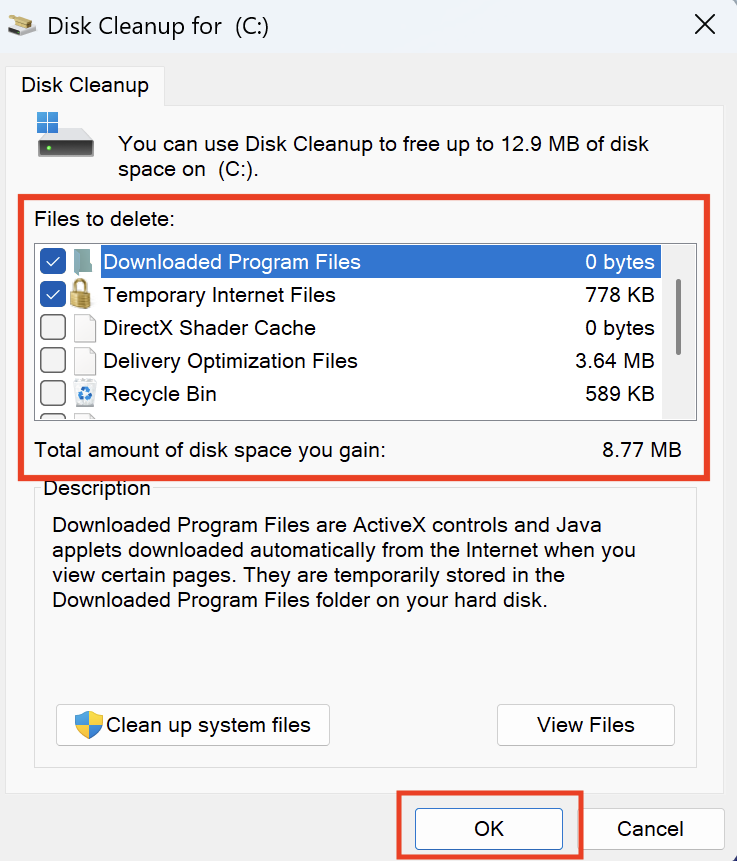
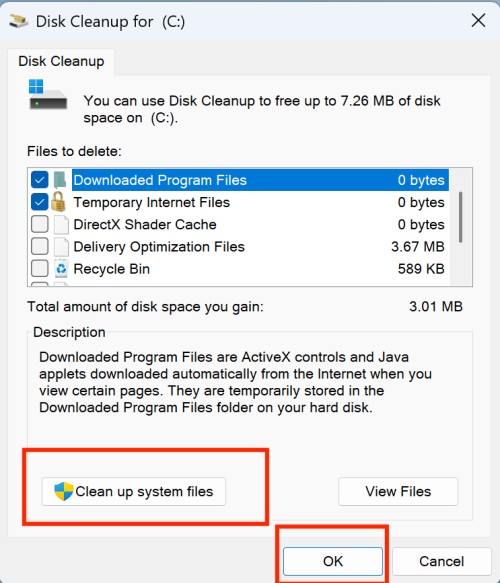
Select File Categories: Check boxes for Temporary files, Recycle Bin, System error memory dump files, Windows Update Cleanup, and Previous Windows installations

Review Advanced Options: Click “Clean up system files” for additional cleanup options including old Windows installations
Execute Cleanup: Click OK and confirm the deletion when prompted
2. Clean Temporary Files and Folders
Temporary files serve various purposes during normal computer operation but often remain on your system long after they’re needed. These files can accumulate rapidly, especially if you frequently install software, browse the internet, or work with multimedia files.
Browser cache files, while designed to speed up web browsing by storing frequently accessed data locally, can grow to several gigabytes over time. The Downloads folder is another common culprit for space consumption, as users often forget about files they’ve downloaded for temporary use.
Navigate to Temp Folders: Press Windows + R, type “%temp%” and press Enter to access temporary files

Select All Files: Press Ctrl + A to select all temporary files in the folder

Delete Safely: Press Delete key or right-click and select Delete, then empty the Recycle Bin

Clear Additional Temp Locations: Also clean C:\Windows\Temp folder (requires administrator privileges)
Clear Browser Cache: Open each browser’s settings and clear browsing data, cache, and temporary files
Remove Download Folder Clutter: Review your Downloads folder and delete unnecessary files
3. Uninstall Unused Programs and Applications
Over time, computers accumulate software that users no longer need or use. This includes trial versions of software, games played once, outdated utilities, and manufacturer bloatware that comes pre-installed on new computers. These programs not only consume disk space but may also run background processes that slow down your system.
Large applications like video editing software, development environments, or games can consume several gigabytes each. By regularly auditing your installed software and removing unused applications, you can reclaim significant storage space while also improving system performance.
Open Programs and Features: Go to Control Panel > Programs > Programs and Features, or use Settings > Apps
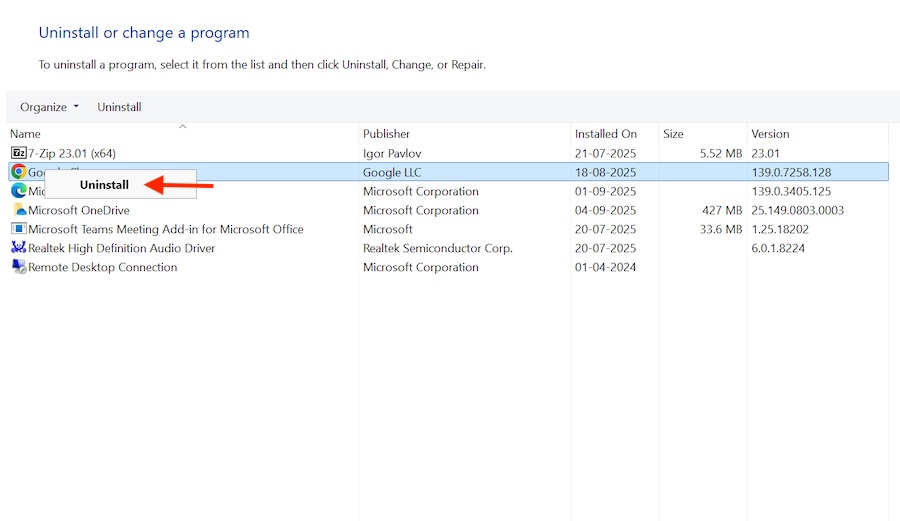
Sort by Size: Click on the Size column to identify the largest applications
Review Installation Dates: Sort by install date to find programs you haven’t used recently
Identify Bloatware: Look for pre-installed software you never use (often from computer manufacturers)
Uninstall Systematically: Right-click on unwanted programs and select Uninstall, following the removal wizard
Use Third-party Uninstallers: Consider tools like Revo Uninstaller for complete removal, including leftover files and registry entries
4. Use Storage Sense (Windows 10/11)
Storage Sense represents Microsoft’s modern approach to automatic disk cleanup. This intelligent feature continuously monitors your system’s storage usage and automatically removes unnecessary files based on your configured preferences.
Unlike manual cleanup methods, Storage Sense works proactively to prevent storage issues before they become problematic. The feature can automatically empty your Recycle Bin after a specified period, remove temporary files, and manage cloud-synced content by keeping frequently accessed files local while moving others to cloud-only storage.
Enable Storage Sense: Go to Settings > System > Storage and toggle on Storage Sense
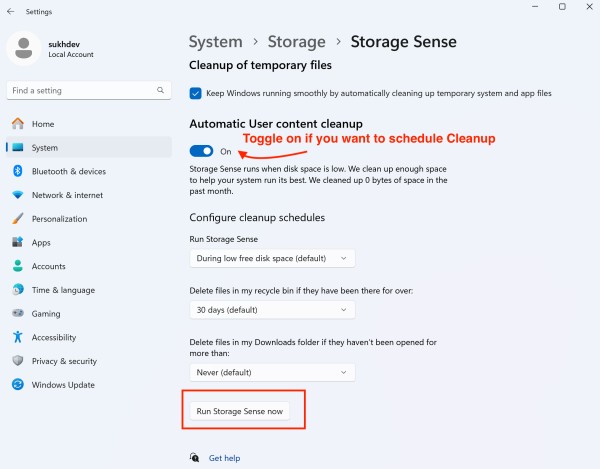
Configure Automatic Cleanup: Click “Automatic User content cleanup”
Set Cleanup Schedule: Choose how often Storage Sense runs (daily, weekly, monthly)
Configure File Retention: Set how long to keep files in Recycle Bin and Downloads folder
Enable Cloud Content Management: Allow automatic removal of locally synced cloud files
Run Manual Cleanup: Click “Run Storage Sense now” to immediately free up space
5. Move Files to External Storage or Cloud
Personal files, particularly multimedia content, often represent the largest consumers of disk space on personal computers. High-resolution photos, video files, and music collections can quickly consume hundreds of gigabytes.
By strategically moving these files to external storage or cloud services, you can maintain access to your content while freeing up valuable local storage. Modern cloud services offer seamless synchronization, allowing you to access your files from anywhere while keeping only recently accessed items stored locally.
- Identify Large Personal Files: Use File Explorer to sort folders by size and identify large files
- Create Backup Strategy: Set up external hard drive or cloud storage service
- Move Media Files: Transfer photos, videos, and music to external storage or cloud services like OneDrive, Google Drive, or Dropbox
- Relocate Document Folders: Move large document collections to external drives
- Use Cloud Synchronization: Configure cloud services to sync files while keeping local copies minimal
- Update File Paths: Ensure applications can still access moved files or update shortcuts accordingly
6. Clear System Cache and Log Files
System cache and log files serve important diagnostic and performance functions but can grow substantially over time. Windows maintains detailed logs of system events, errors, and activities, which can be valuable for troubleshooting but consume considerable disk space in normal operation.
The Windows Component Store, which manages system updates and features, can also accumulate outdated files. Application caches, stored in the AppData folder, help programs load faster but can become quite large, especially for browsers, media players, and development tools.
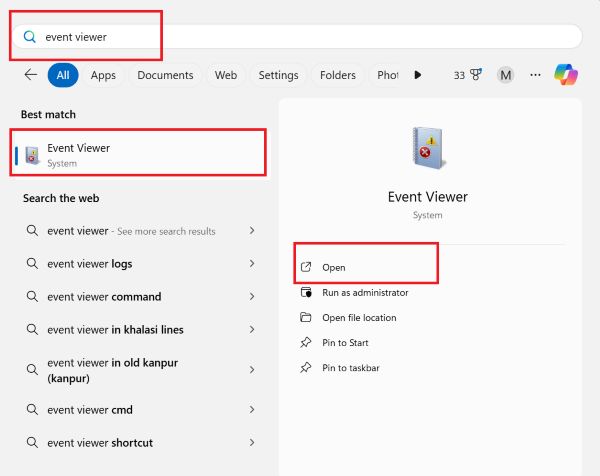
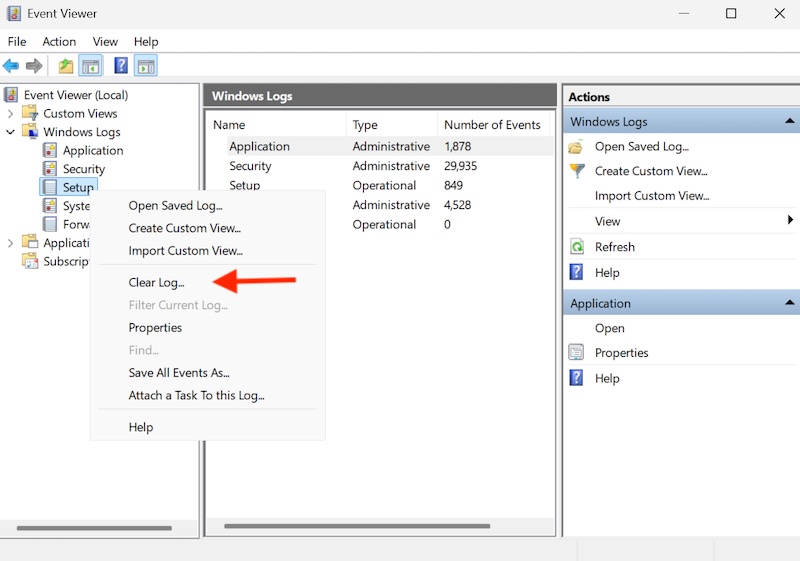
Access Event Viewer: Open Event Viewer to clear system logs
Clear Windows Logs: Expand Windows Logs, right-click each category, and select “Clear Log”
Remove Old Log Files: Navigate to C:\Windows\Logs and delete old log files (exercise caution)
Clear Application Caches: Look for cache folders in C:\Users[Username]\AppData\Local and clean application-specific caches
Use CCleaner or Similar: Consider reputable third-party tools for comprehensive cache cleanup
7. Compress Files and Folders
File compression can significantly reduce storage requirements, particularly for text documents, spreadsheets, and other compressible file types. Windows’ built-in NTFS compression feature provides transparent compression, meaning files are automatically compressed and decompressed as needed without user intervention.
While compression can save substantial space, it’s important to consider the trade-offs, including slightly slower file access times and increased CPU usage when working with compressed files.
- Identify Compression Candidates: Look for document folders, archived projects, or infrequently accessed files
- Use Built-in Compression: Right-click folders, select Properties, click Advanced, and check “Compress contents to save disk space”
- Implement NTFS Compression: Enable compression on entire drives or specific folders through drive properties
- Archive with ZIP: Create ZIP archives for old project files or document collections
- Use Third-party Compression: Consider tools like 7-Zip or WinRAR for better compression ratios
- Monitor Performance Impact: Be aware that compressed files may take slightly longer to access
8. Clean Windows Update Files
Windows Update files can consume enormous amounts of disk space, often several gigabytes. The system maintains downloaded update files, installation backups, and previous Windows versions to enable rollback functionality.
While this provides valuable recovery options, these files become less necessary over time, especially after confirming that recent updates are working properly. The SoftwareDistribution folder, which stores downloaded updates, can become particularly large and may occasionally become corrupted, requiring manual cleanup.
Open Disk Cleanup as Administrator: Right-click Disk Cleanup and select “Run as administrator”
Access System Files: Click “Clean up system files” button
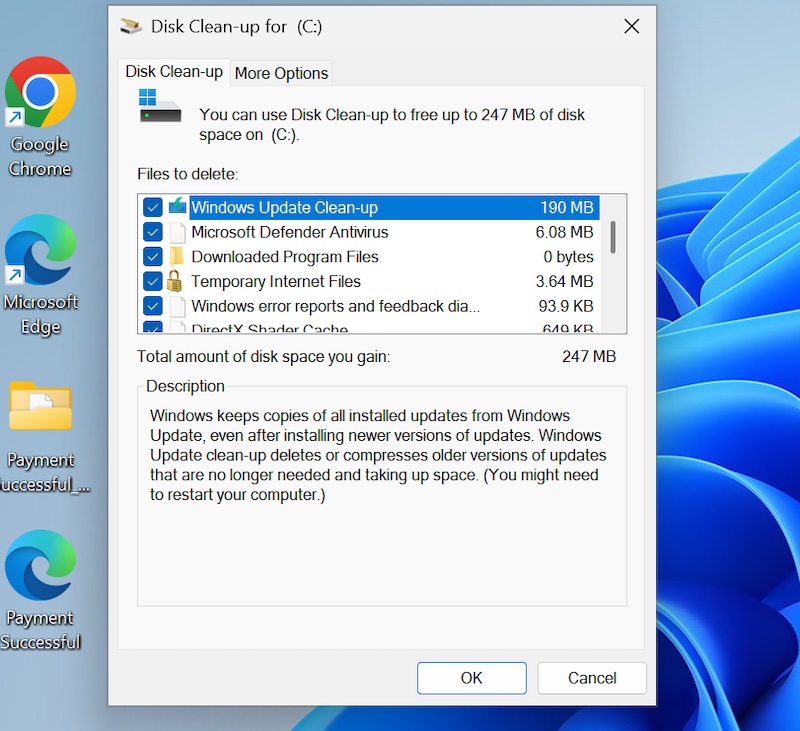
Select Update Categories: Check “Windows Update Cleanup” and “Previous Windows installations”
Remove Old Updates: Select “Windows ESD installation files” if present
Clear Download Cache: Navigate to C:\Windows\SoftwareDistribution\Download and delete contents
Reset Windows Update: If necessary, use Windows Update troubleshooter to reset the update cache
9. Manage Virtual Memory and Hibernation
Virtual memory and hibernation files can consume several gigabytes of disk space. The page file (pagefile.sys) serves as virtual memory when physical RAM is insufficient, while the hibernation file (hiberfil.sys) stores system state when entering hibernation mode.
On systems with ample RAM, these files may be unnecessarily large or entirely unnecessary. Disabling hibernation can immediately free up several gigabytes, though you’ll lose the ability to hibernate your computer.
Optimize Page File: Go to System Properties > Advanced > Performance Settings > Advanced > Virtual Memory

Resize Page File: Set custom size or let Windows manage automatically based on available space

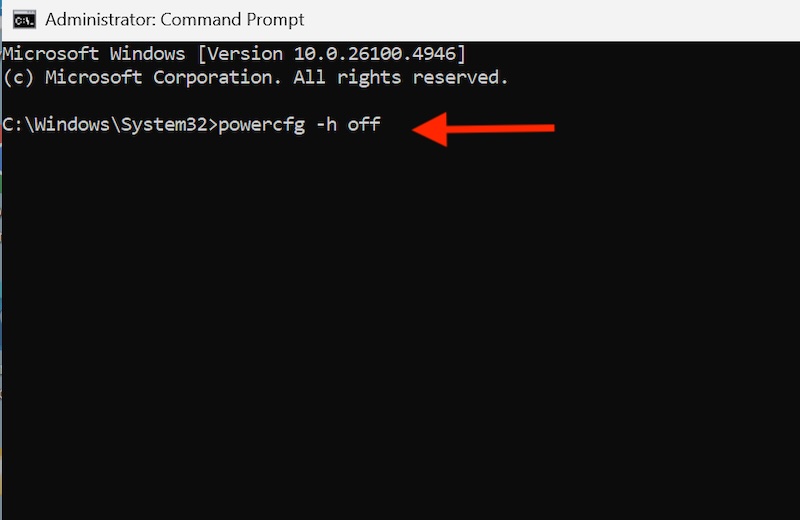
Disable Hibernation: Open Command Prompt as administrator

Run “powercfg -h off” to disable hibernation and remove hiberfil.sys
Configure Sleep Settings: Adjust power settings to use sleep instead of hibernation
Monitor Page File Usage: Use Performance Monitor to determine if page file adjustments are beneficial
Re-enable if Needed: You can re-enable hibernation later with “powercfg -h on” if desired
10. Use Third-party Cleanup Tools
- Download Reputable Tools: Consider CCleaner, BleachBit, or TreeSize for advanced cleanup options
- Scan for Duplicate Files: Use tools like Duplicate Cleaner or dupeGuru to find and remove duplicate files
- Analyze Disk Usage: Employ WinDirStat or TreeSize to visualize disk usage and identify space-consuming files
- Clean Registry: Use registry cleaners cautiously to remove obsolete entries (create backup first)
- Schedule Regular Maintenance: Set up automatic scans and cleanup routines
- Verify Tool Legitimacy: Only download from official sources and read reviews before installing
Third-party cleanup tools can provide more comprehensive and automated cleanup capabilities than built-in Windows utilities. These tools often feature advanced duplicate file detection, comprehensive registry cleaning, and detailed disk usage analysis. However, it’s crucial to choose reputable tools and understand their functions before use. Some cleanup operations, particularly registry cleaning, can potentially cause system instability if not performed correctly.
Additional Considerations and Best Practices
Regular maintenance is key to preventing storage issues from recurring. Establish a monthly routine of running disk cleanup, reviewing installed programs, and monitoring disk usage. Consider upgrading to a larger drive or adding additional storage if you consistently run out of space despite regular cleanup efforts.
Always create backups before performing major cleanup operations, especially when using third-party tools or manually deleting system files. While the methods outlined in this guide are generally safe, having a recent backup provides peace of mind and recovery options if something goes wrong.
Monitor your system’s performance after cleanup to ensure that removed files weren’t important for specific applications or system functions. Most cleanup operations are reversible if you discover issues, but prevention is always preferable to recovery.
Conclusion
Maintaining adequate free space on your C drive is essential for optimal computer performance and system stability. The methods outlined in this guide provide a systematic approach to reclaiming disk space without risking data loss. Starting with Windows’ built-in tools like Disk Cleanup and Storage Sense offers the safest cleanup options, while advanced techniques like managing virtual memory and using third-party tools can yield dramatic space savings.
The key to long-term success lies in developing regular maintenance habits rather than waiting for storage crises. Monthly cleanup routines, periodic software audits, and proactive file management will prevent space issues from recurring. Remember that prevention is always more effective than emergency cleanup measures.
Most users can expect to recover 10-30% of their drive space through these methods, with some cases yielding even more dramatic results. By implementing these strategies consistently, you’ll enjoy faster boot times, improved application performance, and a more responsive computing experience while ensuring your valuable data remains safe and accessible.
![How to Clean Up C Drive Space Without Losing Data [Windows 11]](https://www.geeksdigit.com/wp-content/uploads/2025/10/reinstall-bluetooth-driver-windows-11.jpg)
![How to Clean Up C Drive Space Without Losing Data [Windows 11]](https://www.geeksdigit.com/wp-content/uploads/2025/05/disk-cleanup-windows-11.jpg)