Windows 11, Microsoft’s latest operating system, includes several tools and features designed to help users manage their disk space efficiently. These tools not only free up space but also help maintain the overall health of your system. From the classic Disk Cleanup utility to the more modern and automated Storage Sense, Windows 11 offers multiple ways to ensure your hard drive isn’t bogged down by junk.
This comprehensive guide will walk you through all the methods available to perform disk cleanup in Windows 11, ranging from basic built-in tools to advanced command-line techniques and third-party software. Whether you’re a casual user or a tech enthusiast, this guide has something for you. Let’s explore how to reclaim storage, boost speed, and maintain a healthy Windows 11 system.
What Is Disk Cleanup?

Disk Cleanup is a maintenance utility in Microsoft Windows designed to help users free up space on their hard drives by identifying and removing files that are no longer needed. Over time, a computer accumulates various temporary and redundant files—such as cached data, old system logs, Windows update leftovers, and items in the Recycle Bin. While these files often serve a purpose during their creation, they become unnecessary once their function is complete and can take up significant storage space.
The purpose of Disk Cleanup is to declutter your system and improve its overall performance. By removing these non-essential files, you can reclaim valuable disk space, speed up your computer, and reduce the risk of file conflicts or system slowdowns. Disk Cleanup can also contribute to better security and system stability by clearing sensitive temporary data and outdated logs.
How to Do Disk Cleanup on Windows 11
Windows 11 provides several ways to perform disk cleanup, including the traditional Disk Cleanup tool, the automated Storage Sense feature, and manual cleanup options through system settings or command-line utilities. Each of these methods targets different types of files but shares the common goal of enhancing system efficiency. Here are some easy steps to follow:
Method 1: Using the Built-In Disk Cleanup Tool
One of the simplest and fastest ways to free up space on your Windows 11 PC is by using the Disk Cleanup tool. This built-in utility allows you to remove temporary files, system cache, and other junk in just a few clicks.
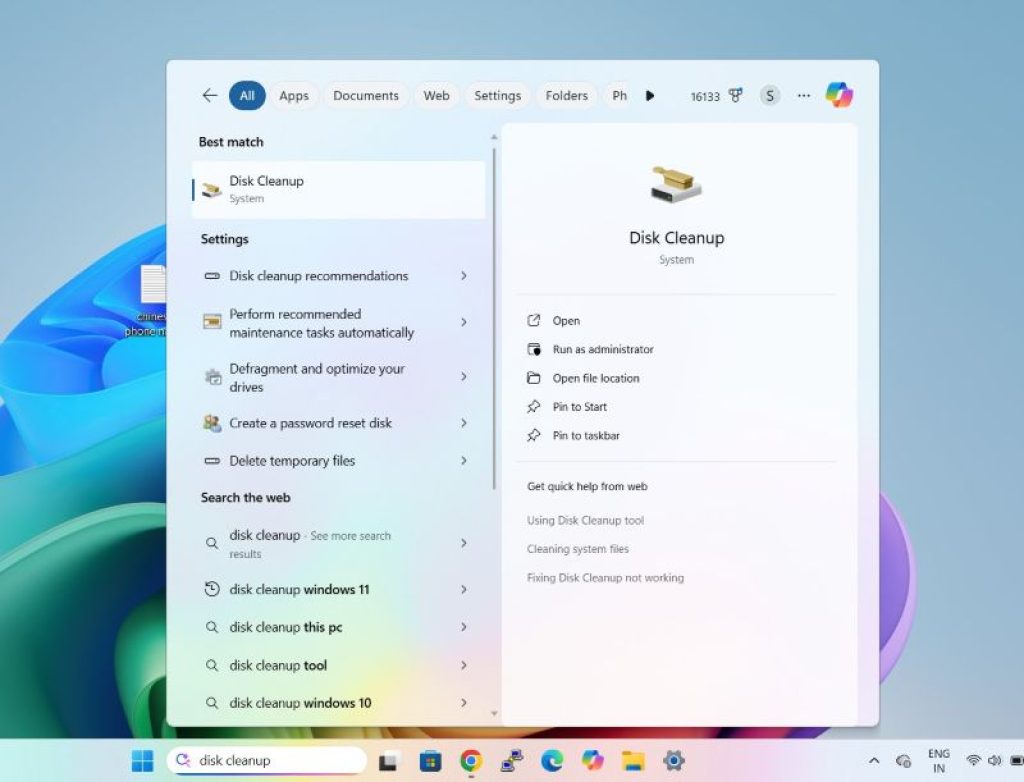
Step 1: Open Disk Cleanup
- Press
Windows + Son your keyboard to open the search bar. - Type Disk Cleanup and click on the result.
Step 2: Select a Drive
- When prompted, choose the drive you want to clean—usually this is your C: drive.
- Click OK to proceed.

Step 3: Scan for Junk Files
- Disk Cleanup will quickly scan the selected drive and show you a list of files you can safely delete.
Common options include:
- Temporary Internet Files
- Recycle Bin
- Thumbnails
- Delivery Optimization Files
- System-created temporary files

Step 4: Select and Clean
- Check the boxes next to the types of files you want to delete.
- Click OK, then confirm by clicking Delete Files.
In less than a minute, you’ve freed up space and improved your system’s performance. For a deeper clean, you can click “Clean up system files” (optional), which will rescan your drive and include system update leftovers and more.
Method 2: Using Storage Sense
Storage Sense is a built-in feature in Windows 11 that can automatically clean your system.
How to Enable Storage Sense
- Press
Windows + Ito open Settings. - Navigate to System > Storage.
- Toggle Storage Sense to On.
- Click Storage Sense settings to configure:

You can:
- Run it on a schedule
- Automatically delete temporary files
- Remove files in Recycle Bin after a number of days
- Clean up Downloads folder periodically
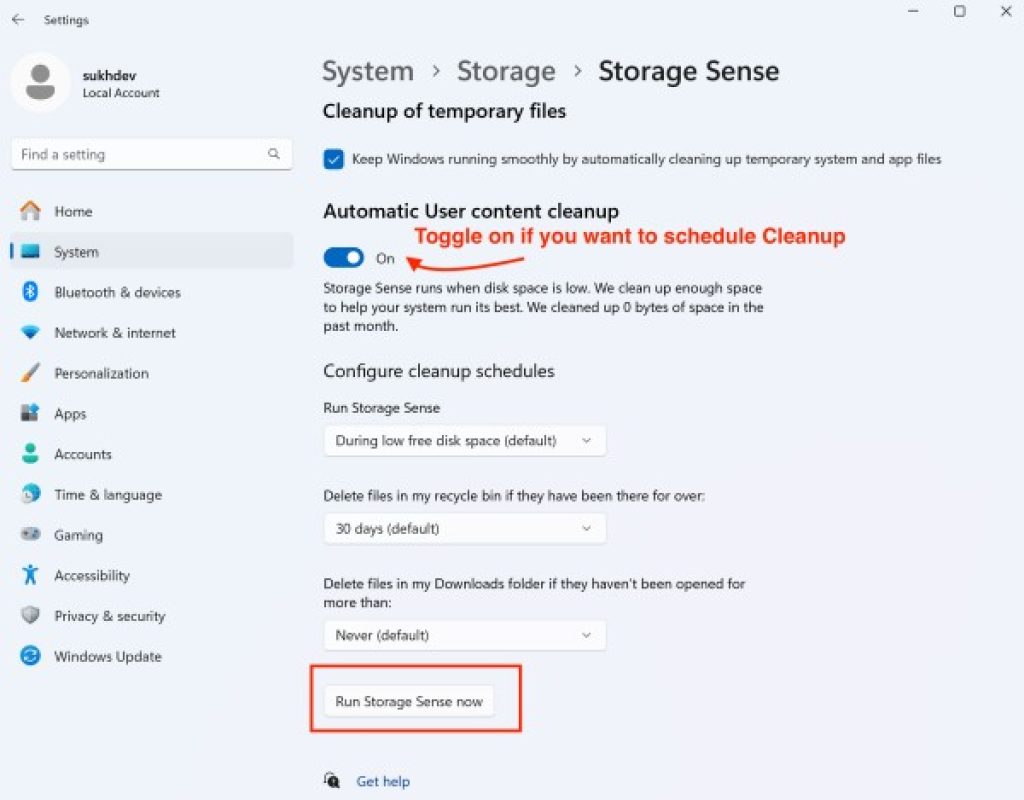
Manually Run Storage Sense
- Scroll down in the Storage Sense settings.
- Click Run Storage Sense now to clean up your PC.
Method 3: Free Up Space Using Windows Settings
- Go to Settings > System > Storage.
- Click Temporary files under your main drive.
- Windows will scan and present a breakdown of temporary files.
- Select the types you want to delete and click Remove files.
This method is user-friendly and gives you visual feedback.
Method 4: Using Command Line (CMD or PowerShell)
Disk Cleanup via Command Prompt
- Press
Windows + R, typecmd, and press Ctrl + Shift + Enter to open as Admin. - Type the following: bashCopyEdit
cleanmgr /sageset:1This opens the Disk Cleanup settings dialog. Select file types to delete and save. - Run the cleanup: bashCopyEdit
cleanmgr /sagerun:1
PowerShell for Advanced Cleanup
PowerShell can help automate cleanup tasks:
Get-ChildItem "C:\Windows\Temp" | Remove-Item -Recurse -Force
Clear-RecycleBin -Force
This will clear temp files and empty the Recycle Bin.
Note: Be careful with automation—ensure you’re not deleting files you may need.
Method 5: Manually Deleting Unnecessary Files
Clear the Temp Folder
- Press
Windows + Rand type%temp%. - Delete all files in the folder.
Clear Prefetch Files
- Press
Windows + Rand typeprefetch. - Delete all files (requires admin rights).
Clear Windows Update Cache
- Open Services:
services.msc - Stop the Windows Update service.
- Go to
C:\Windows\SoftwareDistribution\Download - Delete all files.
- Restart the Windows Update service.
Method 6: Third-Party Tools for Disk Cleanup
While Windows provides solid tools, third-party apps can add features like deeper scans and registry cleaning.
Popular Tools:
- CCleaner: Cleans junk files, cache, browser history, and registry entries.
- BleachBit: Open-source tool for system and application cleanup.
- Wise Disk Cleaner: Includes disk defragmenting and advanced junk file cleanup.
- Glary Utilities: All-in-one performance booster with disk and registry cleaners.
Caution: Use only trusted software to avoid bloatware or malware.
Best Practices for Disk Maintenance
Keeping your Windows 11 system running smoothly involves more than just occasional cleanups—it requires adopting good habits for ongoing disk maintenance. Regular attention to your computer’s storage health can prevent performance slowdowns, extend hardware life, and ensure your system stays secure and efficient. Here are the best practices every user should follow for optimal disk maintenance:
- Schedule cleanups monthly using Storage Sense or a reminder.
- Back up important data before major cleanups.
- Uninstall unused apps to free up space.
- Use cloud storage for large files (e.g., OneDrive or Google Drive).
- Monitor storage health via Settings > System > Storage.
Frequently Asked Questions (FAQs)
Does disk cleanup delete personal files?
No. Disk Cleanup only removes temporary and system files. It doesn’t touch your personal documents or photos.
How often should I clean up my disk?
Once a month is ideal, or whenever you notice performance lags or low storage.
Can Disk Cleanup cause problems?
Rarely, if you delete crucial system files like old Windows installations you might need later. Always review selections before confirming.
What if Disk Cleanup doesn’t work?
Try alternative methods like Storage Sense, manual deletion, or a third-party tool. Also, ensure your system has no disk errors.
Conclusion
Windows 11 makes disk cleanup easier than ever with both manual and automated tools. Whether you prefer traditional utilities like Disk Cleanup, modern features like Storage Sense, or command-line control, keeping your system tidy is a crucial part of PC health.
By following these disk maintenance best practices, you can keep your Windows 11 PC running smoothly, efficiently, and securely over time. Make disk cleanup part of your regular maintenance routine to keep your computer in peak condition. What are your thoughts? Please do let’s know in the below comment section!
![How to Do Disk Cleanup on Windows 11 [2026 Updated]](https://www.geeksdigit.com/wp-content/uploads/2025/05/take-screenshot-windows-11-thumb.jpg)
![How to Do Disk Cleanup on Windows 11 [2026 Updated]](https://www.geeksdigit.com/wp-content/uploads/2025/10/clean-c-drive-space-without-losing-data.jpg)