Filling out online forms can be a repetitive and time-consuming task, especially when you frequently enter your name, email address, phone number, or home address across different websites. Thankfully, Microsoft Edge includes a built-in Auto-fill feature that stores your information and automatically fills it in whenever required. Whether you’re entering addresses, payment details, passwords, or basic contact info, Edge makes the process faster and more convenient.
In this detailed guide, you’ll learn how to enable automatic form filling in Microsoft Edge, how to add and manage your auto-fill data, how to sync it across devices, and how to turn it off when needed. The steps are easy to follow and suitable for both beginners and advanced users.
What Is Automatic Form Filling in Microsoft Edge?

Automatic form filling—also known as Auto-fill—is a feature in Microsoft Edge that allows the browser to store your information and insert it automatically into online forms. This includes:
- Names
- Addresses
- Phone numbers
- Email addresses
- Saved passwords
- Payment information
- Birthday details
- Saved personal profiles
Once set up, Auto-fill eliminates the need to type these details repeatedly, saving time and reducing typing errors.
Why Use Automatic Form Filling?
Here are some top benefits:
1. Saves Time
Typing long information repeatedly is tiring. Auto-fill completes forms instantly.
2. Reduces Mistakes
Auto-fill ensures your stored information is accurate and consistent.
3. Sync Across Devices
If you sign in with your Microsoft account, Edge can sync your saved info across your computer, tablet, and mobile phone.
4. Helps With Online Shopping
When purchasing items online, saved cards and addresses make the checkout process quick and smooth.
5. Secure Storage

Microsoft Edge stores your information securely using encryption. Sensitive data like payment information can be protected with Windows Hello, PIN, or biometric login.
How Automatic Form Filling Works in Edge
Microsoft Edge stores your information locally or in your Microsoft account (if sync is enabled). When you visit a website that requires similar details, Edge automatically detects the form fields and suggests the saved data.
You can choose to apply the suggested info with a single click.
Method 1: Enable Auto-Fill for Personal Information
This includes your name, email, phone number, and address. Here’s how to turn it on:
Step 1: Open Microsoft Edge
Launch the Microsoft Edge browser on your PC or laptop.
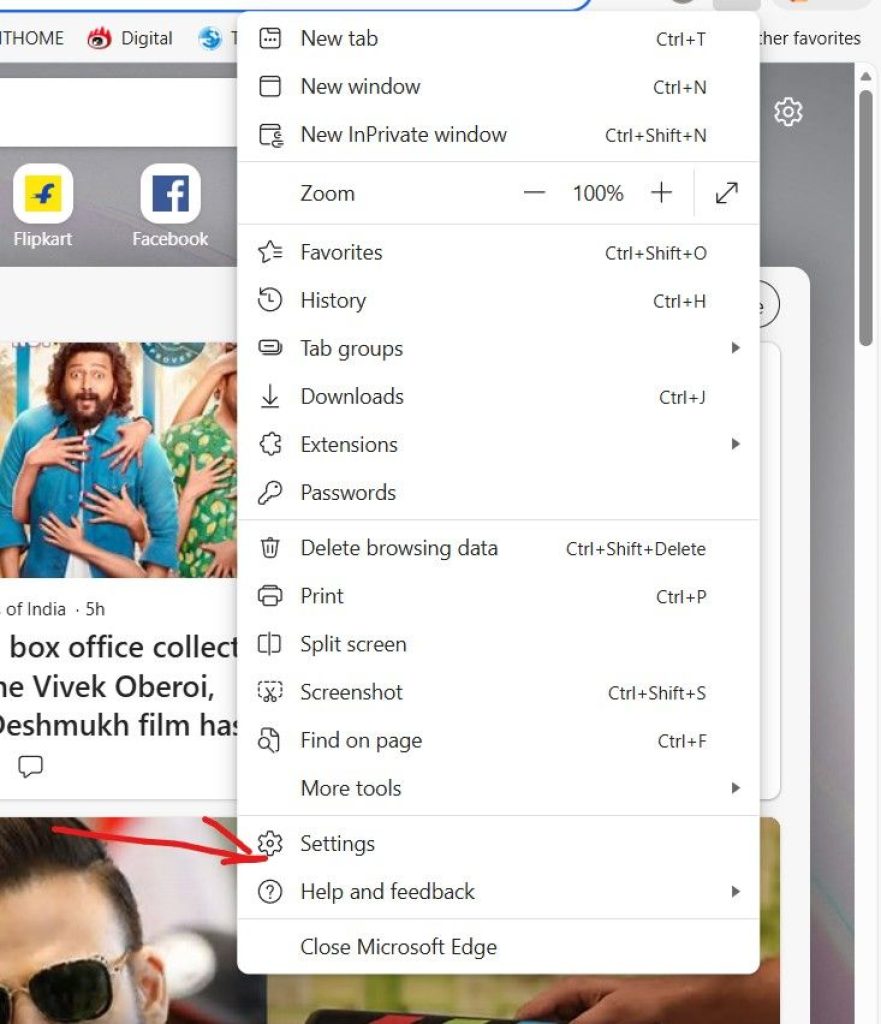
Step 2: Go to Settings
- Click the three-dot menu (⋯) in the top-right corner.
- Select Settings from the menu.
Step 3: Open Profiles Section
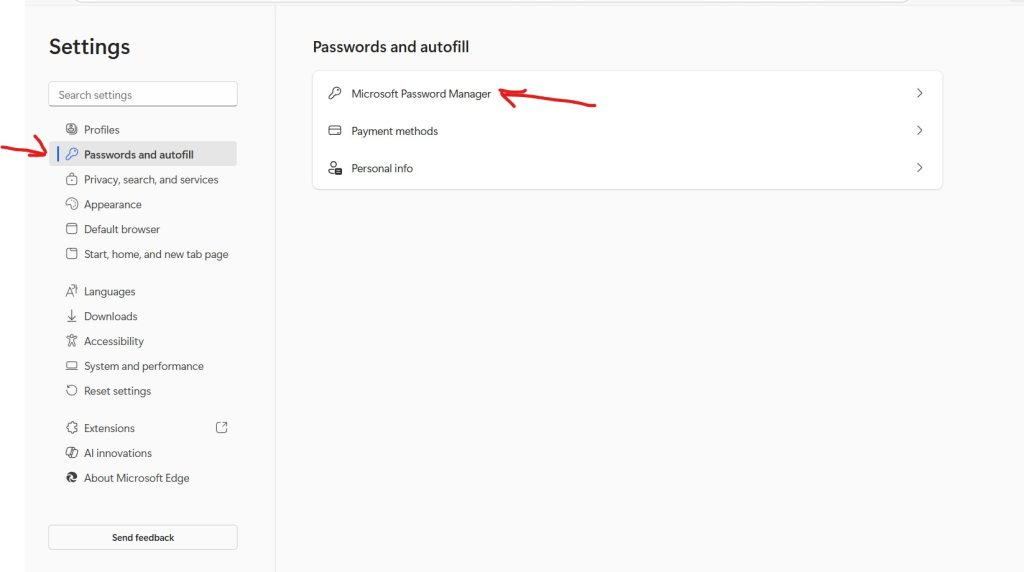
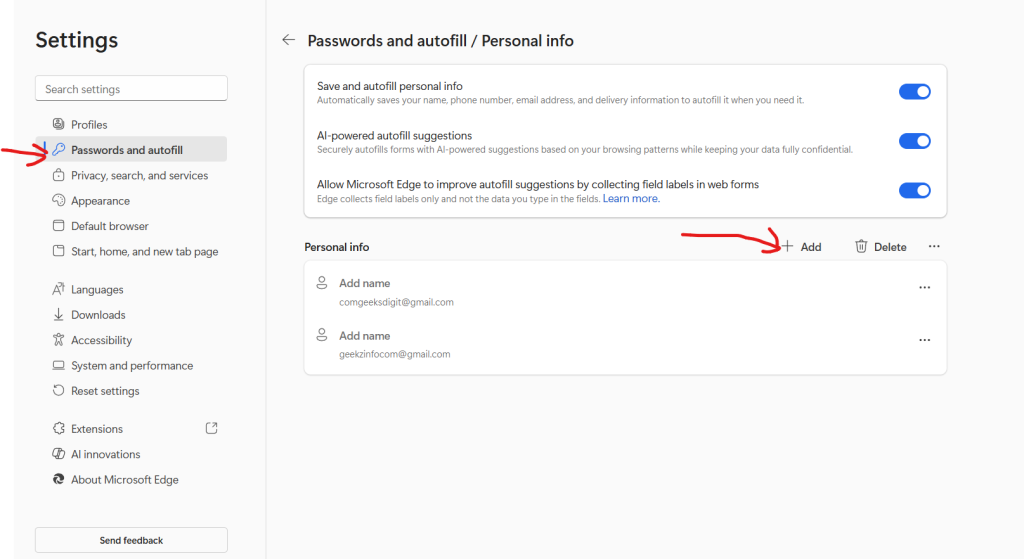
In the left sidebar, click Passwords & Autofill.
Step 4: Choose Personal Info
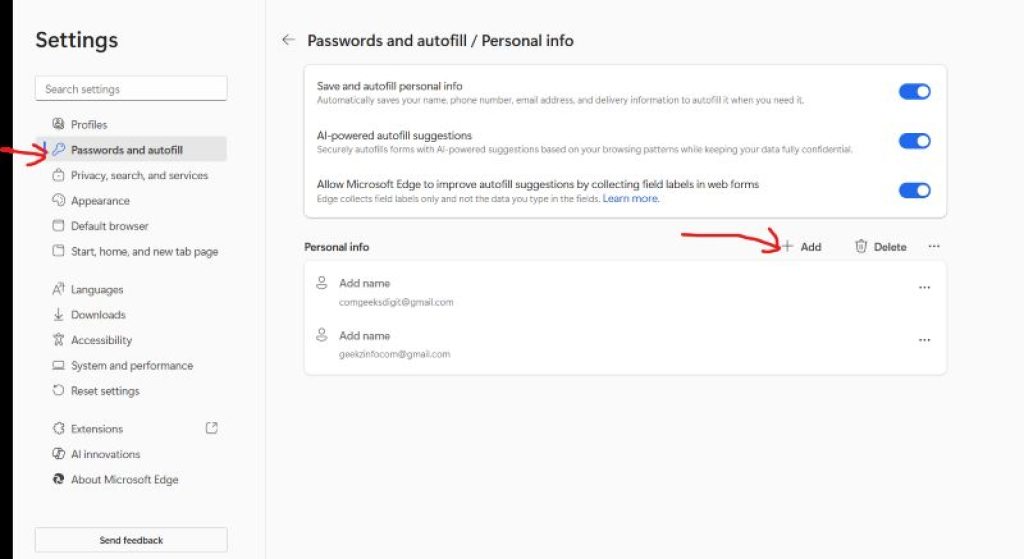
Under the Profiles menu, click Personal info > +Add.
Step 5: Turn On Personal Info Auto-Fill
Enable the toggle next to:
“Save and fill personal info”
This allows Edge to save and auto-fill your:
- Name
- Address
- Phone number
Step 6: Add Your Personal Information
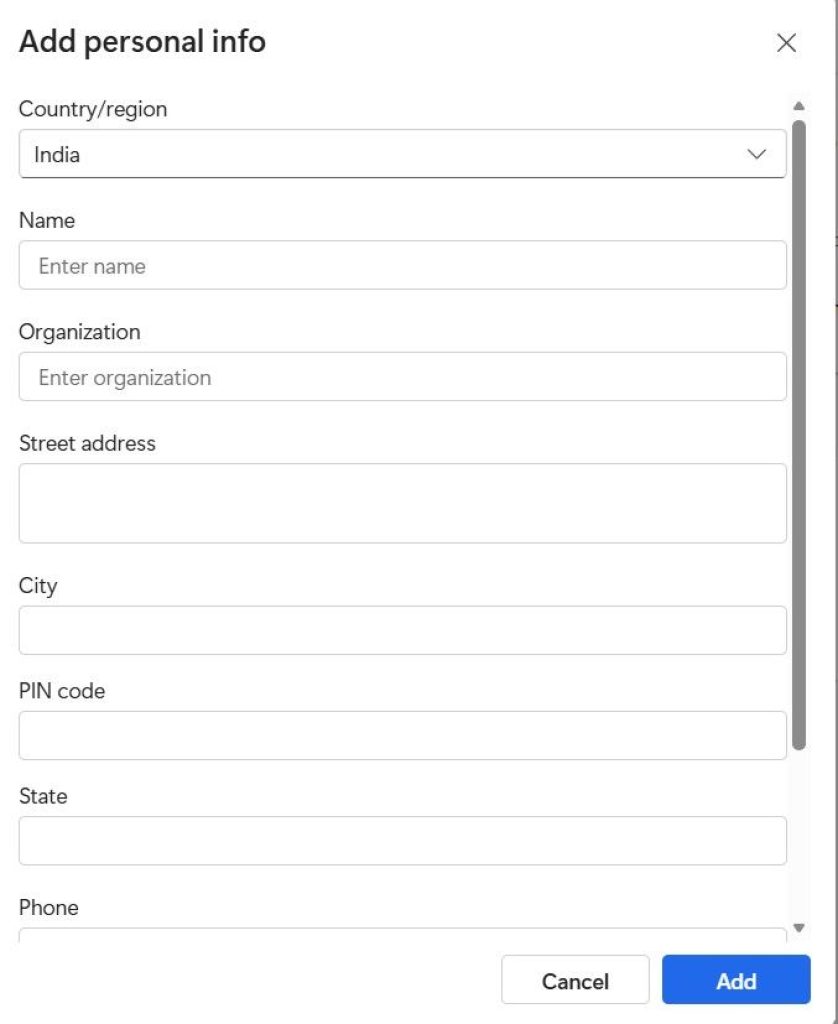
You can manually add a new entry:
- Click Add personal info.
- Enter your name, address, city, zip/postal code, phone number, etc.
- Click Save.
Now, whenever you come across a website form asking for these details, Edge will automatically fill the information for you.
Method 2: Enable Auto-Fill for Passwords
Saving passwords helps you log in to websites quickly without typing passwords every time.
Step 1: Open Settings
Click the three-dot menu → Settings.
Step 2: Open Passwords Section
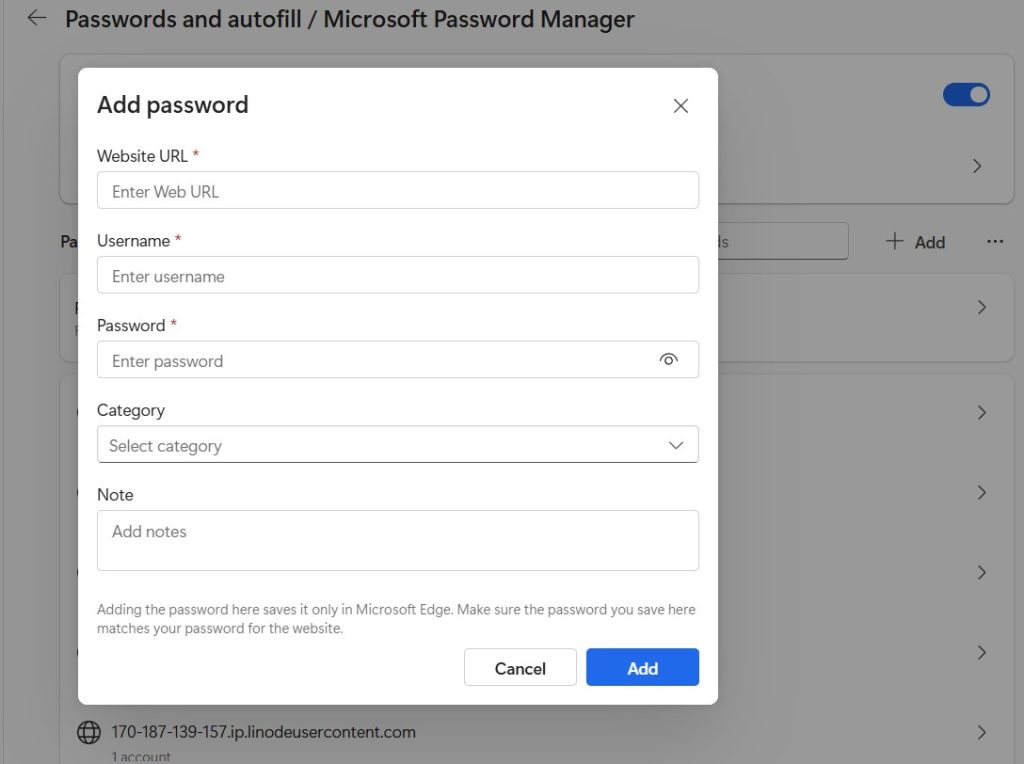
Go to Passwords and autofill → Microsoft Password Manager.
Go to Passwords > +Add
Step 3: Turn On Password Saving Features
Enable the following toggles:
- Ask to save passwords
- Autofill passwords and passkeys
Once enabled, Edge will prompt you to save your login details whenever you sign in to a website.
Step 4: View or Edit Saved Passwords
From the same page, you can:
- View saved passwords
- Edit usernames
- Delete incorrect entries
- Export passwords (requires Windows authentication)
Edge also includes:
- Password health check
- Password generator
These tools improve security while keeping auto-fill easy.
Method 3: Enable Auto-Fill for Payment Info (Debit/Credit Cards)
Microsoft Edge can also remember your card details to help you check out quickly when shopping online.
Step 1: Go to Settings
Open the three-dot menu → Settings.
Step 2: Open Payment Info Section
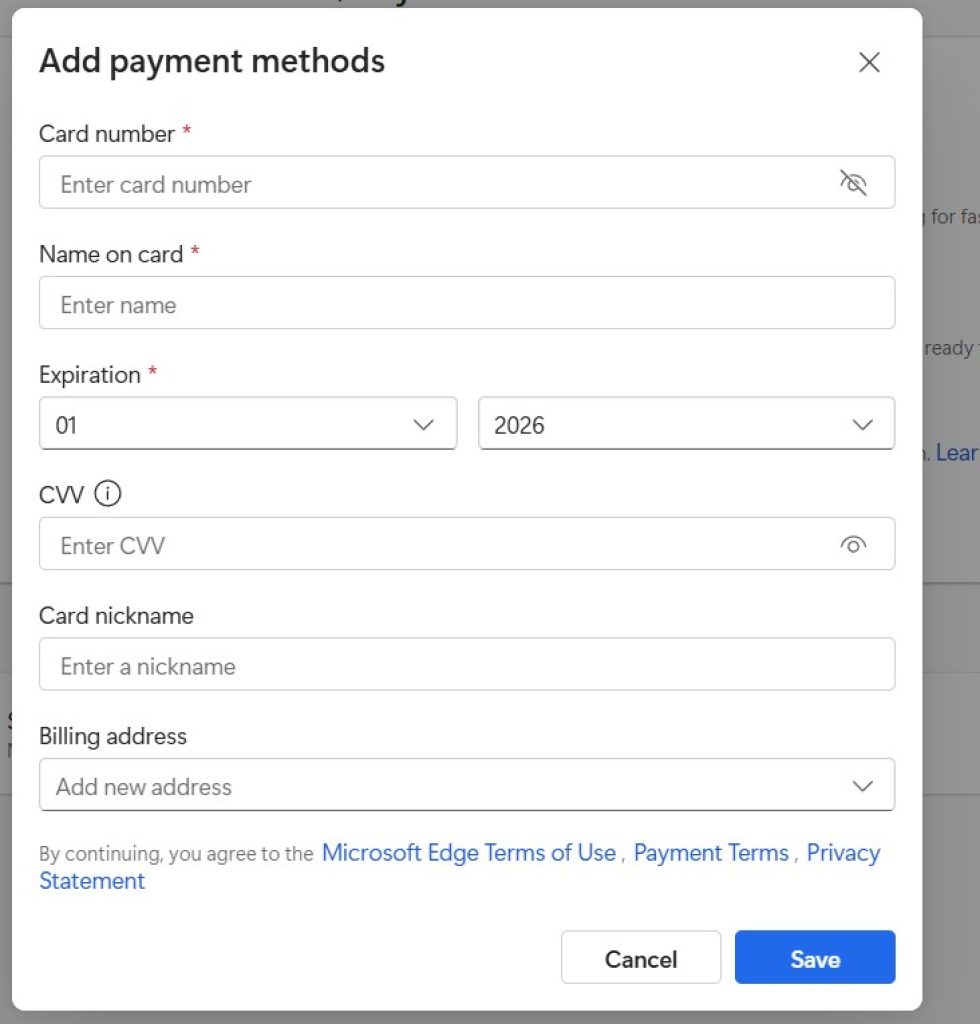
In the left sidebar, click Passwords and autofill > Payments.

Step 3: Turn On Save and Fill Payment Info
Enable:
- Save and fill payment info
Step 4: Add Payment Method
Click Add card and fill the details:
- Card number
- Cardholder name
- Expiry date
Security code (CVV) is usually asked during transactions for safety purposes.
Step 5: Use Windows Hello for Security
Enable Require authentication (Face, PIN, fingerprint) to protect your saved card information from unauthorized use.
Method 4: Enable Auto-Fill for Addresses Across Devices Using Sync
To sync personal info, passwords, and payment details across devices:
Step 1: Sign In to Edge
Sign in using your Microsoft account.
Step 2: Open Sync Settings
Go to:
Settings → Profiles → Sync
Step 3: Turn On Sync Options
Enable the following:
- Passwords
- Personal info
- Payment info (optional)
- Favorites
- History
This ensures your saved form data appears automatically on any device where you’re signed in.
Method 5: Use Profiles for Different Auto-Fill Data (Work, School, Personal)
Microsoft Edge allows multiple profiles. Each profile can have different auto-fill information.
Useful For:
- Using separate work and personal emails
- Shopping with separate cards
- Keeping office and home addresses separate
- Isolating browsing history and saved data
How to Create a New Profile
- Open Edge.
- Click your profile icon.
- Select Add profile.
- Sign in or use a local profile.
Each profile will have its own separate auto-fill data.
Advanced Auto-Fill Settings in Edge
Here are additional settings you should know:
1. Autofill Suggestions Visibility
Edge allows you to:
- Enable or disable suggestions
- Control hover suggestions
- Manage info visibility
2. Address Cleaning
Edge detects duplicate addresses and helps remove old entries.
3. Import Auto-Fill Data from Other Browsers
You can import data from:
- Chrome
- Firefox
- Safari
- Brave
How to Import
Go to:
Settings → Profiles → Import browser data
Frequently Asked Questions (FAQs)
1. Is Auto-Fill safe in Microsoft Edge?
Yes. Microsoft Edge uses secure encryption and can require Windows Hello authentication for sensitive info like payment cards.
2. Can I sync my auto-fill data across devices?
Absolutely. Just sign in with your Microsoft account and enable sync under Profiles → Sync.
3. How do I delete saved Auto-Fill information?
Go to:
- Personal info to delete saved addresses
- Passwords to delete login credentials
- Payments to delete saved cards
Click the three-dot menu next to an entry → Delete.
4. Why is Edge not auto-filling forms?
Possible reasons:
- Auto-fill toggles disabled
- Browser update required
- Sync not working
- Website blocks auto-fill
- Corrupt browser profile
5. Is it safe to store credit card information in Edge?
Yes, as long as you use Windows Hello and keep your device secure. CVV codes are not stored, adding another layer of protection.
Final Thoughts
Enabling automatic form filling in Microsoft Edge is an excellent way to enhance your browsing experience. It saves time, reduces errors, speeds up online shopping, and keeps your information organized across all your devices. With just a few steps, you can enable auto-fill for personal details, passwords, and payment information. Plus, Edge offers robust security tools like Windows Hello, password monitoring, and encrypted syncing to ensure your data stays safe.
Whether you’re a student, professional, or casual user, enabling auto-fill can make your online tasks significantly faster and hassle-free. So go ahead and set it up today—once done, you’ll wonder how you ever worked without it!