HDMI, or High-Definition Multimedia Interface, has become the go-to standard for connecting computers to external displays like monitors, TVs, and projectors. Whether you’re giving a presentation, watching a movie on a bigger screen, or setting up a dual-monitor workstation, using HDMI ensures seamless transmission of both high-quality video and audio.
While physically plugging in the HDMI cable is straightforward, many users find the actual process of enabling HDMI output on a Windows PC less intuitive. You might encounter issues like no signal, missing audio, or improper display scaling.

Thankfully, Windows offers built-in tools and settings that make switching to HDMI easy—once you know where to look. In this detailed guide, we’ll walk you through everything you need to know about switching to HDMI on your Windows PC. From physical setup to adjusting display settings, audio configurations, and troubleshooting, this article ensures a smooth and frustration-free experience.
Check Your Hardware and Cable
Before diving into software settings, ensure your hardware is correctly set up.
Inspect the Ports
Most Windows PCs and laptops come with HDMI ports, but not all of them. Some ultrabooks may only have USB-C or mini-HDMI, requiring adapters.
- Standard HDMI: Most desktops and full-size laptops have this.
- Mini HDMI: Smaller laptops or tablets may use this.
- USB-C with DisplayPort or HDMI Alt Mode: Some modern devices support HDMI output through USB-C.
- Dedicated GPU (on desktops): Make sure you’re plugging into the GPU’s HDMI port if you’re using one.
Use the Right HDMI Cable
HDMI cables come in various versions:
- Standard HDMI (up to 1080i/720p)
- High-Speed HDMI (up to 4K at 30Hz)
- Premium High-Speed HDMI (up to 4K at 60Hz)
- Ultra High-Speed HDMI (up to 10K, used with HDMI 2.1)
Step-by-Step Guide to Switching to HDMI on Windows PC
Once you’ve confirmed that your HDMI cable and ports are in good working order, it’s time to walk through the process of switching your Windows PC to HDMI. This step-by-step guide covers everything from the initial connection to adjusting your display and sound settings.
Step 1: Connect the HDMI Cable
Start by turning off both your Windows PC and the external display device (such as a monitor or TV) for safety and to prevent any potential signal issues. Connect one end of the HDMI cable to your computer’s HDMI output port. Then, plug the other end into the HDMI input port of your display device. Once securely connected, power on both devices. In many cases, Windows will automatically detect the new display and switch over; however, this doesn’t always happen, especially on older machines or non-default display configurations.
Step 2: Switch to the Correct Input Source on Your Display
On your external monitor or TV, use the remote control or physical buttons to switch the input source to the corresponding HDMI port you used. Most displays label their ports as HDMI 1, HDMI 2, etc. Make sure you select the correct one—otherwise, even with a proper connection, you’ll be left staring at a blank screen or “No Signal” message.
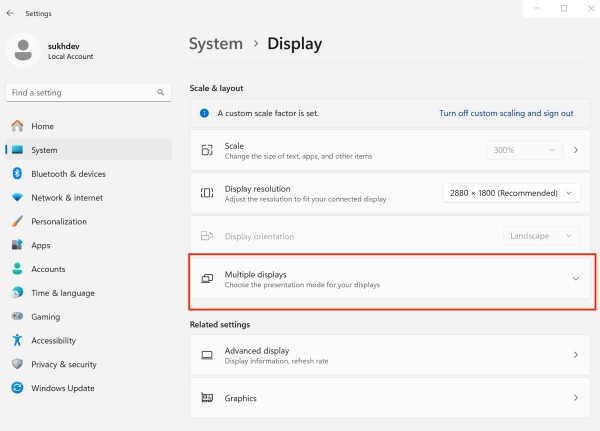
Step 3: Use Windows Display Settings to Detect the HDMI Display

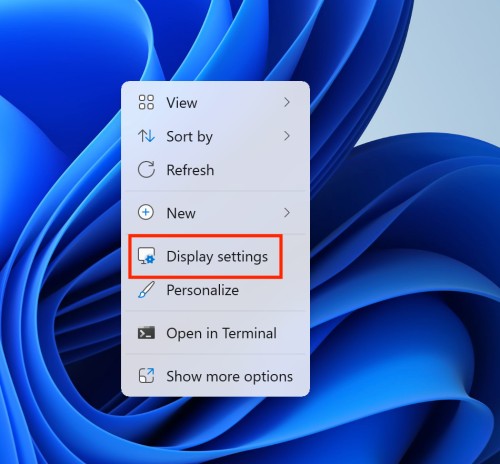
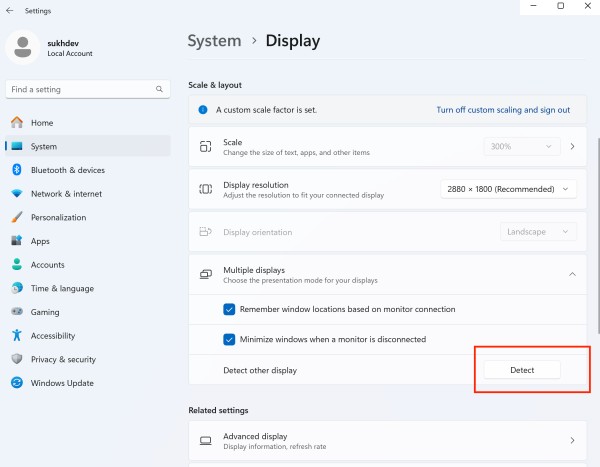
Once the physical connection is made and the input source is set correctly, go to your Windows PC. Right-click on an empty area of your desktop and select Display settings from the context menu. Under the Display section, you’ll see numbered displays representing your current screen(s). If your HDMI-connected display doesn’t appear automatically, scroll down and click the Detect button under Multiple displays. This prompts Windows to search for any new monitors connected via HDMI or other ports.
Step 4: Choose a Display Mode
Once your HDMI display is detected, scroll down to the Multiple displays dropdown menu. Here, you can choose how the second screen should function:
- Duplicate these displays – Shows the same content on both your PC screen and the HDMI display. Ideal for presentations or mirroring content.
- Extend these displays – Expands your desktop across both screens, allowing multitasking across two separate workspaces.
- Show only on 1 / Show only on 2 – Displays content only on the selected monitor. For example, “Show only on 2” turns off the laptop screen and displays only on the HDMI-connected monitor.
Choose the desired option based on your needs, and click Apply to finalize the change.
Step 5: Adjust Resolution and Orientation
After selecting the display mode, make sure the resolution is correctly set for the HDMI display. Scroll up in the same Display settings window, and under the Display resolution dropdown, choose the recommended resolution for your monitor or TV. If it’s a Full HD or 4K display, ensure that the PC is sending the proper signal—especially if the text or UI elements look blurry. You can also adjust the orientation (landscape or portrait) and the display order by dragging and reordering the numbered screens to reflect your physical layout. This is particularly helpful when using extended mode with dual monitors.
Step 6: Set HDMI Display as Primary (Optional)
If you plan to use the HDMI-connected display as your main screen—especially useful when connecting a laptop to a larger monitor—you can designate it as your primary display. In the Display settings window, select the HDMI monitor (usually labeled as Display 2), and then check the box that says Make this my main display. This ensures your desktop icons, Start Menu, and primary taskbar all appear on the larger screen instead of the laptop panel.
Step 7: Configure HDMI Audio Output
HDMI carries both video and audio signals. However, Windows might not automatically switch your audio output from your PC speakers to the HDMI device. To manually change the audio output, right-click on the sound icon in the taskbar and choose Sounds or Open Sound settings (depending on your Windows version). In the Sound settings window, under the Output section, select your HDMI-connected display or audio device from the list. It may appear as Digital Audio (HDMI) or the name of your TV/monitor. Once selected, test the audio by playing a video or sound clip. If it doesn’t work immediately, try unplugging and re-plugging the HDMI cable, or restarting your PC.
Step 8: Use Keyboard Shortcuts to Toggle Displays (Optional)
If you frequently connect and disconnect your PC from external monitors or TVs, Windows offers a quick shortcut: Windows Key + P. Pressing this combination brings up the Project sidebar, where you can toggle between different display modes (PC screen only, Duplicate, Extend, Second screen only). This shortcut is incredibly handy when switching on the fly or troubleshooting display issues without digging through settings.
Tips for a Better HDMI Experience
- Label HDMI inputs on your display to remember which is which.
- Use HDMI 2.0+ cables for 4K or high-refresh gaming.
- If you’re using an HDMI to VGA/DVI adapter, make sure it’s active and supports audio if needed.
- Some older laptops disable HDMI until a display is detected—try closing the lid or using Project (Win + P) to force output.
Bottom Line
Switching to HDMI on a Windows PC might seem simple at first glance, but ensuring everything works correctly—from video display to high-fidelity sound—can involve multiple settings and potential adjustments. Whether you’re duplicating your laptop screen to a large TV, extending your desktop for productivity, or routing audio through an external sound system, HDMI offers an elegant and powerful solution. The key is to follow the correct sequence: verify hardware, establish a physical connection, configure display and audio settings, and, when necessary, troubleshoot with driver updates or system restarts.
With the steps laid out in this guide, even users unfamiliar with HDMI should feel confident managing connections on any Windows 10 or Windows 11 PC. As home offices and entertainment setups continue to evolve, mastering HDMI usage ensures you’ll make the most out of your digital workspace or viewing experience. And remember, the Windows + P shortcut is your best friend for quick HDMI switching!