Windows 11 comes with a beautiful design and a lot of new features. But just like older versions of Windows, sometimes you install apps or programs that you no longer use. These unused apps can slow down your computer or take up unnecessary space.
In this guide, we will show you step-by-step how to uninstall programs on Windows 11 using different methods. We’ll keep the language simple, and include screenshots (or describe where to add them) to make everything clear.
Why You Might Want to Uninstall a Program?

Over time, you may notice that your computer is running slower, storage space is filling up, or you’re just seeing too many apps you never use. These are signs that it’s a good time to uninstall some programs.
One of the biggest reasons to remove programs is to free up storage space. Some apps, especially games or creative software, can take up several gigabytes. If your hard drive is nearly full, your PC may slow down or even stop working properly.
Another reason is to improve your computer’s performance. Some apps run in the background even when you’re not using them, using up your system’s memory and processor power. Getting rid of these can help your computer run faster and smoother.
You might also want to uninstall programs that you no longer use or never meant to install in the first place. Some come pre-installed on new computers (often called “bloatware”), while others sneak in with software bundles.
Sometimes, uninstalling and reinstalling a program is the best way to fix errors or bugs. If an app isn’t working right, removing and reinstalling it can solve the issue.
Before we dive into the steps, let’s quickly look at some common reasons you might want to uninstall a program:
- It’s taking up too much space.
- You don’t use it anymore.
- It came pre-installed and you don’t need it.
- It’s slowing down your computer.
- You want to fix a problem by reinstalling it.
In short, uninstalling programs is a simple and effective way to keep your Windows 11 PC clean, fast, and organized.
Method 1: Uninstall from the Start Menu

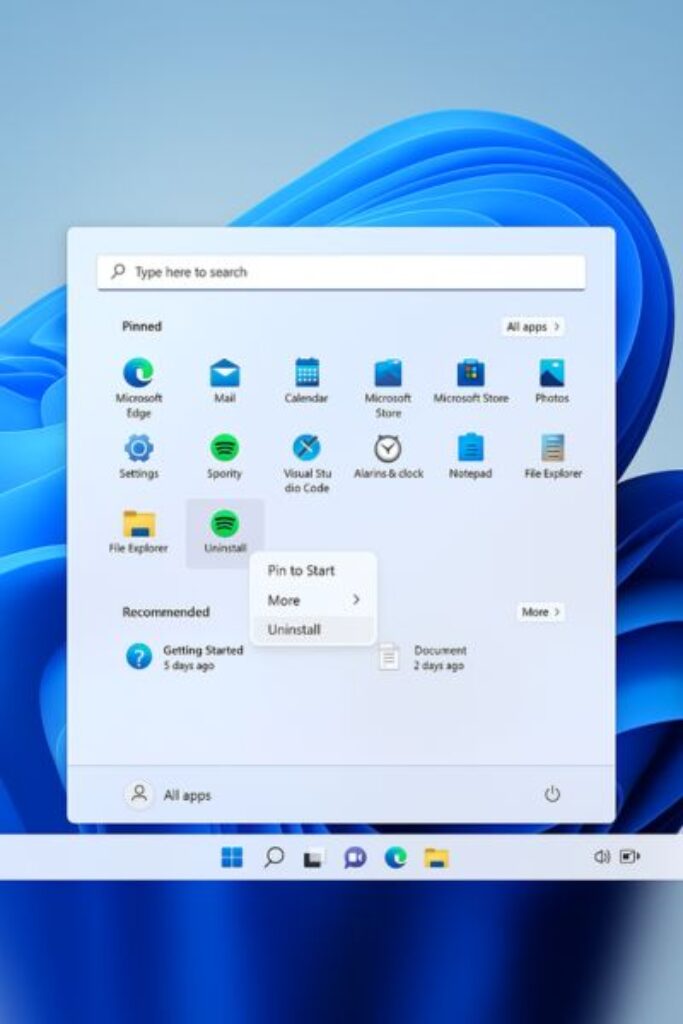
The Start Menu is one of the quickest ways to uninstall apps in Windows 11. It’s very easy to use, especially for apps that you installed from the Microsoft Store or smaller programs that don’t require a lot of setup to remove.
- Click the Start Menu
You’ll find the Start button (Windows icon) in the center of the taskbar at the bottom of your screen. Click it to open the Start Menu. - Find the Program You Want to Remove
You can either scroll through the list of installed apps or simply type the name of the app in the search bar at the top of the Start Menu. - Right-click on the App
Once you find the app you want to uninstall, right-click on it. A small menu will appear. - Click “Uninstall”
From the menu, click on the option that says “Uninstall.” - Confirm the Uninstall
Windows may show a confirmation box asking if you’re sure you want to remove the program. Click “Uninstall” again to continue. If it’s a larger program, it might open a separate uninstall window.

Method 2: Use the Settings App
This method is helpful if you want to remove multiple apps or check how much space each one takes.
Steps:
- Press Windows + I to open Settings.
- Go to “Apps” on the left-hand side.
- Click “Installed apps”.
- Scroll or search for the app you want to remove.
- Click the three-dot menu (⋮) next to the app.
- Choose “Uninstall” and confirm.
This method is great for managing many apps and checking storage use.
Method 3: Uninstall from the Control Panel (for older programs)
Some older desktop programs might not appear in the Settings app. For these, use the Control Panel.
Steps:
- Press Windows + R to open the Run box.
- Type
controland press Enter. - Click “Programs”, then “Programs and Features”.
- You’ll see a list of installed programs.
- Find and click the program you want to remove.
- Click the “Uninstall” button at the top.
- Follow any on-screen instructions to complete the uninstall.
This method is especially useful for traditional software like old games or tools.
Method 4: Use a Third-Party Uninstaller (Optional)
Sometimes, a program won’t uninstall properly. In such cases, you can use a trusted uninstaller app.
Popular Options:
- Revo Uninstaller
- IObit Uninstaller
- Geek Uninstaller
These tools can remove leftover files and registry entries.
⚠️ Note: Always download from the official website and avoid random download links.
Bonus Tips
Tip 1: Restart After Uninstalling
After uninstalling large programs, it’s a good idea to restart your computer to clear up memory and background processes.
Tip 2: Check for Leftover Files
Sometimes, even after uninstalling, a few files might stay in folders like:
C:\Program FilesC:\Program Files (x86)%AppData%
You can delete these manually—but only if you’re sure they’re safe to remove.
Tip 3: Don’t Remove System Apps (Unless You’re Sure)
Windows 11 has some built-in apps that are essential. Avoid uninstalling apps you don’t recognize unless you’ve researched them.
![How to Uninstall Programs on Windows 11? [Easy Steps]](https://www.geeksdigit.com/wp-content/uploads/2024/11/fix-gpu-keeps-crashing.jpg)
![How to Uninstall Programs on Windows 11? [Easy Steps]](https://www.geeksdigit.com/wp-content/uploads/2024/09/pc-restart-while-gaming.jpg)