Adjusting your screen brightness is a simple yet powerful way to improve your computing experience. Whether you’re working in bright daylight or a dimly lit room, managing the brightness of your display can help reduce eye strain, extend battery life, and enhance visibility. Windows 11 provides a variety of ways to control brightness levels—manually and automatically—through system settings, keyboard shortcuts, and advanced display features.
From using the Quick Settings panel to accessing deeper controls in the Settings app or Mobility Center, users have multiple options depending on their device type—laptop, tablet, or desktop with an external monitor. Windows 11 even includes features like adaptive brightness and Night Light to make screen adjustments more dynamic and eye-friendly.
Why Adjusting Brightness Is Important

Before diving into the steps, it’s worth understanding why brightness control is so vital:
- Eye Comfort: Prolonged screen exposure can cause eye strain. Adjusting brightness according to your environment reduces fatigue.
- Battery Saving: Lower brightness levels consume less power, extending your laptop’s battery life.
- Better Visibility: Too dim or too bright screens can make content hard to see. Adjusting brightness ensures optimal clarity.
- Adaptive Experience: Automatic brightness helps the screen adjust to lighting changes in your surroundings for consistent comfort.
Adjust Screen Brightness Using Quick Settings in Windows 1
The Quick Settings panel in Windows 11 offers one of the fastest and most convenient ways to adjust your screen brightness. It’s especially useful for laptop and tablet users who want instant access to frequently used settings like Wi-Fi, Bluetooth, volume, and brightness.
Step 1: Open the Quick Settings Panel
- Move your mouse cursor to the bottom-right corner of the screen.
- Click on the cluster of system icons (Wi-Fi, volume, battery).
- OR press
Windows + Aon your keyboard to open the Quick Settings panel instantly.
- OR press
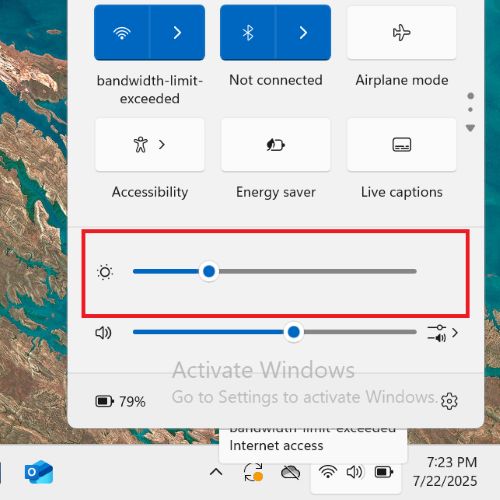
Step 2: Locate the Brightness Slider
- In the panel that appears, look for the brightness slider.
- It is usually marked with a sun icon 🌞 and sits near the volume control.
Step 3: Adjust the Brightness
- Click and drag the slider left to decrease brightness.
- Drag it to the right to increase brightness.
- The brightness will update in real time as you move the slider.
Step 4: Close the Quick Settings Panel
- Once you’ve adjusted the brightness to your liking, click anywhere outside the panel or press
Escto close it.
Optional Step: Add the Brightness Slider (If Missing)
- In the Quick Settings panel, click the pencil (✏️ Edit quick settings) icon.
- Click Add.
- Choose Brightness from the list.
- Click Done to save your changes.
This method is the fastest way to manage brightness on laptops and tablets. However, if you’re using an external monitor and the slider isn’t available, you’ll need to use your monitor’s hardware buttons or other methods explained later in this guide.
Adjust Brightness via Windows Settings
Windows Settings provides a more precise way to control brightness, especially if you want to access advanced features like Night Light or adaptive brightness. This method works on most laptops, tablets, and some all-in-one PCs.
Step 1: Open Windows Settings
- Click on the Start button (Windows icon) on the taskbar.
- Select Settings from the menu.
- Or, press
Windows + Ion your keyboard to open Settings directly.
- Or, press

Step 2: Go to the Display Settings
- In the Settings window, click on System (usually the first option on the left sidebar).
- Then, click Display on the right side.

Step 3: Locate the Brightness Slider
- Under the Brightness & color section, you’ll see a slider labeled Brightness.
- This slider lets you adjust the brightness level of your built-in display.
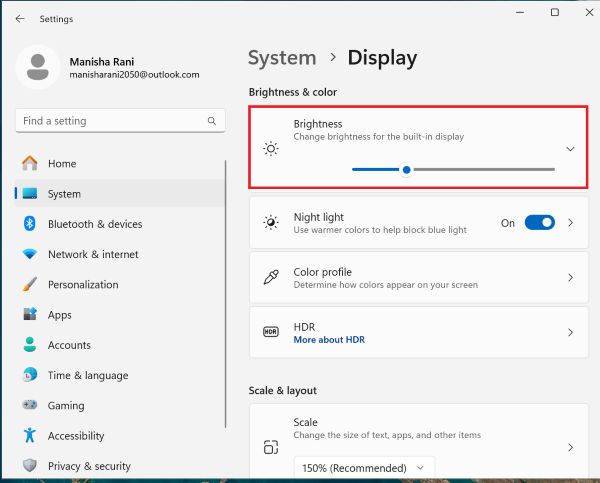
Step 4: Adjust the Brightness
- Drag the slider to the right to increase brightness.
- Drag it to the left to reduce brightness.
- The brightness will change in real time as you adjust the slider.
Step 5 (Optional): Enable Adaptive Brightness
If your device has an ambient light sensor, you’ll also see an option:
- Change brightness automatically when lighting changes.
- Toggle this option on if you want Windows to adjust your brightness based on your surroundings.
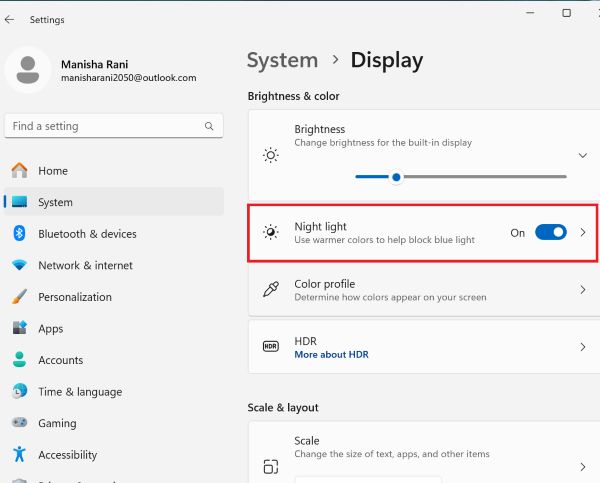
Step 6 (Optional): Enable Night Light
- Just below the brightness slider, you’ll see Night light.
- Toggle this on to reduce blue light for more comfortable viewing at night.
- Click on Night light settings to set schedules and adjust the color temperature.
When to Use This Method
- If the brightness slider is missing in Quick Settings.
- When setting up brightness automation or Night Light.
- For precise control during work, reading, or multimedia viewing.
This method is ideal for users who want more control and customization over their display settings in Windows 11.
Use Third-Party Brightness Tools
If Windows controls are limited or not functioning correctly, you can use reliable third-party apps to manage brightness.
Popular Tools:
- Twinkle Tray: Allows you to control brightness for multiple monitors directly from the system tray.
- Dimmer: Lets you reduce brightness below Windows’ minimum level.
- Monitorian: A simple and clean app available from the Microsoft Store that provides easy brightness control for all connected displays.

These tools are especially helpful for multi-monitor setups where Windows doesn’t manage brightness well.
Troubleshooting: Brightness Slider Missing or Not Working
Update Display Drivers
- Open Device Manager (
Win + X→ Device Manager). - Expand Display adapters.
- Right-click your graphics driver (Intel, AMD, or NVIDIA) → click Update driver.
- Choose Search automatically or manually install from manufacturer’s site.
Roll Back Driver
Sometimes, new drivers break brightness controls:
- Open Device Manager → right-click your display adapter.
- Select Properties → Driver tab → Roll Back Driver (if available).
Reinstall Display Adapter
- In Device Manager → right-click the adapter → Uninstall device.
- Restart your PC to reinstall it automatically.
Enable Generic Monitor Driver
- In Device Manager → expand Monitors.
- Right-click Generic PnP Monitor → Enable (if disabled).
Adjust Brightness on External Monitors
Unlike laptops, desktop monitors usually require manual adjustment:
- Use physical buttons on your monitor to access the OSD (On-Screen Display).
- Navigate to the Brightness/Contrast section and adjust accordingly.
- Some monitors support DDC/CI, allowing brightness control via apps like ClickMonitorDDC or Monitorian.
Additional Tips for Managing Brightness Effectively
- Use Dark Mode: Reduces strain and brightness contrast in low-light environments.
- Enable Battery Saver Mode: This automatically lowers brightness when battery power is low.
- Use Eye-Care Software: Apps like f.lux can automatically adjust brightness and color temperature throughout the day.
- Keep Your Drivers Updated: Always ensure your display and chipset drivers are current for optimal performance.
- Calibrate Display Colors: For accurate brightness and color balance, use Settings > Display > Advanced display settings > Calibrate display color.
Frequently Asked Questions (FAQs)
Why is the brightness slider missing in Windows 11?
The brightness slider may be missing if you’re on a desktop with an external monitor or if your graphics/display drivers are outdated. Try updating or reinstalling your drivers from Device Manager.
How do I automatically adjust brightness based on time or lighting?
Enable adaptive brightness in Settings > System > Display (if your device supports it), or use f.lux for time-based brightness and color temperature adjustment.
Can I adjust brightness on a desktop monitor using software?
Yes, if your monitor supports DDC/CI, you can use tools like ClickMonitorDDC or Monitorian to change brightness from within Windows.
Conclusion
Adjusting screen brightness in Windows 11 is a simple yet impactful action that can enhance your comfort, preserve battery life, and reduce eye strain. Whether you prefer quick settings, keyboard shortcuts, or more advanced methods like PowerShell commands or graphics control panels, Windows 11 gives you multiple ways to control display brightness to your liking.
This guide covered some easiest ways to change brightness, troubleshooting missing sliders, and working with third-party tools. For those who often switch between different lighting environments, features like Night Light and adaptive brightness can automate the process and improve user experience.
If you are using external displays, don’t forget that adjusting brightness often requires hardware interaction unless your monitor supports DDC/CI. Keeping your display drivers updated is also essential for ensuring these features work seamlessly. With the right settings, you can tailor your screen’s brightness to any situation—whether you’re working hard or just relaxing.