Windows 11 comes packed with many built-in features that enhance your computing experience. Some of these features are enabled by default, while others are optional and can be turned on or off depending on your needs. Knowing how to manage these Windows features can help you customize your system, improve performance, and even add new functionality.
In this article, we will explore how to turn Windows features on or off in Windows 11. We will cover what Windows features are, why you might want to enable or disable them, and provide a step-by-step guide on how to do it. Plus, we’ll discuss some popular features you might find useful.
What Are Windows Features?
Windows Features are optional components built into the Windows operating system. They include things like:
- Internet Information Services (IIS) for running websites locally
- Hyper-V for virtualization
- Legacy tools like Telnet client
- .NET Framework for running certain applications
- Windows Subsystem for Linux (WSL) for running Linux apps
Not all users need every feature, so Microsoft allows you to turn these features on or off. Turning off unused features can free system resources, improve security, or simply reduce clutter.
Why Turn Windows Features On or Off?
There are several reasons why you might want to manage Windows features:
- Performance Optimization
Disabling unused features can save memory and CPU power, making your computer run faster. - Security
Turning off unnecessary features reduces the potential attack surface for malware or hackers. - Adding Functionality
Sometimes you need to enable a feature to run a specific app or service, like enabling Hyper-V to create virtual machines. - Troubleshooting
Turning a feature off and on again can fix problems related to that component.
How to Turn Windows Features On or Off in Windows 11
Windows 11 makes it easy to manage features through a dedicated control panel. Follow these simple steps to enable or disable Windows features:
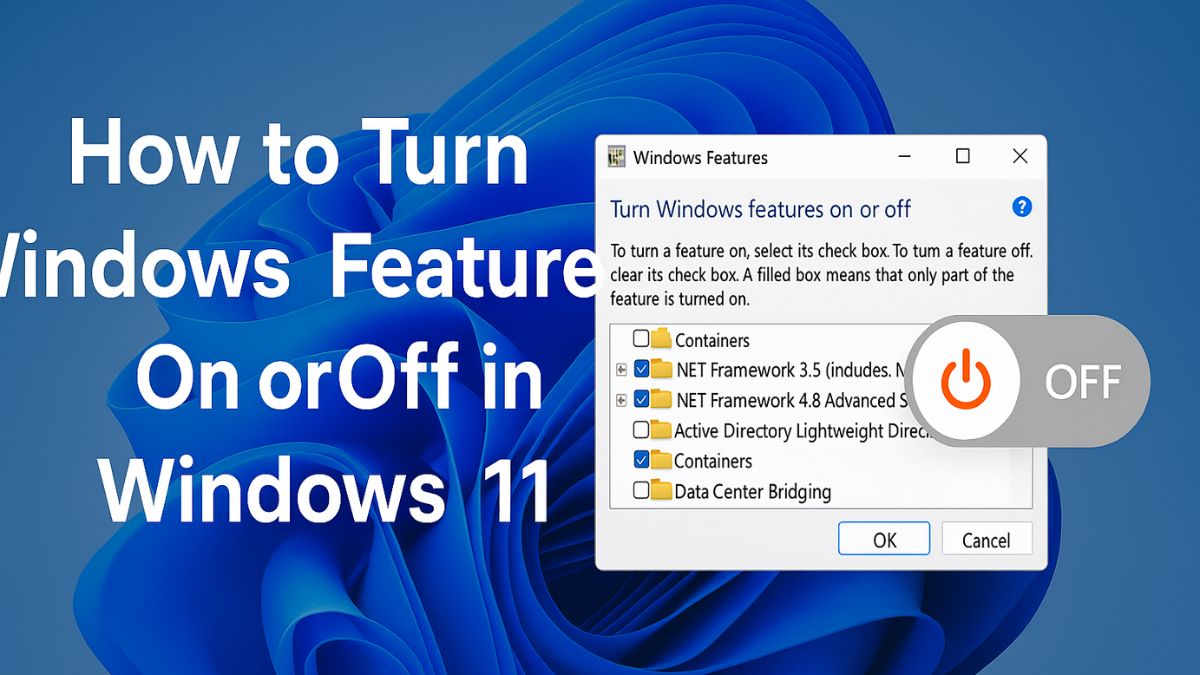
Step 1: Open the Windows Features Dialog
- Click on the Start Menu (Windows icon) on your taskbar or press the Windows key on your keyboard.
- Type “Turn Windows features on or off” in the search bar.
- Click on the search result labeled “Turn Windows features on or off”. This will open a window called Windows Features.
Alternatively, you can:
- Press Windows + R to open the Run dialog.
- Type optional features and press Enter.
Step 2: View Available Windows Features
Once the Windows Features window opens, you will see a list of features with checkboxes next to them.
- Features with a checked box are currently enabled.
- Features with an unchecked box are disabled.
- Some features may have a filled box, which means only part of that feature is enabled.
Step 3: Turn a Feature On or Off
- To enable a feature, click the checkbox next to it to add a checkmark.
- To disable a feature, uncheck the box next to it.
Step 4: Confirm Your Changes
After selecting or deselecting the features:
- Click OK.
- Windows will apply the changes. This may take a few moments.
- You may be prompted to restart your computer for the changes to take effect. Save any work and click Restart now if needed.
Popular Windows Features You Might Want to Enable or Disable
Here are some common Windows features that users often manage:
1. Hyper-V
- What it is: A virtualization technology that allows you to run virtual machines.
- Why enable it: Useful for developers or IT professionals who want to test software or run multiple operating systems on one PC.
- How to use it: After enabling Hyper-V, you can create and manage virtual machines using the Hyper-V Manager.
2. Windows Subsystem for Linux (WSL)
- What it is: Allows you to run Linux command-line tools and apps directly on Windows.
- Why enable it: Great for developers who need Linux tools but don’t want to dual boot or use a virtual machine.
- Versions: WSL 2 is the latest and more powerful version; you can enable it through the Windows Features window and then install your preferred Linux distribution from the Microsoft Store.
3. .NET Framework 3.5 and 4.8
- What it is: Software frameworks required by many Windows apps.
- Why enable it: Some older or business applications depend on these frameworks.
- Note: .NET Framework 4.8 is installed by default in Windows 11; you may only need to enable 3.5 for legacy apps.
4. Internet Information Services (IIS)
- What it is: A web server feature for hosting websites locally.
- Why enable it: Developers or testers can host and test websites on their machine.
- Usage: After enabling IIS, you can configure websites and services through the IIS Manager.
5. Telnet Client
- What it is: A command-line tool for communicating with remote computers.
- Why enable it: Used for troubleshooting or connecting to legacy systems.
- Security: Telnet is not secure; use it carefully.
6. Windows PowerShell 2.0
- What it is: Older version of PowerShell.
- Why enable it: Only needed if you run legacy scripts.
Tips for Managing Windows Features
- Check dependencies: Some features depend on others. For example, enabling certain developer tools may require .NET Framework.
- Use search: If you are not sure what a feature does, search online for more information.
- Be cautious: Disabling critical features can cause system instability. If unsure, it’s best to leave default settings alone.
- Restart your PC: Always restart your computer if Windows prompts you, so changes apply correctly.
- Use PowerShell: For advanced users, Windows features can also be managed via PowerShell commands for automation or remote management.
Troubleshooting When You Can’t Turn Features On or Off
Sometimes, you might encounter issues, such as:
- Error messages when enabling a feature.
- Windows not applying changes after restart.
- Features grayed out and not selectable.
How to Fix:
- Run Windows Update and install all updates.
- Use System File Checker:
- Open Command Prompt as admin.
- Type
sfc /scannowand press Enter.
- Check if your Windows version supports the feature (some features are only in Pro or Enterprise editions).
- Use DISM tool to repair system images:
- Open Command Prompt as admin.
- Type: cmdCopyEdit
DISM /Online /Cleanup-Image /RestoreHealth
- Restart your PC and try again.
Final Thoughts
Managing Windows features in Windows 11 is a simple yet powerful way to tailor your PC to your specific needs. Whether you are a casual user wanting to streamline your system or a professional needing advanced tools like Hyper-V or WSL, knowing how to turn these features on or off gives you greater control over your computing environment. Disabling unnecessary features can improve system performance and security, while enabling the right ones can unlock new capabilities.
Always remember to proceed with caution—only turn off features you’re sure you don’t need, and keep your system updated to avoid compatibility issues. Using the Windows Features dialog or PowerShell commands provides flexibility whether you prefer a graphical interface or command-line control.
With this knowledge, you can optimize your Windows 11 experience, making your PC faster, safer, and better suited for your tasks. Take advantage of these tools today and customize Windows 11 exactly how you want it.