Geeksdigit Team
Solid-state drives have become the backbone of modern computing, delivering the fast boot times, quick file transfers, and snappy application loading that Windows 11 users expect. But like any piece of hardware, an SSD relies on firmware — the low-level software embedded directly on the drive’s controller chip — to manage everything from data read/write operations to wear leveling, garbage collection, and communication with your motherboard.
Firmware updates for SSDs aren’t just routine housekeeping. Manufacturers regularly release them to patch bugs that can cause random freezes, fix compatibility issues with certain chipsets, improve performance and endurance, and in some cases, resolve serious problems like data corruption or drives that suddenly disappear from the system. If you’ve noticed your SSD behaving oddly, or you simply want to make sure your storage is running on the most stable and optimized version of its internal software, updating the firmware is a smart move.

That said, firmware updates are inherently more delicate than a typical software update. Because firmware controls how your SSD stores and retrieves data at the most fundamental level, an interrupted or failed update can, in rare cases, render a drive unusable. This makes preparation just as important as the update process itself.
This guide walks you through everything you need to know about updating SSD firmware on Windows 11: how to check your current firmware version, four reliable methods to perform the update, common pitfalls to avoid, and answers to the questions people ask most often about this process. Whether you own a Samsung 990 Pro, a WD Black SN850X, a Crucial T700, or a Kingston NV2, the general principles here will apply, even though the specific tools differ by brand.
Before You Begin: Preparation Checklist
Before jumping into any of the methods below, take a few minutes to prepare properly. Skipping this step is the single biggest reason firmware updates go wrong.
Back up your data. This is non-negotiable. While firmware update failures are uncommon, they do happen, and when they do, the drive can become inaccessible. Copy your important files to an external drive, a second internal drive, or a cloud service before you start.
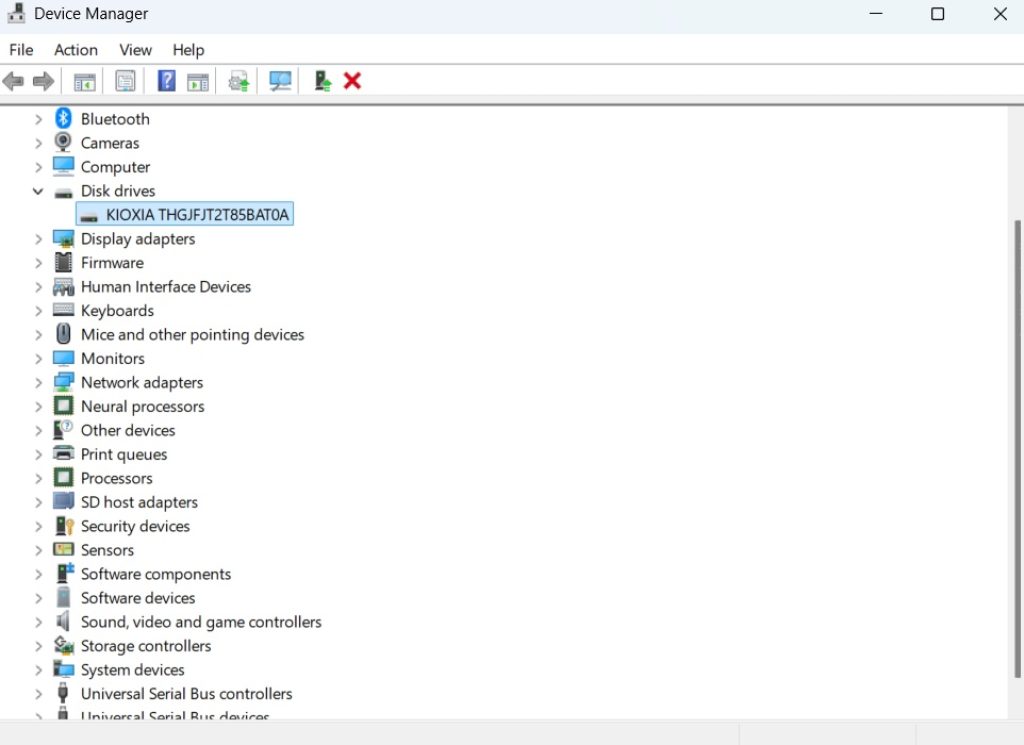
Identify your exact SSD model. Firmware packages are model-specific, and sometimes even specific to a particular capacity or hardware revision within the same product line. Installing the wrong firmware file, if a tool even allows it, can damage the drive. You can find your SSD’s exact model number in Windows by opening Device Manager, expanding Disk drives, and reading the full device name. Alternatively, use a tool like CrystalDiskInfo, which displays the model, firmware version, and health status in one place.
Check your current firmware version. You’ll want to know this so you can confirm whether an update is actually available and verify success afterward. CrystalDiskInfo, the manufacturer’s own utility, or Windows PowerShell can all show this information.
Ensure a stable power supply. For desktops, consider using a UPS (uninterruptible power supply) if you have one. For laptops, plug into AC power and make sure the battery is charged above 50%. A power interruption mid-update is one of the few scenarios that can genuinely brick a drive.
Close background applications. Disable antivirus scans temporarily, close any programs that write to disk, and avoid running other intensive tasks during the update.
With that groundwork done, let’s look at the four main ways to update SSD firmware on a Windows 11 system.
Method 1: Using the Manufacturer’s Dedicated Software
The most common and generally safest way to update SSD firmware is through the manufacturer’s own management utility. Nearly every major SSD brand offers a free application that handles firmware updates alongside drive health monitoring, secure erase, over-provisioning, and performance optimization.
Popular examples include:
- Samsung Magician for Samsung SSDs
- Western Digital Dashboard for WD and SanDisk drives
- Crucial Storage Executive for Crucial SSDs
- Kingston SSD Manager for Kingston drives
- SK hynix / Solidigm Toolbox for those respective brands
- ADATA SSD Toolbox for ADATA and XPG drives
Here’s the general process, which is broadly similar across all these tools:
- Download the correct utility from the manufacturer’s official website. Avoid third-party download sites, since firmware tools are a common target for bundled malware.
- Install and launch the application. It should automatically detect any supported SSDs connected to your system.
- Navigate to the firmware or drive information section. The software will display your current firmware version and check online for a newer version.
- Review the release notes. Reputable manufacturers list what each firmware version fixes or improves. This helps you understand whether the update addresses an issue you’re actually experiencing.
- Start the update process. The software will typically ask you to close other applications and confirm you want to proceed. Some tools require a system restart to apply the update outside of the normal Windows environment, since firmware can’t safely be flashed while the OS is actively reading from and writing to the drive.
- Let the process complete without interruption. This can take anywhere from a few seconds to a couple of minutes. Do not turn off your PC, close the laptop lid, or unplug anything during this window.
- Verify the update. Reopen the utility afterward to confirm the firmware version has changed to the expected number.
This method is recommended for most users because the software is purpose-built for your exact drive, includes built-in safety checks, and reduces the chance of applying incompatible firmware.
Method 2: Updating Firmware via Bootable USB Tool
Some manufacturers, particularly for enterprise-grade or older consumer SSDs, don’t offer a Windows-based one-click updater. Instead, they provide a firmware update package designed to run from a bootable USB drive, outside of Windows entirely. This approach flashes the firmware in a minimal, isolated environment (often a lightweight Linux or DOS-based system), which reduces the risk of Windows background processes interfering with the update.
Here’s how this method typically works:
- Download the firmware ISO or update package from the manufacturer’s support page for your specific model.
- Create a bootable USB drive. Tools like Rufus (free and widely used) can write the ISO to a USB stick. Open Rufus, select your USB drive, choose the downloaded ISO as the boot selection, and click Start. This will erase the USB drive’s existing contents, so use a spare one.
- Restart your computer and boot from the USB drive. You’ll usually need to press a key like F12, F11, Esc, or Delete during startup to access the boot menu, then select the USB device. If it doesn’t appear, you may need to adjust boot order or disable Secure Boot temporarily in your UEFI/BIOS settings.
- Follow the on-screen instructions in the bootable environment. These tools are usually text-based or have a simple menu interface. You’ll typically select the target drive from a list and confirm the firmware update.
- Wait for completion, then remove the USB drive and reboot normally back into Windows 11.
- Confirm the new firmware version using CrystalDiskInfo or the manufacturer’s Windows utility.
This method requires more manual steps and comfort navigating BIOS/UEFI menus, but it’s often the only option for certain drives, especially data center or NAS-oriented SSDs, and it can also be a fallback if the Windows-based utility fails to detect your drive properly.
Method 3: Updating Firmware Through NVMe Command Line Tools
For more advanced users, or in situations where a graphical utility isn’t available or isn’t working correctly, firmware can be updated directly through command-line tools that speak to the drive using the NVMe protocol.
The most relevant tool here is nvme-cli, which has a Windows-compatible build, though it’s more commonly associated with Linux. On Windows, some manufacturers also expose firmware update functionality through their own command-line utilities that ship alongside or instead of a GUI.
A general workflow looks like this:
- Download the firmware binary file (often with a
.binor similar extension) from the manufacturer’s site, along with any command-line utility they provide. - Open Command Prompt or PowerShell as Administrator. Right-click the Start button and select “Terminal (Admin)” or “Windows PowerShell (Admin).”
- Identify your drive using a command such as:
wmic diskdrive list briefor, if using nvme-cli:
nvme list- Download the firmware image to the drive’s firmware slot using a command like:
nvme fw-download /dev/nvme0 --fw=firmware_file.bin(On Windows, device paths and exact syntax vary by tool, so always refer to the specific documentation provided with the firmware package.) 5. Activate the new firmware with a commit command, which tells the controller to switch to the newly loaded firmware slot, sometimes immediately and sometimes after the next reboot:
nvme fw-commit /dev/nvme0 --slot=1 --action=1- Reboot the system if required, then verify the firmware version using
nvme listornvme id-ctrl.
This method offers the most control and transparency about exactly what’s happening, but it also carries the highest risk of user error since there’s no graphical confirmation dialog holding your hand. It’s best suited for IT professionals, enthusiasts comfortable with command-line tools, or situations involving servers and multiple drives where scripting the update makes sense.
Method 4: Updating Firmware via Windows Update or OEM System Updates
A fourth, often overlooked, path is through Windows Update itself or through your PC manufacturer’s own system update utility (such as Dell Command Update, Lenovo Vantage, or HP Support Assistant). Some SSD firmware updates, particularly for drives that came pre-installed in laptops and prebuilt desktops, are distributed this way rather than through the SSD manufacturer’s own tools.
Steps for this method:
- Open Settings by pressing
Windows + I. - Go to Windows Update, then click Advanced options, and check Optional updates. Driver and firmware updates sometimes appear here separately from regular cumulative updates.
- Install any listed driver or firmware updates relevant to storage controllers or your specific SSD.
- Alternatively, check your OEM’s update tool. If your PC came from Dell, HP, Lenovo, Asus, or another major manufacturer, their proprietary update software often bundles storage firmware updates validated specifically for that system configuration. This can actually be safer than a generic manufacturer tool in some cases, since the OEM has tested the firmware against your exact motherboard and BIOS combination.
- Restart when prompted to allow the update to apply.
- Verify the update afterward using Device Manager or CrystalDiskInfo.
This method is convenient because it requires no manual downloading or drive identification, but it’s also the least predictable. Not all firmware updates get pushed through Windows Update, and there can be a delay of weeks or months between a manufacturer releasing new firmware and it appearing through this channel. Treat this as a supplementary check rather than your primary method if you’re trying to resolve a specific known issue.
Comparing the Four Methods
| Method | Best For | Risk Level | Ease of Use |
|---|---|---|---|
| Manufacturer software | Most home users | Low | Easy |
| Bootable USB tool | Drives without Windows utilities | Medium | Moderate |
| Command-line (nvme-cli) | IT professionals, servers | Medium-High | Advanced |
| Windows Update / OEM tools | Laptop and prebuilt PC users | Low | Easy |
For the vast majority of people, starting with Method 1 (manufacturer software) and falling back to Method 4 (OEM tools) if nothing is available covers nearly every situation. Methods 2 and 3 exist primarily for edge cases and advanced use.
FAQ
Do I actually need to update my SSD firmware? Not always. If your drive is working reliably, performing well, and you’re not experiencing any known issues that a firmware update addresses, there’s no urgent need to update. However, applying firmware updates that fix documented bugs, especially ones related to data integrity, random disconnects, or thermal throttling, is generally worthwhile.
Will updating firmware erase my data? Typically no. The vast majority of firmware updates are designed to preserve user data. That said, a small number of updates, particularly major version jumps, explicitly warn that they will wipe the drive. Always read the release notes and instructions provided with the specific firmware package before proceeding, and back up your data regardless.
What happens if the update fails or is interrupted? This is the primary risk with firmware updates. An interruption, such as a power loss or forced shutdown during the flashing process, can leave the drive in a corrupted or unbootable state. Many modern SSD controllers include safeguards, like dual firmware banks, that allow the drive to fall back to the previous working firmware if an update doesn’t complete cleanly, but this protection isn’t universal across all models. This is why using a stable power source and avoiding interruptions is so important.
Can I update firmware on my Windows 11 boot drive? Yes, most manufacturer tools support updating the firmware of the drive Windows is currently running from. The utility will usually schedule the update to occur either immediately in a way that doesn’t require active OS access to the drive, or on the next restart, before Windows fully loads.
How often do SSD manufacturers release firmware updates? This varies widely. Some manufacturers release updates every few months, especially for newer, actively supported product lines. Others may go a year or more without an update for a given model. Checking every three to six months is a reasonable cadence for most users.
Is it safe to update firmware on an SSD in a laptop running on battery? It’s best to avoid this. Always connect your laptop to AC power before starting a firmware update, even if the battery shows a high charge, to eliminate any risk of an unexpected shutdown mid-process.
What if my SSD isn’t detected by the manufacturer’s software? This can happen if you’re using a generic or OEM-branded version of a drive, if the drive is connected through certain external enclosures or RAID controllers that mask its true identity, or if you’re missing the correct NVMe or storage drivers. Try connecting the drive directly via SATA or M.2 without any external enclosure, and ensure your chipset drivers are up to date through Windows Update or your motherboard manufacturer’s site.
Does updating firmware improve SSD speed or lifespan? Sometimes. Firmware updates can include optimizations to wear-leveling algorithms, garbage collection, and thermal management that improve sustained performance and, in some cases, extend usable lifespan. However, dramatic speed increases are uncommon; most updates focus on stability, compatibility, and bug fixes rather than raw performance gains.
Conclusion
Updating SSD firmware on Windows 11 isn’t something most users need to do frequently, but knowing how to do it safely is valuable when the situation calls for it, whether you’re chasing down a mysterious system freeze, want compatibility with a new BIOS version, or simply want to keep your storage running on the most polished version of its controller software.
Of the four methods covered here, the manufacturer’s dedicated application is the right starting point for nearly everyone: it’s straightforward, includes safety checks, and is built specifically for your drive. Bootable USB tools and command-line utilities remain valuable options for drives without native Windows support or for users who want granular control, while Windows Update and OEM system tools offer a convenient, low-effort path, particularly for prebuilt systems and laptops.
Whichever method you choose, the fundamentals stay the same: confirm your exact drive model, back up your data, ensure stable power, and avoid interrupting the process once it starts. Follow that discipline, and firmware updates become a routine, low-risk part of keeping your Windows 11 system running smoothly rather than a source of anxiety.