
 Geeksdigit Team
Internet Protocol version 6 (IPv6) is the modern successor to IPv4, designed to solve the problem of address exhaustion and to support the ever-growing number of devices connected to the internet. While IPv4 relies on a limited pool of 32-bit addresses, IPv6 uses a 128-bit addressing system that offers a virtually unlimited supply of unique addresses. Windows 11 comes with IPv6 enabled by default, and Microsoft actually recommends leaving it on for most users, since many modern networks and services are optimized for it.
That said, there are legitimate reasons why someone might want to disable IPv6 on their Windows 11 machine. Some older routers, VPN clients, or corporate networks don’t fully support IPv6 and can experience connectivity hiccups when it’s active. Other users troubleshoot network issues by temporarily disabling IPv6 to see if it resolves DNS resolution delays, slow browsing, or unstable connections. On the other hand, if IPv6 has been switched off in the past — whether by an IT policy, a troubleshooting step, or a system change — you might want to turn it back on to take advantage of faster routing, better security features, and compatibility with newer network infrastructure.
Fortunately, Windows 11 gives you several ways to enable or disable IPv6, ranging from simple graphical interfaces to more advanced command-line tools. This guide walks through four practical methods, so you can choose the one that best matches your comfort level and needs. Whether you prefer clicking through menus or typing commands, you’ll find a method here that works for you.
Before diving in, it’s worth noting that in most cases, disabling IPv6 isn’t necessary and won’t meaningfully improve your internet speed or stability. If you’re experiencing network problems, it’s often better to first check for driver updates, router firmware updates, or DNS settings. Still, if you’ve decided that adjusting IPv6 is the right move for your situation, the steps below will get you there safely.
Methods to Enable or Disable IPv6 in Windows 11
Method 1: Using the Settings App
The Settings app is the most user-friendly way to manage your network adapter’s IPv6 configuration, and it’s the recommended approach for most users who aren’t comfortable with command-line tools.
Open Settings. Press Windows + I to launch the Settings app, or click the Start button and select the gear icon.
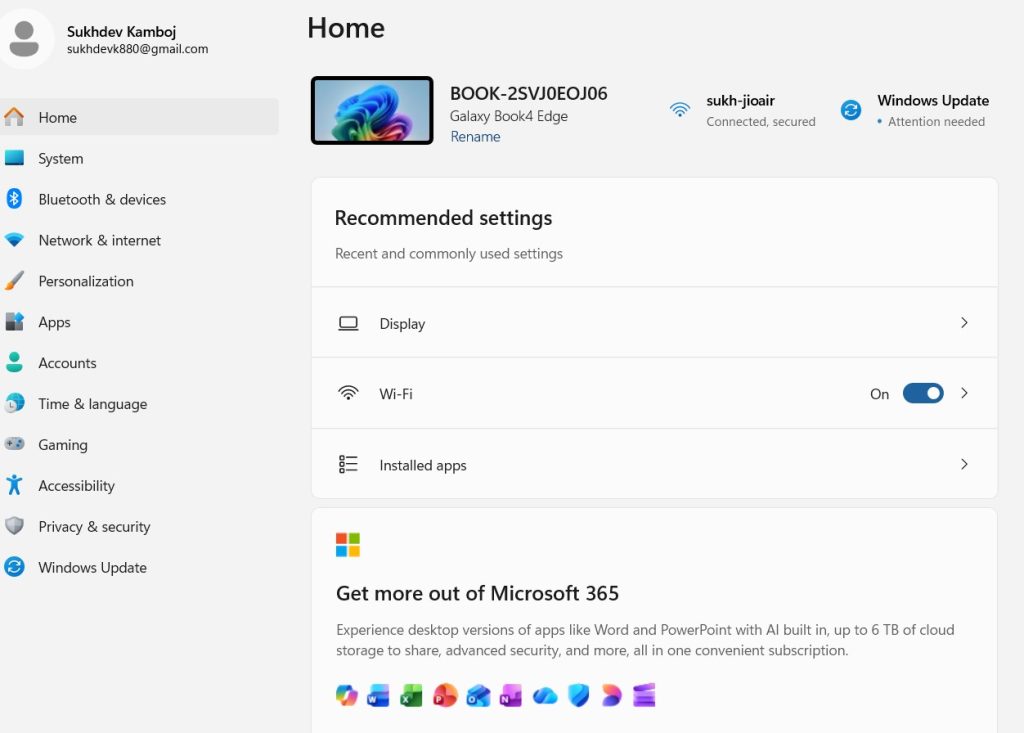
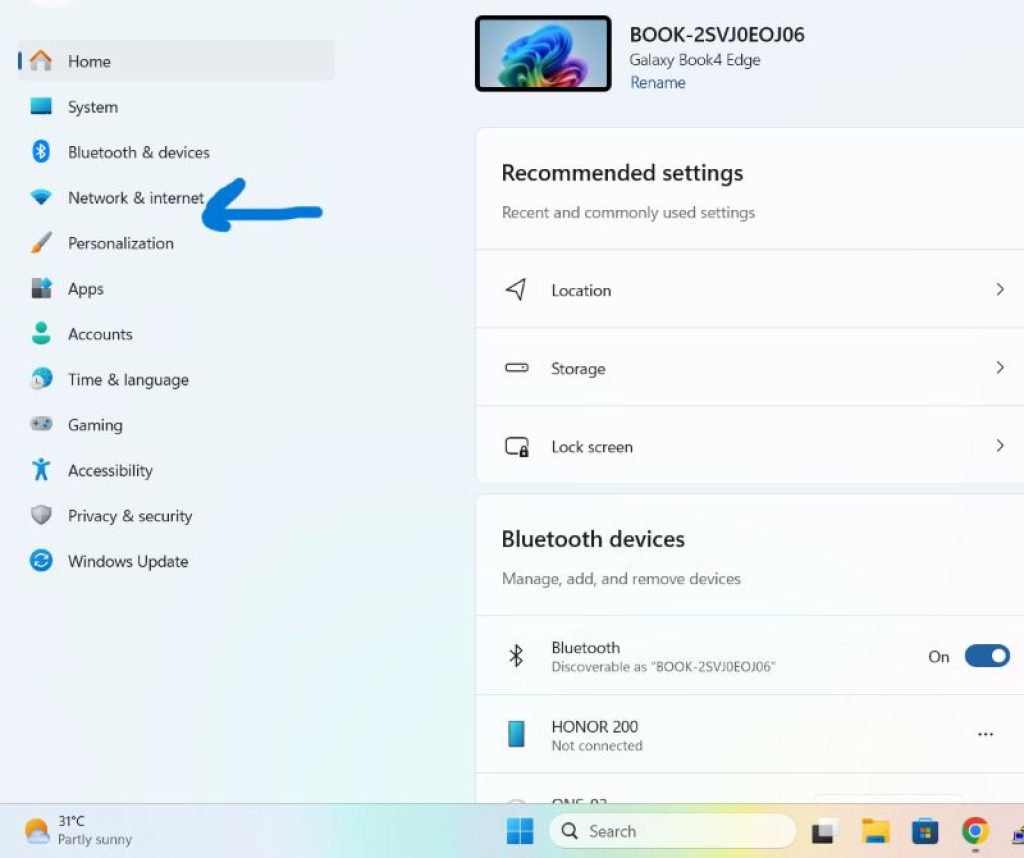
Navigate to Network & Internet. In the left sidebar, click on “Network & internet.”
Select your connection type. Depending on how your PC connects to the internet, click either “Wi-Fi” or “Ethernet.” If you’re using Wi-Fi, you’ll then need to click on the toggle of your currently connected network.
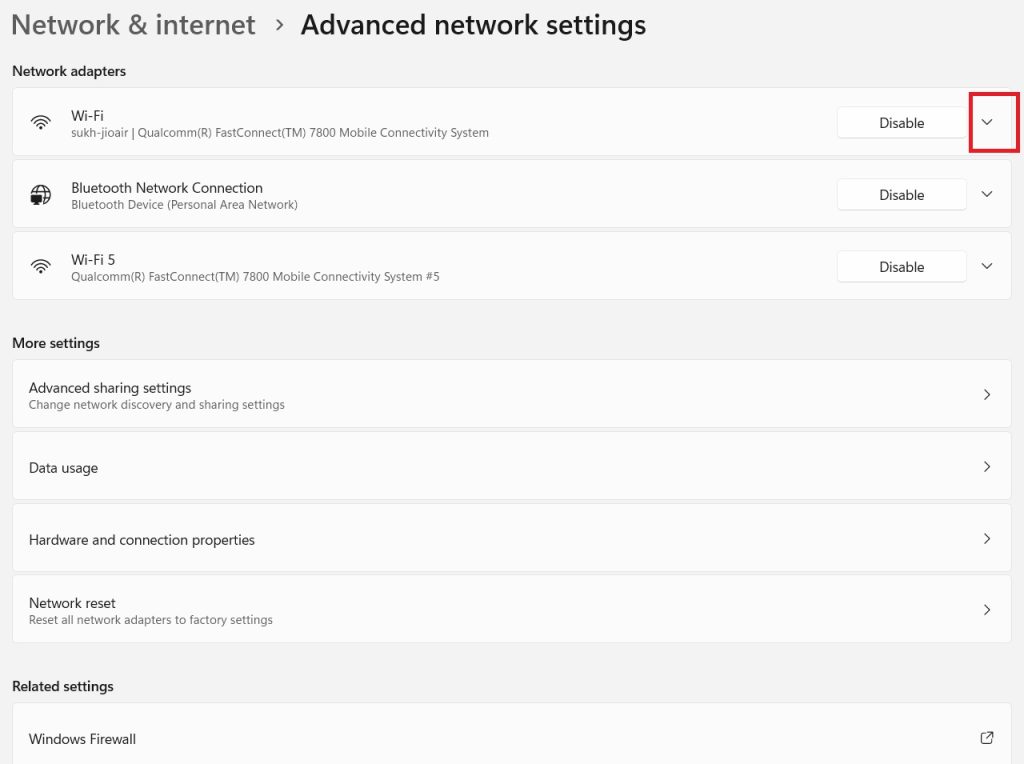
Open advanced network settings. Scroll down and click on “Hardware properties” or the network adapter name to view its details.
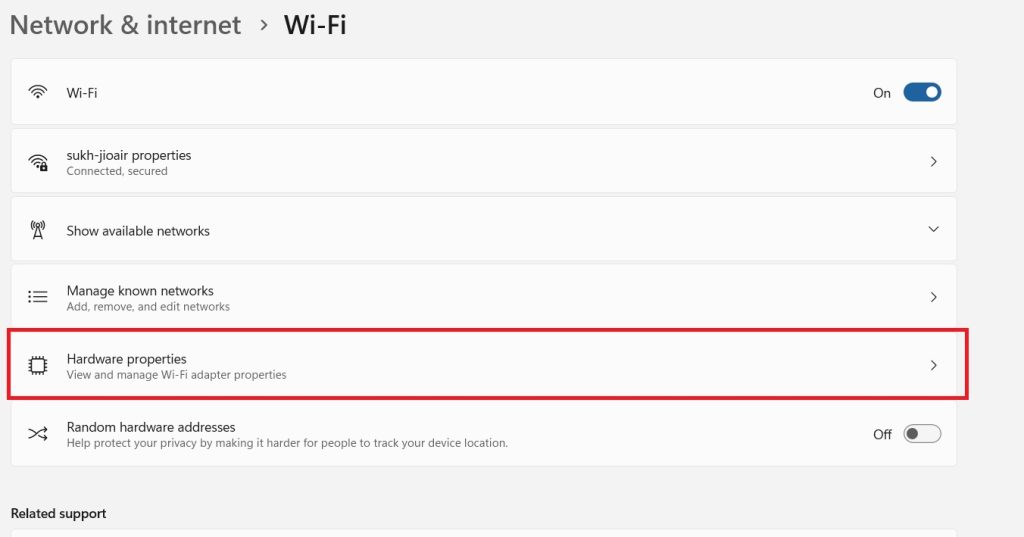
Edit IP settings. Look for an option labeled “Edit” next to IP assignment, or scroll to find IPv6 configuration options directly listed on the properties page.
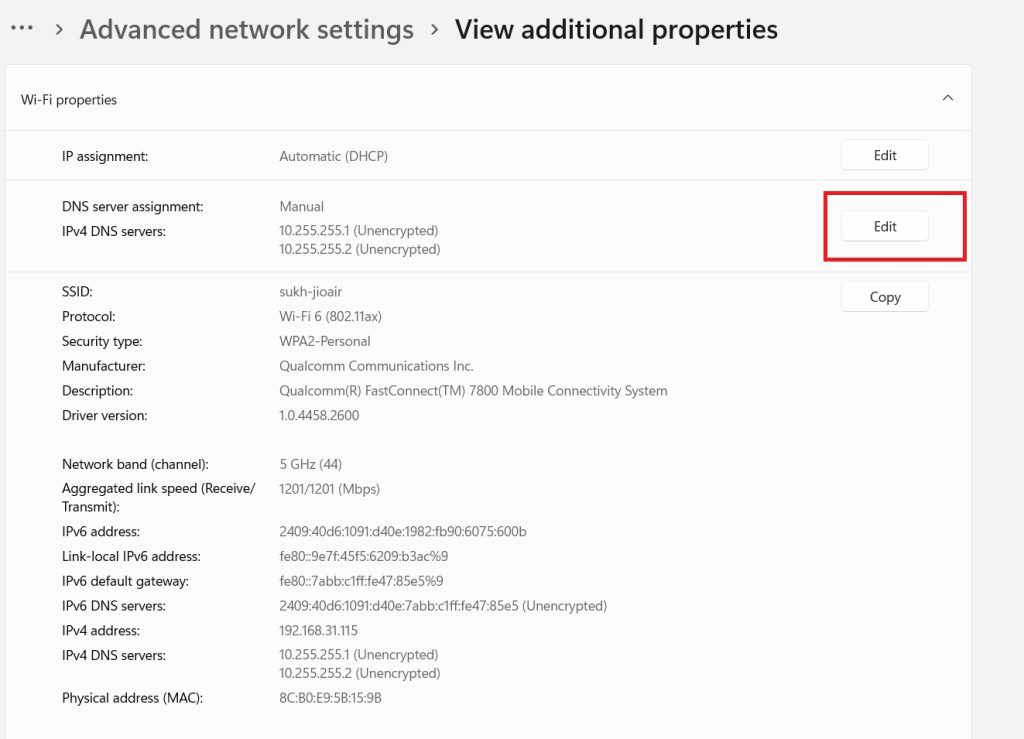
Toggle IPv6. If you see a direct toggle for IPv6, switch it to “On” or “Off” as desired. In some builds of Windows 11, you may need to click “Edit” next to IP settings, choose “Manual,” and then toggle the IPv6 switch within that dialog before saving.
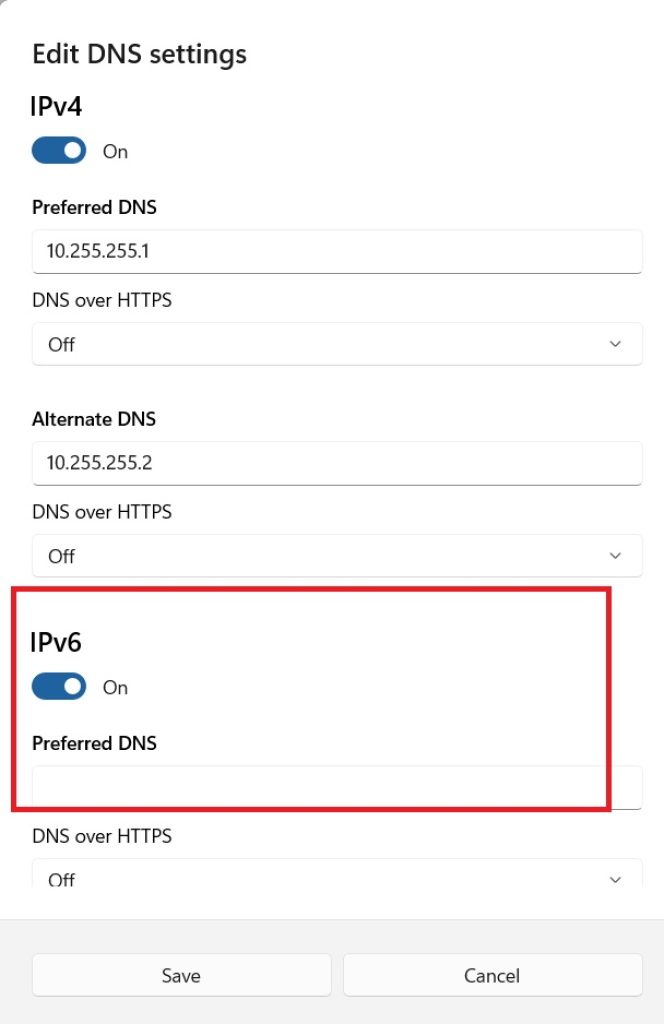
Restart if needed. After making changes, restart your PC or disable and re-enable the network adapter for the changes to fully take effect.
This method is ideal because it doesn’t require you to dig into Control Panel or use commands, and it’s less likely to cause accidental misconfigurations since the interface only exposes safe, relevant options.
Method 2: Using Control Panel (Network Adapter Properties)
For users who prefer the more traditional Windows interface, Control Panel still offers a straightforward way to enable or disable IPv6 at the adapter level.
- Open Control Panel. Click the Start button, type “Control Panel,” and press Enter.
- Go to Network and Sharing Center. Click on “Network and Internet,” then “Network and Sharing Center.” Alternatively, you can search directly for “Network and Sharing Center” in the Start menu.
- Access adapter settings. Click “Change adapter settings” in the left-hand pane. This will display a list of all your network connections, including Wi-Fi and Ethernet.
- Open adapter properties. Right-click on the network adapter you’re currently using (for example, “Wi-Fi” or “Ethernet”) and select “Properties.” You may be prompted for administrator permission.
- Locate Internet Protocol Version 6 (TCP/IPv6). In the list of items, find the checkbox labeled “Internet Protocol Version 6 (TCP/IPv6).”
- Enable or disable it. To disable IPv6, uncheck the box. To enable it, check the box. Click “OK” to save your changes.
- Close and restart. Close the Network Connections window and restart your computer to ensure the change is applied properly.
This method is particularly useful because it lets you disable IPv6 on a per-adapter basis, which is helpful if you have multiple network connections (like both Wi-Fi and Ethernet) and only want to change settings for one of them.
Method 3: Using Command Prompt (netsh)
If you’re comfortable with the command line, using Command Prompt with the netsh utility gives you precise control and is especially useful for scripting or applying changes across multiple network interfaces at once.
- Open Command Prompt as administrator. Click Start, type “cmd,” right-click “Command Prompt,” and select “Run as administrator.” Confirm the User Account Control (UAC) prompt if it appears.
- Check current interfaces. Type the following command and press Enter to see a list of your network interfaces:
netsh interface ipv6 show interface
This will display each network adapter along with an index number, which you may need for more targeted commands. 3. Disable IPv6 on a specific adapter. To disable IPv6 on a particular interface, use:
netsh interface ipv6 set interface "Wi-Fi" disabled
Replace “Wi-Fi” with the exact name of your adapter as shown in the interface list (for example, “Ethernet”). 4. Enable IPv6 on a specific adapter. To turn IPv6 back on, use:
netsh interface ipv6 set interface "Wi-Fi" enabled
- Disable IPv6 system-wide (optional, advanced). If you want to disable IPv6 more broadly across all adapters, you can also adjust the registry value described in Method 4, since
netshalone primarily manages per-interface settings. - Verify the change. Run the show interface command again to confirm the adapter’s state has updated.
- Restart your computer. This ensures the network stack fully reflects the new configuration.
This method is fast and repeatable, making it a favorite among IT professionals and power users who need to apply the same settings across many machines using scripts.
Method 4: Using the Registry Editor
The Registry Editor method offers the most granular, system-wide control over IPv6 and is typically used by advanced users or system administrators. Because editing the registry carries some risk if done incorrectly, it’s a good idea to back up your registry or create a system restore point before proceeding.
- Create a restore point (recommended). Search for “Create a restore point” in the Start menu, open System Properties, and click “Create” to make a backup you can revert to if something goes wrong.
- Open Registry Editor. Press
Windows + R, typeregedit, and press Enter. Approve the UAC prompt if asked. - Navigate to the TCP/IP parameters key. In the address bar at the top of Registry Editor, paste the following path and press Enter:
HKEY_LOCAL_MACHINE\SYSTEM\CurrentControlSet\Services\Tcpip6\Parameters
- Create or modify the DisabledComponents value. Right-click in the empty space on the right panel, choose “New,” then “DWORD (32-bit) Value.” Name it
DisabledComponents. If this value already exists, simply double-click it to edit. - Set the appropriate value. Double-click
DisabledComponentsand enter one of the following values (in hexadecimal):0— Enables IPv6 on all interfaces (default, recommended by Microsoft).0xff(orffffffff) — Disables IPv6 on all non-tunnel interfaces.0x20— Prefers IPv4 over IPv6 by modifying prefix policies, without fully disabling IPv6.
- Click OK and close Registry Editor.
- Restart your PC. A full restart is required for registry-based network changes to take effect.
This method affects the entire system rather than a single adapter, so it’s best reserved for situations where you need a permanent, system-wide change, such as in enterprise environments with specific compliance or compatibility requirements.
Conclusion
Enabling or disabling IPv6 in Windows 11 is a straightforward process once you know where to look, and the method you choose largely depends on your comfort level and the scope of the change you want to make. The Settings app and Control Panel are ideal for everyday users who want a quick, visual way to toggle IPv6 on a specific network connection. Command Prompt offers a fast, scriptable option for those managing multiple devices or interfaces, while the Registry Editor provides the deepest level of control for advanced users and system administrators who need system-wide changes.
It’s worth remembering that Microsoft generally recommends keeping IPv6 enabled, since disabling it can sometimes cause more problems than it solves, particularly with newer networking equipment, VPNs, and cloud services that are increasingly built around IPv6 support. If you’re disabling it to troubleshoot a specific issue, consider re-enabling it once you’ve identified and resolved the underlying problem, or explore alternative fixes like updating network drivers or router firmware first.
Whichever method you choose, always restart your computer after making changes to ensure your network stack fully applies the new configuration. And if you’re working in a shared or corporate environment, it’s a good idea to check with your network administrator before making system-wide changes, since IPv6 settings can sometimes be tied to broader network policies.
Frequently Asked Questions (FAQ)
1. Will disabling IPv6 improve my internet speed?
In most cases, no. Disabling IPv6 rarely results in a noticeable speed improvement, and in some situations it can actually slow things down if your ISP or router is optimized to prioritize IPv6 traffic. The idea that disabling IPv6 universally speeds up a connection is largely a myth left over from older troubleshooting advice. If you’re experiencing slow internet, it’s usually more effective to check your router’s firmware, update network drivers, or run a speed test to identify the actual bottleneck before touching IPv6 settings.
2. Is it safe to disable IPv6 permanently?
Generally, yes, it’s safe, but it’s not necessarily recommended. Windows 11 and many modern applications are designed to work smoothly with IPv6, and some newer network features or services may depend on it being active. If you disable it and don’t experience any connectivity issues, it’s fine to leave it off. However, if you notice problems accessing certain websites or services, or if your network environment changes (such as connecting to a different ISP or corporate network), you may want to re-enable it using one of the methods above.
3. What’s the difference between disabling IPv6 through Control Panel versus the Registry Editor?
Disabling IPv6 through Control Panel or the Settings app only affects the specific network adapter you select, such as your Wi-Fi or Ethernet connection. This is a more targeted, reversible change. Disabling IPv6 through the Registry Editor, on the other hand, affects the entire system at a deeper level, including all current and future network adapters, tunnel interfaces, and certain background services. The registry method is more comprehensive but also carries slightly more risk if not done carefully, so it’s best suited for advanced troubleshooting or enterprise deployment scenarios.
4. Why does my network adapter still show an IPv6 address after I disabled it?
This can happen if the change hasn’t fully taken effect yet, usually because the computer hasn’t been restarted. IPv6 settings, especially registry-based changes, often require a full system restart to apply correctly — simply disabling and re-enabling the adapter may not be enough. If you’ve restarted and still see an IPv6 address, double-check that you modified the correct adapter (if you have multiple network connections) and confirm that the DisabledComponents registry value, if used, was entered correctly and saved.





