Sukhdev Kamboj
Every Windows 11 user eventually hits a moment when the computer stops behaving. A driver update leaves the screen flickering, a newly installed program makes the system crawl, or a Windows update leaves you with a blue screen at startup. In these situations, the fastest fix is often not a reinstall or a factory reset. It is System Restore.
System Restore is a built-in Windows feature that takes periodic “snapshots” of your system files, installed programs, drivers, Windows registry settings, and other critical system data. Each snapshot is called a restore point. If something breaks, you can roll your computer back to a time when it worked properly. Windows creates restore points automatically before major events such as installing a driver, applying a significant update, or running certain installers. You can also create them manually.

An important caveat: System Restore is not a backup tool. It does not touch your personal files, such as documents, photos, music, and videos. It only reverses system-level changes. Apps and drivers installed after the restore point will be removed, and apps you uninstalled after that date may return. Even so, it is one of the safest and least destructive ways to repair a misbehaving PC.
This guide walks through every practical method for restoring Windows 11 to an earlier restore point, from the simple in-Windows approach to recovery options for computers that won’t boot at all.
Before You Begin: Check That System Protection Is Turned On
System Restore only works if System Protection is enabled for your system drive. On many Windows 11 installations it is off by default, so it’s worth checking now, even if your PC is working fine.
- Press the Windows key, type Create a restore point, and press Enter.
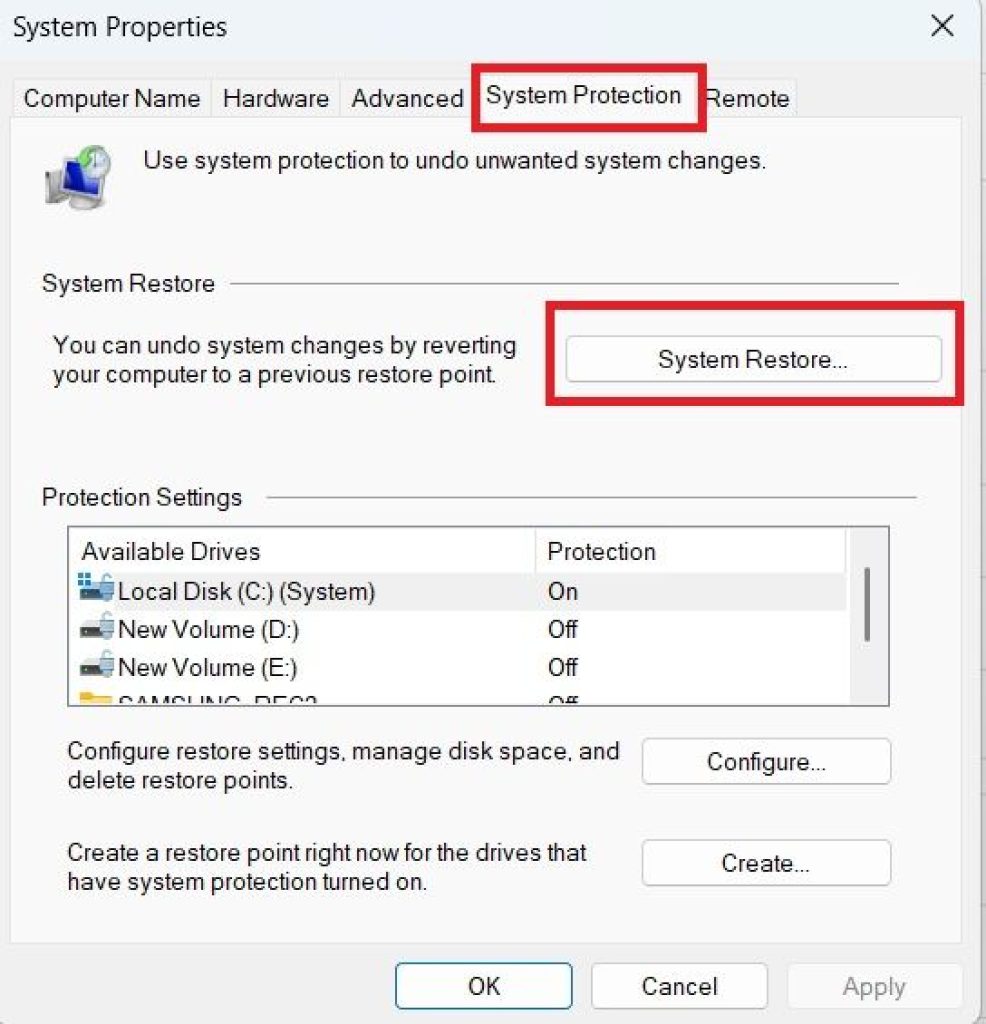
- In the System Properties window, on the System Protection tab, look at the Protection Settings list.
- If your C: drive shows Off, select it and click Configure.
- Choose Turn on system protection.
- Use the slider to set the maximum disk space for restore points. Between 5% and 10% of the drive is usually enough.
- Click Apply, then OK.
To create a restore point manually, for example before installing risky software, click Create on the same tab, give the restore point a descriptive name, and click Create again. Windows will confirm when it’s done.
Method 1: Restore from Within Windows 11 (System Restore Wizard)
This is the standard method, and it works when you can still sign in to Windows.
Press the Windows key, type Create a restore point, and open the result.
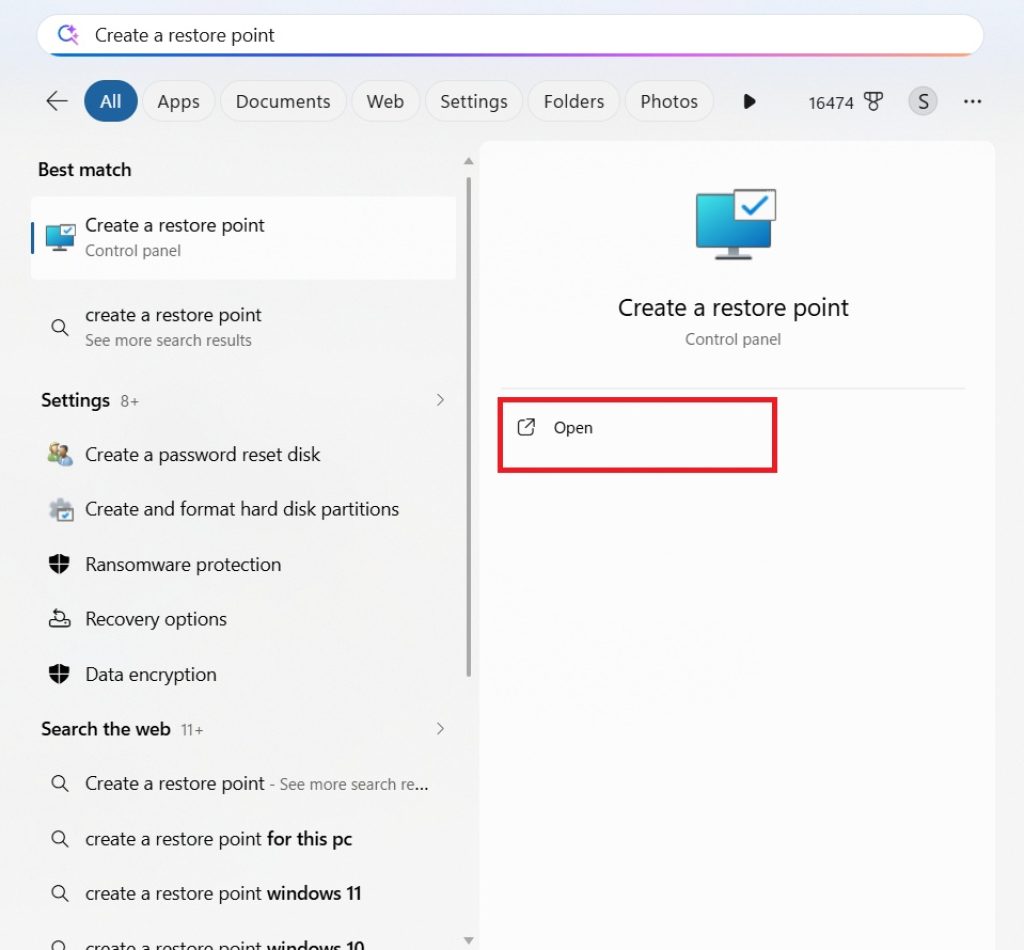
On the System Protection tab, click System Restore.
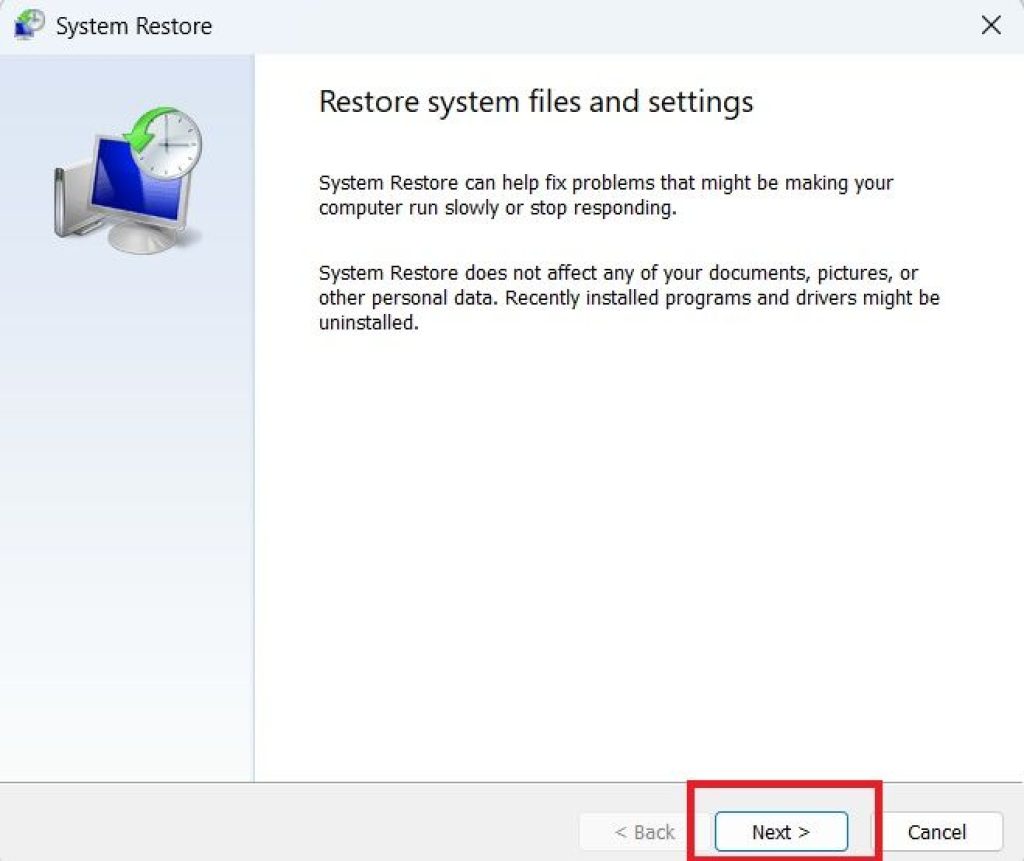
Click Next on the welcome screen. Windows may recommend the most recent restore point. You can accept it or select Choose a different restore point and click Next.
Review the list of available restore points. Each one shows a date, time, description, and type (for example, Automatic, Manual, or Install). If you don’t see older ones, tick Show more restore points.
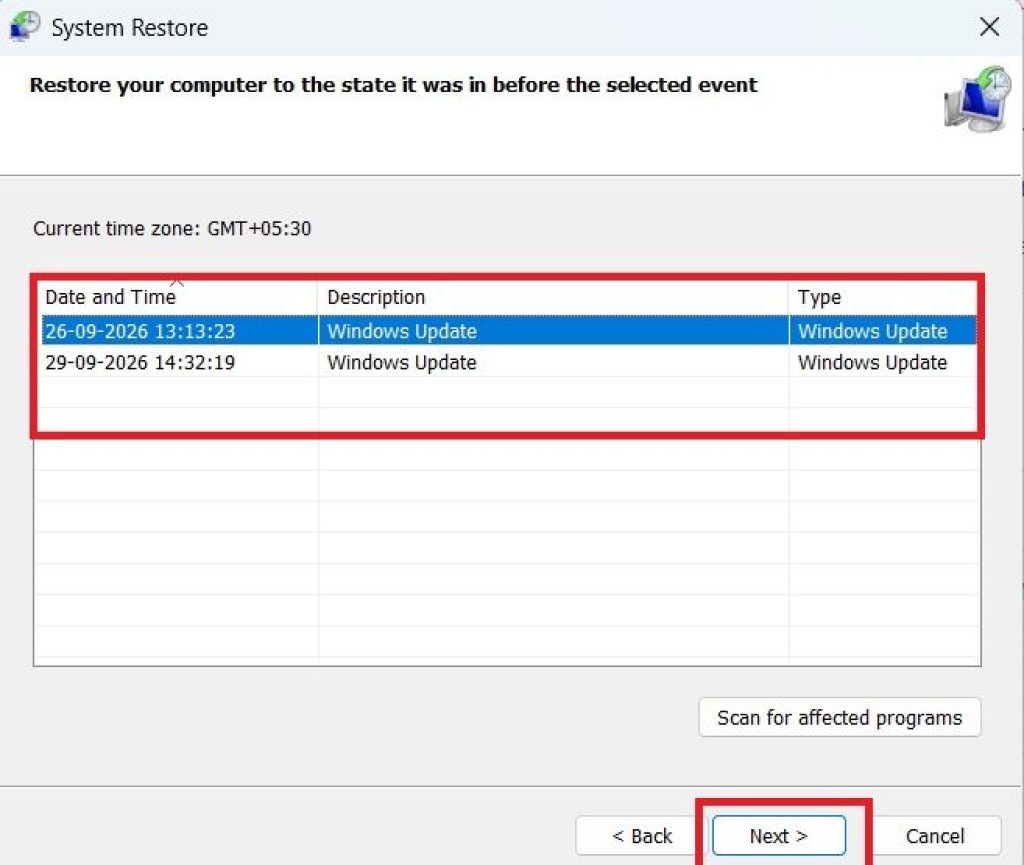
Select the restore point created before your problem began. If you’re unsure which one to pick, choose the latest one from before the trouble started.
Click Scan for affected programs. This shows exactly which programs and drivers will be removed or restored. It’s a very useful preview, so read it.
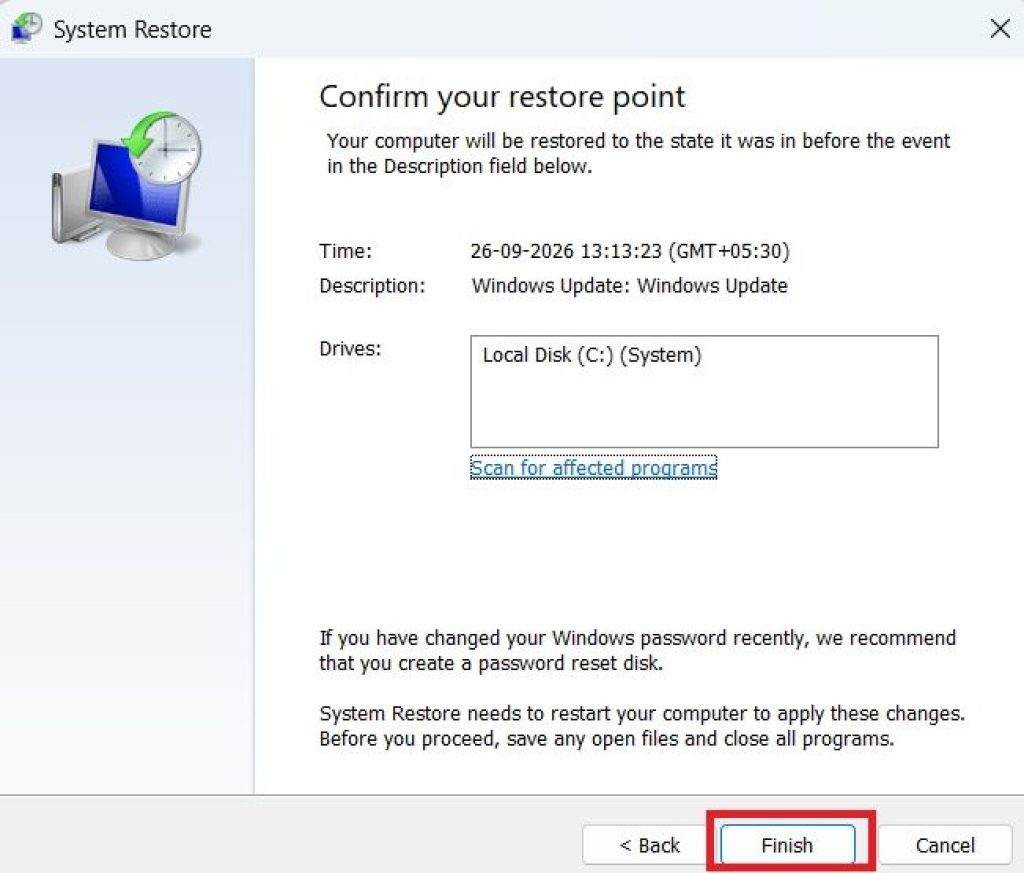
Click Close, then Next, then Finish.
Confirm with Yes when Windows warns that the process can’t be interrupted once it begins.
Your PC will restart, and a screen will display “Please wait while your Windows files and settings are being restored.” This can take 15 to 30 minutes or longer, depending on your hardware and how much has to be reversed. Do not turn off the computer or unplug it during this stage. When you sign back in, a message will tell you whether the restore was successful.
Method 2: Restore from Safe Mode
If Windows loads but crashes, freezes, or behaves erratically, Safe Mode can help. It starts Windows with a minimal set of drivers and services, which often prevents the faulty software from interfering with the restore process.
- Press Windows key + I to open Settings.
- Go to Update & Security > Recovery.
- Under Advanced startup, click Restart now.
- After the restart, select Troubleshoot > Advanced options > Startup Settings > Restart.
- When the Startup Settings menu appears, press 4 or F4 to enable Safe Mode. (Press 5 or F5 for Safe Mode with Networking.)
- Sign in, then follow the steps from Method 1 to open System Restore and select your restore point.
If you can’t reach Settings because the PC is unstable, there is a shortcut: hold Shift while clicking Restart from the sign-in screen’s power button, which takes you directly to the same blue recovery menu.
Method 3: Restore from the Windows Recovery Environment (When Windows Won’t Start)
When Windows fails to boot altogether, you can still reach System Restore through the Windows Recovery Environment (WinRE). This is a separate, built-in mini-system that loads before Windows itself.
Getting into WinRE:
- Windows 11 usually enters recovery automatically after two or three failed startup attempts. You’ll see “Preparing Automatic Repair,” followed by a blue screen with options.
- If it doesn’t, force the computer to shut down by holding the power button for about 10 seconds during startup. Repeat this two or three times until the recovery screen appears.
Running System Restore from WinRE:
- On the Automatic Repair screen, click Advanced options. (Or, from the “Choose an option” screen, click Troubleshoot.)
- Select Troubleshoot > Advanced options > System Restore.
- Choose your user account and enter your password if prompted.
- Follow the on-screen wizard: click Next, select a restore point, click Next, then Finish.
- Confirm the warning and wait for the process to complete. Your PC will restart automatically.
If the recovery environment can’t find any restore points at this stage, it usually means System Protection was turned off or the points were deleted. In that case, move on to Method 4 or the alternatives near the end of this article.
Method 4: Use Windows 11 Installation Media
If the built-in recovery environment is damaged or unavailable, a Windows 11 installation USB drive can serve as a rescue tool. You can create one on another working computer.
- On a working PC, download the Media Creation Tool from Microsoft’s official website.
- Run it, choose Create installation media for another PC, and select a USB flash drive of at least 8 GB. Follow the prompts to complete the process.
- Plug the USB drive into the problem computer and boot from it. You may need to press a key such as F2, F12, Esc, or Del at startup to open the boot menu, and choose the USB drive.
- On the first Windows Setup screen, choose your language and keyboard layout, then click Next.
- Click Repair your computer in the bottom-left corner. Do not click Install now.
- Choose Troubleshoot > Advanced options > System Restore.
- Select the target operating system, then follow the wizard to pick and apply a restore point.
This approach is especially handy when the recovery partition on your hard drive is corrupted.
Method 5: Use the Command Line
Advanced users can start System Restore from Command Prompt or PowerShell. This is useful if the graphical tools are not working or you prefer keyboard-driven troubleshooting.
Launching the wizard with a command:
- Press Windows key + R, type rstrui.exe, and press Enter. This opens the same System Restore wizard as Method 1.
Restoring via PowerShell (run as Administrator):
- Right-click the Start button and choose Windows PowerShell (Admin).
- List your restore points with:
Get-ComputerRestorePoint - Note the SequenceNumber of the point you want.
- Run:
Restore-Computer -RestorePoint 5
Replace 5 with your chosen sequence number.
Command Prompt in the recovery environment:
If you’re in WinRE, you can open Troubleshoot > Advanced options > Command Prompt, then type rstrui.exe and press Enter. On some systems this opens the graphical wizard even when the normal menu option fails.
Troubleshooting Common Problems
“System Restore did not complete successfully.” Try a different, older restore point. Antivirus software sometimes blocks the process, so temporarily disabling it can help. Running the restore from Safe Mode also improves the odds.
No restore points are listed. System Protection was probably turned off, or the disk space allotment was too small and older points were deleted. Unfortunately, points that no longer exist can’t be recovered. Turn protection on going forward.
The restore made things worse. System Restore is reversible. Run it again, and you’ll see an option called Undo System Restore at the top of the wizard. Select it to return to the state before the restore.
Errors related to disk corruption. Open Command Prompt as administrator and run sfc /scannow, followed by DISM /Online /Cleanup-Image /RestoreHealth, to repair damaged system files. Then try System Restore again.
Restore points disappear after Windows updates. Major feature updates sometimes wipe old restore points. Create a fresh manual point after each big update once you’ve confirmed things are stable.
What to Do If System Restore Can’t Fix the Problem
If no restore point works, you still have options:
- Uninstall recent updates: Go to Settings > Update & Security > Windows Update > View update history > Uninstall updates.
- Startup Repair: Available in the recovery environment under Advanced options, this fixes common boot issues.
- Reset this PC: Under Settings > Update & Security > Recovery, this reinstalls Windows and lets you keep your personal files.
- System Image Recovery: If you previously created a full system image backup, you can restore from it in the recovery environment.
Because these options can be more drastic, back up your important files first whenever your PC allows it.
Conclusion
System Restore remains one of the most valuable and underused tools in Windows 11. With a single restore point, you can undo a bad driver, a faulty update, or a problematic installation without losing your personal files or spending hours reinstalling everything. Whether you can still sign in, need Safe Mode, or must boot from recovery media, there is a method that fits nearly every situation.
The best time to prepare is before something goes wrong. Make sure System Protection is turned on, keep a reasonable amount of disk space reserved for restore points, and create a manual point before making major system changes. Pair this with regular backups of your personal files to cloud storage or an external drive, and you’ll be ready for almost anything Windows throws at you.
Frequently Asked Questions
1. Will System Restore delete my personal files?
No. System Restore affects system files, installed programs, drivers, and registry settings. Your documents, photos, videos, and other personal data are left untouched. However, applications installed after the restore point was created will be removed, so you may need to reinstall them. It’s still smart to back up important files before any major repair.
2. How long does a System Restore take?
Most restores finish in 15 to 30 minutes, but times vary with the speed of your drive and the number of changes being reversed. A PC with a traditional hard drive may take longer than one with an SSD. Never interrupt the process, as doing so can leave Windows in an unstable state.
3. How often does Windows 11 create restore points automatically?
By default, Windows creates a restore point before significant events, such as installing a new driver, an application that uses a Windows Installer package, or certain Windows updates. It may also create one weekly if System Protection is enabled. You can create additional points manually at any time, which is recommended before making big changes to your system.
4. Can I undo a System Restore if it doesn’t help?
Yes. Open the System Restore wizard again, and you’ll see an Undo System Restore option at the top. Selecting it returns your computer to the state it was in before the restore ran. If the restore was run from Safe Mode or the recovery environment, the undo option is available the same way, provided the process completed successfully.