Geeksdigit Team
Microsoft Office includes several security features designed to protect your computer from potentially harmful files. One of these features is Trusted Documents, which allows you to tell Office that a particular document is safe. Once a document becomes trusted, Office can stop displaying certain security warnings every time you open that file.
Trusted Documents are especially useful when you regularly work with Excel workbooks, Word documents, or PowerPoint presentations containing macros, ActiveX controls, data connections, or other types of active content. However, because trusted documents can bypass some security checks, you should only trust files when you are confident that their source and contents are safe.
Microsoft Office provides a dedicated Trusted Documents section inside the Trust Center. From there, you can allow or disable trusted documents, allow documents stored on network locations to become trusted, and clear the list of documents that you previously trusted. These settings are available in supported desktop versions of Microsoft 365 and Office, including Excel, Word, and PowerPoint.
In this guide, you will learn what Trusted Documents are, how the feature works, how to enable or disable it, how to clear previously trusted documents, and what you should do if the Trusted Documents option is missing or unavailable.
What Are Trusted Documents in Microsoft Office?
A Trusted Document is an Office file that you have explicitly told Microsoft Office you trust. This normally happens when you open a file containing potentially active or unsafe content and select Enable Content or choose the option to always enable the document’s active content.
Active content can include macros, ActiveX controls, data connections, add-ins, and other features that can perform actions beyond simply displaying text or formatting. Because some of these features can potentially be abused by malware, Office normally displays security warnings before allowing them to run.
For example, suppose you receive an Excel workbook containing a VBA macro. When you open it, Excel may display a security warning saying that macros have been disabled. If you know the workbook came from a reliable source and you select Enable Content, Office can remember that decision by marking the workbook as trusted.
The next time you open that same workbook, Office generally does not display the same warning again. Microsoft explains that trusted documents can open without the Message Bar warning for active content, although the trust can be affected if the file is moved.
This feature is convenient for files that you use frequently, but it should not be treated as a way to make every Office file safe. Trusting a malicious document can allow potentially dangerous content to operate with fewer security warnings.
What Happens When You Trust a Document?
When you trust an Office document, Microsoft Office remembers your decision. This means you generally do not have to repeatedly click Enable Content whenever you open that same file.
For example, imagine you have an Excel workbook used for accounting that contains a legitimate macro. The first time you open it, Excel may block the macro and display a security warning. After verifying that the workbook is legitimate, you can enable its content and make the document trusted.
Afterward, the workbook can open without the same security warning.
Trusted Documents can also affect Protected View. Microsoft states that a document that has been trusted does not open in Protected View. This is one reason you should only trust documents from sources you know and trust.
The important point is that Trusted Documents and Trusted Locations are not the same thing. A trusted document refers to an individual file that Office remembers as trusted. A Trusted Location is a folder that you specifically designate as safe, causing files stored there to receive different security treatment.
How to Open the Trusted Documents Settings
You can access Trusted Documents from Excel, Word, or PowerPoint. The basic process is almost identical in all three applications.
Open Excel, Word, or PowerPoint and follow these steps:
- Click File in the upper-left corner.
- Select Options.
- In the Office Options window, select Trust Center.
- Click Trust Center Settings.
- Select Trusted Documents from the left-hand menu.
You will now see the Trusted Documents settings.
Microsoft’s current support documentation lists this same Trust Center path for viewing and changing Trusted Documents settings.
The exact appearance of the window can vary slightly depending on your Office version, but the basic navigation remains similar across supported desktop versions.
You can use Excel to access these settings even if you normally work with Word or PowerPoint. However, it is worth remembering that some security settings are application-specific. For example, Excel’s macro settings do not automatically change Word’s macro settings.
Method 1: Enable Trusted Documents
If Trusted Documents has been disabled and you want Office to remember documents that you explicitly trust, you can enable the feature from the Trust Center.
Open an Office application such as Excel and go to:
File > Options > Trust Center > Trust Center Settings > Trusted Documents
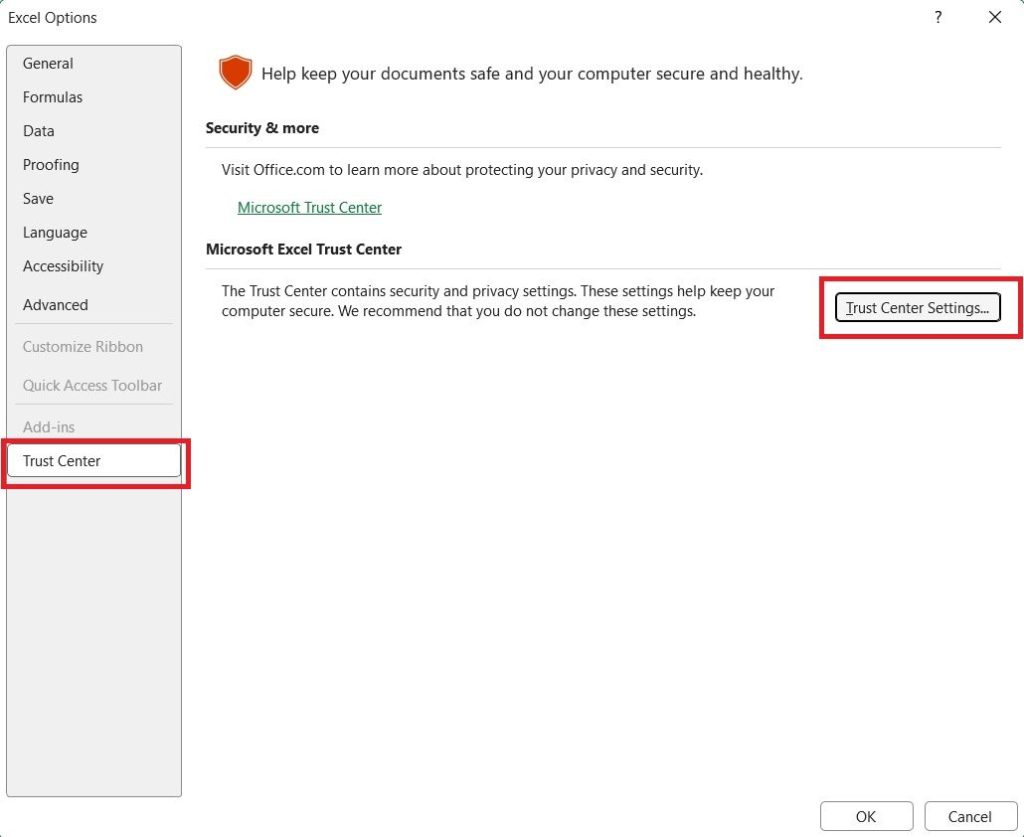
Look for the option related to disabling Trusted Documents.
If Disable Trusted Documents is selected, clear that option.
Then click OK to save the changes.
Click OK again to close the Office Options window if necessary.
After enabling Trusted Documents, Office can once again remember documents that you explicitly mark as trusted.
For example, if you open a legitimate Excel workbook containing macros and choose the appropriate Enable Content option, Office can remember that decision for that document.
The important distinction is that enabling the Trusted Documents feature does not automatically enable macros or other active content in every file. Office still uses its other security mechanisms to determine whether content should be blocked and whether you need to make a decision.
Microsoft specifically warns that you should never enable active content unless you are confident that it is safe.
Method 2: Disable Trusted Documents
If you want Microsoft Office to show the security warning every time you open documents that contain potentially unsafe active content, you can disable Trusted Documents.
Open Excel, Word, or PowerPoint and go to:
File > Options > Trust Center > Trust Center Settings > Trusted Documents
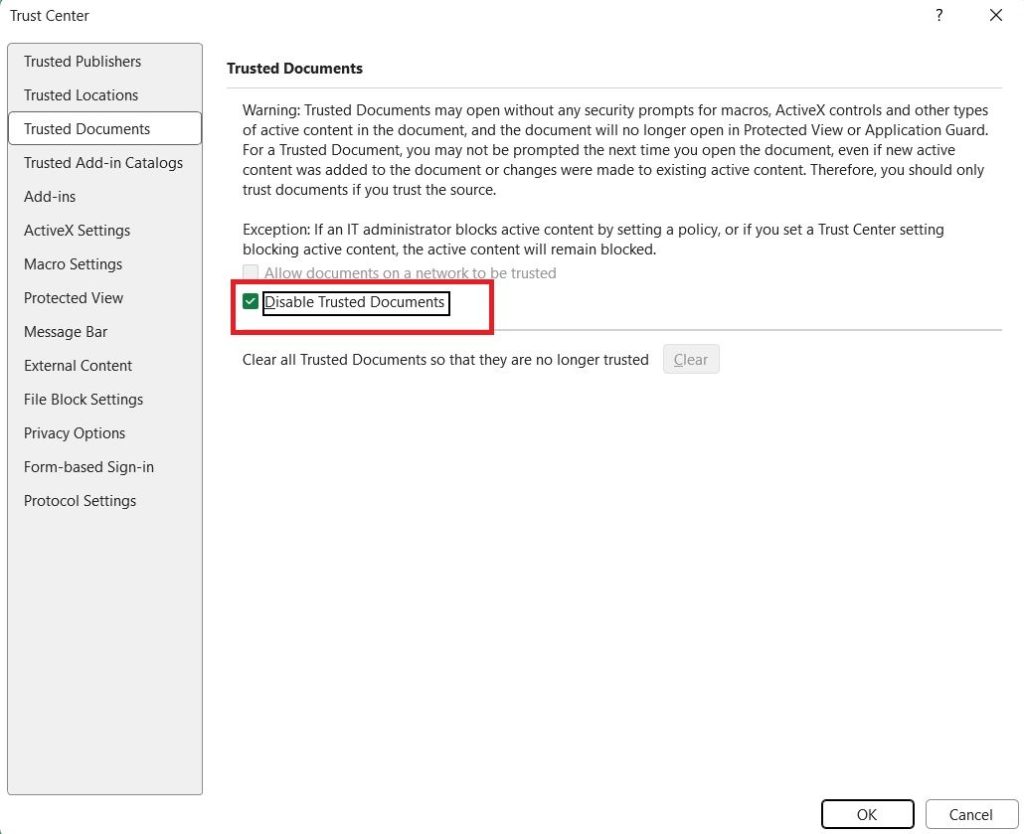
Find the option named Disable Trusted Documents.
Select it and click OK.
Office will now stop using the Trusted Documents feature to automatically remember your previous trust decisions.
This means the security warning can appear again when you open files that contain active content.
Microsoft describes this setting as causing the Security Warning dialog to appear for files each time they are opened.
This option can be useful on computers where you regularly open files from different sources and want Office to provide a fresh warning instead of remembering previous decisions.
For example, if several people use the same computer or you frequently download Office files from the internet, disabling Trusted Documents can provide an additional opportunity to review a file before enabling its active content.
However, this does not mean that all other Office security features are disabled. Trusted Documents is only one part of the overall Office security system.
Method 3: Clear All Previously Trusted Documents
Sometimes you do not want to completely disable Trusted Documents. Instead, you may simply want to remove all documents that Office has previously marked as trusted.
This is useful if you have trusted many files in the past but now want Office to ask you about them again.
Open:
File > Options > Trust Center > Trust Center Settings > Trusted Documents
Look for the option to:
Clear all Trusted Documents so that they are no longer trusted
Select the option and confirm the change if Office asks for confirmation.
After clearing the trusted-document list, previously trusted files are no longer treated as trusted documents.
The next time you open one of those files, Office can display the appropriate security warning again.
Microsoft specifically provides the Clear all Trusted Documents option for removing documents that were previously trusted.
This method is often preferable to changing other security settings because it gives you a clean starting point without requiring you to permanently disable the entire Trusted Documents feature.
Method 4: Allow or Disable Trusted Documents on Network Locations
Microsoft Office also provides a separate setting for documents stored on network locations.
This is important for users who access Office files from shared folders, company servers, NAS devices, or other network locations.
Open:
File > Options > Trust Center > Trust Center Settings > Trusted Documents
Look for:
Allow documents on a network to be trusted
If you enable this option, Office can allow documents stored in network locations to become trusted.
If you clear the option, Office will not allow network documents to be trusted through the Trusted Documents mechanism.
Microsoft recommends being particularly careful with network documents because other people may potentially modify files stored on shared network locations.
For example, suppose your company has a shared folder containing Excel reports with legitimate macros. Allowing network documents to become trusted can make those files easier to use.
However, if the network folder is accessible to many users and its contents are not tightly controlled, automatically trusting files from that location could increase security risks.
For personal computers, you generally do not need to enable network trust unless you actually work with trusted Office documents stored on a network.
Method 5: Trust a Document When the Security Warning Appears
You can also create a Trusted Document directly when opening a file.
Suppose you open an Excel workbook and see a yellow security warning indicating that active content has been disabled.
If you completely trust the file and its source, you can click Enable Content.
Depending on the type of content and Office version, you may see a confirmation asking whether you want to make the document trusted.
Select the appropriate option to trust the document.
Microsoft explains that enabling the content of a trusted file can make the document trusted so that the warning does not appear again when you reopen it.
This is generally the easiest way to trust a specific file.
However, you should not click Enable Content simply because a document asks you to do so.
A document downloaded from an unknown website, received unexpectedly through email, or obtained from an untrusted person could contain malicious macros or other active content.
If you only need to read the document, there is usually no reason to enable its macros or other active features.
Method 6: Use a Trusted Location Instead of Trusting Individual Files
If you regularly work with a large number of legitimate Office files, manually trusting every file can become inconvenient.
In that situation, Microsoft provides Trusted Locations.
A Trusted Location is a folder that you tell Office is safe. Files stored in that folder receive different security treatment and can avoid some Trust Center checks. Microsoft recommends using this approach when you have a collection of files from a reliable source that you need to use regularly.
To create a Trusted Location:
- Open Excel, Word, or PowerPoint.
- Go to File > Options.
- Select Trust Center.
- Click Trust Center Settings.
- Select Trusted Locations.
- Click Add new location.
- Click Browse.
- Select the folder you want to trust.
- Click OK.
- Click OK again to save the settings.
Once the folder is trusted, Office treats files stored there as coming from a trusted location.
This can be useful for a personal folder containing your own macro-enabled Excel templates or business documents.
However, you should avoid adding your entire Downloads folder, desktop, or a broad shared folder as a Trusted Location. Microsoft warns that files stored in Trusted Locations can bypass some security checks, so you should only use folders where you are confident that the files are safe.
Method 7: Remove a Trusted Location
If you previously added a folder as a Trusted Location and no longer want Office to trust files stored there, you can remove it.
Open:
File > Options > Trust Center > Trust Center Settings > Trusted Locations
Select the folder from the list.
Click Remove.
Then click OK to save your changes.
Removing the Trusted Location does not necessarily delete the files in that folder. It simply removes the special trust status assigned to that folder.
Microsoft recommends reviewing Trusted Locations carefully because files placed inside them can bypass some security checks.
If you created a Trusted Location temporarily for a project, removing it after the project is finished is a good security practice.
Method 8: Trust a Publisher Instead of Individual Documents
Another option is to trust a publisher.
This can be useful when you regularly receive digitally signed Office files from the same organization or software developer.
When an Office file contains appropriately signed active content, you may be given an option to trust all documents from that publisher.
Microsoft explains that trusting a publisher means trusting all code signed with that publisher’s certificate, so this decision should be made carefully.
You can view trusted publishers by opening:
File > Options > Trust Center > Trust Center Settings > Trusted Publishers
From there, you can review publishers that Office currently trusts.
If you no longer trust a publisher, you can select it and remove it from the list, provided your Office installation allows the change.
This approach can be more convenient than trusting individual documents, but it also has broader security implications because the trust applies to future signed content from that publisher.
Trusted Documents vs Protected View
Trusted Documents and Protected View are related, but they are not identical features.
Protected View is designed to provide a restricted environment for potentially unsafe files, particularly files obtained from locations such as the internet or other potentially risky sources.
Trusted Documents allows you to tell Office that a particular file is safe.
Once a document is trusted, Microsoft says it does not open in Protected View.
For example, you might download an Excel file from the internet. Office may initially open it in Protected View. If you determine that the file is legitimate and enable editing or active content as appropriate, the file can become trusted depending on its contents and security settings.
This is why you should not blindly trust files merely to remove Protected View.
Protected View is there for a reason. If a file comes from an unknown source, it is safer to leave it restricted until you have verified that the document is legitimate.
Trusted Documents vs Trusted Locations
These two features are often confused.
A Trusted Document is generally an individual file that you have chosen to trust.
A Trusted Location is a folder that you have designated as safe.
For example, suppose you have one Excel workbook called MonthlyReport.xlsm that contains a macro. You can trust that specific workbook.
Alternatively, if you have an entire folder containing hundreds of legitimate macro-enabled workbooks that you regularly use, you could create a Trusted Location for that folder.
Trusted Locations are more convenient but also potentially broader in scope because other files placed in the folder can benefit from the location’s trust status.
Therefore, if you only need to trust one or two files, trusting individual documents is usually more controlled.
If you maintain a dedicated folder containing only files that you know are safe, a Trusted Location can be more practical.
Frequently Asked Questions
What is the fastest way to enable Trusted Documents?
Open Excel, Word, or PowerPoint and go to File > Options > Trust Center > Trust Center Settings > Trusted Documents. If Disable Trusted Documents is selected, clear it and click OK. This allows Office to remember documents that you explicitly trust.
How do I remove all trusted documents?
Go to File > Options > Trust Center > Trust Center Settings > Trusted Documents and select Clear all Trusted Documents so that they are no longer trusted. This removes the trust status from previously trusted documents.
Should I trust an Excel file that asks me to enable macros?
Only if you know the source is reliable and you understand why the macros are required. Microsoft recommends never enabling macros simply because a document asks you to do so.
Is a Trusted Location safer than enabling Trusted Documents?
Neither should be treated as automatically safe. A Trusted Location can be convenient for a controlled folder containing verified files, but all files placed there can receive reduced security checking. Therefore, only use Trusted Locations for folders whose contents you control and trust.
Conclusion
Trusted Documents is an important Microsoft Office security feature that provides a balance between security and convenience. Instead of showing the same warning every time you open a file that contains active content, Office can remember that you have already reviewed and trusted the document.
You can manage this feature from File > Options > Trust Center > Trust Center Settings > Trusted Documents in supported desktop versions of Excel, Word, and PowerPoint. From this section, you can enable Trusted Documents, disable the feature, allow or prevent network documents from becoming trusted, and clear all previously trusted documents.
The safest approach is therefore simple: trust only files and locations that you genuinely trust, keep Office security protections enabled, and treat unexpected requests to enable macros or other active content with caution.