Sukhdev Kamboj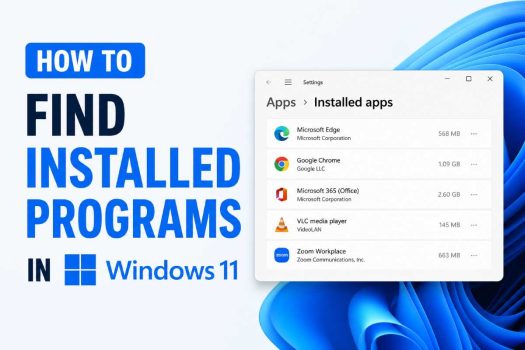
At some point, almost every Windows 11 user runs into the same small mystery: “Do I actually have this program installed?” Maybe you’re trying to reinstall a piece of software and want to check whether an older version is still lurking on your drive. Maybe your PC feels sluggish and you suspect a forgotten app is eating up resources. Maybe you’re preparing to sell or hand off a computer and need a full inventory of what’s on it. Or maybe you’re an IT professional trying to confirm license compliance across a fleet of machines. Whatever the reason, knowing how to find installed programs in Windows 11 is one of those foundational skills that saves time and prevents confusion.
Unlike some earlier versions of Windows, where “Programs and Features” in the Control Panel was the only real destination, Windows 11 spreads software information across several places. There’s the modern Settings app, the legacy Control Panel (which Microsoft still hasn’t fully retired), the Start menu, and a handful of command-line tools like PowerShell, Command Prompt, and the Windows Package Manager (winget). Each of these methods surfaces a slightly different slice of what’s actually on your system, because Windows 11 recognizes several categories of software: traditional desktop programs (the classic .exe installers), Microsoft Store apps (UWP or MSIX packages), and provisioned system apps that come bundled with Windows itself.

This guide walks through every practical method for finding installed programs in Windows 11, from the simplest graphical tools to more advanced command-line techniques that let you export a full software inventory. By the end, you’ll know not just how to check whether a specific app is installed, but how to get a complete, exportable picture of everything running on your PC.
Method 1: Using the Settings App (The Modern, Recommended Way)
The Settings app is Microsoft’s primary, most up-to-date destination for viewing installed software, and it’s the method most guides and Microsoft’s own documentation point to first. It combines both traditional desktop programs and Microsoft Store apps into a single, searchable list.
To get there:
Press Windows key + I to open Settings directly, or click the Start button and select the gear-shaped Settings icon.
In the left-hand navigation pane, select Apps.
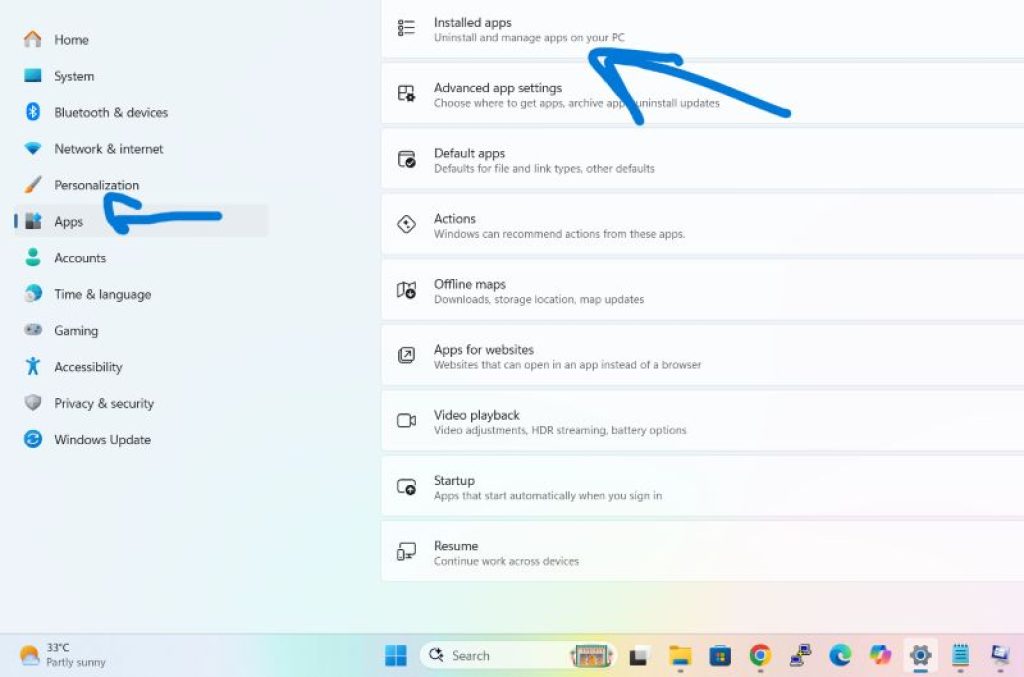
Click Installed apps.
Windows will populate a list showing each app’s name, publisher, and — depending on the app and your Windows build — its installation size and installation date. This page also includes a search box at the top, which is by far the fastest way to check whether a specific program exists on your PC. Instead of scrolling through potentially hundreds of entries, just type a few letters of the app’s name.
Beyond searching, the Installed apps page offers several useful controls:
- View options: You can typically switch between List, Grid, or Category views depending on how you like to browse.
- Sort by: Sort alphabetically by name, by installation date (handy for spotting recently installed or suspicious software), or by size (useful for freeing up disk space).
- Filter by: On PCs with multiple drives, you can filter to show apps installed on a specific drive or across all drives.
Next to each app, a three-dot menu (or similar icon) gives you quick access to actions like Uninstall, Move (to a different drive), Modify, or Advanced options, where you can view an app’s permissions and reset its data. This makes the Installed apps page not just a viewer but a lightweight management console.
It’s worth noting that the exact wording and layout can vary slightly depending on your Windows 11 version — 24H2, 25H2, and newer 26H1 builds all present this page with small cosmetic differences, and Microsoft has been known to reshuffle sort and filter labels between updates. The core path, however — Settings > Apps > Installed apps — has remained consistent and is the officially documented route.
Method 2: Right-Click the Start Button
If opening Settings and navigating through menus feels like too many steps, Windows 11 offers a shortcut. Right-click the Start button (or press Windows key + X) to open the Quick Link menu, and select Installed Apps directly. This drops you straight into the same Installed apps page described above, skipping the need to open Settings and click through Apps first. It’s a small time-saver, but if you check installed software often, it becomes second nature.
Method 3: Searching from the Start Menu or Taskbar
For most people, the fastest way to check whether a specific program is installed isn’t browsing a list at all — it’s searching. Click the Start button or the search icon on the taskbar, then simply type the name of the program you’re looking for. If it’s installed and registered with Windows, it should appear near the top of the search results, often with an option to open it directly.
That said, this method has limitations worth knowing about. Start menu search reflects apps that have a registered shortcut or are indexed by Windows; it doesn’t always reflect every piece of software on your system. An app might be installed but not show a Start menu tile, may not have received a normal shortcut during installation, or might be registered under a different user profile than the one you’re currently using. So while Start search is convenient for everyday use, it’s not a reliable method for auditing everything installed on a machine — for that, you want the Installed apps page or a command-line tool.
Method 4: The Classic Control Panel (Programs and Features)
Despite Microsoft’s years-long push toward the modern Settings app, the classic Control Panel hasn’t disappeared, and many longtime Windows users still reach for it out of habit. It remains useful because it sometimes surfaces legacy desktop applications, drivers, or system components that don’t always appear cleanly in the newer Settings interface.
To access it:
- Press Windows key + R to open the Run dialog.
- Type
appwiz.cpland press Enter. This opens Programs and Features directly.
Alternatively, you can search for “Control Panel” from the Start menu, open it, and navigate to Programs > Programs and Features.
This view presents a straightforward table: program name, publisher, installation date, and size, with a column for version number. You can sort by clicking any column header, and right-clicking an entry gives you options to uninstall or change/repair the software. One limitation is that Programs and Features generally shows only traditional desktop applications — Microsoft Store apps typically won’t appear here, which is why cross-referencing with the Settings app gives you a more complete picture.
Method 5: Using PowerShell
For users who want more control, a scriptable output, or the ability to export a full list of installed software, PowerShell is the next step up. It’s built into Windows 11 and doesn’t require installing anything extra.
To open it, right-click the Start button and select Terminal (or Windows PowerShell), or search for “PowerShell” from the Start menu.
A commonly used command for listing traditionally installed desktop programs is:
Get-ItemProperty HKLM:\Software\Wow6432Node\Microsoft\Windows\CurrentVersion\Uninstall\* | Select-Object DisplayName, DisplayVersion, Publisher, InstallDate | Format-Table -AutoSizeThis pulls data from the Windows registry’s “Uninstall” keys, which is where most traditional installers register themselves. It returns a clean table with the program name, version, publisher, and install date.
For Microsoft Store and MSIX-packaged apps specifically, PowerShell offers a different command:
Get-AppxPackage | Select-Object Name, Version, PackageFullNameThis is especially useful for troubleshooting Store apps, since it exposes package-level detail that the graphical Settings page doesn’t always show.
If you want to save either list to a file for later reference — say, before reinstalling Windows or migrating to a new PC — you can pipe the output to a CSV file:
Get-ItemProperty HKLM:\Software\Wow6432Node\Microsoft\Windows\CurrentVersion\Uninstall\* | Select-Object DisplayName, DisplayVersion, Publisher, InstallDate | Export-Csv -Path "$env:USERPROFILE\Desktop\InstalledPrograms.csv" -NoTypeInformationThis creates a spreadsheet-ready file on your desktop that you can open in Excel or share with a colleague.
Method 6: Using Command Prompt
If you prefer the older Command Prompt over PowerShell, Windows 11 still supports it, though Microsoft has been quietly nudging users toward PowerShell and Terminal in recent builds. One classic tool available from Command Prompt is wmic, which can query the Windows Management Instrumentation database for installed software:
wmic product get name,versionThis command lists installed program names and version numbers. It’s worth knowing, however, that wmic has been deprecated by Microsoft in favor of PowerShell equivalents, and on some systems it may run slowly or require the optional WMIC feature to be re-enabled. For most users, PowerShell’s registry-based query is a faster and more future-proof alternative.
Method 7: Using Winget (Windows Package Manager)
For power users, IT administrators, and anyone who wants a modern, streamlined inventory, winget is arguably the best command-line option. Winget is Microsoft’s official package manager, built into current versions of Windows 11, and it can list software regardless of whether it was installed via winget, an MSI installer, or the Microsoft Store.
Open Terminal or PowerShell and run:
winget listThis produces a clean, readable table of installed applications along with their version numbers and, where available, their package IDs — the unique identifiers winget uses to install or update software. This is particularly handy if you’re rebuilding a PC: you can export the list, then use it as a reference to reinstall the same set of applications with winget’s install command, dramatically speeding up a fresh Windows setup.
To save the list to a text file for backup purposes:
winget list > "$env:USERPROFILE\Desktop\WingetAppList.txt"Choosing the Right Method for Your Needs
With so many options, it helps to think about what you’re actually trying to accomplish:
- Quick check on whether a specific app is installed: Use Start menu search or the search box inside Settings > Apps > Installed apps.
- Browsing everything installed with the ability to uninstall or manage apps: Use Settings > Apps > Installed apps.
- Looking for legacy desktop software or version details in a familiar table view: Use the classic Control Panel’s Programs and Features.
- Creating an exportable inventory for backup, documentation, or troubleshooting: Use PowerShell or winget, both of which can output to CSV or text files.
- Investigating Microsoft Store or MSIX-specific app details: Use PowerShell’s
Get-AppxPackagecommand. - Rebuilding or migrating to a new PC: Use
winget listto capture your software list, then use it later to reinstall everything quickly.
It’s also worth remembering that no single method captures absolutely everything on a PC. Drivers, background services, optional Windows features, and certain system components are managed through entirely different interfaces — Device Manager, Windows Features, or Windows Update — and won’t appear in any “installed apps” list. If an app doesn’t show up where you expect it, that doesn’t automatically mean it’s not on the system in some form; it may simply be registered differently than you assumed.
Conclusion
Finding installed programs in Windows 11 is rarely as simple as checking one single place, but once you understand the landscape, it becomes second nature. The Settings app’s Installed apps page is the best all-around starting point for most users — it’s fast, searchable, and lets you manage software directly. The classic Control Panel still has a role for spotting older desktop programs and version details in a familiar layout. Start menu search offers speed and convenience for everyday checks, though it isn’t a complete inventory. And for anyone who needs more power — IT professionals, developers, or simply curious power users — PowerShell, Command Prompt, and winget offer scriptable, exportable ways to generate a full software inventory, complete with version numbers and installation dates.
The right method ultimately depends on what you’re trying to do. If you just want to know whether Zoom or Photoshop is installed, a quick Start menu search will do. If you’re auditing a machine before a factory reset, an exported CSV from PowerShell or a winget list gives you a durable record you can reference later. And if you manage multiple computers across an organization, combining the Settings app with command-line tools like winget gives you both the convenience of a graphical interface and the precision of a scriptable inventory. Once you know where to look — and which tool matches your goal — finding out exactly what’s installed on a Windows 11 PC takes only a few seconds.