
 Sukhdev Kamboj
If you’ve opened Task Manager on your Windows 11 PC and spotted a mysterious process called Vmmem eating up several gigabytes of RAM or spiking your CPU, you’re not alone. It’s one of the most commonly searched “what is this process” questions among Windows 11 users, right up there with questions about svchost.exe or Antimalware Service Executable. The good news: Vmmem is not malware, and in almost every case it’s a normal (if occasionally excessive) part of how Windows handles virtualization.
This guide explains exactly what Vmmem is, why it shows up, why it sometimes consumes so much memory, and — most importantly — how to bring its resource usage back under control.
What Is the Vmmem Process?
Vmmem stands for Virtual Machine Memory. It’s a system process that Windows creates automatically whenever a virtualization feature is active. Rather than being a standalone application you installed, Vmmem is essentially a “container” that Task Manager uses to represent the memory and CPU resources consumed by a virtual machine running on your PC.
Vmmem is tied to Windows’ built-in virtualization stack, which relies on the Hyper-V platform under the hood. Several common Windows features and third-party tools depend on this same virtualization layer, which is why Vmmem tends to appear for more people than you’d expect:
- Windows Subsystem for Linux (WSL/WSL2) — lets you run a Linux environment directly inside Windows
- Docker Desktop — which uses WSL2 or Hyper-V to run Linux containers
- Windows Sandbox — a temporary, isolated desktop environment for testing untrusted apps
- Hyper-V virtual machines — full VMs you’ve created yourself
- Android emulators (like those bundled with some development tools) that rely on virtualization
If you use any of these — even without realizing it, since some development tools quietly enable WSL2 or Hyper-V in the background — Windows will spin up a Vmmem process to manage the memory and CPU allocated to that virtual environment.
You might also see a closely related process called VmmemWSL, which specifically represents the resources used by WSL2. Everything discussed below applies to it as well.
Is Vmmem Safe? Could It Be a Virus?
For the overwhelming majority of users, Vmmem is completely legitimate and represents a genuine Windows system process — it isn’t inherently dangerous, and you don’t need to remove it. It’s essentially a meter for the memory and CPU that Windows allocates to WSL2, Docker Desktop, Hyper-V, Windows Sandbox, Android emulators, and other virtualized workloads, and in the vast majority of cases it’s completely safe.
That said, malware occasionally disguises itself using names similar to legitimate system processes to avoid detection. You should be more cautious and consider running a malware scan if any of the following apply:
- You don’t use WSL, Docker, Hyper-V, Windows Sandbox, or any VM software, yet Vmmem is still consuming significant resources
- Unfamiliar virtualization software appeared on your PC after downloading something from an untrustworthy source
- Vmmem’s activity coincides with other suspicious symptoms — browser redirects, fake update pop-ups, unexplained PowerShell windows, new scheduled tasks you didn’t create, or unfamiliar files appearing in folders like AppData or Temp
- The process is running from an unusual file path rather than the standard Windows system location
In those specific scenarios, run a full scan with Windows Security (Microsoft Defender) or a reputable second-opinion scanner. But for the vast majority of people, high Vmmem usage simply means a virtual machine, container, or Linux environment is doing real work in the background — it’s a resource meter, not an infection.
Why Does Vmmem Use So Much Memory?
Virtualization is inherently resource-intensive. When you spin up a VM, container, or Linux subsystem, Windows has to allocate real chunks of your physical RAM and CPU time to that virtual environment so it can function like an independent machine. A few common causes drive Vmmem’s memory footprint especially high:
1. Heavy workloads inside WSL2 or a VM. Compiling code, running a database, indexing large file systems, or running multiple containers simultaneously all demand more memory from the underlying virtual machine.
2. Docker Desktop containers. Each container you run needs its own share of memory and CPU, and Docker on Windows typically routes through WSL2 to do this — so heavier Docker workloads translate directly into a heavier Vmmem process.
3. No memory cap configured. By default, WSL2 doesn’t set a strict ceiling on how much RAM it can claim, so it can grow to use a very large portion of your system’s total memory if left unmanaged.
4. Multiple WSL distributions running at once. If you have more than one Linux distro installed and running (say, Ubuntu and Debian simultaneously), Vmmem has to account for all of them together.
5. Memory not being released promptly. WSL2 and some VM configurations are known to hold onto memory for a while after a task finishes rather than immediately handing it back to Windows, which can make usage look worse than what’s actually “needed” at that moment.
None of this means something is broken — it just means the memory management model for lightweight virtualization prioritizes performance over conservative resource use, unless you explicitly configure limits.
How to Fix Vmmem High Memory Usage in Windows 11
Here are the most effective fixes, ordered from quickest/temporary to more permanent.
1. Restart WSL
The fastest way to reclaim memory immediately is to restart the WSL virtualization layer. This won’t uninstall anything or delete your Linux files — it simply shuts down the running virtual machine and lets it restart fresh the next time you launch a distribution.
Save any open work inside your Linux distributions first — this command closes everything.
Press Win + R, type powershell, then press Ctrl + Shift + Enter to launch it with administrator rights.
Or
Directly search in Windows search bar.
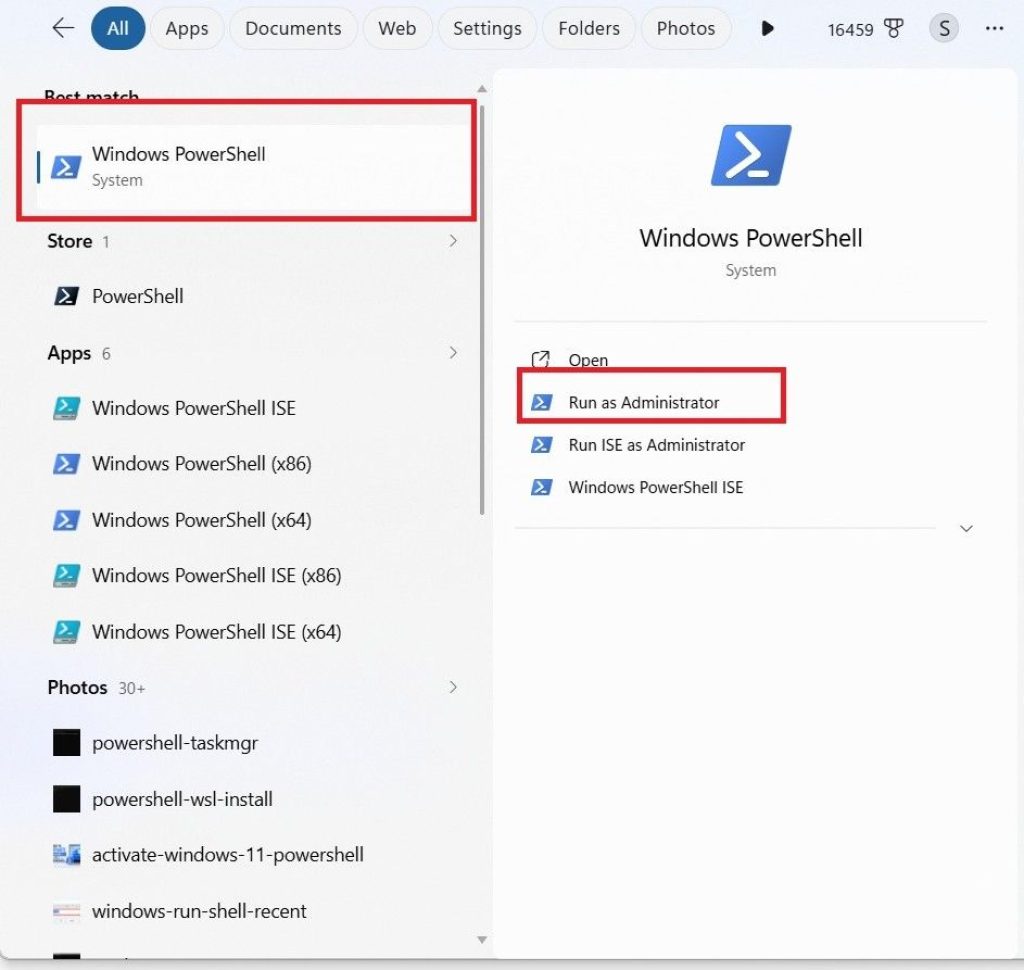
Run the following command:
wsl --shutdown
This terminates every running WSL distribution, not just the one you have open in a terminal window.
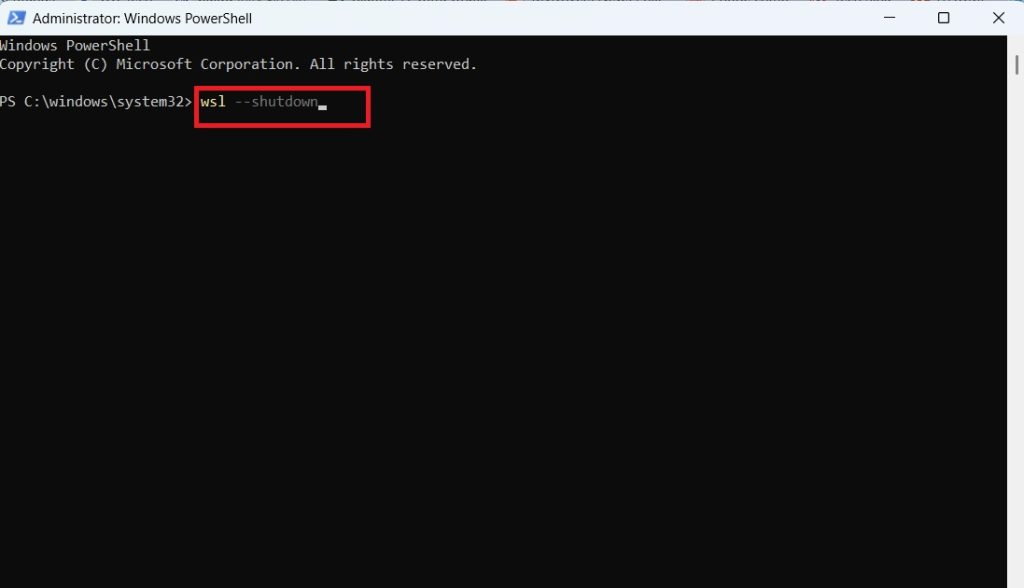
Check Task Manager — Vmmem’s memory usage should drop significantly or disappear until you next open a WSL terminal or a tool (like Docker Desktop) that depends on it.
This is a good first step to try whenever Vmmem usage spikes unexpectedly, since it costs you nothing and takes only a few seconds.
2. Shut Down WSL Entirely (If You Don’t Need It Running)
If you don’t use WSL constantly throughout the day, you can simply avoid leaving it running in the background. Closing your Linux terminal windows and any apps that depend on WSL (including Docker Desktop) will let the Vmmem process wind down on its own after a short period of inactivity. If it doesn’t, use the wsl --shutdown command above to force it closed.
3. Limit WSL2’s Memory and CPU Usage with a .wslconfig File
This is the most effective long-term fix. Windows lets you cap exactly how much RAM, how many CPU cores, and how much swap space WSL2 is allowed to use, which prevents Vmmem from ever ballooning out of control again.
- Open File Explorer.
- In the address bar, type
%UserProfile%and press Enter — this takes you to your user folder (e.g.,C:\Users\YourUsername). - Create a new file named exactly
.wslconfig(make sure Windows doesn’t append.txtto the end — you may need to enable “File name extensions” in the View menu to confirm). - Open the file in Notepad and add configuration like this:
   [wsl2]
   memory=4GB
   processors=2
   swap=2GB
- Adjust the values based on your system’s total RAM and how much you’re comfortable dedicating to WSL. As a rule of thumb, allocate no more than half your total physical RAM.
- Save the file.
- Restart WSL so the new settings take effect:
wsl --shutdown
From now on, WSL2 (and therefore Vmmem) will be hard-capped at the limits you set, no matter how demanding your workload becomes inside Linux.
4. Limit Docker Desktop’s Resource Allocation
If Docker Desktop is the main driver of your Vmmem usage, you can set resource limits directly inside Docker rather than (or in addition to) editing .wslconfig:
- Open Docker Desktop.
- Click the Settings (gear) icon.
- Go to the Resources tab.
- Adjust the sliders for CPUs, Memory, and Swap to more conservative values.
- Click Apply & Restart.
Reducing the number of containers you run simultaneously, and cleaning up unused images and containers (docker system prune), also helps keep memory demands lower.
5. Reduce Allocated Memory for Hyper-V Virtual Machines
If a full Hyper-V VM (rather than WSL or Docker) is behind the high Vmmem readings, check how much RAM you’ve assigned to it:
- Open Hyper-V Manager.
- Right-click the virtual machine and select Settings.
- Under Memory, lower the amount of RAM allocated, or switch on Dynamic Memory so the VM only uses what it actually needs rather than reserving a fixed amount at all times.
- Apply the changes and restart the VM.
6. Shut Down Virtual Machines and Sandbox Instances You’re Not Using
It sounds obvious, but leaving a Hyper-V VM or Windows Sandbox session running in the background — even minimized — keeps its full memory allocation locked up. Close these environments properly (rather than just minimizing the window) when you’re finished with them.
7. Keep Windows and WSL Updated
Microsoft periodically ships performance and memory-management improvements to WSL and the virtualization stack. Keeping both current reduces the chance you’re hitting a known, already-fixed memory leak or inefficiency.
- To update WSL specifically, open PowerShell as administrator and run:
wsl --update
- To check for Windows updates, go to Settings > Windows Update and install anything available.
8. Restart Your PC
If none of the above brings usage down and you suspect memory simply isn’t being released properly after a long work session, a full restart clears out any lingering virtualization overhead and gives you a clean slate.
Should You Ever Disable Vmmem Completely?
You can’t disable Vmmem directly, since it isn’t a standalone feature — it only exists because a virtualization feature is active. If you genuinely never use WSL, Docker, Hyper-V, or Windows Sandbox, the real fix is to turn those features off:
- Open Control Panel > Programs > Turn Windows features on or off.
- Uncheck Windows Subsystem for Linux, Virtual Machine Platform, and/or Hyper-V, depending on which ones you have enabled and don’t need.
- Restart your PC.
With those features disabled, Windows has no reason to create a Vmmem process at all. Keep in mind this will also disable any app that depends on them, including Docker Desktop and certain Android emulators.
Final Thoughts
Vmmem showing up in Task Manager isn’t a bug or a sign of infection — it’s simply Windows being transparent about how much of your system’s resources are being consumed by virtualization features you’re actively using, whether that’s WSL2, Docker, Hyper-V, Windows Sandbox, or an emulator.
The real fix isn’t to “kill” the process, but to manage the workload behind it: restart WSL when it’s idle, set a firm memory cap with a .wslconfig file, right-size your Docker or Hyper-V resource allocations, and keep everything updated. Do that, and Vmmem stops being a mystery and starts behaving exactly the way it’s supposed to — using just enough memory to get your work done, and nothing more.
![What Is Vmmem Process? High Memory Usage Fix [Windows 11]](https://www.geeksdigit.com/wp-content/uploads/thumbs_dir/How-to-Use-MBR2GPT-Disk-Conversion-Tool-in-Windows-11-rt08g29ed6n9dqzox8u0hd5po358jnpqigbuhywmkc.jpg)
![What Is Vmmem Process? High Memory Usage Fix [Windows 11]](https://www.geeksdigit.com/wp-content/uploads/thumbs_dir/lenovo-system-update-rt1j7uhgx7mav578t2j30gv5w7zl0o7y0es6tyccho.jpg)



