Windows 11, the latest operating system from Microsoft, comes with a refined interface and improved performance features. However, beneath its sleek design lies a fundamental structure built around user permissions and security protocols. One essential function every user should understand is how to “Run as Administrator.” This capability allows programs or apps to execute with elevated privileges, often required to perform critical system changes, install software, or access protected files. While standard accounts have limited permissions to maintain system safety, administrator mode unlocks full access and control.
Knowing when and how to run applications as an administrator is crucial for troubleshooting, advanced configurations, and even basic system tasks. Whether you’re an everyday user or an IT professional, mastering this feature ensures better control over your system. In this guide, we’ll explore the various methods available in Windows 11 to run programs as an administrator and why this function is important for both security and functionality.
Understanding Administrator Privileges in Windows 11

Before diving into the methods, it’s vital to understand what “administrator privileges” mean. Windows operates on a system of user accounts—primarily Standard and Administrator. Standard users have limited permissions and are typically prevented from making system-wide changes, installing new software, or modifying registry settings. Administrator accounts, however, have elevated privileges, allowing unrestricted access to the operating system.
Running a program as an administrator means you’re temporarily granting that app or command full control of the system. This can be useful for:
- Installing or uninstalling software.
- Changing system settings.
- Running diagnostic or repair tools.
- Accessing restricted folders.
- Editing the Windows Registry.
However, with great power comes great responsibility. Misusing administrator privileges—especially with malicious or untrusted software—can harm your system. That’s why Windows includes User Account Control (UAC) to notify users before allowing elevation of privileges.
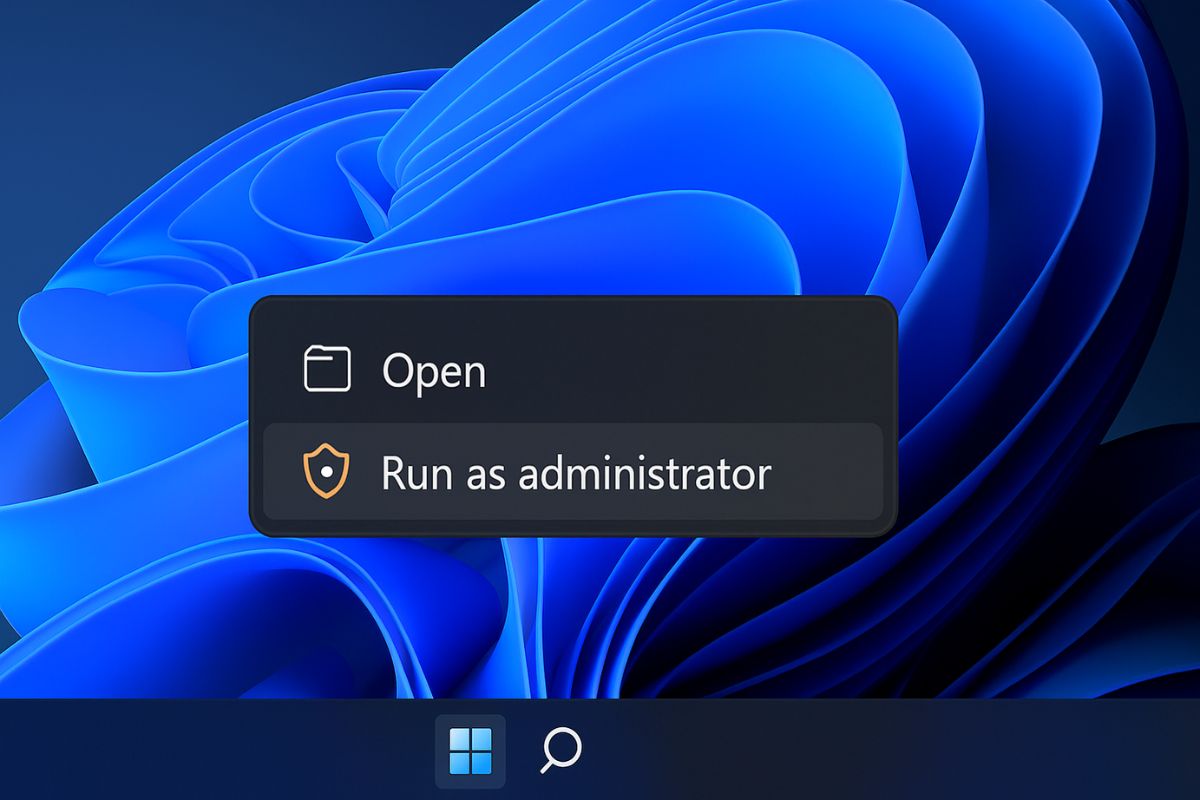
Method 1: Right-Click “Run as Administrator” Option
This is the most straightforward and widely used method to run any executable or shortcut as an administrator.
Steps:
- Navigate to the application or shortcut icon on your desktop, Start menu, or File Explorer.
- Right-click on the application icon.
- Select “Run as administrator” from the context menu.
- If prompted by User Account Control (UAC), click “Yes” to grant access.
This method works for most apps, including .exe files, shortcuts, and command-line tools.
Tip: For apps pinned to the taskbar, hold Shift and right-click to reveal the “Run as administrator” option.
Method 2: Use the Start Menu Search
Windows 11’s Start menu integrates a powerful search function, which also allows quick access to administrative execution.
Steps:
- Click the Start button or press the Windows key.
- Type the name of the application (e.g., cmd, PowerShell, Notepad).
- In the search results, right-click the desired application.
- Select “Run as administrator.”
- Confirm the UAC prompt.

Shortcut Tip: If you don’t want to right-click, just press Ctrl + Shift + Enter after typing the app name in the search bar. This will directly launch it with admin rights.
Method 3: Run from File Explorer with Admin Rights
If you’re navigating through folders in File Explorer and want to run a file with elevated permissions:
Steps:
- Open File Explorer and locate the executable file.
- Right-click on the file.
- Click “Run as administrator.”
- Confirm the UAC popup.
This is especially helpful when dealing with setup files, configuration utilities, or scripts stored in local folders.
Method 4: Always Run a Program as Administrator
If you frequently use a program that requires admin rights, you can configure it to always launch with elevated privileges.
Steps:
- Right-click on the app’s shortcut and select Properties.
- Navigate to the Compatibility tab.
- Under the Settings section, check the box labeled “Run this program as an administrator.”
- Click Apply, then OK.
From now on, this program will always ask for admin privileges when launched.
Note: This works only for shortcuts. If you apply it directly to an executable, the same behavior applies when run from that specific path.
Method 5: Use Task Manager to Run with Admin Rights
Task Manager isn’t just for closing apps—it can also start new processes with elevated permissions.
Steps:
- Press Ctrl + Shift + Esc to open Task Manager.
- Click File > Run new task.
- Type the name of the app (e.g.,
cmd,explorer,notepad, etc.). - Check the box “Create this task with administrative privileges.”
- Click OK.
This method is particularly useful if your desktop is unresponsive, and you need to launch diagnostic tools quickly.
Method 6: Use Command Prompt or PowerShell as Administrator
Both Command Prompt and PowerShell can launch other apps with elevated privileges.
To open Command Prompt as administrator:
- Press Windows + S, type cmd.
- Right-click Command Prompt, then click Run as administrator.
Or press Ctrl + Shift + Enter after typing cmd.
From within an elevated command line:
start "" /B /D "C:\Path\To\Program" "ProgramName.exe"
Or in PowerShell:
Start-Process "ProgramName.exe" -Verb RunAs
Replace "ProgramName.exe" with the actual name of the program. The -Verb RunAs flag instructs PowerShell to launch it with administrative permissions.
Method 7: Create a Shortcut that Always Runs as Administrator
To simplify frequent administrative tasks, you can make a custom shortcut that launches any app with admin rights.
Steps:
- Right-click on your desktop > New > Shortcut.
- Type the path to the program (or browse to it).
- Click Next, give it a name.
- Right-click the shortcut > Properties.
- Go to Compatibility tab.
- Check Run this program as an administrator.
- Click Apply > OK.
You now have a shortcut that always launches with elevated privileges.
Method 8: Enable Administrator Account (Built-in Super Admin)
Windows includes a hidden “super administrator” account with unrestricted access.
To enable it:
- Open Command Prompt as Administrator.
- Type the following and press Enter:
net user administrator /active:yes
- To assign a password (highly recommended):
net user administrator yourpassword
To disable the account later:
net user administrator /active:no
Warning: Only use this account when necessary. Always secure it with a strong password.
Method 9: Use Group Policy to Force Admin Mode (Pro Editions)
If you’re running Windows 11 Pro, you can use the Local Group Policy Editor to configure settings that force apps to request elevated privileges.
Steps:
- Press Windows + R, type
gpedit.msc, press Enter. - Navigate to: pgsqlCopyEdit
Computer Configuration > Windows Settings > Security Settings > Local Policies > Security Options - Look for policies like:
- User Account Control: Behavior of the elevation prompt
- User Account Control: Admin Approval Mode
- Adjust the settings to suit your needs, such as always prompting for elevation.
This approach is ideal in business environments or for system administrators.
Method 10: Run Scheduled Tasks with Admin Rights
Using Task Scheduler, you can automate a task to run as administrator—even at startup.
Steps:
- Open Task Scheduler (
taskschd.msc). - Click Create Task (not “Create Basic Task”).
- Under General, check Run with highest privileges.
- On the Actions tab, click New, then set the path to the executable.
- On Triggers, you can choose to run the task on logon, at a specific time, or on event.
This is perfect for apps that require admin rights on startup.
Bonus Tip: Use Windows Terminal with Admin Rights
Windows 11 integrates Windows Terminal, a unified shell that combines Command Prompt, PowerShell, and other shells.
Steps:
- Press Windows + X or right-click Start.
- Choose Windows Terminal (Admin).
- Accept the UAC prompt.
You can now execute a wide range of commands across different shells in one place.
Final Thoughts
Knowing how to run applications as an administrator in Windows 11 is more than just a power-user trick—it’s a crucial part of system management and security. Whether you’re installing software, troubleshooting a stubborn issue, or accessing protected system files, administrative privileges provide the control needed for advanced operations. However, these privileges come with significant responsibility. Misusing them—intentionally or accidentally—can lead to system instability or security vulnerabilities. That’s why tools like User Account Control (UAC) are built-in as safeguards.
Fortunately, Windows 11 offers numerous ways to run programs as administrator, ranging from simple right-click methods to more advanced tools like Task Scheduler and Group Policy Editor. Once you understand these options, you’ll be better equipped to manage your system effectively. Always ensure that the applications you elevate are trusted and necessary. Mastering this knowledge will not only make you a more efficient user but also a safer one in today’s evolving digital environment.