The Snipping Tool in Windows 11 is a built-in screenshot utility that allows users to quickly capture screenshots, edit them, and share them with others. Whether you want to capture the entire screen, a specific window, or a custom area, the Snipping Tool provides several easy options. It is especially useful for students, bloggers, IT professionals, and anyone who needs to take screenshots for tutorials, presentations, or troubleshooting.
In Windows 11, Microsoft redesigned and improved the Snipping Tool by combining the classic Snipping Tool and Snip & Sketch features into a single modern application. The updated tool offers improved editing tools, better keyboard shortcuts, screen recording capability (in newer versions), and seamless integration with the Windows operating system.

This detailed guide explains how to use Snipping Tool in Windows 11 step-by-step, including all available features, different screenshot modes, keyboard shortcuts, editing options, and troubleshooting tips. By the end of this guide, you will know how to capture and manage screenshots like a professional.
What is the Snipping Tool in Windows 11?
The Snipping Tool is a built-in screenshot application available in Windows 11 that lets users capture screenshots of their screen. Instead of using external software, you can quickly take screenshots directly using this tool.
With Snipping Tool, you can:
- Capture the entire screen
- Capture a specific window
- Capture a custom area of the screen
- Delay screenshots for a few seconds
- Edit screenshots using built-in annotation tools
- Save screenshots in different formats
- Share screenshots instantly
Windows 11 made the tool more powerful by adding a modern interface and additional editing features. This makes it much easier for beginners and advanced users alike.
How to Open Snipping Tool in Windows 11
There are several ways to open the Snipping Tool in Windows 11. Depending on your preference, you can use the Start menu, search bar, keyboard shortcuts, or quick settings.
Method 1: Open Snipping Tool Using the Start Menu
The easiest way to launch the Snipping Tool is through the Start menu.
Follow these steps:
- Click the Start button on the taskbar.
- Type Snipping Tool in the search box.
- Click on the Snipping Tool app from the results.


Once opened, the main interface of the Snipping Tool will appear.
This method is best for beginners who prefer accessing applications through the Start menu.
Method 2: Open Snipping Tool Using Windows Search
Windows Search allows you to quickly find apps without browsing through menus.
Steps to open it:
- Press Windows + S on your keyboard.
- Type Snipping Tool.
- Select the app from the search results.
This is one of the fastest ways to open the tool.
Method 3: Open Snipping Tool Using Keyboard Shortcut
Windows 11 includes a built-in keyboard shortcut that instantly opens the snipping interface.
Press the following keys:
Windows + Shift + S
Once you press these keys:
- The screen will dim slightly.
- A small snipping toolbar appears at the top.
- You can choose the screenshot mode.
This method is extremely popular because it lets you take screenshots without opening the full application.
Method 4: Open Snipping Tool from Run Command
Advanced users often use the Run command to open system applications quickly.
Steps:
- Press Windows + R to open the Run dialog box.
- Type snippingtool
- Press Enter.

The Snipping Tool will launch immediately.
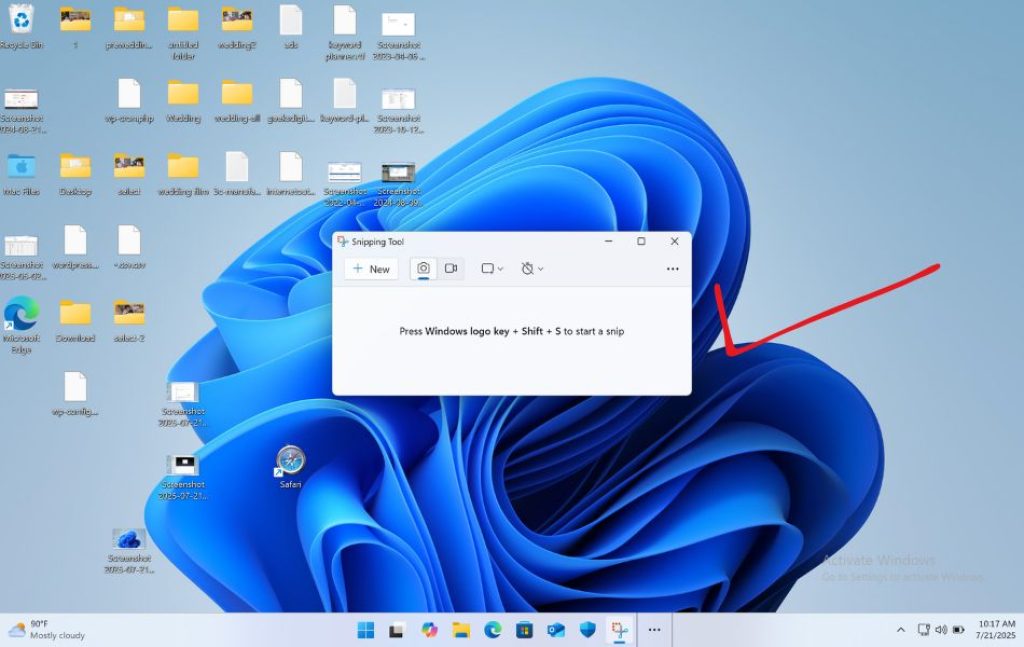
Understanding the Snipping Tool Interface
When you open the Snipping Tool, you will see a simple and modern interface. The design is clean and easy to use.
The main interface includes:
- New Button – Starts a new screenshot.
- Mode Selector – Choose the type of snip.
- Delay Option – Delay screenshot capture.
- Edit Tools – Draw, highlight, or erase annotations.
- Save Button – Save your screenshot.
- Share Button – Share captured images.
Understanding these elements will help you use the tool more efficiently.
Different Snipping Modes in Windows 11
The Snipping Tool provides four main screenshot modes. Each mode is designed for different situations.
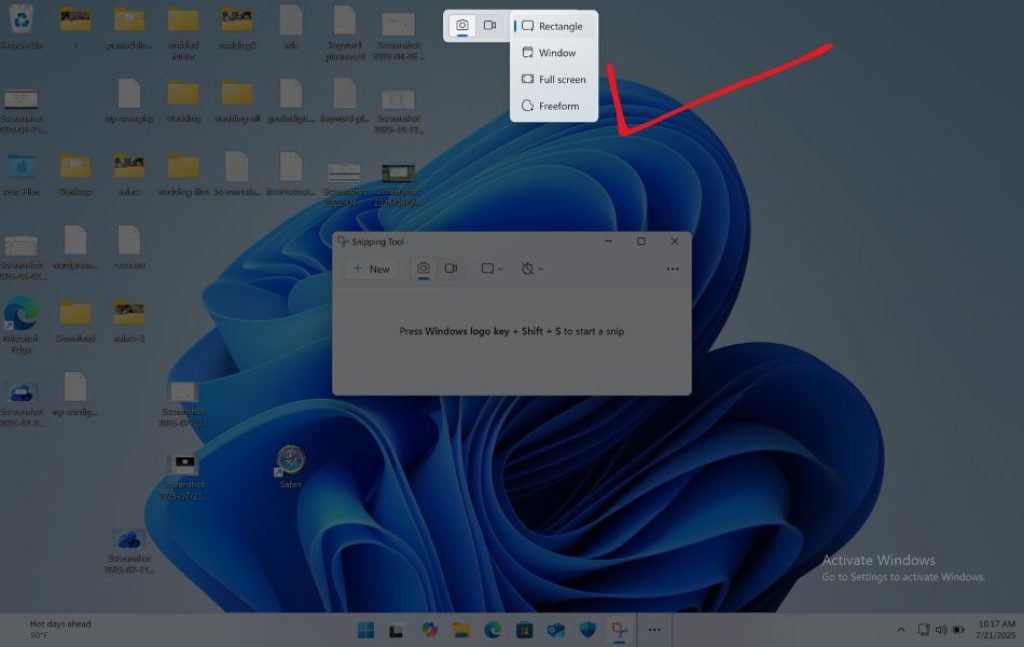
1. Rectangular Snip
Rectangular Snip allows you to capture a specific rectangular area of the screen.
How to use it:
- Open the Snipping Tool.
- Click New.
- Choose Rectangular Snip.
- Click and drag the mouse to select the area.
- Release the mouse button to capture the screenshot.
This is the most commonly used snipping mode because it allows precise screenshot selection.
You can capture:
- Part of a webpage
- Specific application area
- Small sections of documents
2. Freeform Snip
Freeform Snip lets you draw a custom shape around the area you want to capture.
Steps to use:
- Open the Snipping Tool.
- Select Freeform Snip.
- Click New.
- Use your mouse to draw any shape around the area.
- Release the mouse button to capture.
This mode is useful when:
- The content is not rectangular
- You want irregular shaped screenshots
- You want to highlight specific objects
3. Window Snip
Window Snip captures the screenshot of a specific application window.
Steps:
- Open the Snipping Tool.
- Choose Window Snip.
- Click New.
- Click the window you want to capture.
The tool will automatically capture the selected window.
This is helpful when you want screenshots of:
- Browser windows
- Software interfaces
- Dialog boxes
4. Full-Screen Snip
Full-Screen Snip captures the entire screen instantly.
Steps:
- Open Snipping Tool.
- Select Full-Screen Snip.
- Click New.
The screenshot will immediately capture everything on your screen.
This mode is useful for:
- Desktop screenshots
- Game screenshots
- Full software interfaces
How to Take a Screenshot Using Snipping Tool
Taking screenshots with the Snipping Tool is very simple.
Follow these steps:
- Open the Snipping Tool.
- Click the New button.
- Select the screenshot mode.
- Capture the area you want.
- The screenshot will appear in the editor.

Once captured, you can edit, save, or share the screenshot.
How to Delay Screenshots in Snipping Tool
Sometimes you need to capture something that appears after a few seconds, such as menus or tooltips.
The Snipping Tool provides a delay feature.
Steps to use delay:
- Open the Snipping Tool.
- Click the Delay dropdown.
- Choose a delay time:
- 3 seconds
- 5 seconds
- 10 seconds
- Click New.
- Prepare the screen.

After the delay ends, you can capture the screenshot.
This feature is useful when capturing:
- Dropdown menus
- Context menus
- Hover tooltips
- Temporary notifications
Editing Screenshots in Snipping Tool
After capturing a screenshot, the Snipping Tool opens a built-in editor.
This editor allows you to annotate or modify screenshots.

Pen Tool
The Pen tool lets you draw lines or mark important areas.
You can:
- Circle important elements
- Highlight sections
- Write notes on the screenshot
Highlighter Tool
The Highlighter allows you to highlight important text or areas.
This is commonly used in:
- Tutorials
- Documentation
- Educational content
Eraser Tool
If you make a mistake while drawing, the Eraser tool removes annotations.
Simply select the eraser and click the unwanted marks.
Ruler Tool
The ruler helps you draw straight lines.
You can rotate the ruler and draw accurate annotations.
Touch Writing
If you have a touchscreen device or stylus, you can write directly on the screenshot.
This feature is very helpful for tablets and touchscreen laptops.
How to Save Screenshots in Windows 11
Once you capture a screenshot, you may want to save it.
Steps:
- Click the Save icon.
- Choose the save location.
- Enter a file name.
- Select the format:
- PNG
- JPG
- GIF
- Click Save.
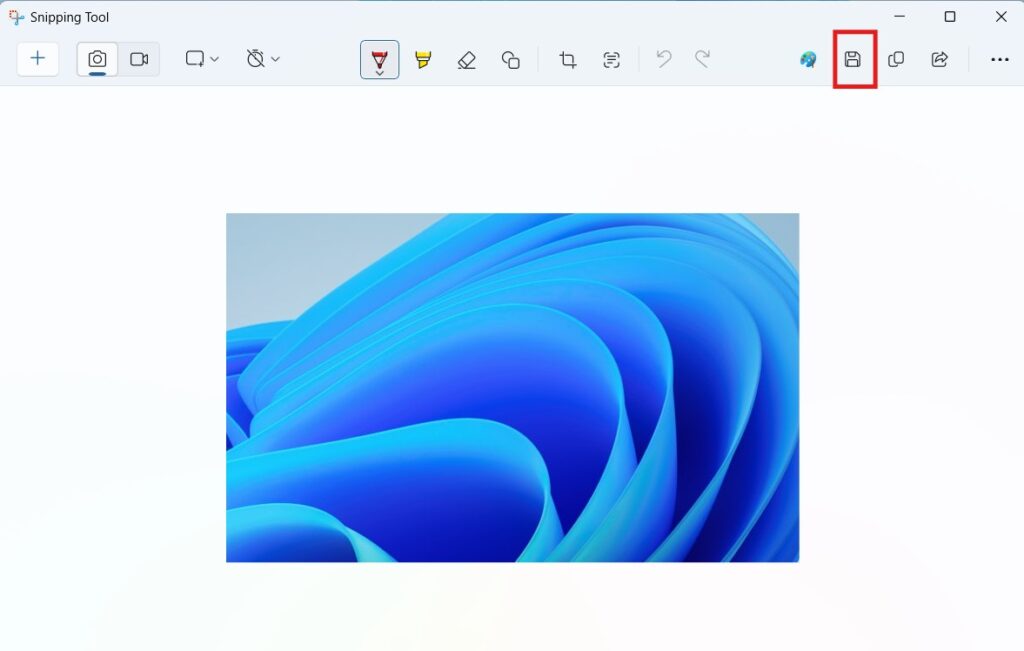
PNG is the most commonly used format because it preserves high image quality.
How to Copy Screenshots to Clipboard
Sometimes you do not need to save the screenshot. Instead, you may want to paste it directly into another program.
Steps:
- Capture the screenshot.
- Click Copy.
- Open another application like:
- Word
- Paint
- PowerPoint
- Press Ctrl + V.
The screenshot will be pasted instantly.
How to Share Screenshots
Windows 11 allows you to share screenshots directly from the Snipping Tool.
Steps:
- Capture a screenshot.
- Click the Share button.
- Choose an app such as:
- Microsoft Teams
- OneNote
- Other sharing apps.
This feature is helpful for quick communication.
Snipping Tool Keyboard Shortcuts
Using keyboard shortcuts makes screenshot capture faster.
Important shortcuts include:
- Windows + Shift + S – Open snipping toolbar
- Ctrl + N – Create new snip
- Ctrl + S – Save screenshot
- Ctrl + C – Copy screenshot
- Ctrl + Z – Undo annotation
- Ctrl + Y – Redo annotation
Learning these shortcuts can significantly speed up your workflow.
How to Record Screen Using Snipping Tool
Recent versions of Windows 11 added screen recording support inside the Snipping Tool.
Steps to record the screen:
- Open the Snipping Tool.
- Select the Record option.
- Click New recording.
- Select the area you want to record.
- Click Start recording.

You can also use the shortcut Windows Logo Key + Shift + R to directly open the Snipping Tool screen recording option.
The recording will capture screen activity.
You can then save the video file.
This feature is useful for:
- Tutorials
- Software demonstrations
- Problem reporting
Snipping Tool vs Print Screen Key
Many users wonder whether they should use Print Screen or the Snipping Tool.
Here is the difference:
| Feature | Snipping Tool | Print Screen |
|---|---|---|
| Area selection | Yes | No |
| Editing tools | Yes | No |
| Delay capture | Yes | No |
| Built-in annotation | Yes | No |
| Full screenshot | Yes | Yes |
While Print Screen is quick, the Snipping Tool offers more control and editing features.
Troubleshooting Snipping Tool Issues
Sometimes the Snipping Tool may not work properly. Below are some common solutions.
Restart the Snipping Tool
Close the application and reopen it.
Restart Windows
Restarting the computer often fixes temporary issues.
Update Windows
Make sure Windows 11 is updated because updates often fix bugs.
Steps:
- Open Settings.
- Go to Windows Update.
- Click Check for updates.
Reset the Snipping Tool
You can reset the app through settings.
Steps:
- Open Settings.
- Go to Apps → Installed Apps.
- Find Snipping Tool.
- Click Advanced options.
- Select Reset.
Best Tips for Using Snipping Tool
Here are some tips that make the tool more efficient:
- Use Windows + Shift + S for quick screenshots.
- Save important screenshots in PNG format.
- Use delay capture for menus and popups.
- Use the highlighter tool when creating tutorials.
- Organize screenshots in folders for easy access.
These tips can significantly improve productivity.
Final Thoughts
The Snipping Tool in Windows 11 is a powerful and easy-to-use screenshot utility that allows users to capture, edit, and share screenshots effortlessly. With features like rectangular snip, freeform snip, window snip, full-screen capture, delay timer, built-in editing tools, and screen recording support, it provides everything needed for everyday screenshot tasks.
Whether you are creating tutorials, documenting software issues, preparing presentations, or simply saving information from the screen, the Snipping Tool makes the process fast and convenient. Because it is already included in Windows 11, you do not need to install any additional screenshot software.
By learning the different snipping modes, keyboard shortcuts, editing tools, and sharing options explained in this guide, you can use the Snipping Tool more efficiently and take professional-quality screenshots whenever needed.