Olivia Harper
Windows Security is the built-in security suite included with Windows 11 that helps protect your computer from viruses, malware, ransomware, phishing attacks, malicious websites, and other online threats. Unlike older versions of Windows that required users to install third-party antivirus software, Windows Security provides comprehensive protection out of the box and receives regular updates through Windows Update.
For most home users, Windows Security offers everything needed to keep a Windows 11 PC secure. It includes Microsoft Defender Antivirus, Firewall & Network Protection, SmartScreen, Device Security, Account Protection, and several other features that work together to safeguard your device and personal information. Since these tools are integrated directly into Windows, they work efficiently in the background without requiring complex configuration.

Learning how to use Windows Security properly can significantly improve your computer’s security. Enabling the right features, performing regular scans, checking protection history, and keeping security definitions up to date can help prevent malware infections and protect sensitive data.
In this guide, you’ll learn how to use Windows Security in Windows 11 for the best possible protection using its built-in security features.
What Is Windows Security?
Windows Security is Microsoft’s built-in security application that manages various protection features in Windows 11. It acts as a central dashboard where you can monitor your device’s security status, configure antivirus settings, manage firewall rules, check account protection, and review security alerts.
The application includes several protection areas, including:
- Virus & Threat Protection
- Account Protection
- Firewall & Network Protection
- App & Browser Control
- Device Security
- Device Performance & Health
- Family Options
These components work together to help protect your computer against both offline and online threats without requiring additional security software.
Method 1: Open Windows Security
Before you can configure any protection settings, you need to open the Windows Security app.
Step 1
Press Windows + S to open Windows Search.
Step 2
Type:
Windows Security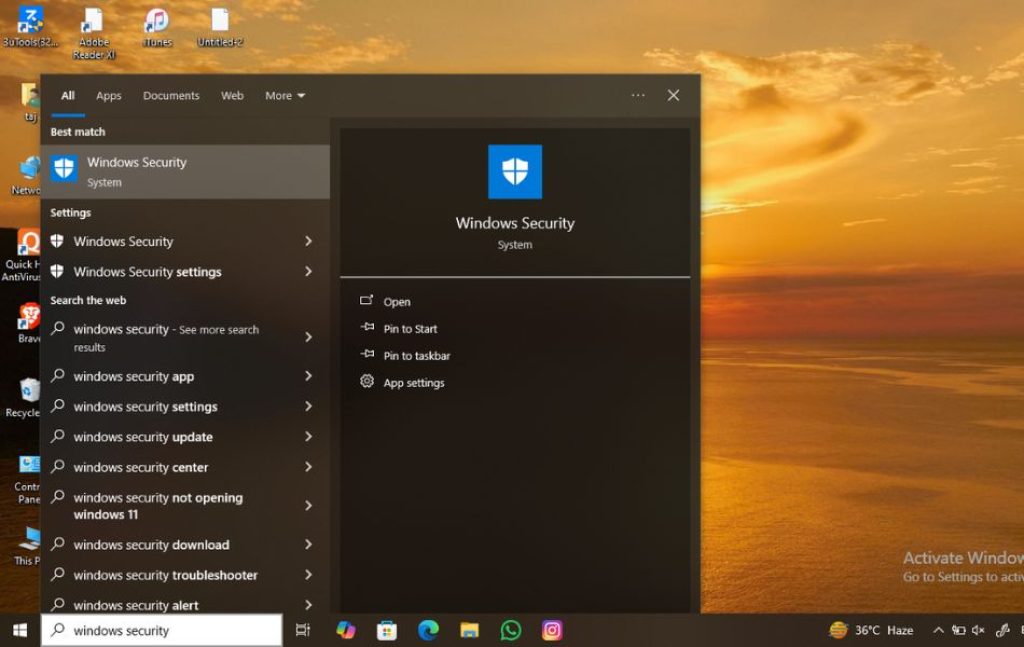
Step 3
Click Windows Security from the search results.
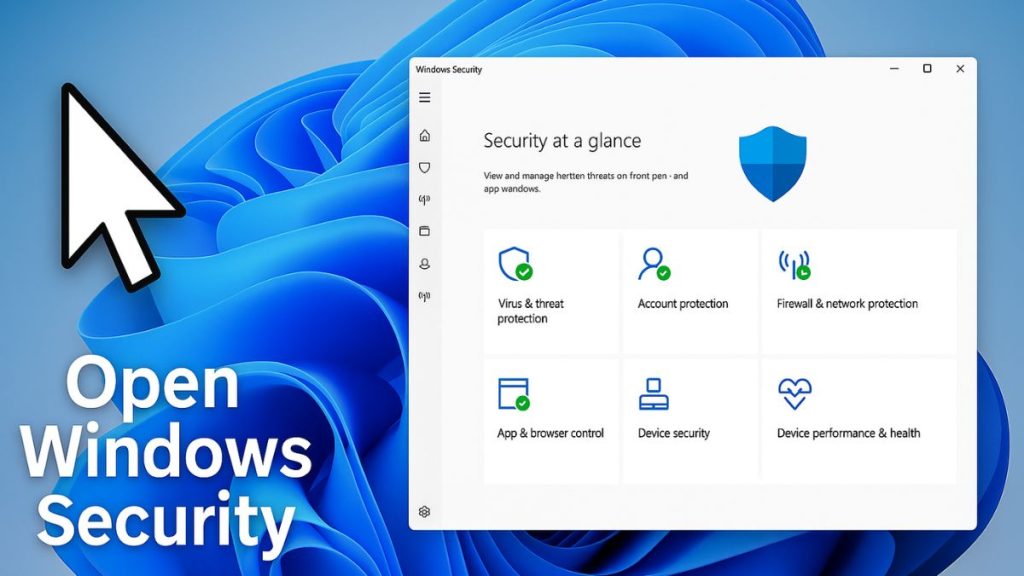
Alternatively, you can open it through Settings.
- Press Windows + I.
- Select Privacy & security.
- Click Windows Security.
- Choose Open Windows Security.
Once opened, you’ll see the Windows Security dashboard displaying the status of all protection areas. Green checkmarks indicate that a security feature is enabled and functioning properly, while yellow or red icons may indicate recommended actions or security issues that require attention.
It’s a good idea to review this dashboard regularly to ensure your PC remains protected.
Method 2: Configure Virus & Threat Protection
Virus & Threat Protection is one of the most important sections of Windows Security. It uses Microsoft Defender Antivirus to detect and remove viruses, spyware, ransomware, trojans, worms, and other malicious software.
Step 1
Open Windows Security.
Step 2
Select Virus & threat protection.
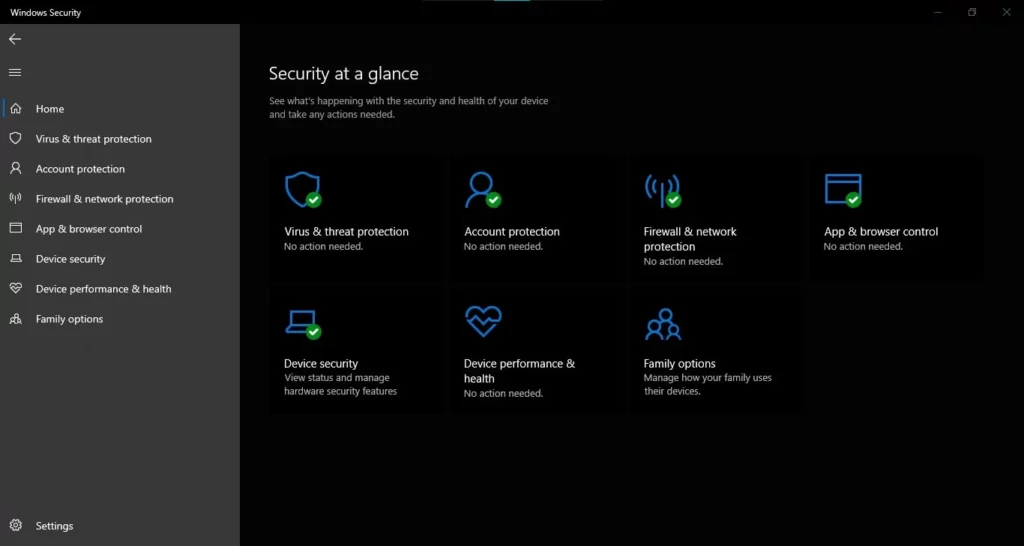
Here you’ll find options such as:
- Quick Scan
- Full Scan
- Custom Scan
- Microsoft Defender Offline Scan
- Protection History
- Manage Settings
Step 3
Click Quick Scan to check the most commonly targeted areas of your computer.
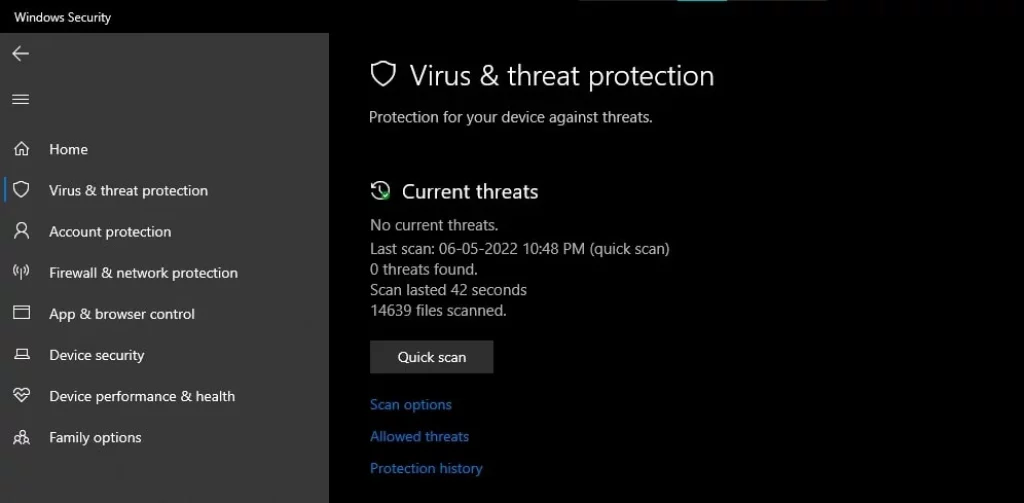
A Quick Scan usually completes within a few minutes and is suitable for routine security checks.
Step 4
For a more thorough inspection, select:
Scan options
Then choose:
- Full Scan
- Custom Scan
- Microsoft Defender Offline Scan
Click Scan now.
A Full Scan examines every file on your computer and may take an hour or longer depending on the size of your storage drive.
The Microsoft Defender Offline Scan restarts your computer and scans before Windows fully loads, making it more effective at removing deeply embedded malware.
Step 5
Click Manage settings under Virus & threat protection settings.
Verify that the following options are enabled:
- Real-time Protection
- Cloud-delivered Protection
- Automatic Sample Submission
- Tamper Protection
Real-time Protection continuously monitors files and applications as they are accessed, helping stop threats before they can infect your system.
Cloud-delivered Protection allows Microsoft Defender to use Microsoft’s cloud intelligence to detect emerging threats more quickly.
Automatic Sample Submission sends suspicious files to Microsoft for analysis, improving malware detection while helping protect other Windows users.
Tamper Protection prevents malicious software or unauthorized users from disabling important Microsoft Defender security settings.
Keeping all of these features enabled provides the highest level of protection for most users.
Method 3: Review Protection History
Windows Security records every action taken by Microsoft Defender, allowing you to review detected threats, quarantined files, completed scans, and recommended security actions.
Step 1
Open Windows Security.
Step 2
Select Virus & threat protection.
Step 3
Click Protection history.
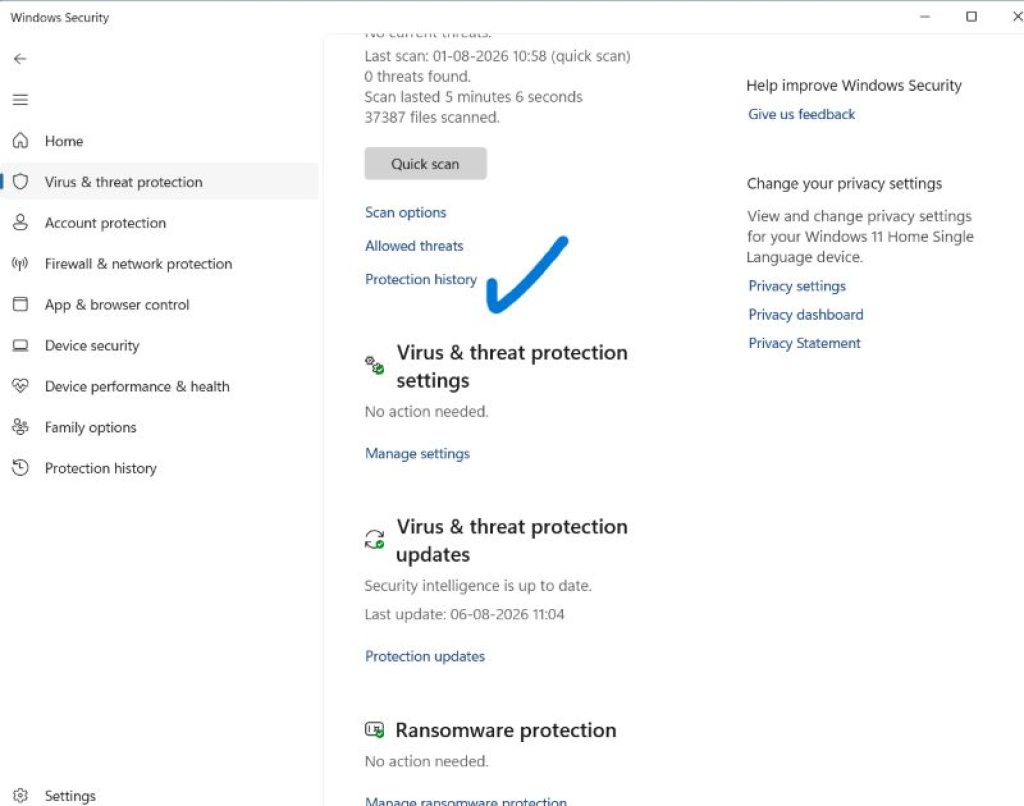
Here you can review recent security events, including:
- Detected malware
- Quarantined files
- Removed threats
- Allowed threats
- Blocked applications
- Security recommendations
If Windows Defender detects suspicious software, you’ll usually see additional details explaining what action was taken.
In some cases, legitimate programs may be flagged incorrectly. Reviewing the Protection History helps you determine whether a file should remain quarantined or be restored if you trust its source.
It’s also useful for confirming that Windows Security successfully removed a threat after a scan.
Checking this section occasionally helps ensure that no important alerts have been overlooked.
Method 4: Secure Your Microsoft Account with Account Protection
Your Microsoft account plays an important role in securing your Windows 11 device. The Account Protection section helps you manage sign-in security and verify that your account is properly protected.
Step 1
Open Windows Security.
Step 2
Click Account protection.
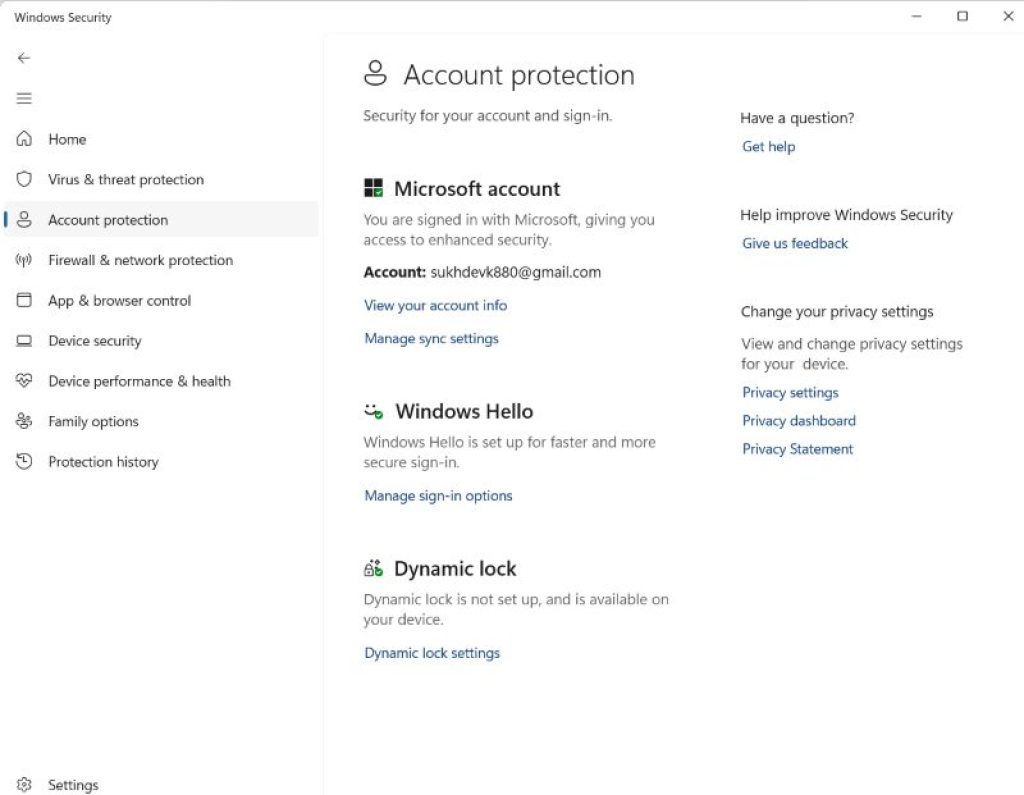
Depending on your setup, you may see options related to:
- Microsoft Account
- Windows Hello
- Dynamic Lock
Step 3
Set up Windows Hello if you haven’t already.
Windows Hello supports several secure sign-in methods, including:
- PIN
- Fingerprint
- Facial Recognition
- Security Key
These authentication methods are generally more secure and convenient than using a traditional password alone.
Step 4
Review your Microsoft account security status.
If Windows recommends verifying your identity or enabling additional security features, follow the on-screen instructions.
Using a Microsoft account with two-step verification adds another layer of protection by requiring a second verification method during sign-in.
Step 5
If your computer supports Bluetooth, consider enabling Dynamic Lock.
Dynamic Lock automatically locks your PC when your paired smartphone moves out of Bluetooth range, helping prevent unauthorized access if you leave your computer unattended.
Together, Windows Hello, account verification, and Dynamic Lock significantly improve your device’s physical and account security.
Method 5: Configure Firewall & Network Protection
Microsoft Defender Firewall helps prevent unauthorized users, malicious software, and network attacks from accessing your computer. It monitors incoming and outgoing network traffic and blocks suspicious connections based on predefined security rules.
Step 1
Open Windows Security.
Step 2
Select Firewall & network protection.
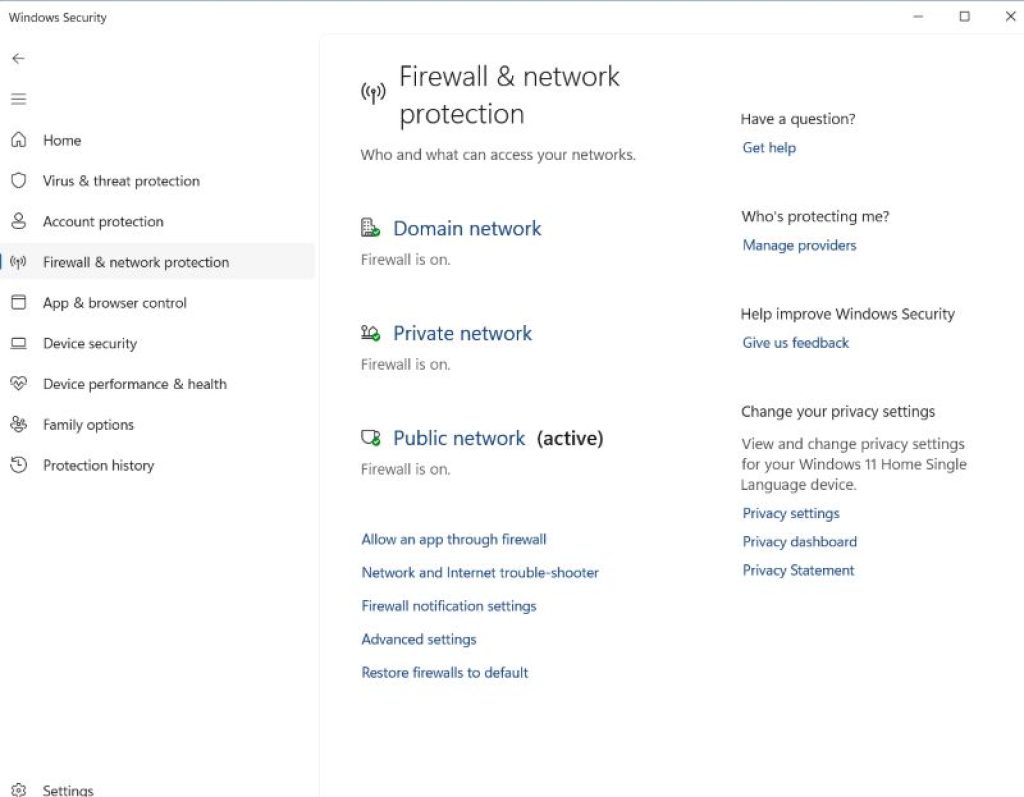
You’ll typically see three network profiles:
- Domain network
- Private network
- Public network
The active network will display a status such as Connected.
Step 3
Click the active network profile.
Step 4
Ensure that Microsoft Defender Firewall is turned On.
Leaving the firewall enabled is one of the easiest ways to improve your computer’s security. Disabling it should only be done temporarily for troubleshooting specific network issues.
Step 5
Return to the Firewall & network protection page.
Here you can also access options such as:
- Allow an app through firewall
- Restore firewalls to default
- Advanced settings
- Network and Internet troubleshooting
If a trusted application cannot connect to the internet, use Allow an app through firewall instead of turning the firewall off completely.
For most users, the default firewall settings provide excellent protection without requiring additional configuration.
Method 6: Enable App & Browser Control
App & Browser Control protects your computer from malicious websites, unsafe downloads, phishing attacks, and potentially dangerous applications. It relies on Microsoft Defender SmartScreen and reputation-based protection to identify threats before they can affect your system.
Step 1
Open Windows Security.
Step 2
Select App & browser control.
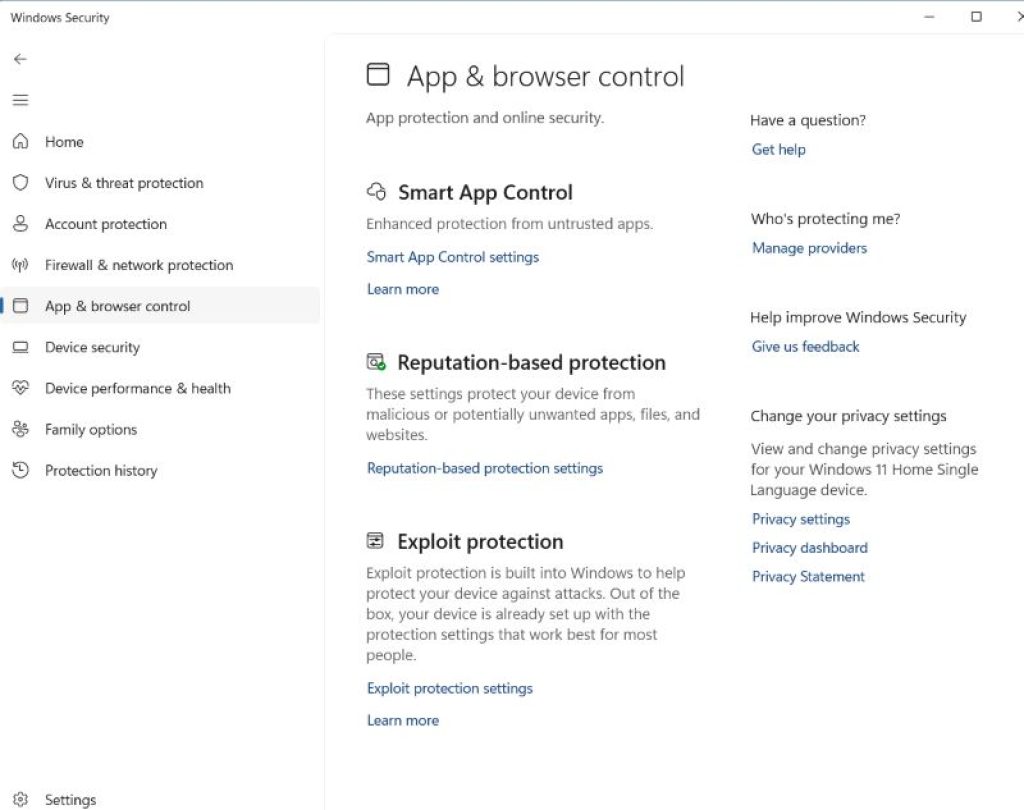
You’ll find several protection features, including:
- Reputation-based protection
- SmartScreen for Microsoft Edge
- SmartScreen for Microsoft Store apps
- Potentially unwanted app blocking
- Exploit protection
Step 3
Click Reputation-based protection settings.
Verify that the following options are enabled:
- Check apps and files
- SmartScreen for Microsoft Edge
- Phishing protection
- Potentially unwanted app blocking
- SmartScreen for Microsoft Store apps
These features help prevent accidental downloads of malicious software and warn you before visiting suspicious websites.
Step 4
Review Exploit protection.
Windows automatically applies security mitigations that help protect applications from common attack techniques such as memory corruption and code injection.
For most users, the default exploit protection settings are recommended and should not be modified unless instructed by an experienced administrator.
Keeping these protections enabled provides an additional layer of defense against both known and unknown threats.
Method 7: Review Device Security Settings
The Device Security section shows whether your computer supports important hardware-based security features. These technologies help protect Windows from low-level attacks that target the operating system before it fully loads.
Step 1
Open Windows Security.
Step 2
Click Device security.
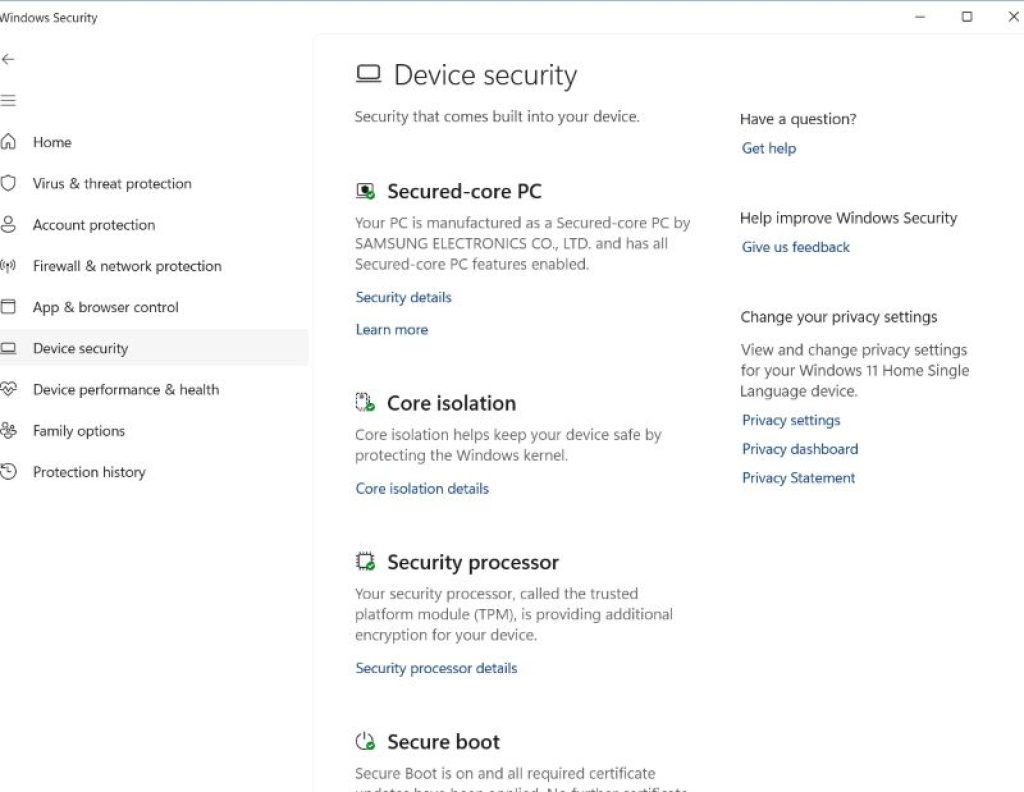
Depending on your hardware, you may see features such as:
- Core isolation
- Memory integrity
- Security processor (TPM)
- Secure Boot
- Hardware security
Step 3
Open Core isolation details.
If supported, enable Memory integrity.
Memory integrity uses virtualization-based security to help prevent malicious code from modifying protected system processes. This makes it more difficult for certain types of malware to compromise Windows.
Some older drivers may not support Memory Integrity. If Windows reports incompatible drivers, update or replace them before enabling the feature.
Step 4
Review the Security processor section.
A Trusted Platform Module (TPM) securely stores encryption keys and works with features such as BitLocker and Windows Hello.
Step 5
Verify that Secure Boot is enabled.
Secure Boot helps prevent malicious bootloaders and rootkits from loading before Windows starts, increasing the overall security of your device.
Modern Windows 11 computers typically have TPM 2.0 and Secure Boot enabled by default.
Method 8: Check Device Performance & Health
Windows Security also includes tools that monitor the health of your device. While this section doesn’t directly protect against malware, it helps identify issues that could affect system stability and security.
Step 1
Open Windows Security.
Step 2
Select Device performance & health.
Here you’ll find information about:
- Storage capacity
- Battery life (on laptops)
- Windows Update status
- Applications
- Time service
If Windows detects any problems, recommendations will appear explaining how to resolve them.
Step 3
Review the Fresh Start option if available.
Fresh Start reinstalls Windows while keeping your personal files. This can remove unnecessary software and restore system performance if your computer has become unstable.
Because reinstalling Windows removes installed applications, use this option only when necessary.
Monitoring this section periodically helps ensure your computer continues to operate reliably.
Method 9: Configure Family Options
Family Options allows parents to help protect children online through Microsoft Family Safety. It provides tools for managing screen time, monitoring activity, and filtering inappropriate content.
Step 1
Open Windows Security.
Step 2
Click Family options.
Step 3
Select View family settings.
This opens Microsoft Family Safety, where you can manage family members associated with your Microsoft account.
Available features include:
- Screen time limits
- Content filtering
- App and game restrictions
- Activity reporting
- Location sharing (for supported devices)
Parents can use these tools to create a safer digital environment while allowing children to use Windows responsibly.
Even if you don’t need parental controls, reviewing this section can help you understand the family safety features available with your Microsoft account.
Method 10: Keep Windows Security Updated
Windows Security is only effective if its malware definitions and security components remain up to date. Microsoft releases new intelligence updates frequently to detect the latest threats.
Step 1
Open Windows Security.
Step 2
Go to Virus & threat protection.
Step 3
Under Virus & threat protection updates, click Protection updates.
Step 4
Select Check for updates.
Windows will download the latest Microsoft Defender security intelligence if newer definitions are available.
Step 5
Also keep Windows itself updated.
- Press Windows + I.
- Select Windows Update.
- Click Check for updates.
- Install any available updates.
- Restart your computer if prompted.
Windows updates often include security improvements, vulnerability fixes, driver updates, and enhancements to Microsoft Defender.
Keeping both Windows and Windows Security updated ensures your computer has the latest protections against newly discovered threats.
Additional Tips for Maximum Protection
Using Windows Security effectively involves more than simply enabling its features. Following good security practices can further reduce the risk of malware infections and unauthorized access.
Use strong, unique passwords for your Microsoft account and enable two-factor authentication whenever possible. Avoid downloading software from untrusted websites, and only install applications from reputable sources.
Be cautious when opening email attachments or clicking links from unknown senders, as phishing remains one of the most common attack methods. Regularly back up important files using File History, OneDrive, or an external storage device so you can recover your data in case of hardware failure or ransomware.
Finally, avoid disabling Windows Security components unless absolutely necessary. The default settings are designed to provide a strong balance between protection and system performance for most users.
Conclusion
Windows Security is a powerful built-in security solution that provides comprehensive protection for Windows 11 without requiring additional antivirus software. By combining Microsoft Defender Antivirus, Firewall & Network Protection, SmartScreen, Device Security, and other security features into a single application, it offers multiple layers of defense against viruses, ransomware, phishing attacks, malicious websites, and unauthorized access.
To get the best protection, it’s important to do more than simply install Windows 11 and leave the default settings untouched. Regularly opening Windows Security to review its status, performing routine Quick or Full Scans, checking Protection History, enabling Real-time Protection and Tamper Protection, and keeping security intelligence up to date all contribute to a safer computing experience. Features like Memory Integrity, Secure Boot, Windows Hello, and Microsoft Defender Firewall further strengthen your system by protecting both your hardware and software from modern threats.
Good security habits are equally important. Keeping Windows updated, downloading software only from trusted sources, avoiding suspicious email attachments, and maintaining regular backups can significantly reduce the risk of data loss or malware infections. Windows Security works best when combined with safe browsing practices and responsible computer usage.
For most home and small business users, Windows Security provides more than enough protection when properly configured. By understanding each protection area and following the steps outlined in this guide, you can maximize your Windows 11 security and help keep your personal files, accounts, and devices protected against today’s evolving cyber threats.
Frequently Asked Questions
Is Windows Security enough to protect my Windows 11 PC?
Yes. For most users, Windows Security provides comprehensive protection against viruses, malware, ransomware, phishing attacks, and other common threats. When combined with regular Windows updates and safe browsing habits, it offers a strong level of security without the need for third-party antivirus software.
Should I keep Real-time Protection enabled?
Yes. Real-time Protection continuously scans files, applications, and downloads for malicious activity. Disabling it leaves your computer more vulnerable to malware and should only be done temporarily for troubleshooting purposes.
How often should I run a Full Scan?
A Quick Scan is usually sufficient for routine checks because Microsoft Defender monitors your system in real time. However, running a Full Scan once every few weeks or whenever you suspect suspicious activity provides an additional layer of assurance.
Can Windows Security remove malware automatically?
Yes. Microsoft Defender Antivirus can detect, quarantine, and remove many types of malware automatically. After a scan, you can review detected threats in Protection History to confirm what actions were taken and whether any additional steps are required.
![How to Use Windows Security in Windows 11 [Enhanced Protection]](https://www.geeksdigit.com/wp-content/uploads/thumbs_dir/Minecraft-Worlds-Saved-on-Windows-PC-rrhtwqahhff8n2tq829nhn8a90t9g6hpzk4dp0twzg.jpg)
![How to Use Windows Security in Windows 11 [Enhanced Protection]](https://www.geeksdigit.com/wp-content/uploads/thumbs_dir/enable-ultimate-performance-power-plan-windows-11-rrhuxmgfqbxec38hsidhuu2lmgywkhyg25xgt04mrg.jpg)