
 Geeksdigit Team
Graphics Processing Unit (GPU) drivers are essential software components that allow Windows and your graphics card to communicate properly. Whether you use an NVIDIA, AMD, or Intel graphics card, keeping the correct driver installed is important for gaming performance, video editing, content creation, and overall system stability. Over time, GPU drivers can become corrupted, outdated, or affected by failed updates, leading to problems such as game crashes, black screens, display flickering, low frame rates, driver timeout errors, screen artifacts, and unexpected system freezes.
While updating a graphics driver often fixes minor issues, there are situations where a standard update is not enough. Leftover files, damaged settings, and old driver components can continue causing problems even after installing a newer version. In these cases, performing a clean installation removes all traces of the existing driver before installing a fresh copy. This ensures that Windows uses a completely new driver installation without inheriting old settings or corrupted files.

This guide explains several methods to cleanly install and reinstall GPU drivers on Windows 11 and Windows 10. Follow the methods below to completely remove existing graphics drivers and install fresh drivers for your graphics card.
Method 1: Identify Your Graphics Card Model
Before reinstalling drivers, determine the exact GPU installed in your computer.
To identify your graphics card:
Press Windows + X.
Select Device Manager.
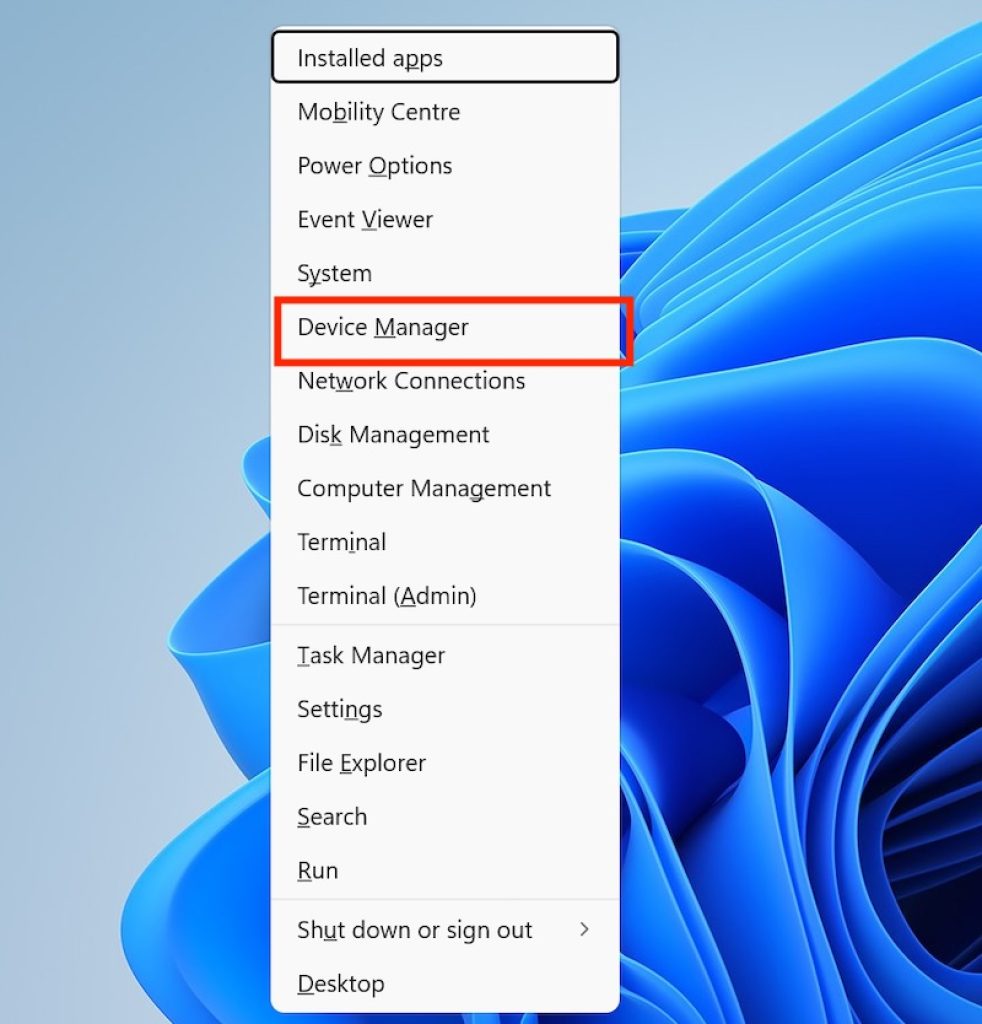
Expand Display adapters.
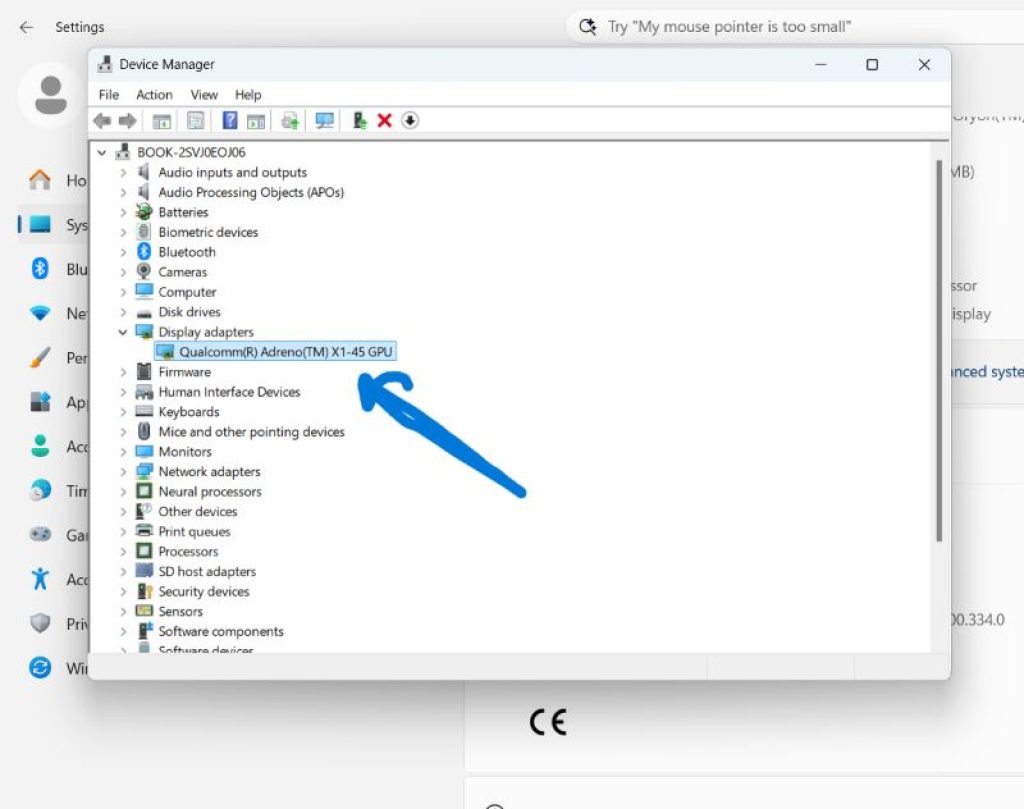
Note the graphics card name.
Examples include:
- NVIDIA GeForce RTX 5070
- NVIDIA GeForce RTX 4060
- AMD Radeon RX 9070 XT
- AMD Radeon RX 7800 XT
- Intel Arc B580
- Intel Arc A770
Knowing the exact model ensures that you download the correct driver later.
Method 2: Download the Latest GPU Driver
Before removing the current driver, download the latest version from the manufacturer’s website.
For NVIDIA users:
- Visit the NVIDIA driver download page.
- Select your graphics card model.
- Download the latest driver package.
For AMD users:
- Visit the AMD drivers page.
- Choose your Radeon GPU.
- Download the latest Adrenalin driver.
For Intel users:
- Visit the Intel graphics driver page.
- Download the latest graphics package.
Save the installer in an easily accessible folder because you will need it after removing the existing driver.
Method 3: Create a System Restore Point
Creating a restore point provides a safety net in case something goes wrong during driver removal or installation.
To create a restore point:
- Open the Start menu.
- Search for Create a restore point.
- Open the result.
- Click Create.
- Enter a name such as:
- Before GPU Driver Reinstall
- Click Create again.
Wait for Windows to complete the process before continuing.
Method 4: Remove the Existing Driver Using Device Manager
Windows can uninstall graphics drivers directly through Device Manager.
Follow these steps:
- Press Windows + X.
- Open Device Manager.
- Expand Display adapters.
- Right-click your graphics card.
- Select Uninstall device.
- Enable:
- Attempt to remove the driver for this device (if available)
- Click Uninstall.
- Restart the computer.
After rebooting, Windows may load a basic display driver temporarily.
This method removes the primary driver but may leave some settings and files behind.
Method 5: Use Display Driver Uninstaller (DDU) for a Complete Removal
Display Driver Uninstaller (DDU) is widely used for completely removing graphics drivers and associated files.
Before using DDU:
- Download the utility.
- Extract the archive.
- Disconnect from the internet if possible.
To perform a clean removal:
- Restart Windows into Safe Mode.
- Launch DDU.
- Select your GPU manufacturer:
- NVIDIA
- AMD
- Intel
- Click Clean and restart.
DDU removes:
- Driver files
- Registry entries
- Driver services
- Control panel settings
- Cached driver components
After restarting, the system will be ready for a fresh installation.
This is generally considered the most thorough method for removing graphics drivers.
Method 6: Install the Fresh GPU Driver
After removing the previous driver, install the downloaded package.
To install:
- Run the driver installer.
- Accept the license agreement.
- Continue through the setup wizard.
Many driver packages offer installation options such as:
- Express Installation
- Recommended Installation
- Clean Installation
- Factory Reset Installation
When available, choose the clean installation option.
This replaces old settings with a fresh configuration.
After installation:
- Restart the computer.
The GPU driver should now be fully installed.
Method 7: Perform a Clean NVIDIA Driver Installation
NVIDIA drivers include a built-in clean installation option.
To use it:
- Launch the NVIDIA installer.
- Choose Custom (Advanced) installation.
- Click Next.
- Enable:
- Perform a clean installation
- Continue with setup.
- Restart the PC after completion.
This resets:
- NVIDIA Control Panel settings
- Profiles
- Display configurations
- Driver preferences
The result is a fresh NVIDIA driver environment.
Method 8: Perform an AMD Factory Reset Installation
AMD drivers provide a factory reset feature that removes previous components before installing new ones.
To use it:
- Run the AMD driver package.
- Enable:
- Factory Reset
- Continue installation.
- Restart the system when prompted.
Factory Reset automatically removes previous AMD driver files and settings before installing the new driver.
Method 9: Install Intel Graphics Drivers Cleanly
Intel graphics drivers can also be installed after complete removal.
To perform a clean Intel installation:
- Remove the existing Intel graphics driver.
- Restart Windows.
- Launch the downloaded Intel installer.
- Complete setup.
- Restart the PC.
Intel’s installer automatically replaces outdated components with fresh files.
Method 10: Prevent Windows from Reinstalling Older Drivers
Sometimes Windows Update automatically installs an older graphics driver before you can install the desired version.
To reduce this risk:
- Disconnect from the internet temporarily.
- Complete the driver installation first.
- Reconnect afterward.
You can also review optional driver updates in Windows Update before allowing automatic installation.
This helps ensure that the intended driver version remains installed.
Method 11: Verify the Driver Installation
After installation, verify that Windows recognizes the new driver correctly.
To check:
- Open Device Manager.
- Expand Display adapters.
- Confirm the correct GPU appears.
- Right-click the device.
- Select Properties.
- Open the Driver tab.
- Verify:
- Driver version
- Driver date
- Provider information
You can also check driver information through NVIDIA Control Panel, AMD Software Adrenalin Edition, or Intel Graphics Software.
Method 12: Test GPU Stability
After reinstalling the driver, test the graphics card to ensure everything is functioning properly.
Recommended tests include:
- Playing a game
- Watching high-resolution video
- Running a benchmark
- Using GPU-accelerated applications
- Testing multiple monitors if applicable
Monitor for:
- Screen flickering
- Crashes
- Black screens
- Driver timeout messages
- Performance drops
If the issues have disappeared, the clean installation was successful.
Frequently Asked Questions
What is a clean GPU driver installation?
A clean installation removes previous driver files, settings, profiles, and related components before installing a fresh version of the graphics driver.
Is Display Driver Uninstaller (DDU) necessary?
Not always. Many users can reinstall drivers using the manufacturer installer. However, DDU is useful when troubleshooting persistent driver-related issues or switching GPU brands.
Will reinstalling GPU drivers improve gaming performance?
It can. Corrupted or outdated drivers may reduce performance, cause crashes, or create compatibility issues. A clean installation often restores proper functionality.
Should I use Safe Mode when removing GPU drivers?
Safe Mode is recommended when using DDU because it prevents driver components from actively running during removal.
Can Windows automatically reinstall graphics drivers?
Yes. Windows Update may automatically install graphics drivers after removal. Disconnecting from the internet during the process can help prevent unwanted driver installation.
Final Thoughts
A clean GPU driver installation is one of the most effective solutions for graphics-related problems on Windows. Whether you are experiencing game crashes, display flickering, poor performance, black screens, driver errors, or issues after upgrading your graphics card, removing the existing driver completely and installing a fresh version can often resolve the problem. While Device Manager can uninstall basic driver components, tools such as Display Driver Uninstaller provide a more thorough cleanup by removing leftover files, services, registry entries, and cached settings.
After removing the old driver, installing the latest version from NVIDIA, AMD, or Intel ensures that your system benefits from current performance improvements, bug fixes, security updates, and compatibility enhancements. Taking the time to perform a proper clean installation can improve stability and eliminate many difficult-to-diagnose graphics problems. By following the methods in this guide, you can safely cleanly install and reinstall GPU drivers on Windows and maintain optimal graphics performance for gaming, productivity, and everyday use.





