Olivia Harper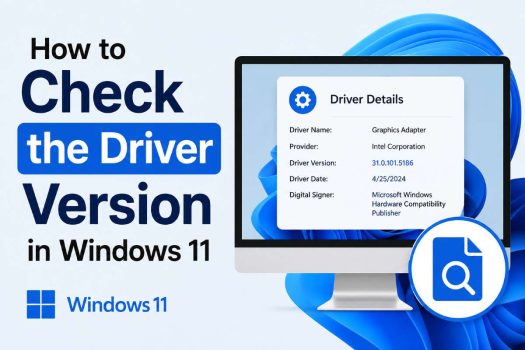
Drivers are the small but essential pieces of software that let Windows 11 talk to your hardware — your graphics card, network adapter, printer, sound card, and dozens of other components. When something isn’t working quite right (a game stutters, a webcam won’t turn on, or a printer refuses to connect), one of the first troubleshooting steps any technician will suggest is checking your driver version. Knowing which version you’re running helps you confirm whether you have the latest update, diagnose compatibility issues, or roll back to a previous version if a new driver caused problems.
The good news is that Windows 11 doesn’t hide this information away. In fact, there are several built-in ways to check driver versions, ranging from simple point-and-click methods in Device Manager to more detailed command-line queries using PowerShell. Depending on what you need — a quick glance at a version number or a full technical readout including date, provider, and digital signature — one method will suit you better than another.

This guide walks through every practical way to check a driver version in Windows 11, explains when to use each method, and answers some of the most common questions people have about driver versions. Whether you’re a casual user trying to fix a hardware glitch or an IT professional auditing a fleet of machines, you’ll find a method here that fits your needs.
Why Checking Your Driver Version Matters
Before diving into the methods, it helps to understand why this small piece of information is so useful:
- Troubleshooting hardware issues: An outdated or corrupted driver is one of the most common causes of hardware malfunctions, from flickering displays to Wi-Fi dropouts.
- Confirming updates installed correctly: After updating a driver, checking the version number confirms the update actually took effect.
- Compatibility checks: Some software (particularly games and creative applications) requires a minimum driver version to run properly.
- Rolling back problematic updates: If a new driver introduces bugs, knowing the old version number helps you identify what to reinstall.
- IT and support documentation: System administrators often need exact driver versions when logging support tickets with hardware vendors.
With that context in mind, let’s look at the methods.
Method 1: Check Driver Version Using Device Manager
Device Manager is the most direct and commonly used tool for viewing driver information in Windows, and it works the same way it has for years.
Steps:
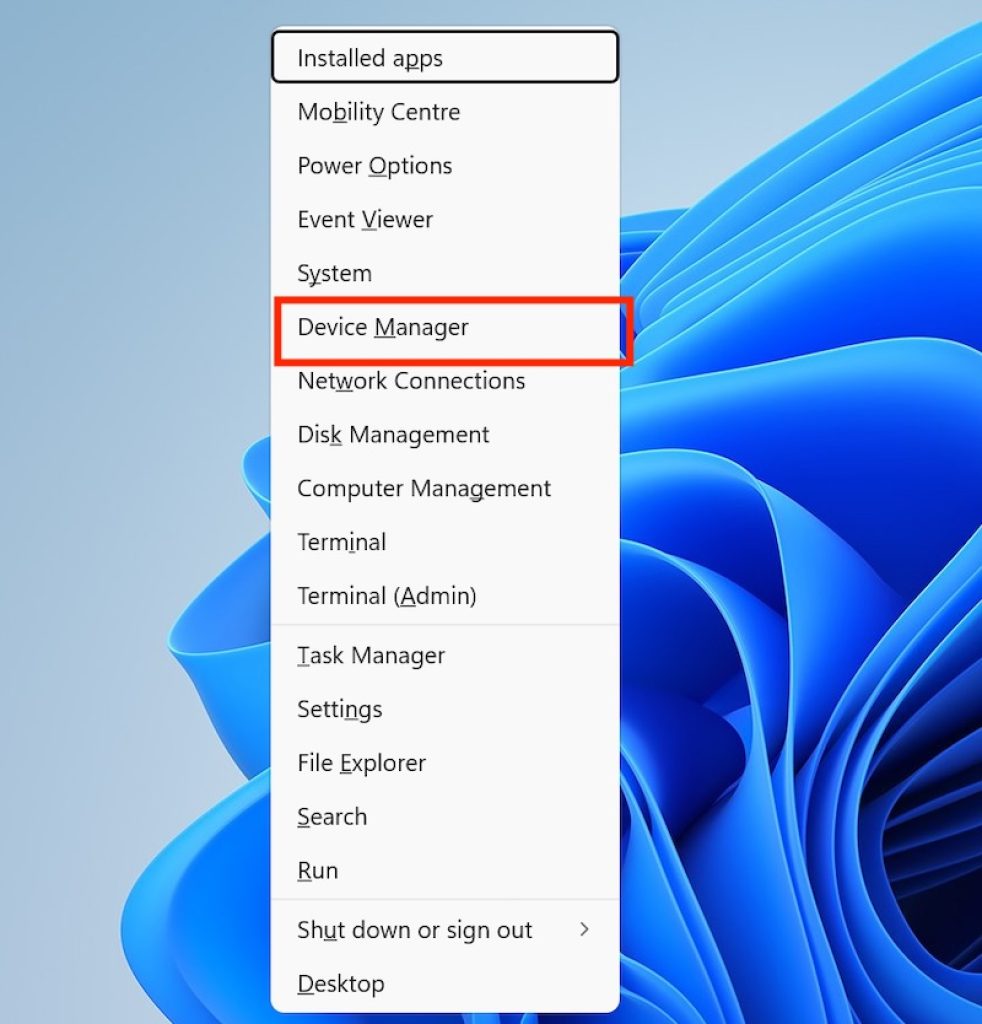
Right-click the Start button (or press Windows + X) and select Device Manager from the menu.
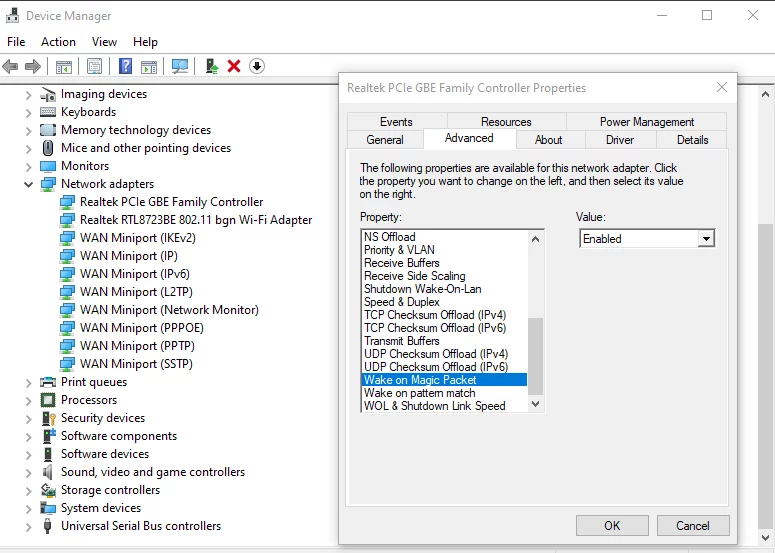
In the Device Manager window, locate the category of hardware you want to check (for example, “Display adapters,” “Network adapters,” or “Sound, video and game controllers”). Click the arrow next to the category to expand it.
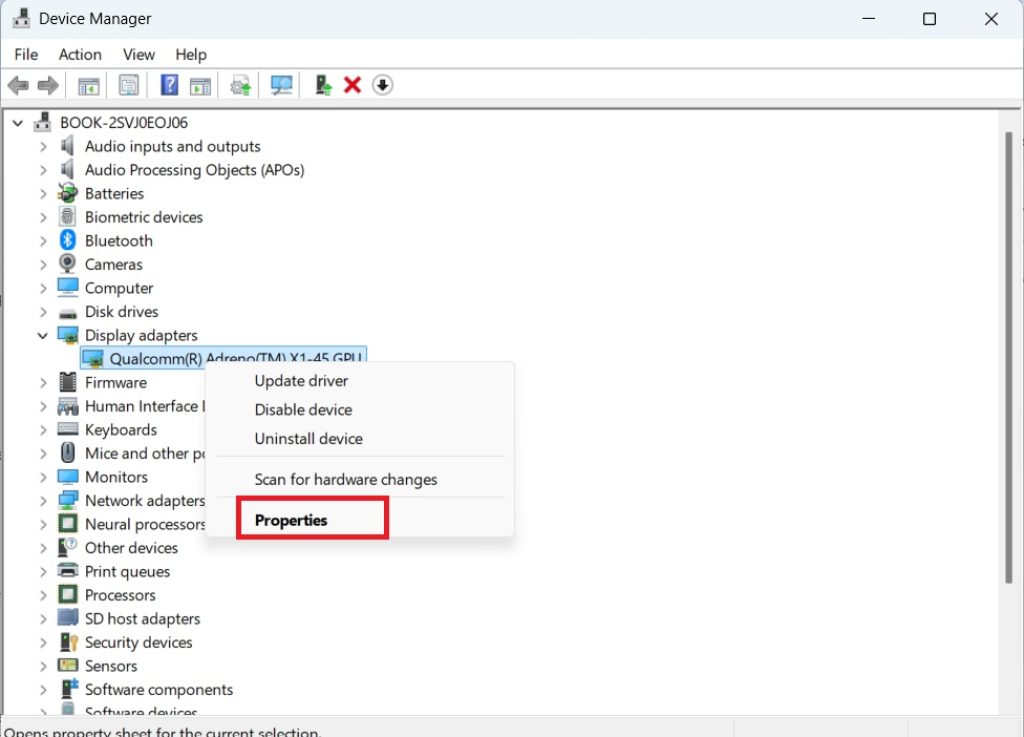
Right-click the specific device (e.g., your graphics card or network card) and select Properties.
In the Properties window, click the Driver tab.
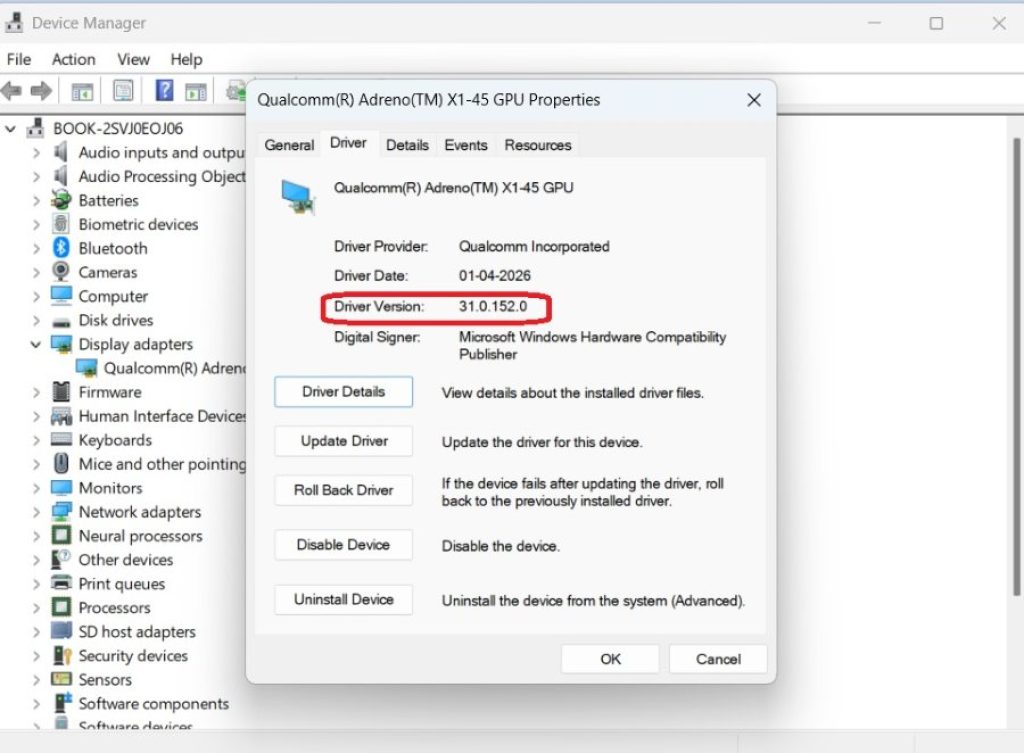
Here you’ll see several pieces of information:
- Driver Provider – the company that published the driver (e.g., Microsoft, NVIDIA, Intel).
- Driver Date – when the driver was released.
- Driver Version – the actual version number, usually formatted like 31.0.15.3179.
- Digital Signer – confirms whether the driver is signed and trusted.
- If you want more detail, click Driver Details to see the specific files associated with the driver.
Device Manager is ideal for quick, visual checks on a single device, and it’s the method most tech support guides point to first because it requires no typing and works for virtually any hardware component.
Method 2: Check Driver Version Using Windows Settings
Windows 11’s Settings app has slowly absorbed more functionality once exclusive to Control Panel, and it now provides a straightforward way to check driver information for many devices, especially printers, Bluetooth accessories, and USB peripherals.
Steps:
- Open Settings by pressing Windows + I.
- Go to Bluetooth & devices.
- Select the category relevant to your device — for example, Printers & scanners, or click Devices to see a general list.
- Click on the specific device you want to inspect.
- Look for a Properties or Hardware section, which may list the driver version depending on the device type.
This method is less comprehensive than Device Manager for components like graphics cards or motherboard chipsets, but it’s convenient for checking peripherals that show up primarily in Settings rather than as expandable categories in Device Manager.
Method 3: Check Driver Version Using PowerShell
For users who prefer speed, precision, or need to check multiple drivers at once, PowerShell offers a powerful command-line alternative. This method is especially useful for IT professionals managing multiple systems or anyone comfortable with basic scripting.
Steps:
- Open the Start Menu, type PowerShell, and select Run as administrator.
- To list all drivers currently installed on the system, type:
Get-WmiObject Win32_PnPSignedDriver | Select-Object DeviceName, DriverVersion, ManufacturerPress Enter. This will output a table showing the device name, driver version, and manufacturer for every installed driver — useful for a broad overview.
- To narrow the results to a specific device, such as your graphics card, use:
Get-WmiObject Win32_PnPSignedDriver | Where-Object {$_.DeviceName -like "*NVIDIA*"} | Select-Object DeviceName, DriverVersionReplace “NVIDIA” with the name (or part of the name) of the device you’re looking for.
- You can also export this information to a text file for record-keeping:
Get-WmiObject Win32_PnPSignedDriver | Select-Object DeviceName, DriverVersion, Manufacturer | Out-File "$env:USERPROFILE\Desktop\DriverList.txt"PowerShell is by far the most efficient method if you need to check many drivers at once or want to document driver versions for support tickets, audits, or system migrations.
Method 4: Check Driver Version Using Command Prompt (driverquery)
If PowerShell feels like overkill, Windows 11 also includes a simpler built-in Command Prompt tool called driverquery, which has been part of Windows for a long time and remains fully functional.
Steps:
- Open the Start Menu, type cmd, and select Run as administrator.
- Type the following command and press Enter:
driverqueryThis lists every installed driver along with its type and link date, though it does not show a detailed version number by default.
- For more detailed output, including driver version numbers, use the verbose flag:
driverquery /v- To make the output easier to read, you can format it as a table or export it to a file:
driverquery /v /fo table > "%userprofile%\Desktop\drivers.txt"This method is a good middle ground — more detailed than Device Manager for bulk checks, but simpler to use than PowerShell if you’re not comfortable with scripting syntax.
Bonus Method: Checking Graphics Driver Version Through Vendor Software
If you specifically want to check your GPU driver version, both NVIDIA and AMD provide their own control panel applications that display this information clearly, often alongside options to update.
- NVIDIA users: Right-click the desktop, select NVIDIA Control Panel, then click System Information in the bottom-left corner. This shows the exact driver version and release date.
- AMD users: Open AMD Software: Adrenalin Edition, go to the Home tab, and look for the driver version listed near the top of the window.
- Intel users: Open the Intel Graphics Command Center (or Intel Driver & Support Assistant), which displays the current driver version under system or driver details.
These vendor tools are particularly useful for gamers and creative professionals who frequently update GPU drivers and want a fast way to confirm the current version without digging through Device Manager.
Method Comparison: Which One Should You Use?
- Device Manager: Best for quick, single-device checks with a graphical interface — ideal for most everyday users.
- Windows Settings: Best for peripherals like printers, Bluetooth devices, and some USB accessories.
- PowerShell: Best for bulk checks, exporting data, and IT/admin tasks across multiple devices.
- Command Prompt (driverquery): Best as a simpler alternative to PowerShell for viewing multiple drivers at once.
- Vendor Software (NVIDIA/AMD/Intel): Best specifically for graphics drivers, especially if you also want update options.
If you’re troubleshooting one specific piece of hardware, Device Manager will almost always be the fastest route. If you’re managing several machines or need a full driver inventory, PowerShell or driverquery will serve you better.
Frequently Asked Questions
1. How do I know if my driver is outdated?
Check the driver’s version and date using any of the methods above, then compare that information with the latest version listed on the manufacturer’s official website or support page. If a newer version exists — especially one addressing bugs, security vulnerabilities, or performance issues — your current driver is outdated. Windows Update and vendor utilities like NVIDIA GeForce Experience or Intel Driver & Support Assistant can also notify you automatically when updates are available.
2. Why does Device Manager show a different version than the manufacturer’s website?
This usually happens because Windows Update installs a generic or slightly older driver package through Microsoft’s certification process, while the manufacturer’s own installer may include a newer or more feature-rich version. Both will work, but manufacturer-direct drivers often include additional software components, control panels, or performance optimizations not present in the Windows Update version.
3. Can I check driver versions without opening Device Manager?
Yes. PowerShell and Command Prompt both allow you to check driver versions without navigating any graphical menus, which is especially useful for remote troubleshooting, scripting, or quickly copying version numbers into a support ticket. Vendor-specific software (like NVIDIA Control Panel) also displays driver versions without needing Device Manager at all.
4. What should I do if a driver version won’t update or shows as unavailable?
First, try updating through Settings > Windows Update > Advanced options > Optional updates, since some drivers are listed separately from regular system updates. If that doesn’t work, download the driver directly from the hardware manufacturer’s official website, which typically offers more current versions than Windows Update. As a last resort, you can use the Update driver option in Device Manager and choose “Search automatically,” or manually point Windows to a downloaded driver file.
Conclusion
Checking your driver version in Windows 11 is a simple but valuable skill, whether you’re resolving a hardware glitch, confirming an update installed correctly, or documenting system details for support purposes. Device Manager remains the most accessible method for everyday users, offering a clear, visual breakdown of driver provider, date, and version number in just a few clicks. For those who need more detail or want to check multiple devices at once, PowerShell and Command Prompt provide fast, scriptable alternatives that are especially useful in IT environments. Meanwhile, vendor-specific tools from NVIDIA, AMD, and Intel offer the most detailed and up-to-date information for graphics drivers specifically.
There’s no single “correct” method — the best choice depends on what you’re trying to accomplish. A casual user checking one printer driver will be perfectly served by Device Manager, while a system administrator auditing fifty machines will save far more time using PowerShell. By understanding all of these methods, you’ll always have a reliable way to find exactly the driver information you need, keeping your Windows 11 system running smoothly and your hardware performing at its best.