
 Olivia Harper
Knowing which devices are connected to your Windows 11 PC can help you manage hardware, troubleshoot connection issues, verify that peripherals are working correctly, and improve security. Whether you’ve connected a USB flash drive, Bluetooth headphones, printer, external monitor, smartphone, webcam, or a wireless accessory, Windows 11 provides several ways to view all connected devices.
Depending on the type of hardware, the information may appear in different areas of Windows. For example, Bluetooth devices are managed separately from USB devices, while network devices and printers have their own settings pages. Windows also includes advanced tools such as Device Manager, System Information, and PowerShell that provide detailed information about connected hardware.
In this guide, you’ll learn multiple ways to see connected devices in Windows 11. These methods range from beginner-friendly options in the Settings app to advanced utilities that display detailed hardware information. Whether you simply want to verify a newly connected device or inspect every piece of hardware attached to your computer, one of these methods will help.
What Are Connected Devices in Windows 11?
Connected devices are any hardware components that communicate with your Windows 11 computer. They may be physically connected using USB, HDMI, DisplayPort, Ethernet, or other cables, or connected wirelessly through Bluetooth or Wi-Fi.
Examples include:
- USB flash drives
- External hard drives and SSDs
- Bluetooth keyboards and mice
- Wireless headphones
- Printers and scanners
- External monitors
- Smartphones
- Webcams
- Microphones
- Gaming controllers
- Docking stations
- Network devices
Windows automatically detects most compatible devices and installs the required drivers, allowing you to view and manage them from several built-in tools.
Method 1: See Connected Devices Using the Settings App
The Settings app is the easiest place to view many of the devices connected to your computer. It groups devices into categories, making it simple for most users to locate Bluetooth devices, printers, cameras, displays, USB accessories, and other connected hardware.
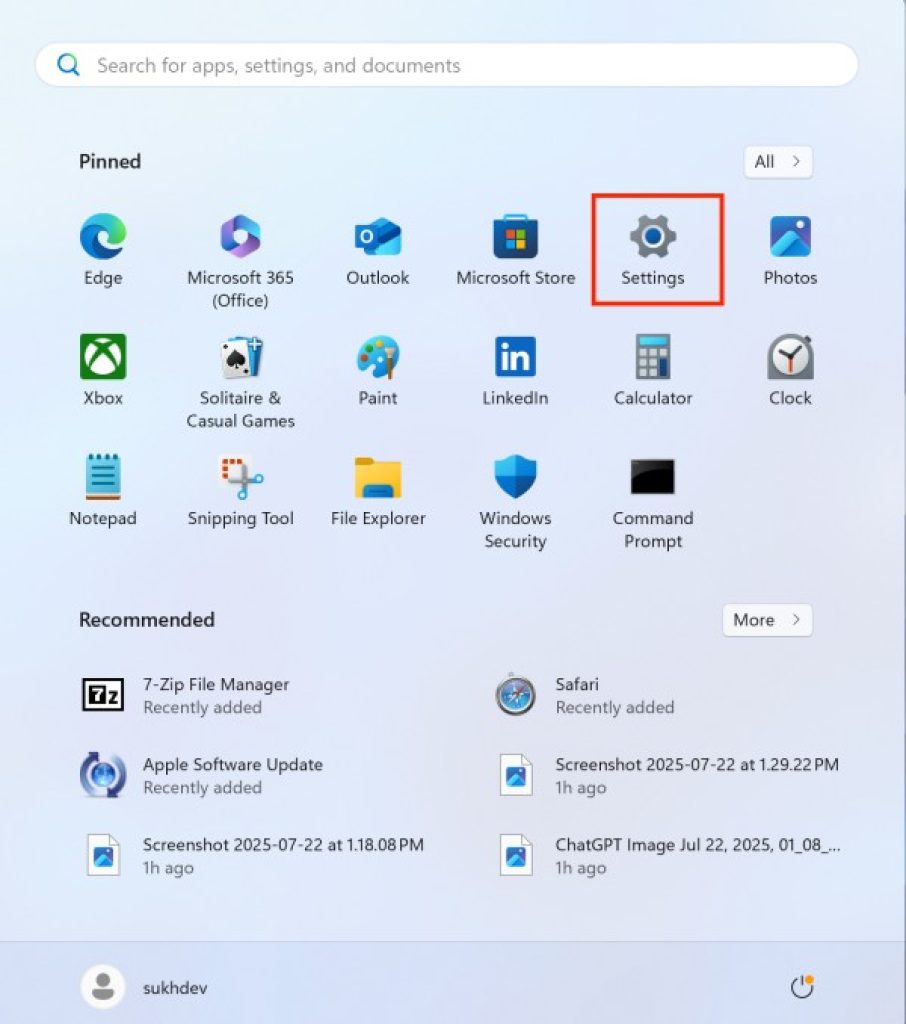
To view connected devices using Settings:
Press Windows + I to open Settings.
Select Bluetooth & devices from the left pane.
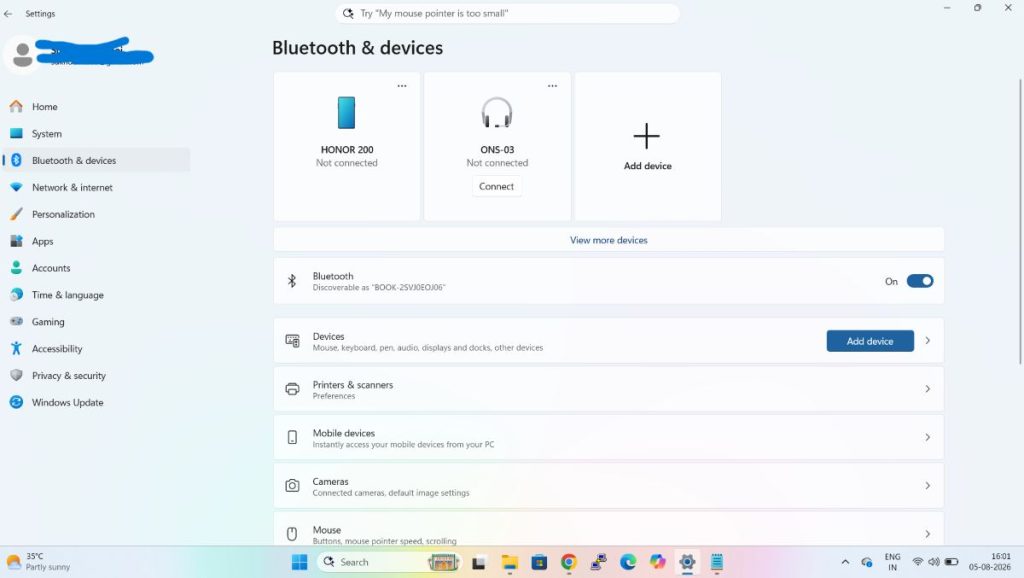
Browse the available categories such as:
- Bluetooth devices
- Printers & scanners
- Cameras
- Mouse
- Touchpad
- Pen & Windows Ink
- USB
Click a category to see connected devices.
You can also open System > Display to view connected monitors and display adapters.
The Bluetooth & devices section updates automatically whenever compatible hardware is connected or removed. From here, you can rename devices, disconnect them, remove paired Bluetooth devices, configure printers, or manage camera settings.
For most everyday users, this is the quickest and simplest method because it requires no technical knowledge and provides a clean interface for managing commonly connected devices.
Method 2: View All Connected Hardware in Device Manager
Device Manager is one of the most powerful built-in Windows tools for viewing connected hardware. It lists virtually every hardware component installed or connected to your computer, including internal devices and external peripherals.
To open Device Manager:
Select Windows + X > Device Manager.
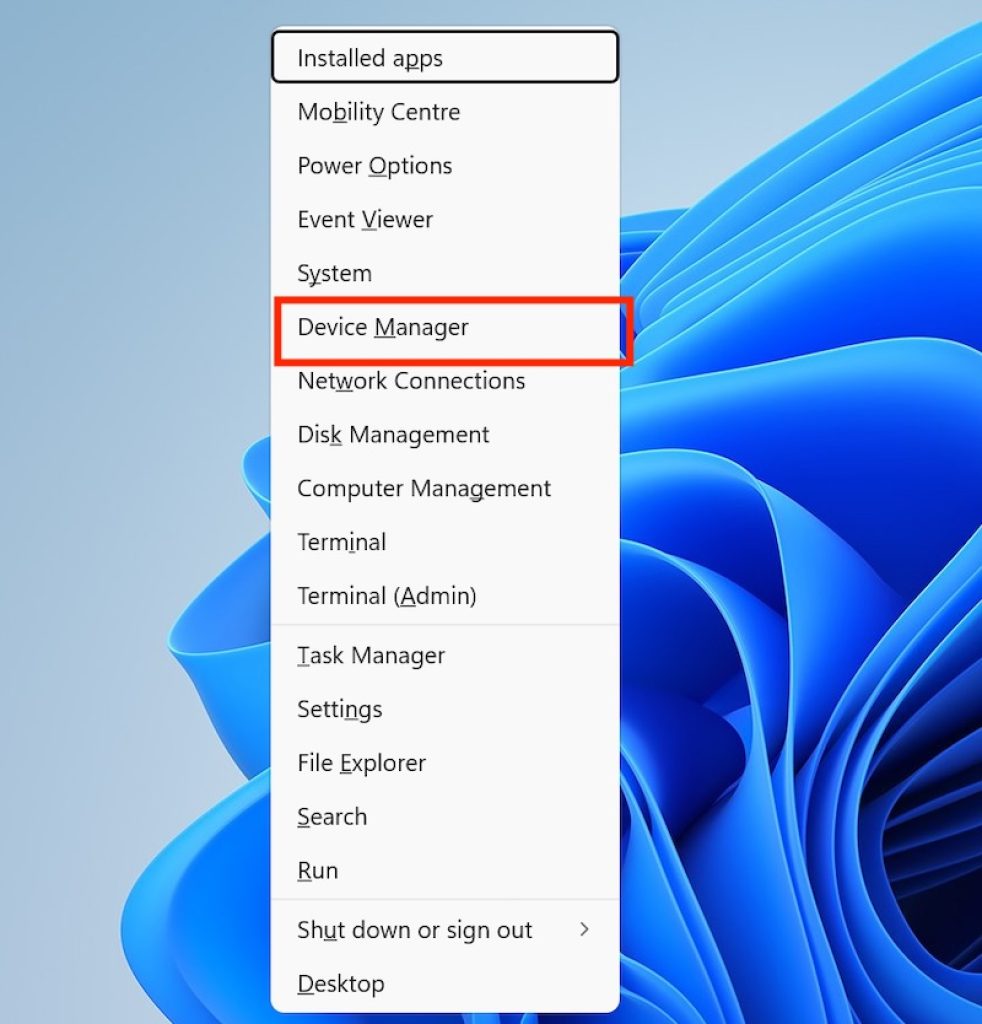
Expand any hardware category.
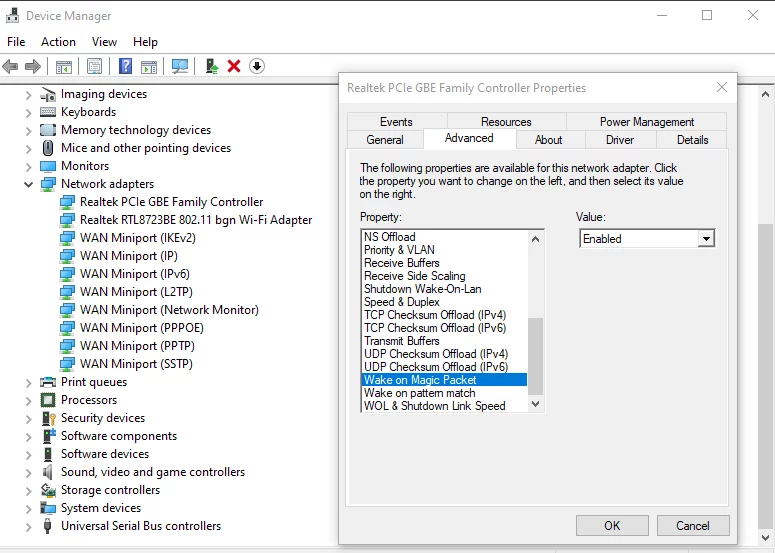
Browse the installed devices.
Some common categories include:
- Disk drives
- Display adapters
- Bluetooth
- Cameras
- Human Interface Devices
- Imaging devices
- Keyboards
- Monitors
- Mice and other pointing devices
- Network adapters
- Ports (COM & LPT)
- Printers
- Sound, video and game controllers
- Universal Serial Bus controllers
Clicking a category displays every connected device within that group.
Double-clicking any device opens its Properties window, where you can view:
- Device status
- Driver version
- Driver provider
- Driver date
- Hardware IDs
- Events
- Power management settings
- Resources
If Windows detects a problem, Device Manager usually displays a yellow warning icon next to the affected device.
Device Manager is especially useful when troubleshooting hardware that isn’t functioning properly or verifying whether Windows has correctly recognized a newly connected device.
Method 3: See Bluetooth Connected Devices
If you’re specifically looking for Bluetooth devices such as wireless headphones, keyboards, speakers, mice, or game controllers, Windows 11 provides a dedicated page for managing them.
To view Bluetooth devices:
- Open Settings.
- Select Bluetooth & devices.
- Turn on Bluetooth if necessary.
- View the list of paired and connected devices.
Connected devices typically display their current connection status, such as:
- Connected
- Paired
- Not connected
You can click the three-dot menu next to a device to:
- Remove it
- Disconnect it
- View additional options (depending on device type)
Windows automatically updates this list whenever a Bluetooth device connects or disconnects.
If a device doesn’t appear, make sure:
- Bluetooth is enabled.
- The accessory is in pairing mode.
- The battery isn’t depleted.
- The device is within range.
Bluetooth devices can also be viewed from Device Manager under the Bluetooth category for additional driver and hardware information.
Method 4: View Connected USB Devices
USB devices are among the most commonly connected peripherals in Windows 11. These include flash drives, external hard drives, keyboards, mice, webcams, smartphones, card readers, USB hubs, docking stations, printers, and many other accessories. Windows automatically detects most USB hardware and installs the necessary drivers.
One of the easiest ways to verify whether Windows has recognized a USB device is through Device Manager.
To view connected USB devices:
- Right-click the Start button.
- Select Device Manager.
- Expand Universal Serial Bus controllers.
- Review the listed USB controllers, hubs, and connected devices.
- Expand other categories such as Disk drives, Portable Devices, or Human Interface Devices if necessary.
If you’ve recently plugged in a USB device, you can also click Action on the menu bar and select Scan for hardware changes to refresh the device list.
Many USB storage devices also appear in This PC within File Explorer. External drives, USB flash drives, and memory cards usually receive a drive letter, allowing you to access them immediately.
If a USB device does not appear, try connecting it to another USB port, using a different cable, or restarting your computer. Faulty USB ports, damaged cables, or outdated drivers can sometimes prevent Windows from detecting the device.
Device Manager also lets you update USB drivers, uninstall malfunctioning devices, or view detailed hardware information such as manufacturer, driver version, and device status.
Method 5: See Connected Printers and Scanners
Windows 11 provides a dedicated page for viewing and managing printers and scanners connected through USB, Wi-Fi, Ethernet, or Bluetooth. This section lets you confirm that your printer has been detected, check its status, and configure printing preferences.
To view connected printers and scanners:
- Press Windows + I to open Settings.
- Select Bluetooth & devices.
- Click Printers & scanners.
- Review the list of available devices.
Selecting a printer provides several management options, including:
- Open print queue
- Set as default printer
- Print a test page
- Rename the printer
- View printer properties
- Remove the printer
If you use multiple printers, Windows displays all installed printers, including virtual printers such as Microsoft Print to PDF and Microsoft XPS Document Writer.
Scanners connected to your computer also appear on this page. Compatible all-in-one printers typically show both printing and scanning capabilities.
If your printer isn’t listed, click Add device to search for available printers on your local network or connected through USB.
This Settings page is generally the best location for managing everyday printing devices without needing advanced administrative tools.
Method 6: View Connected Network Devices
Windows 11 allows you to see devices connected to your local network, making it easier to identify computers, media devices, network printers, NAS devices, and other shared hardware.
One convenient way is through File Explorer.
To see network devices:
- Open File Explorer.
- Select Network from the navigation pane.
- Wait while Windows discovers devices on your network.
- Browse the available computers and network hardware.
Depending on your network, you may see:
- Desktop computers
- Laptops
- Network printers
- Smart TVs
- NAS storage devices
- Media servers
- Routers (in some cases)
If no devices appear, Windows may ask you to enable Network Discovery.
To enable Network Discovery:
- Open Control Panel.
- Select Network and Internet.
- Open Network and Sharing Center.
- Click Change advanced sharing settings.
- Turn on:
- Network Discovery
- File and Printer Sharing
Once enabled, Windows can automatically detect compatible devices on your network.
Keep in mind that some devices may not appear if they have discovery disabled, use different network protocols, or are connected to a different subnet or guest network.
Viewing connected network devices is especially useful for accessing shared folders, network storage, printers, and other computers within your home or office.
Method 7: Use System Information to See Connected Hardware
System Information is a built-in Windows utility that provides a comprehensive overview of your computer’s hardware and software configuration. While it isn’t designed specifically to manage devices, it displays detailed information about many connected components, making it useful for advanced users and troubleshooting.
To open System Information:
- Press Windows + R to open the Run dialog.
- Type msinfo32 and press Enter.
- Wait for the System Information window to load.
- Expand the categories in the left pane to explore your hardware.
Some of the most useful sections include:
- System Summary – Displays general information about your computer, BIOS version, processor, installed memory, and operating system.
- Components > Display – Shows graphics adapters and connected display details.
- Components > Storage – Lists storage controllers, disk drives, and partitions.
- Components > Network – Displays network adapters and connection information.
- Components > USB – Shows connected USB controllers and supported devices.
- Components > Multimedia – Lists audio devices, codecs, and sound hardware.
Selecting any category displays detailed information in the right pane, including manufacturer names, device IDs, driver information, memory addresses, and hardware resources.
Unlike the Settings app, System Information focuses on technical details rather than configuration options. It is especially helpful when verifying hardware specifications, identifying installed components, or collecting system information for troubleshooting.
Method 8: View Connected Devices Using PowerShell
PowerShell is a powerful command-line tool that allows you to retrieve detailed information about connected devices using built-in Windows commands. It is particularly useful for system administrators and advanced users who need to generate hardware inventories or automate system management tasks.
To list connected Plug and Play devices:
- Right-click the Start button.
- Select Terminal (Admin) or Windows PowerShell (Admin).
- Enter the following command:
Get-PnpDevice- Press Enter.
PowerShell displays a table containing:
- Device name
- Device class
- Current status
- Instance ID
To display only devices that are currently working properly, use:
Get-PnpDevice | Where-Object {$_.Status -eq "OK"}To view USB devices only:
Get-PnpDevice -Class USBTo display Bluetooth devices:
Get-PnpDevice -Class BluetoothTo list storage devices:
Get-DiskPowerShell provides much more flexibility than graphical tools because you can filter results, export reports, and combine commands for advanced hardware management.
Although it may appear intimidating to new users, these commands are safe to run because they only retrieve information and do not make changes to your system.
Method 9: Check Connected Devices with Command Prompt
If you prefer using Command Prompt, Windows includes several built-in commands that can display information about connected hardware. While Command Prompt is more limited than PowerShell, it still provides useful details for diagnosing hardware and verifying connected devices.
To use Command Prompt:
- Press Windows + S.
- Search for Command Prompt.
- Open the application.
- Run one of the following commands.
To list installed drivers:
driverqueryTo display Plug and Play devices using Windows Management Instrumentation (WMIC), enter:
wmic path Win32_PnPEntity get Name,StatusDepending on your Windows 11 version, the WMIC command may no longer be available because Microsoft has deprecated WMIC in newer releases. If it doesn’t work, use the PowerShell commands shown in the previous method instead.
You can also use:
systeminfoThis command provides a summary of your computer, including installed hardware, operating system details, BIOS version, available memory, and processor information.
Although Command Prompt isn’t the most convenient way to browse hardware, it remains useful for quickly gathering system information without opening graphical tools.
Method 10: See Connected Storage Devices in Disk Management
Disk Management is the best built-in utility for viewing storage devices connected to your Windows 11 PC. It displays internal drives, external hard drives, SSDs, USB flash drives, memory cards, and storage partitions.
To open Disk Management:
- Right-click the Start button.
- Select Disk Management.
- Wait for Windows to detect all connected drives.
- Review the disks shown in the lower pane.
For each storage device, Windows displays information such as:
- Disk number
- Capacity
- Partition layout
- File system
- Drive letter
- Health status
- Online or Offline status
If you connect an external hard drive or USB flash drive, it should appear automatically after a few seconds.
Disk Management also allows you to:
- Initialize new disks
- Create partitions
- Delete partitions
- Extend or shrink volumes
- Change drive letters
- Format storage devices
- Mark partitions as active
Unlike File Explorer, Disk Management displays every storage device detected by Windows, even if it does not currently have a drive letter assigned.
This makes it one of the most useful tools for diagnosing storage-related problems, confirming whether Windows recognizes a newly connected drive, and managing disks that don’t appear in File Explorer.
Conclusion
Windows 11 offers several built-in tools that make it easy to see and manage connected devices, whether they’re attached through USB, Bluetooth, Wi-Fi, or other connections. For most users, the Settings app provides the quickest way to view everyday devices such as Bluetooth accessories, printers, cameras, and USB peripherals. If you need more detailed information, Device Manager is the best choice because it lists nearly every hardware component recognized by Windows and allows you to view driver details and device status.
For advanced users, tools like System Information, PowerShell, and Command Prompt provide in-depth hardware data and are especially useful for diagnostics, inventory management, or troubleshooting. Meanwhile, Disk Management is ideal for checking storage devices, and File Explorer’s Network section helps you discover other computers and shared devices on your local network.
By learning these methods, you can quickly verify that Windows has detected your hardware, manage connected devices more efficiently, and identify potential issues before they become larger problems. Whether you’re connecting a new accessory or troubleshooting an existing one, Windows 11 includes all the tools you need to monitor your connected devices.
Frequently Asked Questions
1. How do I see all connected devices in Windows 11?
The easiest way is to open Settings > Bluetooth & devices to view commonly connected devices. For a complete list of hardware recognized by Windows, open Device Manager, which displays nearly every installed and connected device.
2. Where can I view USB devices in Windows 11?
You can view USB devices by opening Device Manager and expanding Universal Serial Bus controllers. Storage devices may also appear under Disk drives or in This PC within File Explorer.
3. How can I check if Windows 11 recognizes a newly connected device?
After connecting the device, open Device Manager and look for it in the appropriate hardware category. If it doesn’t appear immediately, select Action > Scan for hardware changes to refresh the device list.
4. Can I see connected devices using PowerShell?
Yes. Open Windows PowerShell or Windows Terminal and run the Get-PnpDevice command to display connected Plug and Play devices. You can also filter the results to show specific device types, such as USB or Bluetooth devices.





