
 Geeksdigit Team
Windows Sandbox is one of the most useful built-in tools for anyone who wants to test unfamiliar software, open suspicious files, or try out a new app without putting their main system at risk. It creates a lightweight, temporary desktop environment that runs completely separate from your actual Windows installation. Once you close it, everything inside disappears — no leftover files, no registry changes, no risk to your real PC.
If you’ve ever hesitated before downloading a program from an unverified source, or wanted a clean environment to test a script, Windows Sandbox solves that problem instantly, without the overhead of installing a full virtual machine like VirtualBox or VMware.
In this guide, you’ll learn exactly how to enable Windows Sandbox in Windows 11 and Windows 10, using three different methods: the Windows Features menu, PowerShell, and Command Prompt (DISM). We’ll also cover the system requirements, common errors, and answer frequently asked questions about this feature.
What Is Windows Sandbox?
Windows Sandbox is a temporary, isolated desktop environment built directly into Windows. It uses lightweight virtualization powered by the Windows hypervisor to create a fully functional, disposable version of Windows that runs alongside your main operating system.
Key characteristics of Windows Sandbox include:
- Isolation — Software installed inside the sandbox cannot affect your host system.
- Disposable — Every time you close the sandbox, all files, installed apps, and system changes are permanently deleted.
- Fresh state every time — Each new session starts as a clean installation of Windows.
- Secure by design — It uses hardware-level virtualization and its own kernel, separate from your main OS.
- No extra downloads — It’s a built-in Windows feature, not a third-party app.
This makes it ideal for testing beta software, checking email attachments, running unknown executables, or experimenting with system settings you wouldn’t want to risk on your primary installation.
System Requirements for Windows Sandbox
Before enabling Windows Sandbox, make sure your PC meets these requirements:
- Edition: Windows 11 or Windows 10, Pro, Enterprise, or Education (Windows Sandbox is not available on Home editions)
- Architecture: 64-bit (AMD64) processor
- Virtualization: Hardware virtualization support, enabled in BIOS/UEFI (Intel VT-x or AMD-V)
- Memory: At least 4 GB of RAM (8 GB or more recommended)
- Storage: At least 1 GB of free disk space (SSD strongly recommended for performance)
- CPU: At least 2 CPU cores (4 cores with hyperthreading recommended)
If you’re running Windows 10, you’ll also need a recent build — Windows 10 version 1903 (build 18362) or later.
Key Methods to Enable Windows Sandbox
There are three reliable ways to enable Windows Sandbox on Windows 11 or Windows 10. Choose whichever method feels most comfortable — all three achieve the same result.
Method 1: Enable Windows Sandbox via Windows Features (GUI Method)
This is the simplest method and works identically on both Windows 10 and Windows 11.
Press Windows + R to open the Run dialog.
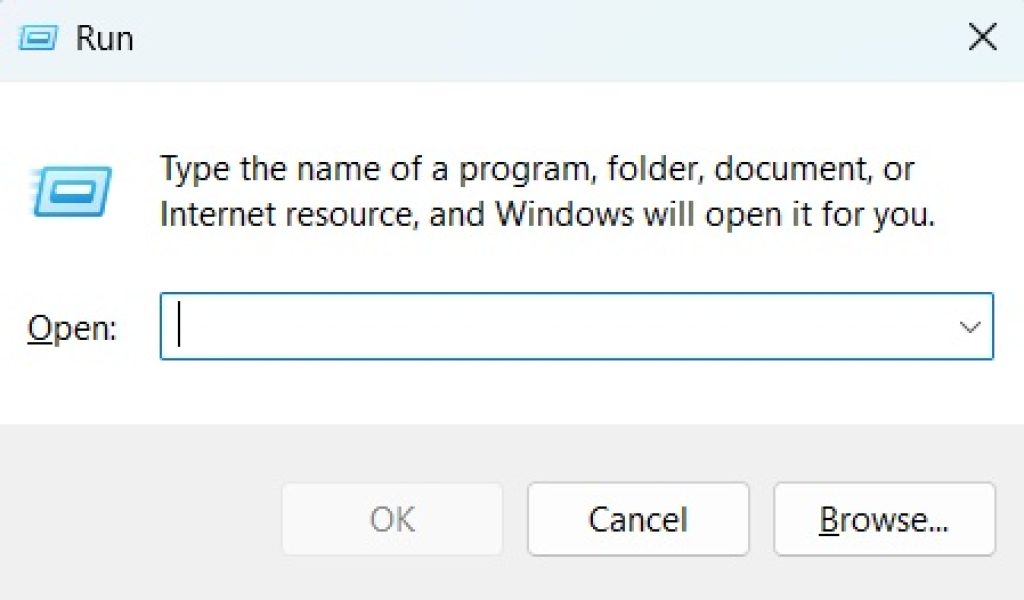
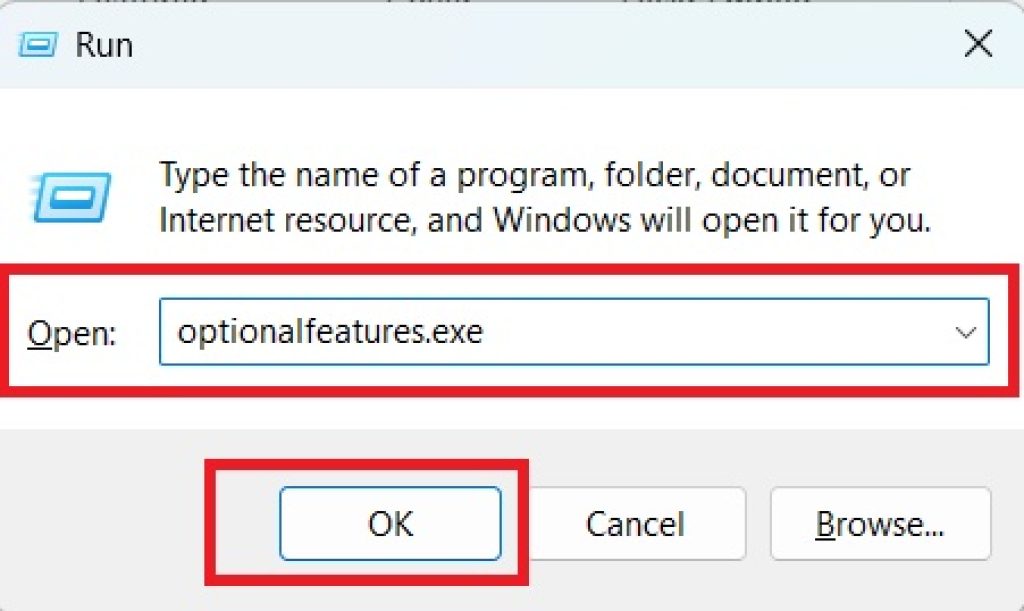
Type optionalfeatures.exe and press Enter. This opens the Windows Features window.
Scroll down the list until you find Windows Sandbox.
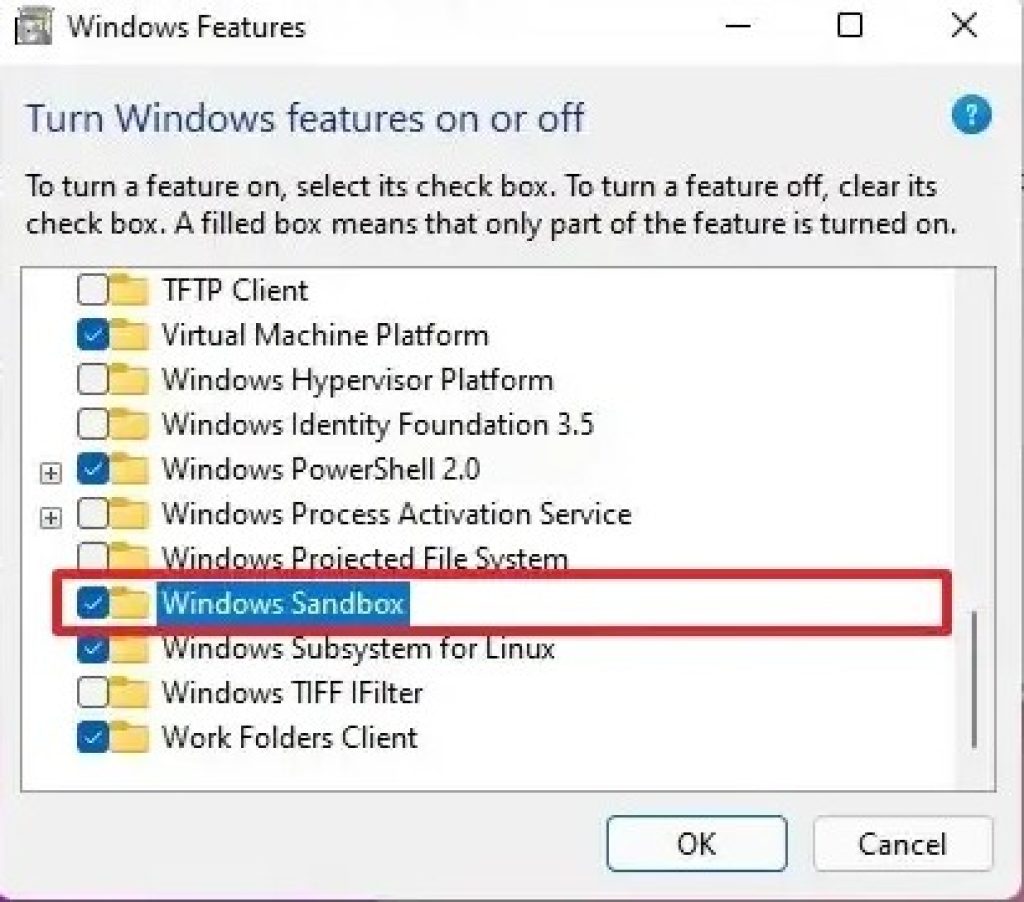
Check the box next to Windows Sandbox.
Click OK.
Windows will search for the required files and apply the changes.
When prompted, click Restart now to complete the installation.
After your PC restarts, Windows Sandbox will be available. You can find it by searching “Windows Sandbox” in the Start menu.
Method 2: Enable Windows Sandbox Using PowerShell
If you prefer using commands or need to enable the feature remotely or via script, PowerShell is a fast alternative.
- Click Start, type
PowerShell, right-click Windows PowerShell, and select Run as administrator. - In the PowerShell window, run the following command:
powershell
Enable-WindowsOptionalFeature -FeatureName "Containers-DisposableClientVM" -All -Online- Press Enter and wait for the process to complete.
- When asked to restart, type Y and press Enter, or restart manually afterward.
Once your system restarts, Windows Sandbox will be enabled and ready to use.
Method 3: Enable Windows Sandbox Using Command Prompt (DISM)
For users who prefer Command Prompt or need to script deployment across multiple machines, the DISM (Deployment Image Servicing and Management) tool works well.
- Click Start, type
cmd, right-click Command Prompt, and choose Run as administrator. - Enter the following command:
DISM /Online /Enable-Feature /FeatureName:"Containers-DisposableClientVM" /All- Press Enter. DISM will process the request and display a progress percentage.
- Once complete, restart your computer if prompted.
This method is particularly useful for IT administrators deploying Windows Sandbox across multiple devices using scripts or remote management tools.
How to Launch and Use Windows Sandbox
Once enabled, using Windows Sandbox is straightforward:
- Open the Start menu and search for Windows Sandbox.
- Click to launch it. A new window will open showing a fresh Windows desktop.
- Copy any file or installer from your main PC and paste it directly into the Sandbox window to test it.
- When you’re finished, simply close the Sandbox window. Windows will warn you that all data inside will be discarded — click OK to confirm.
Every time you open Windows Sandbox, it starts from a completely clean state, so nothing from a previous session carries over.
How to Check If Virtualization Is Enabled
Open Task Manager (Ctrl + Shift + Esc).
Click the Performance tab.
Select CPU.
Look for Virtualization — it should say Enabled.
If it says “Disabled,” you’ll need to enable virtualization (VT-x/AMD-V) in your computer’s BIOS or UEFI settings before Windows Sandbox will work.
Troubleshooting Common Windows Sandbox Issues
If Windows Sandbox doesn’t appear in Windows Features or fails to launch, try these fixes:
- “Windows Sandbox” option is missing entirely: Confirm you’re running Pro, Enterprise, or Education edition. Home edition users must upgrade to Pro to access this feature.
- Virtualization not enabled error: Restart your PC, enter BIOS/UEFI (usually by pressing F2, F10, Del, or Esc during boot), and enable Intel VT-x or AMD-V under CPU or Virtualization settings.
- Sandbox fails to start after enabling: Make sure Hyper-V-related services aren’t conflicting with other virtualization software (like VirtualBox) running in a different virtualization mode.
- Error code 0x80370102: This typically means virtualization is disabled in the BIOS or another hypervisor is interfering. Disable conflicting virtualization software and confirm BIOS settings.
- Sandbox runs slowly: Ensure your files are stored on an SSD, close unnecessary background applications, and confirm your PC meets the recommended 8 GB RAM specification.
Conclusion
Windows Sandbox is a powerful, built-in security tool that lets you safely test software, files, and links without ever risking your main operating system. Whether you enable it through the graphical Windows Features menu, PowerShell, or Command Prompt with DISM, the process takes just a few minutes and requires nothing more than a restart to activate.
For anyone running Windows 11 or Windows 10 Pro, Enterprise, or Education, there’s little reason not to have Windows Sandbox ready to go — it’s free, fast, secure, and can save you from installing malware or unwanted software on your primary system. Once enabled, it becomes an invaluable part of your everyday toolkit for safe testing and experimentation.
Frequently Asked Questions (FAQ)
1. Is Windows Sandbox available on Windows 11 Home or Windows 10 Home? No. Windows Sandbox is only available on Windows 11 and Windows 10 Pro, Enterprise, and Education editions. Home edition users would need to upgrade their Windows license to access this feature.
2. Does Windows Sandbox require an internet connection? No, Windows Sandbox does not require an active internet connection to run, though the sandbox environment does have network access by default, allowing you to browse the web or download files within it, unless network access is explicitly disabled through configuration files.
3. Does anything I do inside Windows Sandbox affect my main computer? No. Windows Sandbox is fully isolated from your host operating system. Any files, installed programs, or system changes made inside the sandbox are permanently discarded the moment you close it.
4. Why is the “Windows Sandbox” option grayed out or missing in Windows Features? This usually happens when hardware virtualization is disabled in your BIOS/UEFI, or when your CPU or Windows edition doesn’t support it. Verify your Windows edition, enable virtualization in the BIOS, and ensure your build meets the minimum version requirements listed earlier in this guide.





