
 Sukhdev Kamboj
If you have used Windows for any length of time, you have probably heard of “Folder Options.” In older versions of Windows, this small but powerful settings window let you control how files and folders behave — whether hidden files are visible, whether file extensions are shown, how double-clicking works, and much more. In Windows 11, Microsoft renamed this window to File Explorer Options, but its purpose remains exactly the same.
Despite the name change, many users still search for “Folder Options” out of habit, and Microsoft has kept backward compatibility so that older commands, shortcuts, and search terms still work. Whether you are trying to reveal hidden files, change how folders are displayed, disable the preview pane, or tweak search behavior, you will need to access this menu.
The tricky part is that Windows 11’s redesigned interface hides many classic settings behind new menus, ribbons, and icons. What used to be a simple right-click option is now buried a layer or two deeper. This guide walks you through every reliable method to open File Explorer Options in Windows 11, from the fastest keyboard-free approach to power-user tricks using the Run dialog and Control Panel. By the end, you will know at least four different ways to reach this menu, so you will never be stuck searching for it again.
Why You Might Need File Explorer Options
Before diving into the methods, it helps to understand what this settings window actually controls. File Explorer Options is divided into three tabs:
- General — controls how folders open (same window or new window), whether items open with a single or double click, and privacy settings like recent file history.
- View — the most frequently used tab, where you can show hidden files and folders, display file extensions, toggle the preview and details panes, and adjust dozens of other display behaviors.
- Search — determines how Windows indexes and searches through files, including whether it searches file contents or just names.
Common reasons people open this menu include:
- Making hidden system files visible for troubleshooting
- Showing file extensions to identify file types more easily
- Changing whether double-clicking opens folders in the same window or a new one
- Adjusting how search results are displayed
- Restoring default folder view settings after a file gets stuck in an odd view mode
Now let’s look at the methods for actually getting there.
Methods to Open File Explorer Options in Windows 11
Method 1: Through the File Explorer Ribbon Menu
This is the most direct method since it lives right inside File Explorer itself.
Open File Explorer by pressing Windows key + E, or by clicking the folder icon on your taskbar.
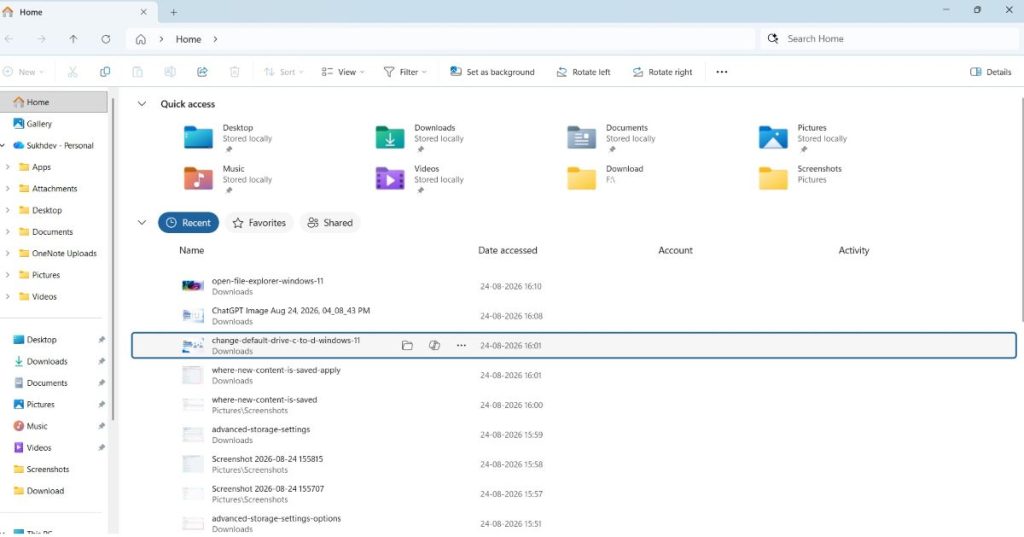
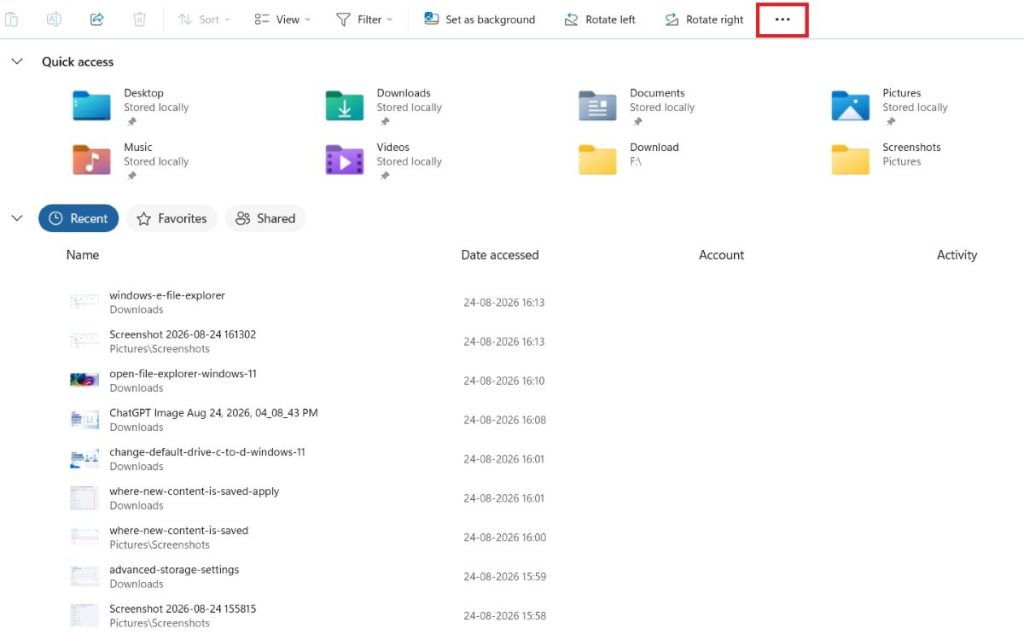
At the top of the window, click the three-dot menu (labeled “See more”) in the toolbar. In some Windows 11 versions, especially after certain updates, you may instead see a “…” (More) icon directly, or the option may appear under View.
From the dropdown menu, select Options.
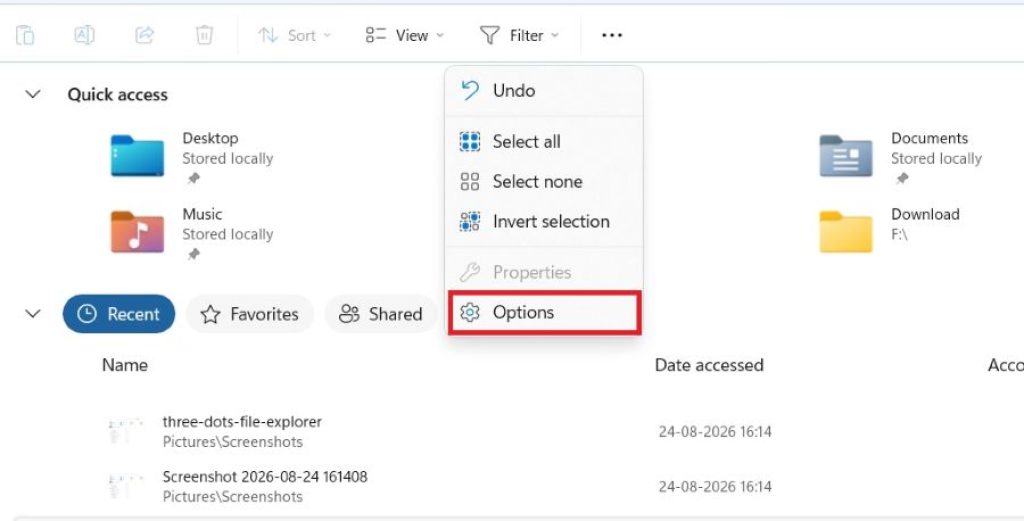
This immediately opens the File Explorer Options window, where you can switch between the General, View, and Search tabs.
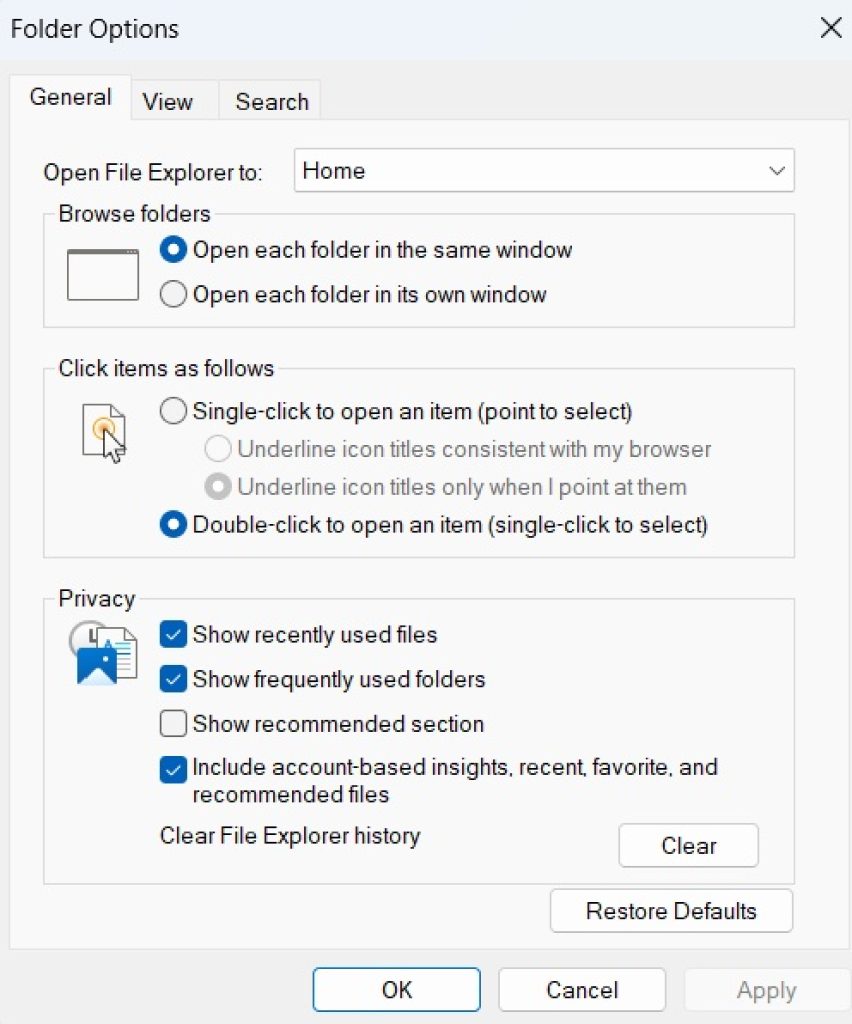
If your version of Windows 11 shows a classic-style ribbon (common on machines that have been updated from Windows 10 or have certain feature updates), you may instead see a View tab at the top with a Show or Options button directly visible without needing the three-dot menu.
This method is ideal because it does not require memorizing any commands — everything is visual and menu-driven.
Method 2: Using the Run Dialog Box
For users who prefer keyboard shortcuts and quick commands, the Run dialog is one of the fastest ways to open this menu, and it has worked consistently since Windows XP.
- Press Windows key + R to open the Run dialog box.
- Type the following command:
control folders
- Press Enter or click OK.
- The File Explorer Options window will open instantly, bypassing any menus entirely.
This method is particularly useful for power users, IT professionals, or anyone who wants a one-step shortcut they can memorize and reuse. It also works reliably even if File Explorer is behaving oddly or a particular menu option is missing.
Method 3: Through the Control Panel
Although Microsoft has been slowly phasing out the classic Control Panel in favor of the modern Settings app, it is still fully functional in Windows 11 and provides another path to the same menu.
- Click the Start button and type Control Panel in the search bar.
- Open the Control Panel app from the search results.
- Change the “View by” option (top-right corner) to Large icons or Small icons if it is currently set to “Category.” This makes all Control Panel items visible in a single list.
- Look for and click File Explorer Options (this is the renamed “Folder Options” entry).
- The familiar three-tab window opens, exactly as it would through the other methods.
If your Control Panel is still set to “Category” view, you can alternatively click Appearance and Personalization, then look for File Explorer Options listed underneath. Either approach gets you to the same destination.
This method is especially useful for users migrating from older Windows versions, since it closely mirrors the process they may already be familiar with.
Method 4: Using Windows Search
Windows 11’s search function is often the quickest way to locate any setting or app without needing to know exactly where it lives in the interface.
- Click the Search icon on the taskbar, or press the Windows key and start typing.
- Type “File Explorer Options” or simply “Folder Options” — both terms will return the correct result thanks to Microsoft’s backward-compatible search indexing.
- Click on the File Explorer Options result under “Best match.”
- The settings window opens directly.
This is arguably the most beginner-friendly method since it does not require navigating any menus or memorizing commands — you simply search for what you want by name, using either the old or new terminology.
Bonus Method: Address Bar Trick
For those who like efficient shortcuts, you can also open File Explorer Options directly from within any File Explorer window’s address bar:
- Open File Explorer.
- Click on the address bar at the top (or press Ctrl + L).
- Type
control foldersand press Enter. - The File Explorer Options window opens immediately.
This works because the File Explorer address bar can execute many Control Panel and system commands, not just file paths.
Once You’re In: Quick Tips on What to Change
While this guide is focused on how to open the menu, here are a few of the most commonly adjusted settings once you get there:
- Show hidden files and folders: Go to the View tab, scroll to “Hidden files and folders,” and select “Show hidden files, folders, and drives.”
- Show file extensions: Under the View tab, uncheck “Hide extensions for known file types.”
- Open each folder in a new window: Under the General tab, select “Open each folder in its own window.”
- Restore default folder view: On the View tab, click “Reset Folders” to undo any layout changes you have made across folders.
Making these changes can significantly improve your workflow, especially if you frequently work with system files, need to identify file types quickly, or prefer a specific window-opening behavior.
Conclusion
Even though Microsoft renamed “Folder Options” to “File Explorer Options” in Windows 11, the core functionality remains just as useful as it always was. Whether you prefer clicking through the File Explorer ribbon menu, typing a quick command into the Run dialog, navigating the Control Panel, or simply searching for it by name, you now have multiple reliable ways to reach this important settings window.
Having several methods in your toolkit is valuable because Windows 11’s interface can vary slightly depending on your update version, and a menu option that is missing in one build might be replaced with a slightly different layout in another. If one method does not work for you, another almost certainly will. With this guide, you should never have to struggle to find hidden files, toggle file extensions, or adjust your folder view settings again.
Frequently Asked Questions (FAQ)
1. Why is it called “File Explorer Options” instead of “Folder Options” in Windows 11? Microsoft renamed the menu to better reflect its association with File Explorer, the app used to browse files and folders in Windows 11. Functionally, it is identical to the “Folder Options” menu found in Windows 7, 8, and 10 — only the name has changed, and Windows still recognizes both search terms.
2. Can I open File Explorer Options without using a mouse? Yes. The fastest keyboard-only method is pressing Windows key + R to open the Run dialog, typing control folders, and pressing Enter. This bypasses all menus and opens the window directly.
3. I don’t see an “Options” button in the File Explorer ribbon. What should I do? Some Windows 11 versions hide this behind the three-dot “See more” menu instead of showing it directly. If you still cannot locate it, use the Run dialog method (control folders) or search for “File Explorer Options” using Windows Search, both of which work regardless of ribbon layout differences.
4. Will changing settings in File Explorer Options affect all folders, or just the one I have open? Most settings in the View tab, such as showing hidden files or file extensions, apply globally across all folders on your system. However, individual folder layout settings, like sorting order or icon size, can sometimes be folder-specific unless you use the “Apply to Folders” or “Reset Folders” buttons to standardize them across your entire system.





