
 Sukhdev Kamboj
If you’ve ever watched your C drive fill up while your D drive sits mostly empty, you already know the frustration. Windows 11 installs on the C drive by default and quietly keeps sending new apps, downloads, documents, and media there too — even after you’ve added a second drive with plenty of free space. Over time, this can leave your system drive cluttered and sluggish, especially if it’s a smaller SSD meant only for the operating system.
The good news is that Windows 11 gives you several built-in ways to redirect where new content goes, so future installations, downloads, and saved files land on D instead of C. It’s important to understand upfront that you generally cannot move the Windows operating system itself from C to D without a full reinstall or a specialized cloning tool — C will almost always remain your boot/system drive. What you can do is change where everything else defaults to, which solves the real problem most people are trying to fix: running out of space on C.
This is an especially common issue for laptops and prebuilt desktops that ship with a small 256GB or 512GB SSD as the C drive alongside a larger secondary HDD or SSD as D. Manufacturers configure Windows to use C for everything by default, which means the drive with the least space ends up carrying the heaviest load — game installs, downloaded files, project documents, media libraries, and more. Left unchecked, this leads to the dreaded “low disk space” warning, slower performance as the drive nears capacity, and difficulty installing Windows updates.
This guide walks through every practical method to make D your default drive for apps, files, and downloads, followed by a conclusion and answers to common questions. Each method below is independent, so you can apply just the ones relevant to your situation, or combine several for the most thorough result.
Method 1: Change the Default Save Location in Windows Settings
Windows 11 has a built-in feature that lets you choose which drive new apps, documents, music, photos, and videos are saved to by default. This is the simplest and most direct method.
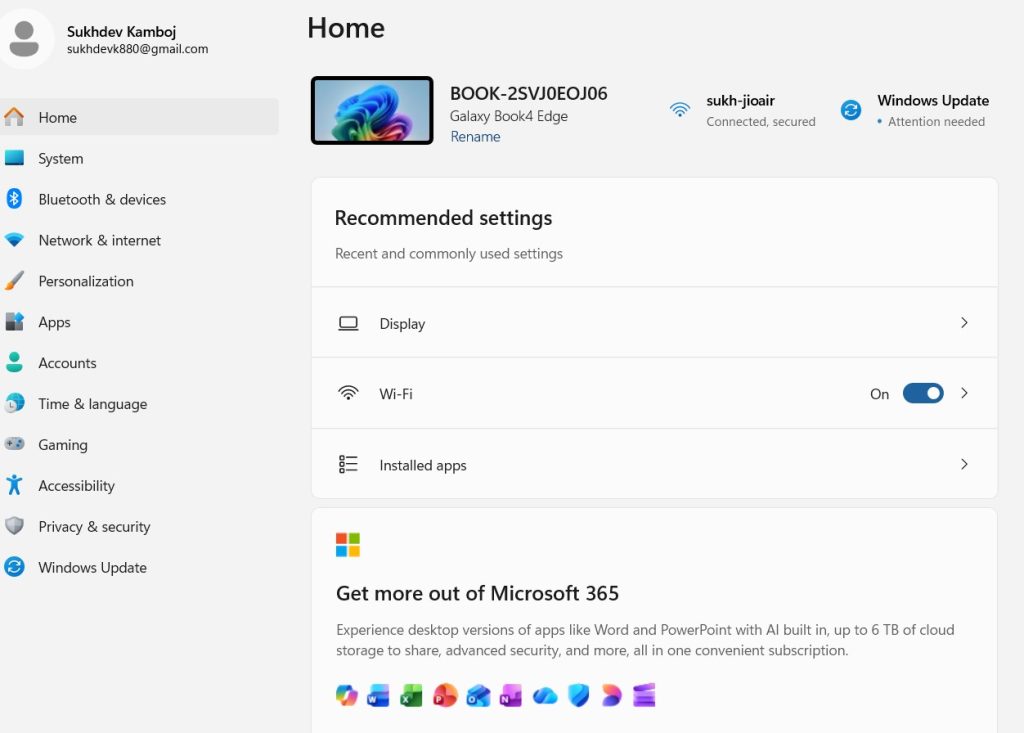
Open Settings by pressing Windows + I.
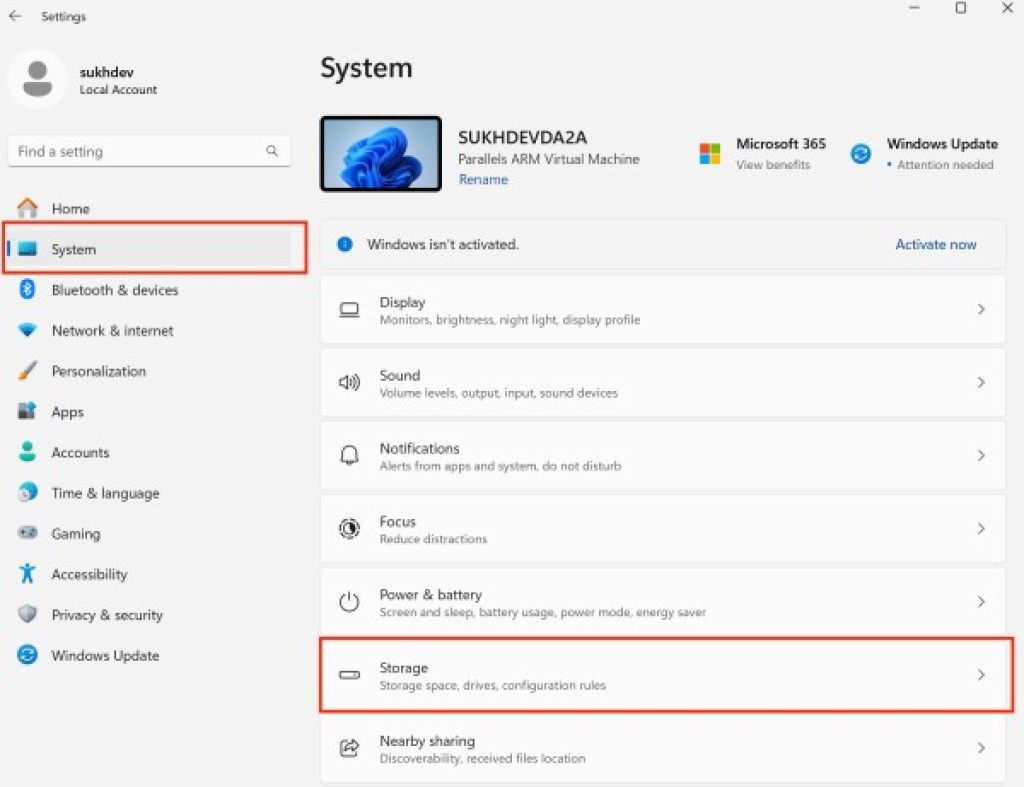
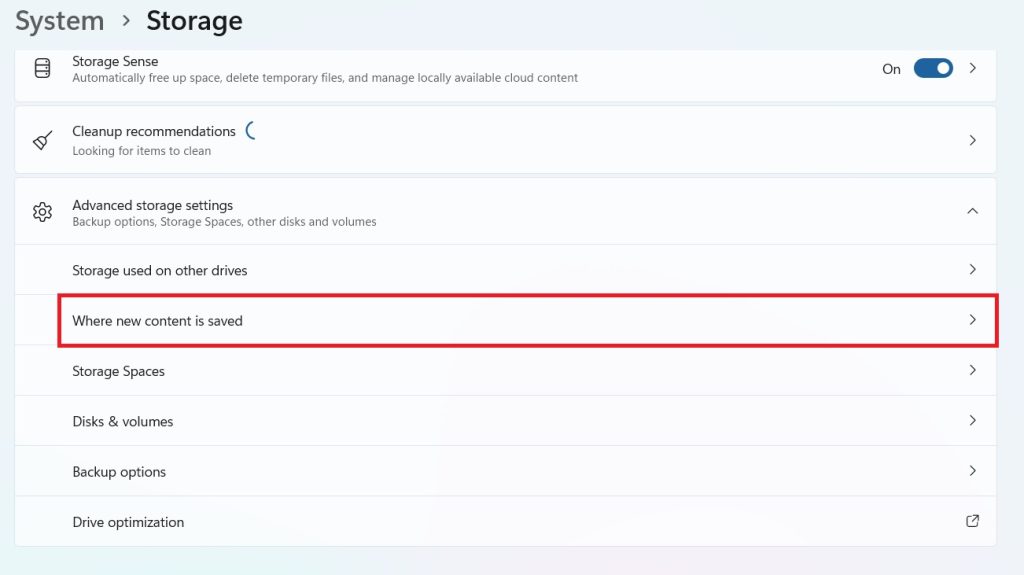
Go to System > Storage.
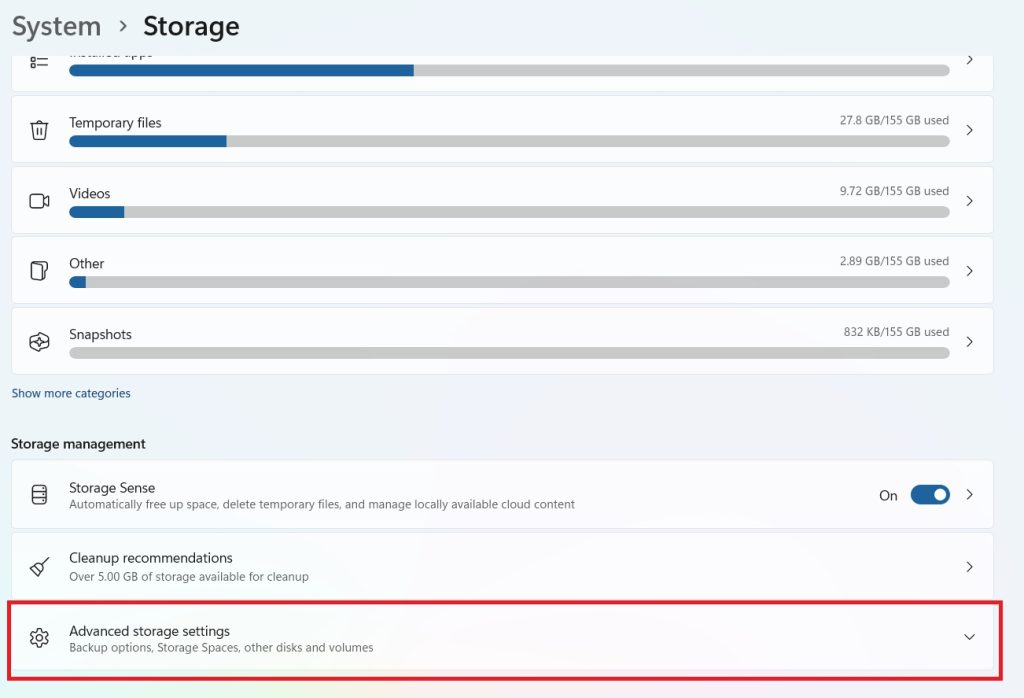
Under the “Storage management” section, click Advanced storage settings.
Select Where new content is saved.
You’ll see dropdown menus for:
- New apps will save to
- New documents will save to
- New music will save to
- New photos and videos will save to
- New movies and TV shows will save to
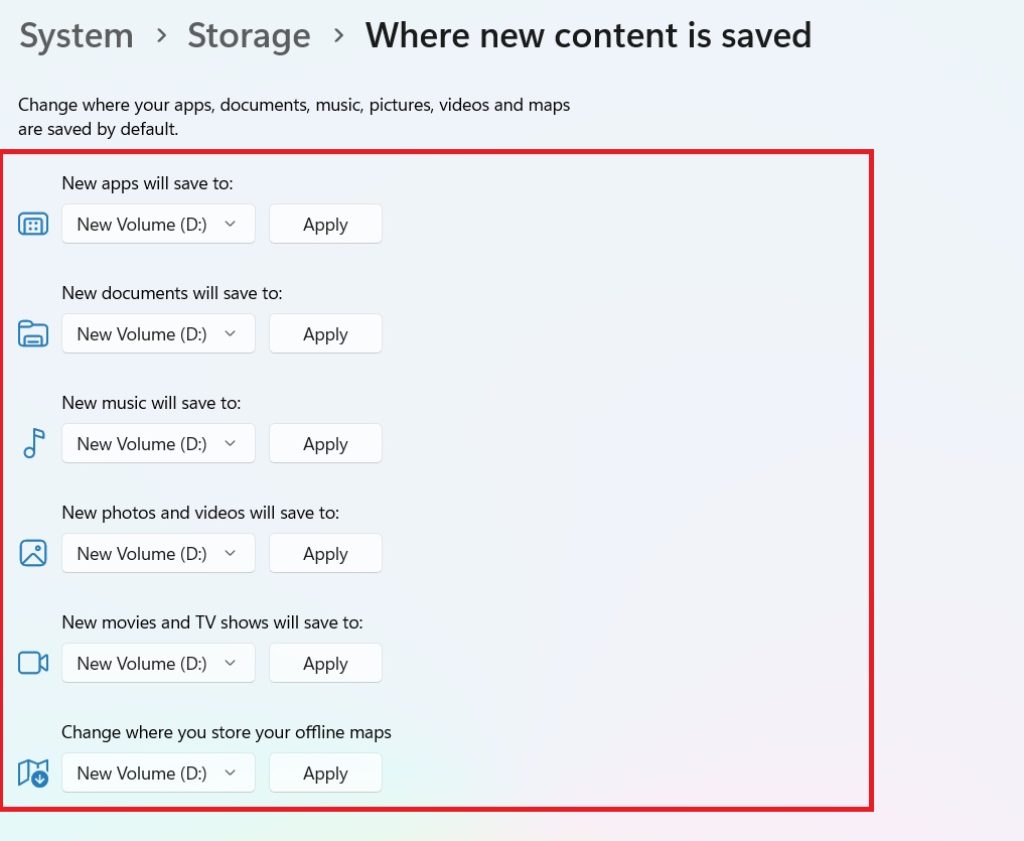
Change each dropdown from C drive to D drive (or whichever drive letter your secondary drive uses).
Click Apply to confirm.
Keep in mind this setting only affects future files and app installs — it does not move anything currently stored on C. You’ll need to manually move existing files if you want to free up space right away.
This method is the best starting point for most users because it’s centralized, requires no third-party tools, and immediately changes behavior across the whole system rather than one app at a time. It’s a good idea to revisit this menu any time you add a new drive or reinstall Windows, since the defaults reset to C unless you configure them again.
Method 2: Move the Default User Folders (Documents, Downloads, Pictures, Music, Videos)
Windows keeps a set of default personal folders — Documents, Downloads, Pictures, Music, and Videos — inside your user profile on C. You can relocate each of these individually so that any app or process that saves to “My Documents” or similar automatically writes to D instead.
- Open File Explorer and navigate to This PC.
- Under “Folders,” right-click the folder you want to move (for example, Documents).
- Select Properties.
- Go to the Location tab.
- Click Move….
- Browse to a folder on your D drive (create a new folder like
D:\Documentsif needed) and select it. - Click Select Folder, then Apply.
- Windows will ask if you want to move existing files from the old location to the new one — click Yes to migrate everything automatically.
Repeat this process for Downloads, Pictures, Music, and Videos. This method is particularly effective because many third-party apps also read these folder locations, so redirecting them has a ripple effect across your system.
For example, most photo editing software, media players, and cloud backup tools default to saving into these same user folders. Once you’ve redirected them to D, those apps will automatically follow suit without any additional configuration on your part. This makes Method 2 one of the most impactful changes you can make, since it touches nearly every category of everyday file — documents from Office apps, downloaded installers, phone photo backups, and downloaded music or video files.
One thing to watch for: after moving a folder, avoid manually recreating the old folder on C afterward, as this can confuse some applications that still reference the original registry path. If you ever need to move a folder back to C, follow the same Properties > Location steps in reverse.
Method 3: Set D as the Default Installation Drive for New Apps
Beyond the general storage settings in Method 1, you can also control installation behavior more precisely depending on where your apps come from.
For Microsoft Store apps: The “New apps will save to” setting from Method 1 handles this automatically. Any app downloaded from the Microsoft Store will install to D going forward.
For traditional desktop apps (.exe installers): Most third-party installers (like Adobe products, games, or utilities) let you choose an install location during setup. When installing new software:
- Run the installer as usual.
- When prompted for an installation path, manually change it from
C:\Program Files\...to something likeD:\Program Files\.... - Complete the installation as normal.
Not every installer offers this option, but the majority of modern software does. It’s worth checking the installer’s “Advanced” or “Custom” setup option if a location isn’t shown by default.
For Steam and other gaming platforms: Gaming platforms are notorious for consuming large amounts of drive space, so it’s worth configuring them separately:
- Open Steam and go to Settings > Storage.
- Click Add Drive and select your D drive to create a new Steam library folder there.
- Right-click the new folder and select Make Default Folder so all future game installs go to D automatically.
Similar library or install-location settings exist in the Epic Games Launcher, Battle.net, and other platforms — look for a “Storage” or “Installation” section in each app’s settings.
Method 4: Change Default Download Location in Your Web Browser
Since browsers handle a huge share of daily file saving, redirecting their default download folder is a high-impact, low-effort change.
In Microsoft Edge:
- Open Edge and click the three-dot menu, then Settings.
- Go to Downloads.
- Click Change next to “Location.”
- Select a folder on your D drive.
In Google Chrome:
- Click the three-dot menu and select Settings.
- Go to Downloads.
- Click Change and choose a D drive folder.
In Mozilla Firefox:
- Open the menu and go to Settings.
- Under General, scroll to “Files and Applications.”
- Choose Save files to and browse to a folder on D.
Once set, every file you download through the browser will be saved to D automatically, rather than defaulting to C:\Users\YourName\Downloads. Note that if you already completed Method 2 and moved your Downloads folder itself to D, most browsers will automatically detect and follow the new location without needing this separate step — but it’s still worth double-checking each browser’s settings to confirm, especially if you use more than one browser regularly.
Method 5: Move the Windows Page File to Manage C Drive Space (Optional)
While this doesn’t change your “default drive” in the traditional sense, moving the virtual memory (page file) off C can significantly reduce how much space Windows itself consumes on your system drive — useful if C is a small SSD.
- Search for “advanced system settings” in the Start menu and open it.
- Under the Advanced tab, click Settings in the Performance section.
- Go to the Advanced tab again, then click Change under Virtual Memory.
- Uncheck Automatically manage paging file size for all drives.
- Select the C drive, choose No paging file, and click Set.
- Select the D drive, choose Custom size, and set an appropriate initial and maximum size (or select System managed size).
- Click Set, then OK, and restart your computer for changes to take effect.
This step is optional and best suited for advanced users, since an improperly configured page file can affect system stability. If you’re not comfortable with this step, it’s safe to skip.
A Note on Moving Windows Itself to D
Many users searching for this topic actually want to know whether the entire Windows installation can be moved from C to D. Technically, this is possible only through disk cloning software (like Macrium Reflect or EaseUS Todo Backup) that clones the entire C drive to D and then makes D bootable — followed by reconfiguring your BIOS/UEFI boot order.
However, this process is complex, carries real risk of data loss or boot failure if done incorrectly, and Microsoft does not officially support simply “switching” the drive letters of your boot and secondary drives. For the vast majority of users, redirecting default save and install locations (Methods 1–4 above) achieves the same practical outcome — keeping C drive usage low — without the risk.
Common Mistakes to Avoid
As you go through these methods, keep the following pitfalls in mind so the process goes smoothly:
- Don’t delete the original folders on C manually. After moving a folder via Method 2, Windows handles the transition automatically. Manually deleting the old folder structure yourself (rather than letting Windows move it) can break shortcuts and app references.
- Avoid using a removable or external drive as your default location. If D is a USB external drive, disconnecting it will cause errors for apps expecting to find their save folder. Default locations work best on an internal secondary drive.
- Remember that some system files must stay on C. Core Windows components, the registry, and certain drivers cannot be redirected to D — this is normal and doesn’t indicate anything went wrong.
- Check available space on D before moving large folders. Media libraries and Steam game folders can be enormous; confirm D has enough room before initiating a move to avoid a failed transfer partway through.
- Restart after major changes. Some settings, particularly the page file adjustment in Method 5, don’t take effect until after a system restart.
Conclusion
Changing your default drive from C to D in Windows 11 isn’t a single switch you flip — it’s a combination of settings that together redirect where new apps, files, and downloads are stored. By adjusting the “Where new content is saved” settings, relocating your default user folders, customizing installation paths for new software, and updating your browser’s download location, you can effectively make D your primary working drive while leaving C dedicated to the operating system.
This approach keeps your system drive lean, improves long-term performance, and gives you more control over how your storage is used. While fully moving Windows itself to another drive is possible through cloning tools, it’s rarely necessary — the methods above solve the underlying space and organization problem for nearly everyone.
Frequently Asked Questions
1. Can I completely move Windows 11 from C to D without reinstalling? Not through built-in settings alone. Windows always installs its core system files to the drive it was originally installed on (typically C), and there’s no native “move OS” feature. The only way to fully relocate Windows is by using third-party disk cloning software to clone C to D and then setting D as the boot drive in BIOS/UEFI — a more advanced and riskier process best reserved for experienced users who are comfortable troubleshooting boot issues if something goes wrong. For most people, it’s simpler and safer to leave Windows on C and redirect everything else to D using the methods described above.
2. Will changing the default save location move my existing files automatically? No, in most cases. The “Where new content is saved” setting in Storage settings only applies going forward — it won’t move apps or files you already have on C. However, when you move default folders like Documents or Downloads via the Properties > Location method, Windows does offer to migrate existing files for you automatically.
3. Why can’t I install some apps directly to D drive? Some applications, particularly certain Microsoft Store apps, system utilities, and older legacy software, are hard-coded to install only to the C drive regardless of your settings. This is a limitation of the individual app or installer, not something you can override through Windows settings.
4. Is it safe to move the Documents, Downloads, and other user folders to D drive? Yes, this is a supported and safe method built directly into Windows and is officially recommended by Microsoft for managing storage across multiple drives. Just make sure your D drive has enough free space and is reliable (not an external drive prone to disconnection), since many apps rely on these folders being consistently accessible. If D is a removable or external drive, avoid moving critical folders there to prevent errors when the drive isn’t connected. For an internal secondary SSD or HDD, this method carries very little risk and can be reversed at any time by repeating the same steps and selecting a location back on C.





