Geeksdigit Team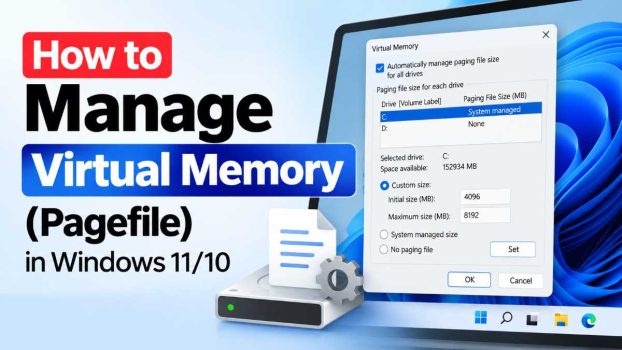
Every time you open a program, your computer pulls data into RAM (Random Access Memory) because RAM is fast and lets your processor access information almost instantly. But RAM is limited, and modern operating systems like Windows 11 and Windows 10 are designed to keep running smoothly even when you have far more applications open than your physical memory can comfortably hold. This is where virtual memory — and specifically the pagefile — comes in.
Virtual memory is a technique that uses a portion of your hard drive or SSD as an extension of your RAM. When your system runs low on physical memory, Windows moves less-frequently-used data out of RAM and into a special file on your storage drive called the pagefile (pagefile.sys). This frees up RAM for active tasks while keeping the offloaded data accessible if it’s needed again. The process happens automatically and invisibly, but it plays a critical role in system stability, especially on machines with limited RAM or when running memory-intensive applications like video editors, large games, or virtual machines.

By default, Windows manages the pagefile size automatically, and for most users, this default configuration works just fine. However, there are situations where manually adjusting virtual memory settings can be beneficial — for instance, if you’re troubleshooting “low on memory” errors, trying to free up disk space, optimizing performance on a system with an SSD, or running specialized software that recommends a specific pagefile size. Understanding how to view, adjust, and optimize your virtual memory settings gives you more control over how your system behaves under memory pressure.
In this guide, we’ll walk through what virtual memory actually does, several methods for managing the pagefile on Windows 11 and Windows 10, tips for choosing the right settings for your hardware, and answers to some of the most frequently asked questions about this feature.
What Exactly Does the Pagefile Do?
Before diving into the methods, it helps to understand the mechanics a little. RAM is volatile and fast, but finite. When your open applications and background processes demand more memory than is physically available, Windows’ memory manager identifies data that hasn’t been accessed recently and writes it to the pagefile on disk. This process is called “paging” or “swapping.” When that data is needed again, Windows reads it back into RAM.
Because reading and writing to a disk — even a fast SSD — is significantly slower than accessing RAM directly, heavy reliance on the pagefile can cause noticeable slowdowns, often referred to as “thrashing.” This is why adding physical RAM is almost always a better performance solution than expanding the pagefile. That said, the pagefile still serves essential purposes beyond just extending memory: it allows Windows to handle memory allocation more flexibly, supports certain crash-dump functions, and prevents out-of-memory crashes in scenarios where RAM usage briefly spikes.
Methods to Manage Virtual Memory in Windows 11/10
Method 1: Check Your Current Virtual Memory Settings
Before making any changes, it’s useful to see your current configuration:
- Press Windows + S and type “advanced system settings,” then click View advanced system settings.
- In the System Properties window, go to the Advanced tab.
- Under the Performance section, click Settings.
- In the Performance Options window, click the Advanced tab.
- Under Virtual memory, you’ll see the total size currently allocated. Click Change to view or edit the detailed settings.
Here you’ll find a list of all your drives, whether Windows is automatically managing the pagefile size, and the recommended vs. currently allocated sizes.
Method 2: Let Windows Automatically Manage Virtual Memory (Recommended for Most Users)
For the majority of users, the safest and simplest approach is to let Windows handle pagefile sizing dynamically:
- Follow the steps above to reach the Virtual Memory window.
- Ensure the checkbox labeled Automatically manage paging file size for all drives is checked.
- Click OK, then OK again, and restart your computer if prompted.
When this option is enabled, Windows dynamically increases or decreases the pagefile size based on real-time system demands. This adaptive approach works well for typical usage — web browsing, office work, media consumption, and light gaming — because Windows’ algorithms are generally quite good at estimating appropriate sizes based on installed RAM and current workload.
Method 3: Manually Set a Custom Pagefile Size
Power users, gamers, or those running specialized software may want more granular control:
- Open the Virtual Memory window as described in Method 1.
- Uncheck Automatically manage paging file size for all drives.
- Select the drive where you want to configure the pagefile (usually your system drive, C:).
- Choose Custom size and enter values (in MB) for Initial size and Maximum size.
- Click Set, then OK, and restart your PC.
A common rule of thumb historically was to set the initial size to 1.5 times your physical RAM and the maximum size to 3 times your RAM, though this guidance predates modern high-RAM systems and SSD storage. On a system with 16GB or more of RAM, many users find that a fixed pagefile of 2–4GB (or even Windows’ own recommended value) is more than sufficient, since the pagefile is now more of a safety net than a primary memory extension.
Method 4: Move the Pagefile to a Different Drive
If your system has multiple storage drives, you can relocate the pagefile — for example, moving it off a smaller, more valuable SSD boot drive onto a secondary HDD or SSD with more free space:
- Open the Virtual Memory settings window.
- Uncheck automatic management.
- Select your current pagefile drive (typically C:) and choose No paging file, then click Set.
- Select the target drive, choose Custom size or System managed size, and click Set.
- Click OK and restart your computer for changes to take effect.
Keep in mind that placing the pagefile on your fastest available drive generally yields better performance, since paging operations are latency-sensitive. Moving it to a slower or mechanical drive purely to save space on your SSD can introduce performance penalties if your system pages frequently, so this method is best reserved for systems with ample RAM where the pagefile is rarely used intensively.
Method 5: Disable the Pagefile Entirely (Not Generally Recommended)
Some users with very large amounts of RAM (32GB+) consider disabling the pagefile altogether to save disk space or reduce SSD wear:
- In the Virtual Memory window, select the drive with the pagefile.
- Choose No paging file and click Set.
- Click OK and restart.
While this can work on systems with abundant RAM and light workloads, it carries risks: some applications and games explicitly check for the presence of a pagefile and may crash or refuse to launch without one, and Windows itself may struggle to generate proper crash dumps or handle unexpected memory spikes. For most users, this method is not advised.
Method 6: Using Command-Line Tools for Advanced Configuration
Advanced users can also configure virtual memory via PowerShell or WMIC for scripting or remote management purposes. For example, using PowerShell, administrators can query and adjust pagefile settings through the Win32_PageFileSetting WMI class, which is particularly useful in enterprise environments managing multiple machines through scripts rather than manually navigating the GUI on each device.
Conclusion
Virtual memory and the Windows pagefile are foundational components of how Windows manages system resources, acting as a safety valve when physical RAM becomes fully utilized. For the vast majority of users, the default automatic management setting is well-tuned and requires no intervention. However, understanding how to view, customize, relocate, or even disable the pagefile gives you valuable troubleshooting and optimization tools — whether you’re dealing with memory-related error messages, trying to reclaim disk space, or fine-tuning a system for specific software requirements.
As a general guideline, the best long-term solution for memory-related performance issues is almost always adding more physical RAM rather than aggressively expanding virtual memory, since disk-based paging is inherently slower than RAM access. That said, keeping a reasonably sized pagefile — even on systems with plenty of RAM — is a sensible safety measure that costs little in terms of disk space while providing an important buffer against unexpected memory-intensive tasks or application crashes.
Frequently Asked Questions
1. How much virtual memory should I allocate on Windows 11/10?
There’s no single “correct” number, since optimal pagefile size depends on your installed RAM, storage capacity, and typical workload. As a general starting point, many users follow guidance of setting the initial size to 1 to 1.5 times installed RAM and the maximum to around 2 to 3 times RAM, though on modern systems with 16GB+ of memory, Windows’ own automatically calculated recommendation is often perfectly adequate. If you frequently run memory-intensive applications like video editing suites, 3D rendering software, or virtual machines, you may benefit from a larger, fixed-size pagefile to avoid dynamic resizing overhead.
2. Can increasing virtual memory improve gaming or overall performance?
Increasing the pagefile size can help prevent crashes or stuttering caused by running out of memory, particularly in games or applications that briefly demand more RAM than is physically installed. However, because disk access is much slower than RAM, relying heavily on virtual memory as a substitute for physical RAM will still result in noticeably reduced performance compared to simply having more RAM installed. Think of the pagefile as a safety net rather than a genuine performance upgrade — it won’t make your system faster than actual RAM would, but it can prevent worse outcomes like application crashes or system instability when memory runs low.
3. Is it safe to disable the pagefile if I have a lot of RAM?
It’s technically possible on systems with large amounts of RAM (32GB or more), but it isn’t generally recommended. Some software explicitly checks for the presence of a pagefile at launch and may fail to start without one. Additionally, Windows uses the pagefile for certain crash-dump and diagnostic functions, and disabling it can make troubleshooting system crashes more difficult. Unless you have a very specific reason and understand the trade-offs, it’s usually safer to keep a modest pagefile enabled, even if you rarely need it.
4. Should I put the pagefile on my SSD or a secondary hard drive?
Generally, placing the pagefile on your fastest available drive yields the best performance, since paging is a latency-sensitive operation — meaning your primary SSD is usually the better choice despite common myths about SSD wear from pagefile writes. Modern SSDs are engineered to handle the write volume from typical pagefile activity without meaningful lifespan concerns. Moving the pagefile to a slower secondary drive to preserve SSD space can be reasonable if you have abundant RAM and rarely trigger heavy paging, but if your system does rely on virtual memory frequently, keeping it on your fastest drive will minimize any performance penalty.