Sukhdev Kamboj
If you’ve upgraded to Windows 11 and find yourself missing the classic File Explorer from Windows 10, you’re far from alone. Windows 11 introduced a redesigned File Explorer with a simplified command bar, rounded corners, tabs, and a trimmed-down context menu — changes that many longtime Windows users find unfamiliar or less efficient. Whether it’s the missing Ribbon interface, the streamlined right-click menu, or just the general layout, plenty of people want their old, familiar file management experience back.
The good news is that Microsoft, whether intentionally or not, left several doors open for reverting to the classic look. There’s a relatively simple method to access an alternative File Explorer that looks like the one in Windows 10, complete with expanded menus and a Ribbon. Beyond that built-in trick, there are also deeper registry tweaks, Group Policy settings, and dedicated third-party tools that can bring back even more of the Windows 10 feel. Below are four methods, ranging from the simplest and completely free “hidden feature” approach to more involved customization options, that will help you restore that classic experience.
Method 1: Restore the Classic Context Menu via Command Prompt

While Methods 1–4 focus on File Explorer’s window layout, many people associate the “Windows 10 look” just as much with the old right-click context menu — the one that shows options like Copy, Paste, Send to, Print, and Bluetooth immediately, instead of hiding them behind “Show more options.” Microsoft hasn’t provided this as an official toggle, but a single Command Prompt command can restore it.
- Click Start, type cmd, then right-click Command Prompt and choose Run as administrator (confirm the UAC prompt if it appears).
- Enter the following command exactly as written, then press Enter:
reg add "HKCU\Software\Classes\CLSID\{86ca1aa0-34aa-4e8b-a509-50c905bae2a2}\InprocServer32" /f /ve
- Restart File Explorer so the change takes effect. You can do this without rebooting by running two more commands:
   taskkill /f /im explorer.exe
   start explorer.exe
- Right-click a file, folder, or empty desktop space to confirm — the full classic context menu should now appear immediately, with no extra click required.
This command works by adding a registry key through the command line rather than opening the Registry Editor manually, which makes it faster and less error-prone for anyone comfortable copying and pasting a single line into an elevated terminal. The change is also fully reversible: if you ever want Windows 11’s default compact menu back, run this command instead, then restart Explorer the same way:
reg delete "HKCU\Software\Classes\CLSID\{86ca1aa0-34aa-4e8b-a509-50c905bae2a2}" /fA couple of practical notes: this command must be run from an elevated (administrator) Command Prompt, or it will silently fail to apply system-wide as expected. Also, because it only touches the context menu and not the File Explorer window itself, it pairs well with Methods 1–4 — you can combine this with, say, the Control Panel trick or a third-party tool to restore both the classic window layout and the classic right-click menu at the same time.
Method 2: Access the Classic Explorer Through Control Panel’s Navigation Bar
A closely related variation on the first method works directly through Control Panel’s own address bar rather than the Windows Tools shortcut, and some users find it more reliable.
The steps look like this:
Open Control Panel from start menu.
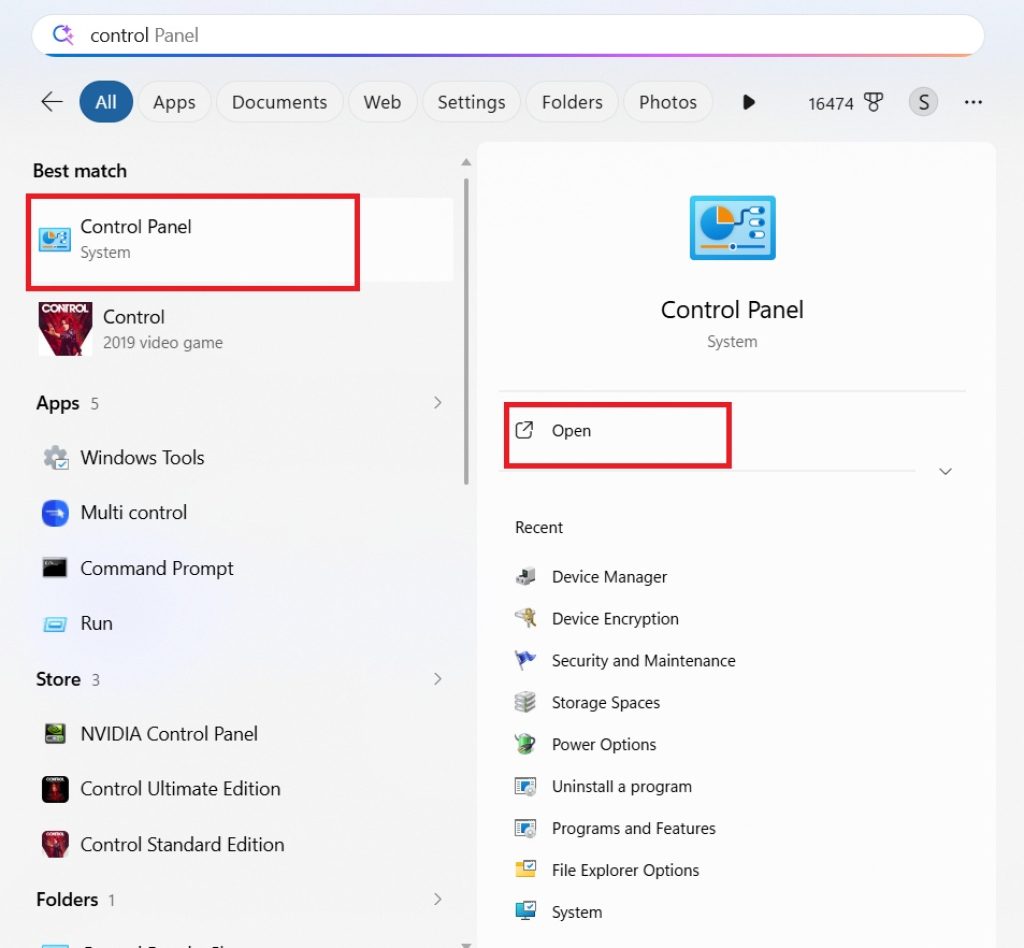
Click on Up arrow around address bar in control panel settings.
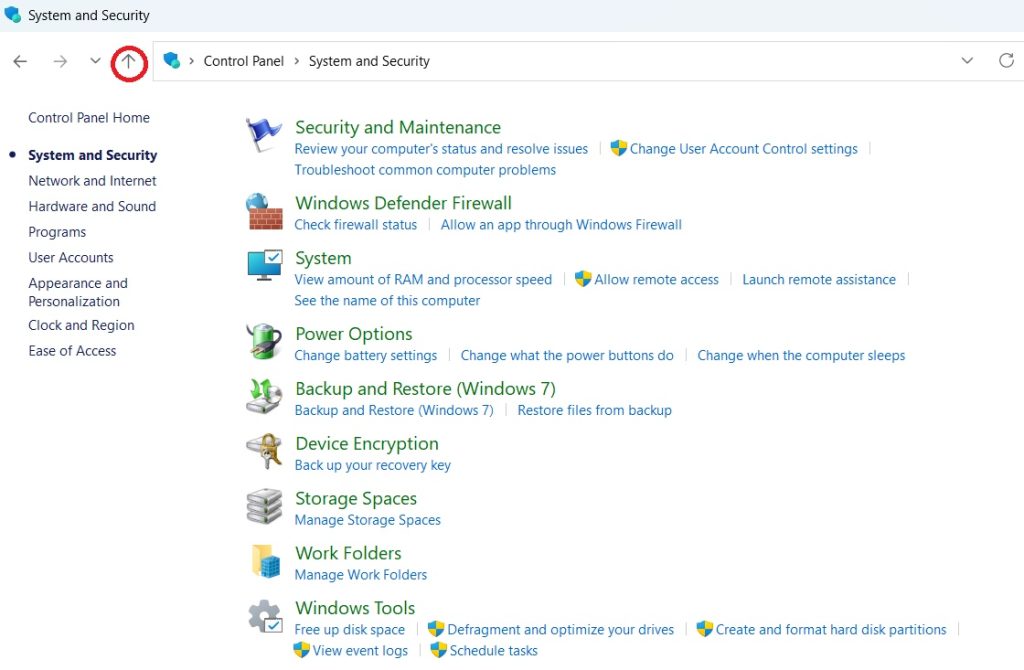
Once Control Panel opens, click into its own address bar again and select Home.
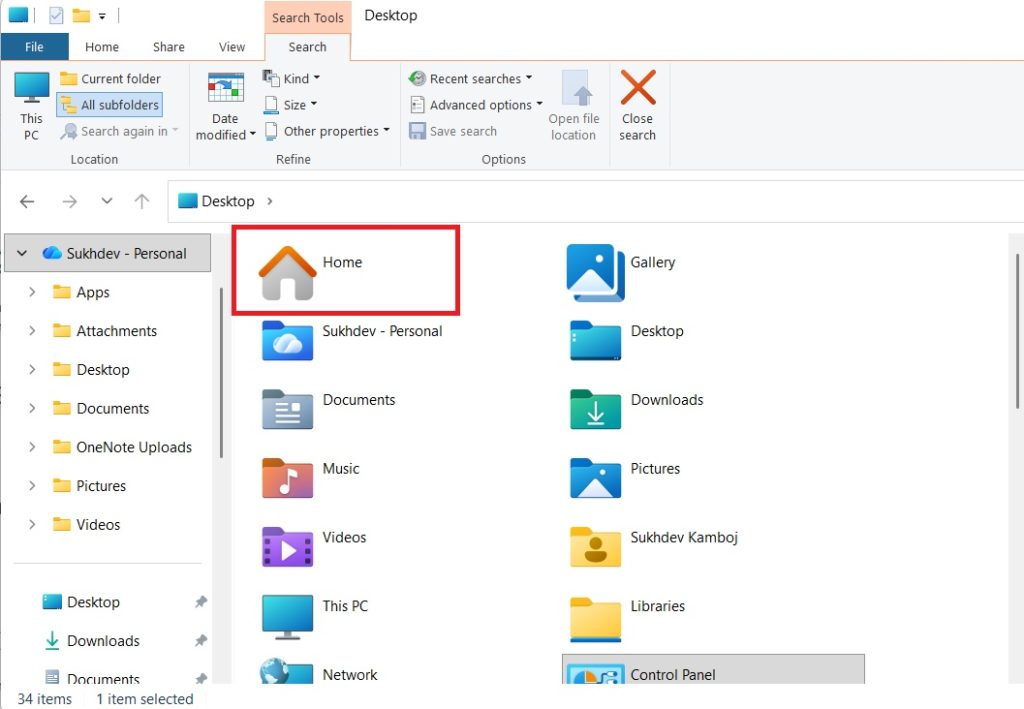
This will bring back the Windows 10 File Explorer view.
From here, you can browse normally using the left-hand navigation tree exactly as you would have in Windows 10, complete with the older-style ribbon-free interface, classic icons, and the traditional folder tree behavior. As with Method 1, this is a temporary display change tied to that particular window rather than a permanent system-wide switch, so it will need to be repeated in new windows or after a reboot. Still, for quick one-off tasks where the modern File Explorer’s command bar feels limiting, it’s a handy shortcut that costs nothing and touches no system files.
Method 3: Enable Classic Shell Behavior via Group Policy or Registry
If you want something closer to a persistent, system-level change rather than a per-window trick, Windows 11 actually includes a legacy administrative setting that can force classic Explorer behavior more broadly. This method is a bit more technical, involves either Group Policy or a registry edit, and is best suited to Windows 11 Pro, Enterprise, or Education editions, since Group Policy Editor isn’t available by default on Home editions.
To enable it through Group Policy:
- Press Windows key + R, type
gpedit.msc, and press Enter to open the Group Policy Editor. - Navigate to User Configuration > Administrative Templates > Windows Components > File Explorer.
- Locate the “Turn on Classic Shell” (sometimes referenced as the ClassicShell) policy setting and enable it.
This ClassicShell policy setting allows administrators to revert specific Windows Shell behavior to that of the classic shell, disabling certain newer features and restoring the older interface, including different context menu behavior. It’s worth being aware of the trade-offs before flipping this switch, though: enabling this setting will restrict users from configuring single-click item opening and will disable the preview pane, while also forcing folder view options into the classic folders view.
If you’re on Windows 11 Home and don’t have access to the Group Policy Editor, the equivalent change can typically be made by importing the matching registry key manually (essentially the registry-level twin of the same Group Policy setting), though this carries more risk since a mistyped registry value can cause instability. Because of that risk, always create a full system backup or restore point before attempting registry-based changes — if something goes wrong, you’ll want an easy way to roll back to a known-good state.
Method 4: Use a Third-Party Customization Tool
For users who want the most complete and durable Windows 10 experience — one that survives restarts, new windows, and Windows updates without needing to be reapplied — dedicated third-party tools are generally the most effective option. Free, well-known utilities exist specifically to restore the old File Explorer Ribbon, the classic Start menu, the left-aligned taskbar, and other pre-Windows 11 interface elements all at once.
These tools generally work by re-registering the old File Explorer components as active shell extensions and hooking into Explorer’s rendering behavior, rather than relying on the temporary Control Panel quirk from Methods 1 and 2. Before some of these tools’ features can be enabled, you’ll typically need to click a “Register as shell extension” option and confirm the prompt that follows.
Broadly, the process with most of these utilities involves:
- Downloading the tool from its official GitHub page or developer website (never from an unofficial mirror, to avoid bundled malware).
- Running the installer, which registers the classic File Explorer and Ribbon components as active shell extensions.
- Restarting File Explorer or your PC so the changes take full effect.
- Adjusting settings within the tool’s control panel to fine-tune which Windows 10-era elements (taskbar position, Start menu, context menu, Explorer Ribbon) you want restored versus which Windows 11 features you want to keep.
The main advantage here is persistence: unlike the Control Panel trick, these changes generally survive reboots and new Explorer windows. The trade-offs are that you’re relying on a third-party developer to keep the tool compatible with each new Windows 11 update, and because these tools hook fairly deeply into the shell, there’s a slightly higher (though still generally low) risk of instability compared to using only Microsoft’s built-in options. If stability is a top priority for you, stick with Methods 1 through 3; if a fully persistent classic look matters more, a reputable, actively maintained customization tool is worth trying.
Restore Modern File Explorer (Command Bar & Tabs) via CMD
If you used a registry command to force the classic Ribbon-style Explorer, this reverses it:
- Click Start, type cmd, right-click Command Prompt, and choose Run as administrator.
- Run this command to delete the key that’s forcing classic mode:
reg delete "HKCU\Software\Classes\CLSID\{d93ed569-3b3e-4bff-8355-3c44f6a52bb5}" /f
- Restart File Explorer so the change applies immediately:
   taskkill /f /im explorer.exe
   start explorer.exe
- Open a new File Explorer window — you should see the modern command bar and tabs back in place.
If instead you’d added a key to enable classic mode rather than deleting one to disable modern mode, use this pair of commands instead (the second line restores modern mode by explicitly setting it):
reg add "HKCU\Software\Classes\CLSID\{d93ed569-3b3e-4bff-8355-3c44f6a52bb5}\InprocServer32" /f /veThen run the same taskkill / start explorer.exe pair above to restart Explorer. Note this specific command bar toggle only worked reliably before Windows 11 version 22H2 — on current builds, deleting the key (step 2 above) is the more consistent method.
Restore the Modern (Compact) Context Menu via CMD
If you’re also using the classic full right-click menu (from the earlier method) and want the modern, streamlined one back:
- Open Command Prompt as administrator.
- Run:
reg delete "HKCU\Software\Classes\CLSID\{86ca1aa0-34aa-4e8b-a509-50c905bae2a2}" /f
- Restart Explorer:
   taskkill /f /im explorer.exe
   start explorer.exe
This removes the key that forces the classic menu, so right-clicking will go back to the compact Windows 11 menu with a “Show more options” entry for the rest.
One thing to check first: if neither command seems to do anything, you may have switched using a third-party tool (like ExplorerPatcher) rather than a raw registry edit — in that case, undo the change from within that tool’s settings instead, since it may be managing the registry keys differently or reapplying them on startup.
A Bonus Tip: Simplify the Modern Navigation Pane
If a full classic-Explorer revival feels like more than you want to take on, there’s a lighter middle-ground option worth mentioning: trimming down the modern File Explorer’s navigation pane so it feels closer to the leaner Windows 10 sidebar, without changing anything else.
If you see too many folders cluttering the Windows 11 File Explorer navigation pane, click the three-dot menu on the toolbar, select Options, then General. Under Privacy, uncheck “Show frequently used folders” and click Apply. Then switch to the View tab, scroll down to the Navigation pane section, and uncheck “Show all folders,” “Expand to open folder,” and “Always show availability status,” then click Apply. Unchecking these boxes will make File Explorer look noticeably more minimal, similar to how it appeared in Windows 10, with far fewer redundant folders on display.
This won’t bring back the Ribbon or the old context menu, but it’s a quick, fully supported way to declutter the interface if that’s your main complaint.
Conclusion
Windows 11’s File Explorer redesign was a big visual departure from Windows 10, but Microsoft left enough legacy code in place that reverting — fully or partially — is entirely possible without third-party risk if you don’t want it. For a quick, no-strings-attached fix, the Control Panel “Windows Tools” trick (Method 1) or its close cousin (Method 2) will get you into classic Explorer in under 30 seconds, though you’ll need to repeat it each session. If you want a setting that sticks system-wide, the Group Policy or registry-based ClassicShell approach (Method 3) is the more “official” route, provided you’re comfortable with its trade-offs around single-click and preview pane behavior. And if you want the fullest, most persistent Windows 10 experience — Ribbon, Start menu, taskbar alignment and all — a well-maintained third-party tool (Method 4) is generally the most complete solution, at the cost of relying on ongoing third-party support.
Whichever method you choose, it’s smart to create a system restore point first, especially before touching Group Policy, the registry, or installing shell-level tools. That way, if a Windows update breaks compatibility or something doesn’t look right, you can roll back cleanly and try a different approach.
FAQ
Will Microsoft eventually remove these workarounds?
It’s possible. It isn’t entirely clear which Windows 11 versions currently support the Control Panel trick, since some users have found it doesn’t work on newer builds like Windows 11 Pro 23H2, suggesting Microsoft may be gradually phasing out the legacy code these tricks rely on. Since File Explorer continues to receive regular updates — the current stable release as of September 2026 sits at version 26H1 (build 10.0.28000.2954) — it’s worth checking that a given method still works after major feature updates, and having a backup plan (like a third-party tool) in case a built-in trick eventually stops functioning.
Is it safe to use third-party tools to restore the classic File Explorer, and will it break my system?
Generally, yes, as long as you download from the developer’s official source rather than a random third-party mirror. The Control Panel trick itself does not affect system stability and doesn’t fully replace the modern File Explorer, and reputable open-source customization tools operate on similar principles by re-registering existing Windows components rather than replacing core system files. That said, any tool that hooks into Explorer’s shell carries a small risk of conflicts after major Windows updates, so it’s good practice to create a restore point beforehand and keep the tool updated to match your current Windows build.