Geeksdigit Team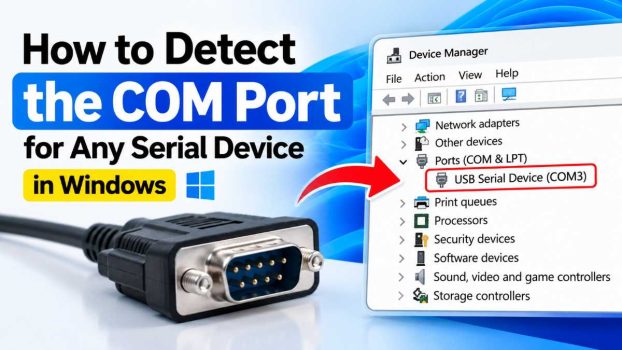
Serial communication may feel like a relic of the pre-USB era, but COM ports are still everywhere. Arduino boards, industrial controllers, barcode scanners, GPS modules, CNC machines, point-of-sale hardware, and countless embedded devices still talk to Windows PCs over a virtual or physical serial connection. Before you can open a terminal session, flash firmware, or configure software to talk to one of these devices, you need one crucial piece of information: which COM port number Windows has assigned to it.
This sounds simple, but it trips up a lot of people. Windows assigns COM port numbers dynamically, and the same device can show up as COM3 today and COM7 tomorrow, especially after a driver update, a different USB hub, or a Windows update. If you have multiple similar devices plugged in at once, figuring out which COM port belongs to which physical device gets even trickier.

This guide walks through every practical method for finding a COM port in Windows, from the simplest built-in tools to more advanced techniques for automation and scripting. Whether you’re a hobbyist connecting an Arduino for the first time or an engineer writing a script that needs to auto-detect hardware, you’ll find a method here that fits.
Why COM Port Detection Matters
Every serial device, whether it’s a genuine RS-232 device or a USB device emulating serial communication through a USB-to-serial chip (like the common CH340, FTDI, or CP210x chipsets), needs a COM port assignment to communicate with software. Terminal programs like PuTTY, development environments like the Arduino IDE, and industrial software packages all ask you to select a COM port number before they can send or receive data. Pick the wrong one, and you’ll get a connection error, silence, or garbled data. Getting COM port detection right the first time saves troubleshooting time and prevents the classic mistake of assuming a device is broken when it’s simply pointed at the wrong port.
Method 1: Device Manager (The Standard GUI Approach)
Device Manager is the most common and reliable way to find a COM port for most users, since it’s built into every version of Windows and requires no extra software.
Steps:
- Right-click the Start button and select Device Manager, or press
Win + Xand choose it from the menu. - Expand the category labeled Ports (COM & LPT). If you don’t see this category, click View > Show hidden devices, since some virtual serial ports only appear once hidden devices are visible.
- Look through the list. Each entry shows a device name followed by its COM port number in parentheses, for example “USB-SERIAL CH340 (COM4)” or “Arduino Uno (COM7).”
- If several similar entries are listed and you’re not sure which one is your device, unplug the device, note which entry disappears from the list, then plug it back in and confirm it reappears with the same number.
This last trick, sometimes called the “unplug test,” is the single most useful technique for identifying a specific device among several similar-looking ones. It works because Device Manager updates its list live as hardware is connected or disconnected.
When to use it: This is the best first step for almost anyone, especially those setting up a device for the first time or troubleshooting by hand.
Method 2: PowerShell (Fast and Scriptable)
For anyone comfortable with a command line, PowerShell offers a quicker and more detailed way to list COM ports, and it can easily be turned into a repeatable script.
Basic command:
powershell
Get-WmiObject Win32_PnPEntity | Where-Object { $_.Name -match 'COM\d+' } | Select-Object NameThis queries all Plug and Play devices and filters for anything whose name includes a COM port reference, then prints just the name (which includes the port number).
A more detailed version that also shows manufacturer and device ID information, which is useful for distinguishing between multiple identical-looking devices:
powershell
Get-WmiObject Win32_PnPEntity | Where-Object { $_.Name -match 'COM\d+' } | Select-Object Name, DeviceID, ManufacturerOn newer systems, Get-WmiObject is being phased out in favor of Get-CimInstance, which uses the same underlying WMI data but through a more modern interface:
powershell
Get-CimInstance Win32_PnPEntity | Where-Object { $_.Name -match 'COM\d+' } | Select-Object Name, DeviceIDWhen to use it: PowerShell is ideal when you need to check port assignments repeatedly, want output you can pipe into a log file, or are building a setup script that needs to detect hardware automatically before configuring software.
Method 3: Command Prompt with mode or wmic
If you prefer the classic Command Prompt, two older utilities can also list serial ports.
Using mode:
cmd
modeRunning mode with no arguments lists all currently active COM ports along with their configuration (baud rate, parity, data bits, and so on). It’s a fast way to see what’s active right now, though it doesn’t show a friendly device name, only the port number.
Using wmic:
cmd
wmic path Win32_PnPEntity where "Caption like '%%(COM%%'" get CaptionThis returns device names containing COM port references, similar to the PowerShell method. Note that Microsoft has deprecated the wmic command in recent Windows 10 and Windows 11 feature updates, and it may not be present on newly installed systems going forward. If wmic isn’t recognized, use one of the PowerShell commands above instead, since they rely on the same underlying WMI data and will keep working after wmic is fully removed.
When to use it: These commands suit users who want a lightweight, no-installation option directly from Command Prompt, particularly on older systems where wmic is still available.
Method 4: Third-Party Utilities and Driver-Specific Tools
When Device Manager and command-line tools aren’t detailed enough, a few specialized tools go further.
- USBDeview (by NirSoft) lists every USB device that has ever been connected to the system, including its assigned COM port, serial number, and vendor/product IDs. This is especially useful for identifying a specific unit among several identical devices, since it can show a device’s unique serial number.
- Chipset-specific utilities, such as the FTDI FT_Prog tool or CH340/CP210x driver utility panels, are useful when you’re working with a specific USB-to-serial chipset and want to rename, reprogram, or lock a COM port assignment so it doesn’t change between reboots.
- Arduino IDE and PlatformIO both include built-in port lists under their board/port selection menus, which is often the fastest path if your “serial device” is specifically a microcontroller board you’re about to program.
- Terminal programs like PuTTY or Tera Term display a dropdown or list of currently available COM ports when you open a new serial session, which doubles as a quick detection method if you already have the software open.
When to use these: Reach for third-party tools when you manage many serial devices, need to keep COM port assignments consistent across reboots, or need details Device Manager doesn’t show, like serial numbers or vendor IDs.
Tips for Handling Multiple or Changing COM Ports
A few practical habits make COM port detection much less frustrating over time:
- Use the same physical USB port each time. Windows often assigns COM port numbers based partly on the USB port history, so plugging a device into a different port can shift its assigned number.
- Force a fixed COM port number. In Device Manager, right-click the device under Ports (COM & LPT), choose Properties, go to the Port Settings tab, click Advanced, and select a specific COM port number from the dropdown. This locks that device to the same number going forward.
- Label devices with unique names when possible. Some USB-to-serial chips allow you to set a custom product string through manufacturer utilities, which then shows up in Device Manager and makes identification instant.
- Automate detection in scripts using the PowerShell methods above rather than hardcoding a COM port number, since hardcoded ports are one of the most common causes of “it worked yesterday” bugs in serial device software.
Conclusion
Finding a COM port in Windows doesn’t have to be guesswork. Device Manager remains the fastest and most reliable option for everyday use, especially when paired with the unplug-and-replug trick to identify a specific device. PowerShell and Command Prompt offer quick, scriptable alternatives well-suited to automation or repeated checks, while third-party tools like USBDeview and chipset-specific utilities fill in the gaps when you need serial numbers, persistent port assignments, or details about devices that aren’t currently connected. Once you know the port, locking it in place with a fixed assignment saves you from re-discovering it every time you plug the device back in. With these four methods in your toolkit, you’ll never be stuck wondering which COM port your hardware landed on.
FAQ
1. Why does my device’s COM port number keep changing?
Windows assigns COM port numbers based on a combination of the device’s hardware ID and its connection history. If you plug the same device into a different USB port, use a different USB hub, or reinstall its driver, Windows may treat it as a “new” device and assign a different port number. Locking the port number through Device Manager’s Advanced Port Settings prevents this.
2. How do I tell apart two identical USB-to-serial devices?
The most reliable way is the unplug test in Device Manager: disconnect one device, see which entry disappears, then reconnect it. For a more permanent solution, use a tool like USBDeview to view each device’s unique serial number, or use manufacturer utilities to set a custom product name on each device so they appear differently in the ports list.
3. My device doesn’t show up under “Ports (COM & LPT)” at all. What should I do?
First, check View > Show hidden devices in Device Manager, since disconnected or virtual devices are sometimes hidden by default. If it’s still missing, the device may need a driver installed; check the category “Other devices” or “Universal Serial Bus controllers” for an entry with a yellow warning icon, and install the appropriate USB-to-serial driver (commonly CH340, FTDI, or CP210x) from the manufacturer’s website.
4. Can I find a COM port without opening Device Manager every time?
Yes. The PowerShell commands in Method 2 can be saved as a .ps1 script and run whenever you need a quick list, and can even be scheduled or embedded into setup scripts for software that needs to detect hardware automatically. Many terminal programs and IDEs, such as PuTTY, Arduino IDE, and PlatformIO, also show available COM ports directly in their connection menus, so you may not need a separate detection step at all if you’re already working inside one of those tools.