Sukhdev Kamboj
If your Windows 11 PC feels slower than it should, especially in games, video editing, or heavy multitasking, a security feature called Virtualization-Based Security (VBS) could be part of the reason. Microsoft enables VBS by default on many new PCs and fresh installs, and it can quietly consume system resources in the background.
The good news is that you can turn it off. This guide covers eight methods to disable VBS and speed up Windows 11, from a simple toggle in Settings to Group Policy, the Registry, and command-line tools. Each method includes clear steps, so you can pick the one that suits your comfort level.

Before you start, remember that VBS is a security feature. Disabling it can improve performance, but it also reduces protection against certain advanced attacks. We cover that trade-off below so you can decide with full information.
What Is VBS and Why Does It Slow Down Windows 11?
Virtualization-Based Security uses your CPU’s hardware virtualization features to create an isolated region of memory, separate from the normal operating system. Windows uses this region to protect sensitive processes such as credentials, drivers, and kernel code from malware.
Its best-known component is Memory Integrity, also called Hypervisor-Protected Code Integrity (HVCI). It blocks unsigned or malicious drivers from running in the kernel.
The catch is overhead. Because VBS runs your system on top of a hypervisor layer, the CPU has extra work to do. Independent tests by hardware reviewers have shown an average gaming performance drop of around 5%, with larger losses in certain CPU-bound titles and on older or lower-end processors. The impact varies widely with your hardware, so results differ from one PC to the next.
Should You Disable VBS?
Disable it if:
- You use a PC mainly for gaming or performance-sensitive work.
- You have an older CPU where the overhead is noticeable.
- You run virtual machines or emulators that conflict with the hypervisor.
- Some drivers or anti-cheat software are incompatible with Memory Integrity.
Keep it on if:
- You handle sensitive data, work devices, or corporate accounts.
- Your organization requires it through policy.
- You download software and drivers from unverified sources.
If you decide to disable it, keep Microsoft Defender or another reputable antivirus running, keep Windows updated, and avoid sketchy drivers.
How to Check Whether VBS Is Running
Before changing anything, confirm VBS is active:
- Press Win + R, type
msinfo32, and press Enter. - In the System Summary, scroll to the bottom.
- Find Virtualization-based security.
- If it says Running, VBS is active. If it says Not enabled, you don’t need to do anything.
Use the same check after each method to confirm the change worked. Remember that a restart is required for the change to take effect.
Method 1: Turn Off Memory Integrity in Windows Security
This is the easiest method and the best place to start. It disables Memory Integrity, the component responsible for most of VBS’s performance cost.
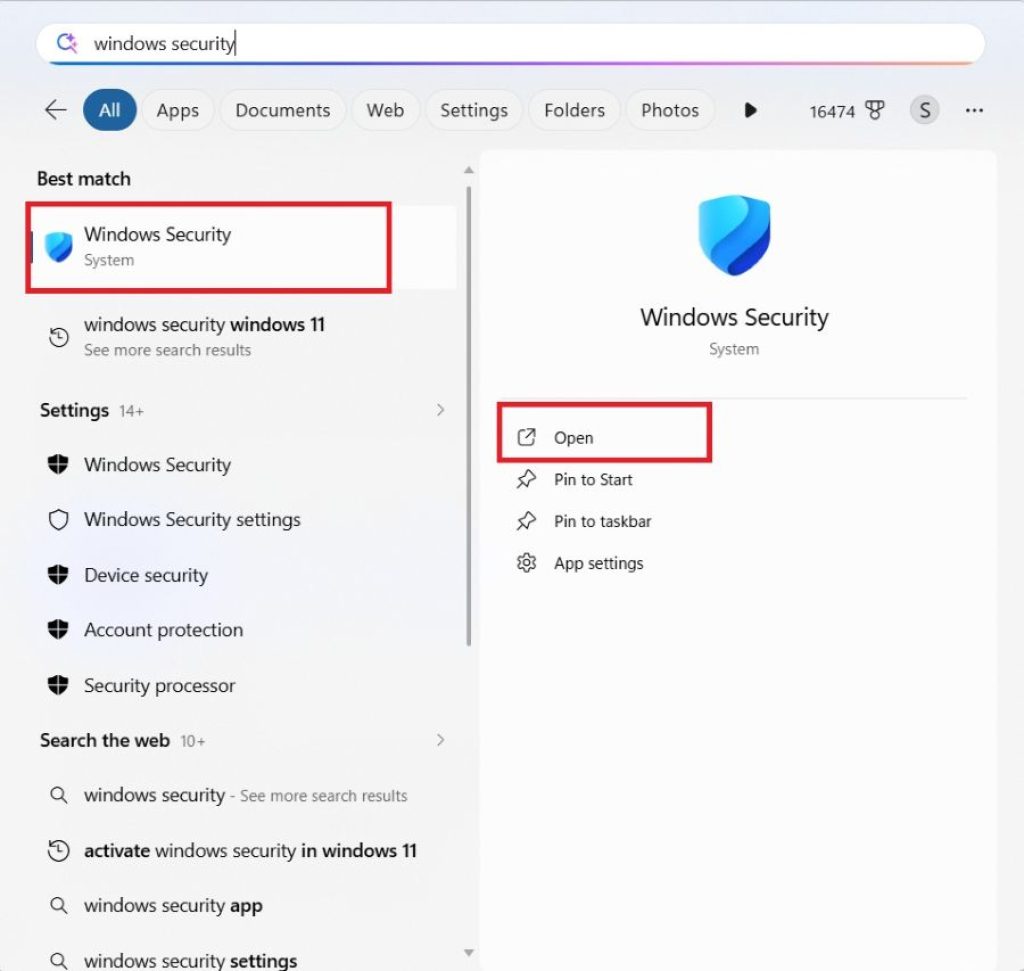
Open the Start menu, type Windows Security, and open it.
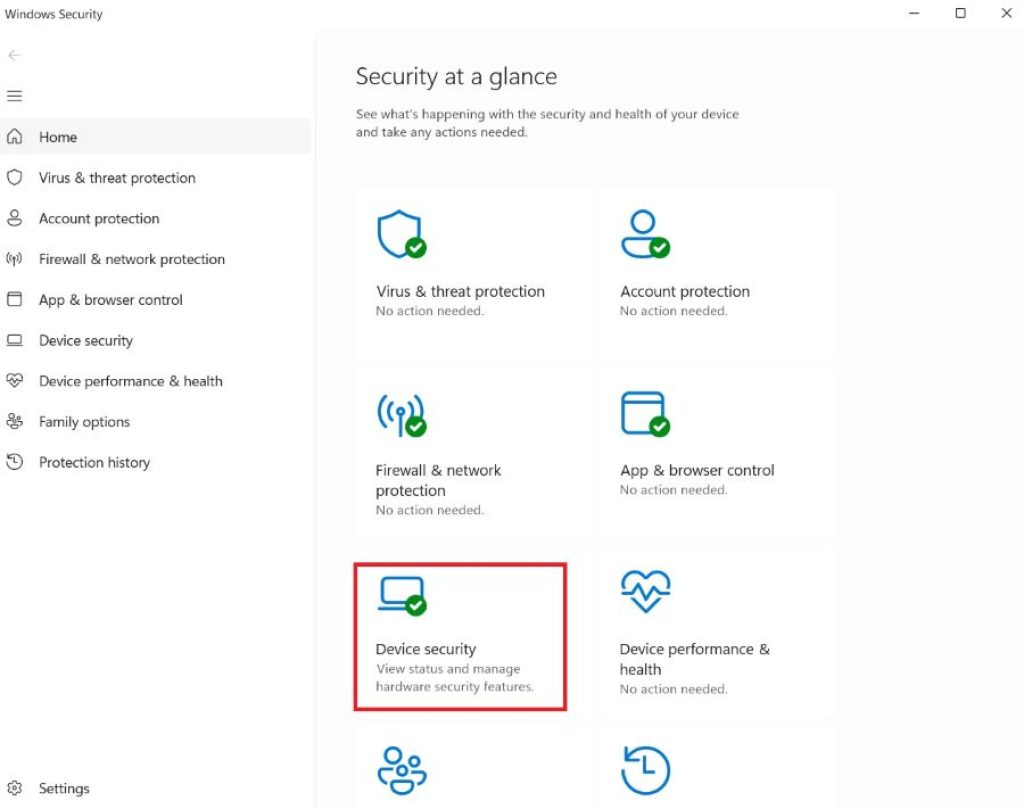
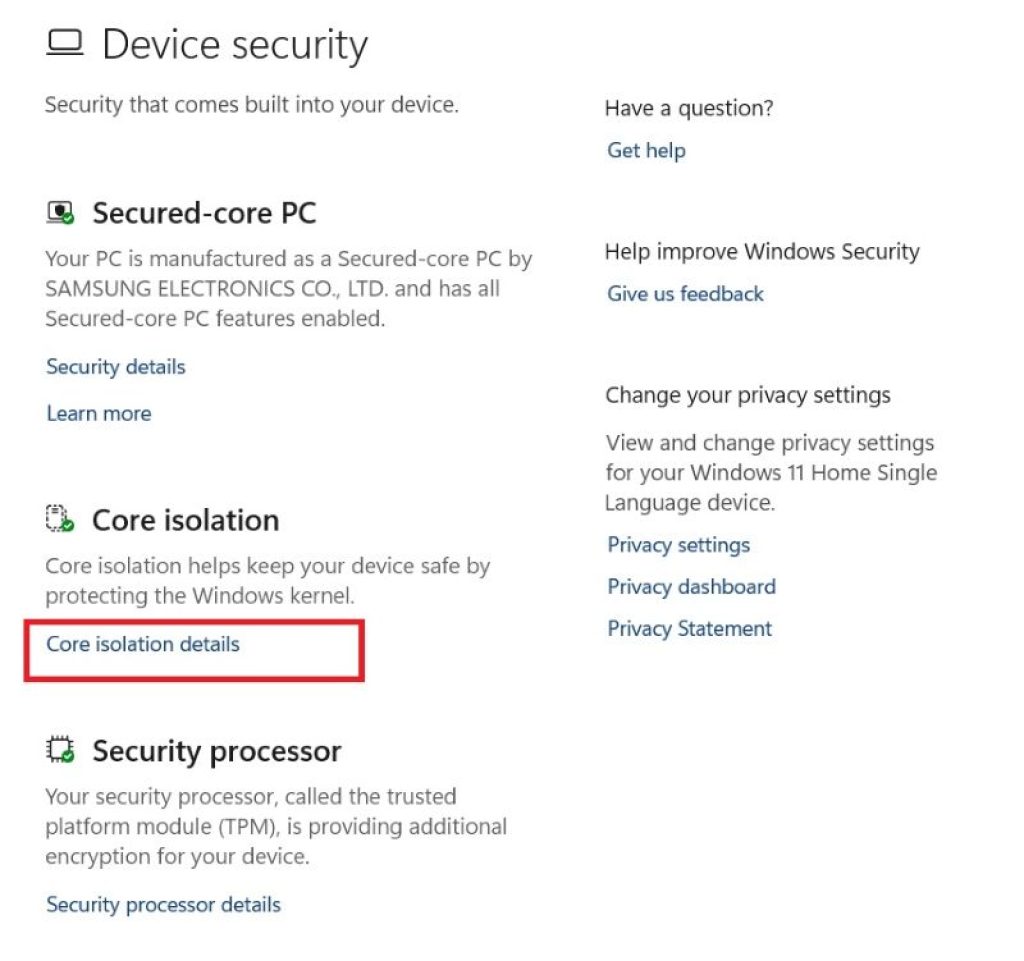
Click Device security.
Under Core isolation, click Core isolation details.
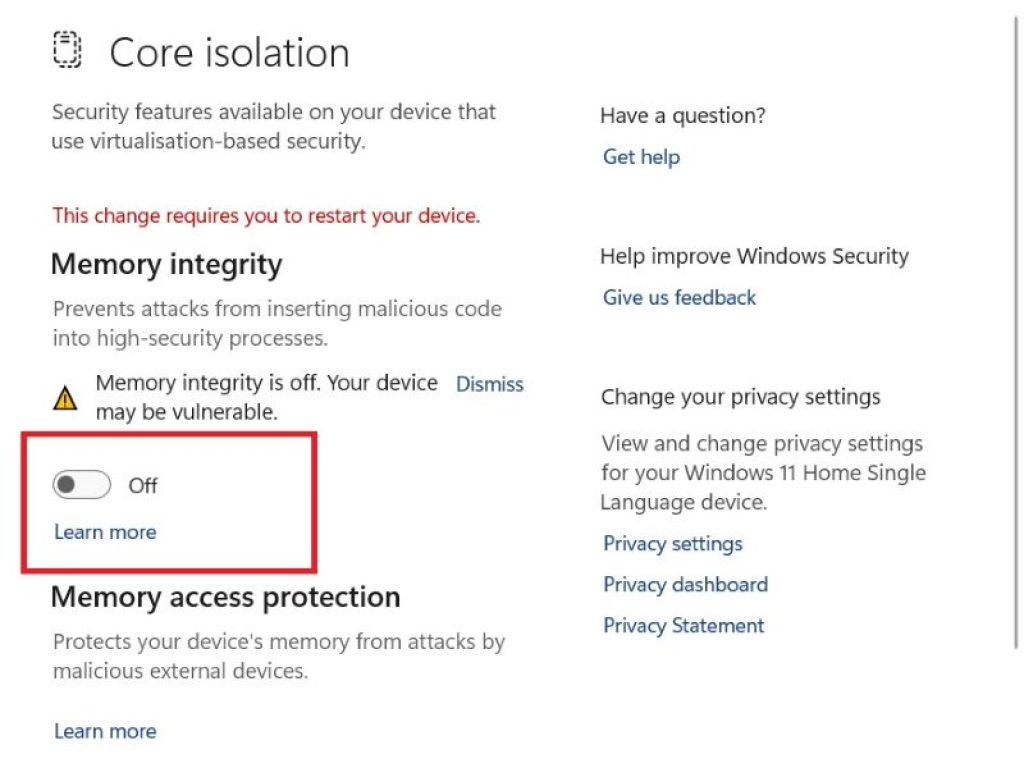
Turn the Memory integrity toggle Off.
Click Yes if User Account Control prompts you.
Restart your PC.
Note: If the toggle is greyed out or turns itself back on, a Group Policy, Registry setting, or incompatible driver is controlling it. Use Method 2 or Method 3 instead.
Method 2: Disable VBS Using Group Policy Editor
The Local Group Policy Editor is available in Windows 11 Pro, Enterprise, and Education. It isn’t included in Home edition.
- Press Win + R, type
gpedit.msc, and press Enter. - Navigate to Computer Configuration → Administrative Templates → System → Device Guard.
- Double-click Turn On Virtualization Based Security.
- Select Disabled.
- Click Apply, then OK.
- Restart your computer.
Setting the policy to Disabled prevents Windows from launching VBS at startup, which is more thorough than the Windows Security toggle. It also stops the setting from being switched back on automatically.
Method 3: Disable VBS Through the Registry Editor
This method works on every Windows 11 edition, including Home. Editing the Registry carries some risk, so create a restore point first (search for “Create a restore point” in the Start menu).
- Press Win + R, type
regedit, and press Enter. - Go to:
HKEY_LOCAL_MACHINE\SYSTEM\CurrentControlSet\Control\DeviceGuard - Double-click EnableVirtualizationBasedSecurity (if it doesn’t exist, right-click, choose New → DWORD (32-bit) Value, and name it exactly that).
- Set its value to 0 and click OK.
- Next, go to:
HKEY_LOCAL_MACHINE\SYSTEM\CurrentControlSet\Control\DeviceGuard\Scenarios\HypervisorEnforcedCodeIntegrity - Set the Enabled value to 0.
- Close Registry Editor and restart.
Double-check the paths and value names before restarting. A typo means the change simply won’t apply.
Method 4: Turn Off Hyper-V and Related Windows Features
VBS relies on Windows’ virtualization components. Disabling them can remove the hypervisor layer entirely, which often gives the biggest speed boost.
- Press Win + R, type
optionalfeatures, and press Enter. - Uncheck the following, if present:
- Hyper-V
- Virtual Machine Platform
- Windows Hypervisor Platform
- Windows Sandbox
- Microsoft Defender Application Guard
- Click OK and let Windows apply the changes.
- Restart when prompted.
Important: This disables tools that depend on these features, including Windows Subsystem for Linux 2 (WSL2), Android emulators, Docker Desktop’s Hyper-V backend, and Hyper-V virtual machines. If you rely on any of those, skip this method or re-enable the features later.
Method 5: Disable the Hypervisor with the bcdedit Command
If VBS keeps coming back after the earlier methods, you can stop the hypervisor from loading at boot.
- Search for Command Prompt, right-click it, and choose Run as administrator.
- Type the following command and press Enter:
bcdedit /set hypervisorlaunchtype off
- Wait for the confirmation message, then restart your PC.
To reverse it at any time, run:
bcdedit /set hypervisorlaunchtype autoThis method is quick and easy to undo, which makes it a good option for testing whether the hypervisor is affecting your performance. Like Method 4, it can break virtual machines and WSL2 while it’s off.
Method 6: Disable Credential Guard and Device Guard (UEFI-Locked Systems)
On some systems, especially managed or work devices, VBS features are enabled with a UEFI lock. In that case the standard methods won’t stick, because the setting is stored in firmware and survives a Registry change.
To clear it, use Microsoft’s Device Guard and Credential Guard Readiness Tool or Microsoft’s documented steps:
- Disable the related Group Policy (Method 2) and delete the relevant Registry values under
HKLM\SYSTEM\CurrentControlSet\Control\DeviceGuard. - Open an elevated Command Prompt and follow Microsoft’s official documentation for removing the UEFI variables using
bcdeditand the SecConfig.efi boot entry. - Restart and, when prompted at boot, press the indicated key (usually F3) to confirm you want to disable the features.
This process is more technical and varies by device. If your PC is managed by an employer or school, ask your IT administrator first, since these settings are usually applied on purpose.
Method 7: Disable Virtualization in BIOS/UEFI
VBS can’t run without hardware virtualization, so switching virtualization off in firmware disables it completely.
- Restart your PC and press the BIOS key during startup (commonly Del, F2, F10, or Esc).
- Find the virtualization setting. It is usually labeled:
- Intel Virtualization Technology (VT-x) on Intel systems
- SVM Mode on AMD systems
- Set it to Disabled.
- Save the changes and exit, usually with F10.
This is a last-resort option. It also disables virtualization for every other program, so VirtualBox, VMware, Android emulators, and WSL2 will stop working. Use it only if the software methods fail.
Method 8: Apply Extra Tweaks to Speed Up Windows 11
Turning off VBS helps, but combining it with a few general tweaks gives you a more noticeable improvement.
Switch to a high-performance power plan. Go to Settings → System → Power & battery, and set Power mode to Best performance. On desktops, you can also choose the High performance plan in Control Panel’s Power Options.
Reduce startup apps. Open Task Manager (Ctrl + Shift + Esc), go to the Startup apps tab, and disable anything you don’t need at boot.
Trim visual effects. Search for “Adjust the appearance and performance of Windows,” choose Adjust for best performance, or manually turn off animations and transparency effects.
Enable Game Mode. Go to Settings → Gaming → Game Mode and turn it on, which prioritizes CPU and GPU resources for games.
Free up storage. Use Settings → System → Storage → Temporary files to remove junk, and keep at least 15 to 20 percent of your system drive free.
Update drivers and Windows. Outdated GPU, chipset, and storage drivers cause slowdowns and can prevent Memory Integrity from being turned off cleanly.
How to Confirm VBS Is Disabled
After restarting:
- Press Win + R, type
msinfo32, and press Enter. - Check Virtualization-based security. It should now read Not enabled.
- Optionally, open Windows Security → Device security → Core isolation and confirm Memory integrity is Off.
Run a quick benchmark or play a game you’ve tested before. Comparing frame rates or load times before and after helps you see whether the change was worth it on your particular hardware.
Conclusion
Disabling VBS is one of the more effective ways to reclaim performance on Windows 11, particularly for gamers and users with older CPUs. Start with the simplest option, turning off Memory Integrity in Windows Security. If that doesn’t hold, move on to Group Policy, the Registry, Windows Features, or the bcdedit command. Reserve UEFI-lock removal and BIOS changes for stubborn cases.
Keep the trade-off in mind. VBS adds a meaningful layer of protection, so if you handle sensitive data or your PC is managed by an organization, leaving it on may be the wiser choice. If you do turn it off, pair it with good security habits: keep Windows updated, use trusted software sources, and run reliable antivirus protection. Combine the change with the extra optimization tweaks in Method 8 for the best overall speed improvement.
Frequently Asked Questions (FAQs)
1. Does disabling VBS really improve performance in Windows 11?
Usually, yes, though the gain depends on your hardware. Reviewers have measured an average improvement of roughly 5% in games, with bigger gains in some CPU-limited situations and smaller ones on modern high-end processors. Everyday tasks like browsing or office work rarely show a noticeable difference.
2. Is it safe to disable VBS and Memory Integrity?
It’s reasonably safe for a personal PC if you use good security habits, but it does lower your protection against kernel-level attacks and malicious drivers. Keep Windows Defender active, install updates promptly, and only download drivers from official sources. If you handle sensitive or corporate data, keeping VBS enabled is the safer choice.
3. Why does Memory Integrity keep turning back on or stay greyed out?
This usually happens because of a Group Policy or Registry setting enforcing it, a UEFI lock, or an incompatible driver that Windows flags. Check Method 2 and Method 3 first. If the toggle refuses to change, update or remove the incompatible driver listed under Core isolation details, or use the UEFI-lock steps in Method 6.
4. Can I re-enable VBS later if I change my mind?
Yes. Reverse whichever method you used: turn Memory Integrity back on in Windows Security, set the Group Policy to Enabled or Not Configured, restore the Registry values to 1, re-enable the Windows features, or run bcdedit /set hypervisorlaunchtype auto. Restart your PC afterward and confirm the status in System Information.