Sukhdev Kamboj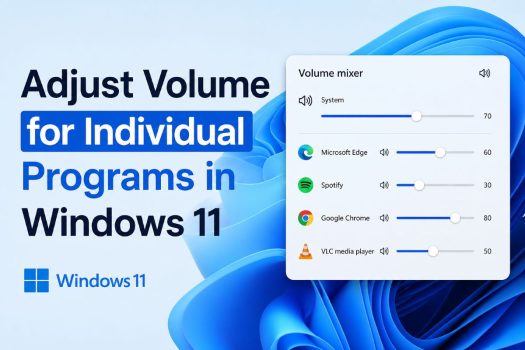
Ever had a game blasting your speakers while Discord whispers your friend’s voice? Or a YouTube video drowning out a notification sound you actually needed to hear? If you’ve ever wished you could turn one app up and another app down without touching your overall system volume, you’re not alone — and the good news is that Windows 11 makes this incredibly easy.
Unlike older versions of Windows where per-app volume control was buried several menus deep, Windows 11 puts individual app volume control front and center with its redesigned Volume Mixer. Whether you’re a gamer trying to balance game audio with voice chat, a content creator juggling multiple audio sources, or just someone tired of Spotify overpowering everything else, this guide will walk you through every method available to control volume for individual programs in Windows 11.

In this article, you’ll learn four different ways to adjust per-app volume — from the built-in Volume Mixer to third-party tools — along with answers to the most common questions users have about Windows 11 sound settings.
Why Adjust Volume for Individual Apps in Windows 11?
Before diving into the methods, it’s worth understanding why per-app volume control matters. Windows 11’s system-wide volume slider affects everything at once — your music, your browser, your games, and your notifications all move together. That’s a problem when:
- You’re gaming and want voice chat (Discord, TeamSpeak) louder than in-game sound effects
- You’re on a video call and don’t want background music from Spotify or YouTube to interrupt
- You’re recording or streaming and need precise control over what your audience hears
- Certain apps are simply mixed louder or quieter than others by default
- You want notification sounds to stay audible even when a video or game is playing loudly
Windows 11’s Volume Mixer solves all of these problems by letting you control the output level of each running application independently, without affecting your master system volume.
Method 1: Use the Windows 11 Volume Mixer (Quickest Way)
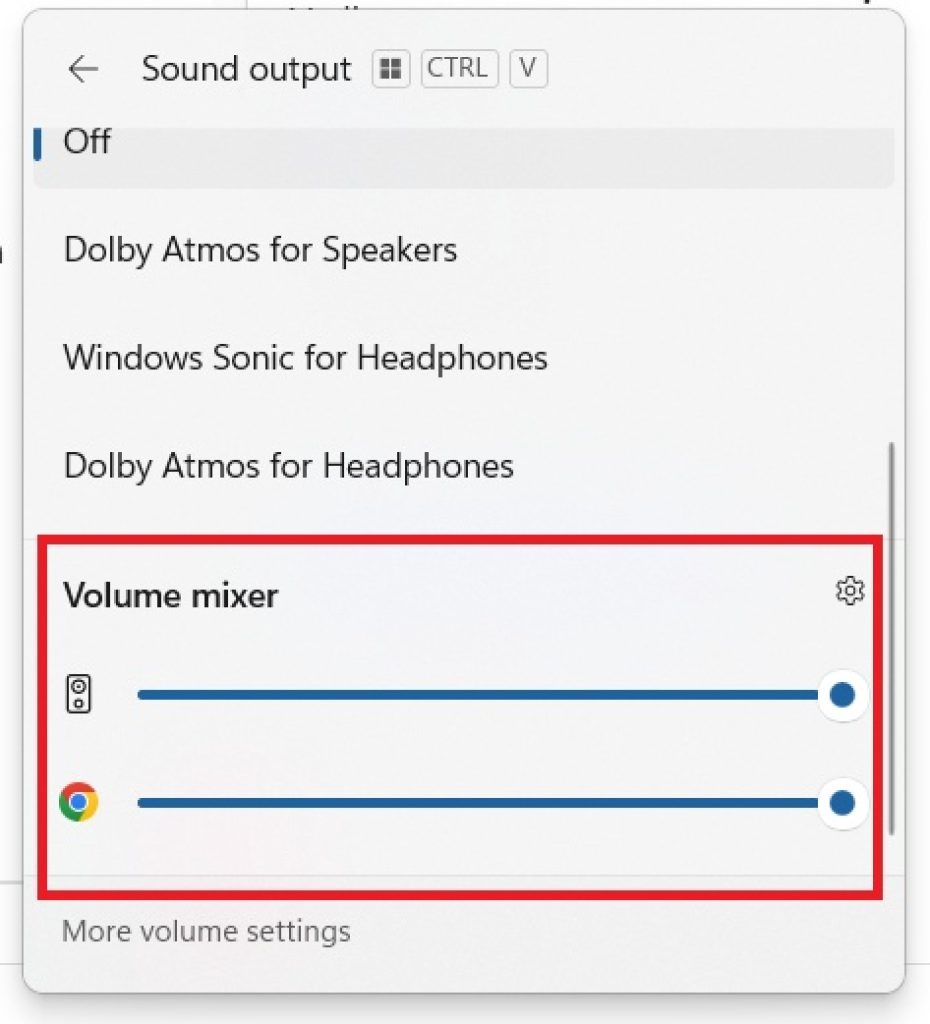
The fastest and most direct way to adjust per-app volume is through the built-in Volume Mixer, which Microsoft redesigned and made much more accessible in Windows 11 compared to Windows 10.
Steps to Open the Volume Mixer
Click the speaker icon in the system tray, located at the bottom-right corner of your taskbar (next to the clock and Wi-Fi icon).
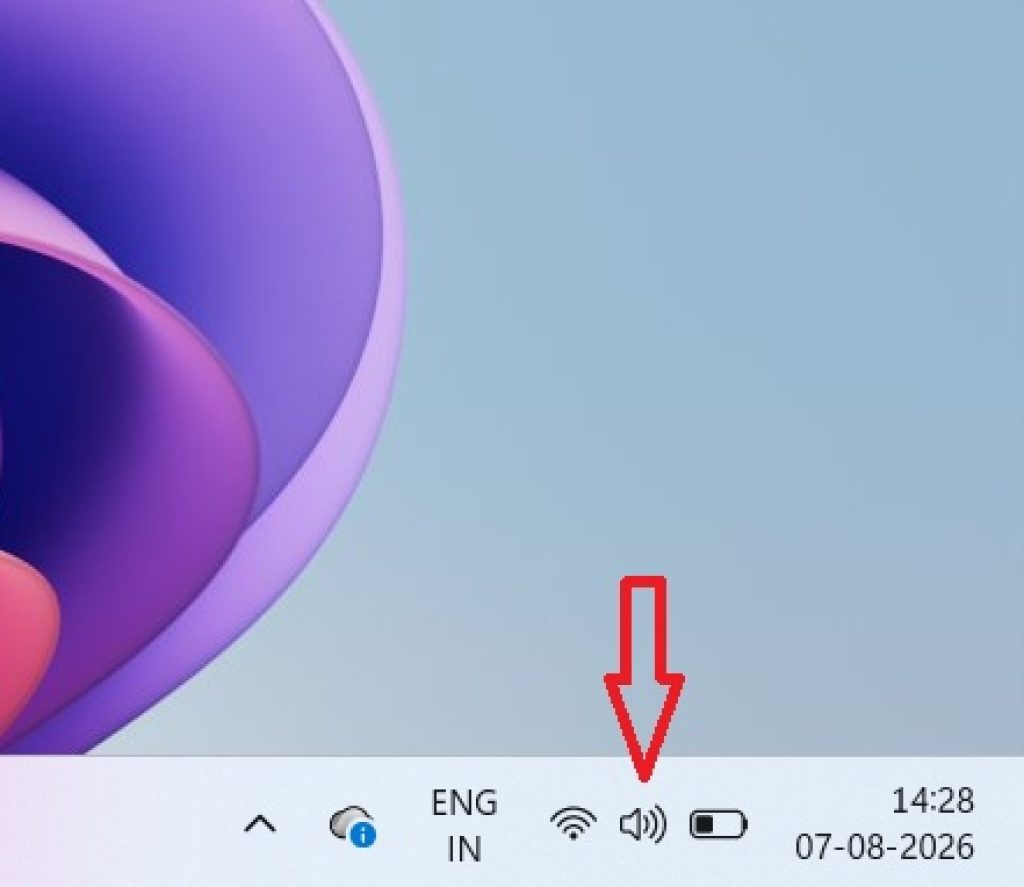
Instead of left-clicking (which just shows the master volume slider), right-click the speaker icon.
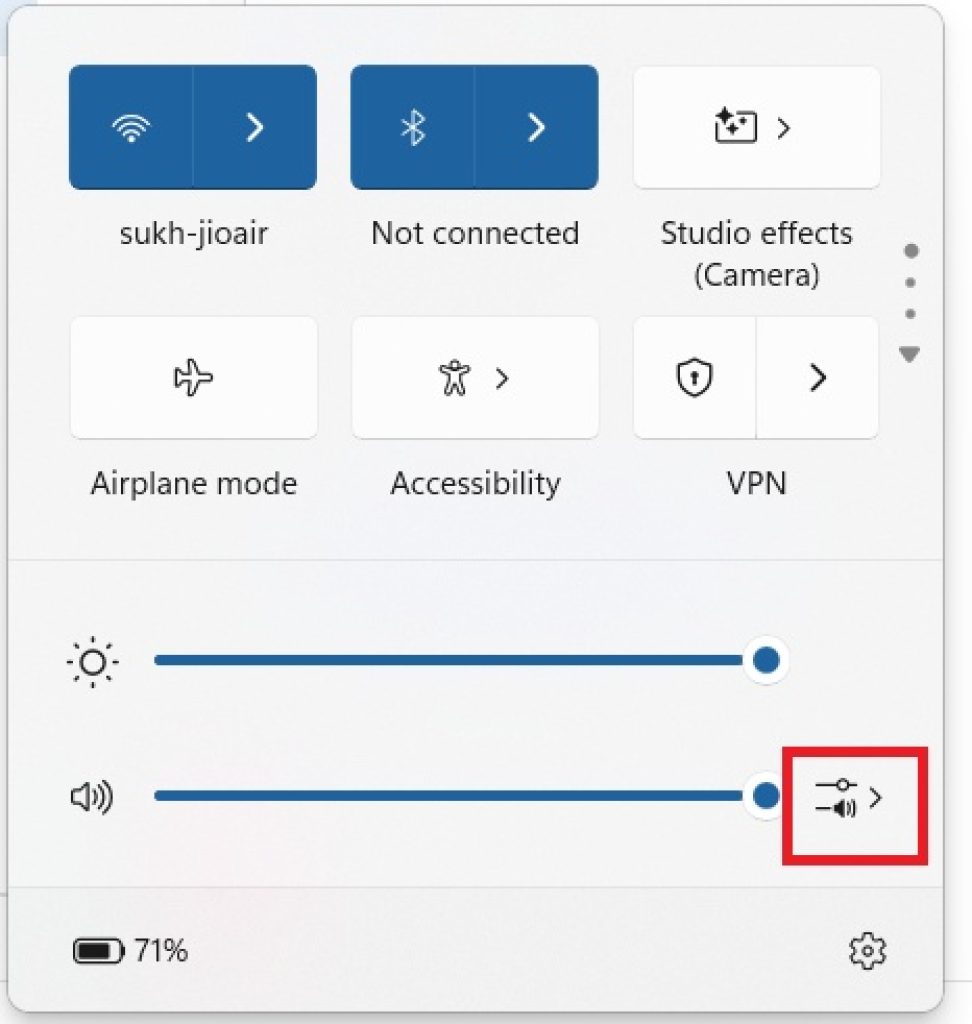
From the context menu, select “Open Volume mixer.”
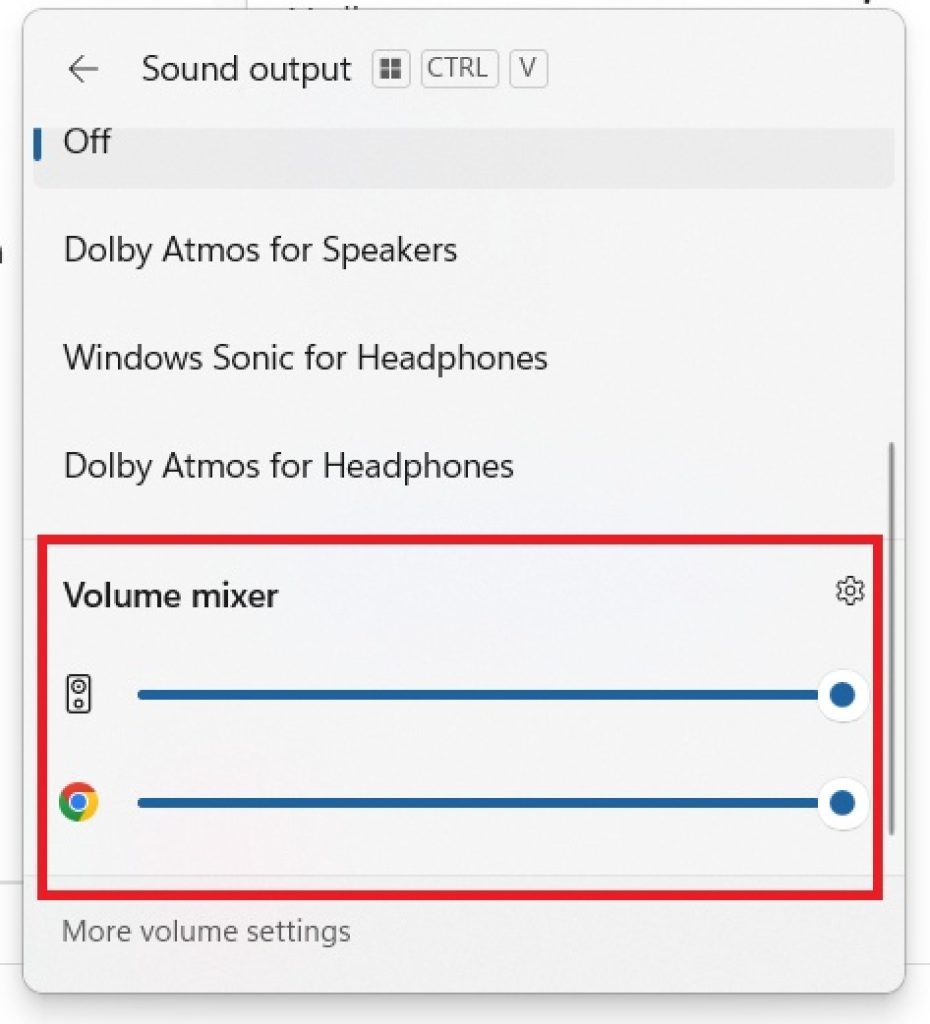
This will open a new window showing every app currently producing or capable of producing audio, each with its own individual volume slider.
Drag the slider for any app left or right to decrease or increase its volume independently of the system volume and other apps.
Alternatively, you can reach the same menu through Settings:
Open Settings (Windows key + I).
Go to System > Sound.
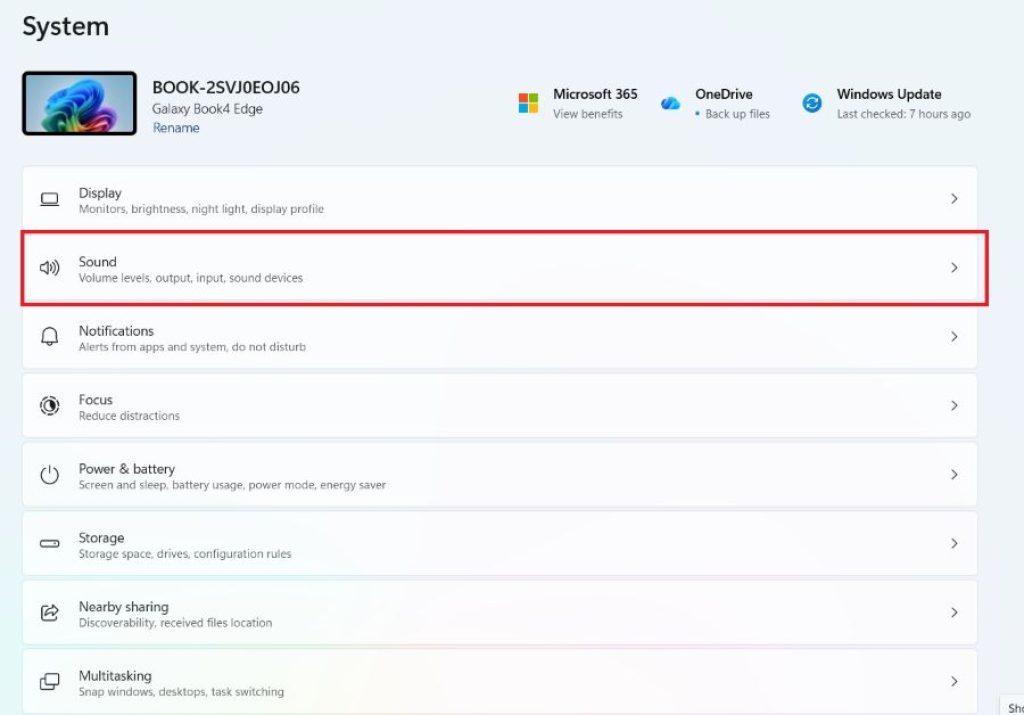
Scroll down and click “Volume mixer” under the “Advanced” section.
What You Can Control in the Volume Mixer
The Windows 11 Volume Mixer isn’t just a set of sliders — it also lets you:
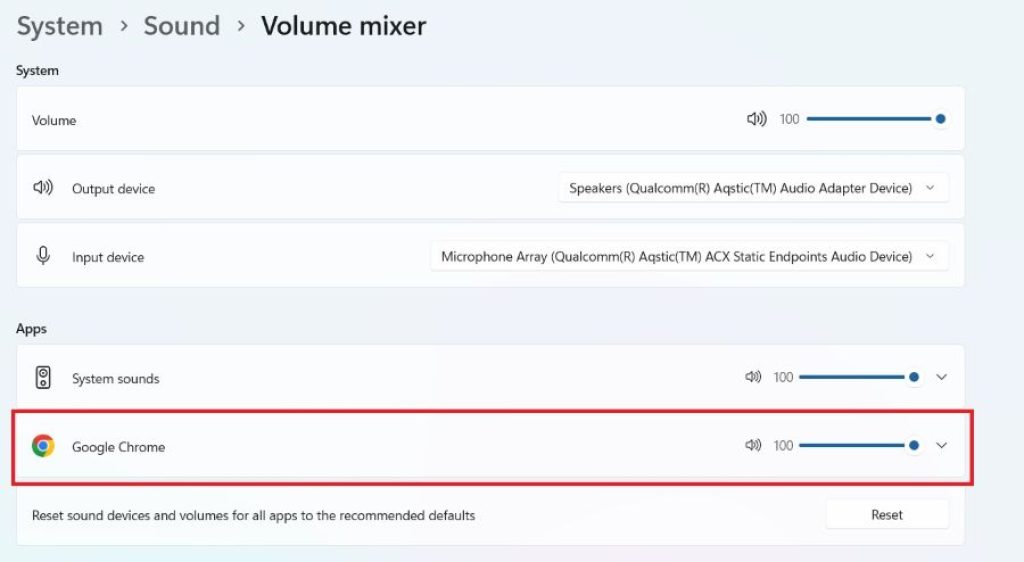
- Mute or unmute individual apps using the small speaker icon next to each slider
- Change the output device per app (for example, route Discord to your headphones while music plays through your speakers) using the dropdown menu beside each application
- Adjust spatial sound settings for supported apps
- See real-time volume levels for every app that’s actively playing or has recently played audio
This method is ideal for quick, on-the-fly adjustments and doesn’t require installing anything extra.
Method 2: Adjust App Volume and Device Preferences via Settings
If you prefer a more detailed, settings-based approach — or want to permanently set an output device for a specific app — Windows 11 offers a dedicated menu called “App volume and device preferences.”
Steps
- Right-click the speaker icon in the taskbar.
- Click “Open Volume mixer” (in some builds you may see the older label “App volume and device preferences” — both lead to similar controls).
- Alternatively, go to Settings > System > Sound > Volume mixer as described above.
- In this menu, you’ll see a full list of running applications along with:
- Their individual volume sliders
- A dropdown to change the output device (speakers, headphones, monitor audio, etc.)
- A dropdown to change the input device, if the app also uses your microphone
This method is particularly useful for people using multiple audio outputs — for instance, routing game audio to a headset while keeping background music or notifications playing through desktop speakers.
Why This Matters for Streamers and Multitaskers
If you stream on platforms like Twitch or record content with OBS Studio, controlling both the volume and output routing of each app separately gives you much more precise control over your final audio mix. You can, for example:
- Send your microphone and game audio to your recording software
- Keep Discord notifications routed only to your headphones so they don’t appear in the recording
- Adjust background music volume without affecting your voiceover levels
Method 3: Use Keyboard Shortcuts and Media Controls (Quick App-Specific Muting)
While Windows 11 doesn’t offer a universal keyboard shortcut to adjust individual app volume levels precisely, it does offer quick ways to mute or control the currently focused or playing app, which can complement the Volume Mixer.
Using the Media Flyout
- Press the dedicated volume keys on your keyboard (if available), or click the speaker icon in the system tray.
- If a media app (like Spotify, YouTube in a browser, or Windows Media Player) is actively playing, Windows 11 often shows a media flyout with play/pause, skip, and volume controls specific to that media session.
- This lets you pause or adjust the currently playing media source without opening the full Volume Mixer.
Using App-Specific Mute Shortcuts
Many applications also include their own internal volume or mute controls:
- Discord: Set a custom “Push to Mute” or per-user volume in User Settings > Voice & Video, or right-click a user’s name in a call to adjust their individual volume.
- Spotify: Has its own in-app volume slider separate from the system mixer.
- Browsers (Chrome, Edge, Firefox): Right-click a tab and select “Mute Tab” to silence just that browser tab without muting the entire browser or system.
Combining these app-level controls with the system-wide Volume Mixer gives you layered control — you can mute a single browser tab while still hearing other tabs, and independently manage that browser’s overall volume relative to other apps.
Method 4: Use Third-Party Volume Control Software
If you want more advanced control than Windows 11 offers natively — such as setting volume limits, creating custom hotkeys, applying equalizer effects per app, or automating volume changes — third-party tools can extend the built-in Volume Mixer’s capabilities.
Popular Third-Party Options
EarTrumpet
- A free, highly rated app available on the Microsoft Store.
- Replaces the default Volume Mixer with a more polished interface accessible directly from the system tray.
- Lets you quickly reassign output devices per app, mute apps individually, and see live volume levels.
- Great for users who want a nicer visual experience than the built-in mixer.
Voicemeeter (by VB-Audio)
- A powerful virtual audio mixer often used by streamers and podcasters.
- Allows routing multiple audio sources through virtual channels, applying independent volume and EQ settings to each.
- Has a steeper learning curve but offers professional-level control.
SoundSwitch
- Primarily designed for quickly switching audio output/input devices, but pairs well with per-app volume workflows for users who juggle multiple audio devices (like headsets, speakers, and monitors) alongside per-app sound levels.
How to Install and Use EarTrumpet (Example)
- Open the Microsoft Store and search for “EarTrumpet.”
- Click Install.
- Once installed, EarTrumpet will run in your system tray, replacing (or sitting alongside) the default volume icon.
- Click the EarTrumpet icon to see all running apps with sliders, and click the arrow next to any app to change its output device instantly.
Third-party tools are optional for most users, since Windows 11’s native Volume Mixer already covers the vast majority of use cases. However, if you’re a streamer, musician, or power user who needs finer control, these tools are worth exploring.
Troubleshooting: What to Do If Per-App Volume Controls Aren’t Working
Occasionally, users find that the Volume Mixer doesn’t show a particular app, or that changes don’t stick. Here are quick fixes:
- App not showing in the mixer: The app needs to be actively playing or have recently played audio. Try playing a sound within the app first, then reopen the mixer.
- Volume resets after restarting the app: This is normal behavior for some apps, since Windows doesn’t always save individual app volume levels permanently across sessions. Third-party tools like EarTrumpet can help apps “remember” volume levels more reliably.
- Update audio drivers: Outdated audio drivers can cause the Volume Mixer to behave unpredictably. Go to Device Manager > Sound, video and game controllers, right-click your audio device, and select Update driver.
- Restart Windows Audio service: Press Windows + R, type
services.msc, find Windows Audio, right-click, and select Restart.
Frequently Asked Questions
Can I set individual app volume permanently in Windows 11?
Windows 11’s Volume Mixer settings generally persist for the duration of an app’s session, but some apps reset to default volume after being closed and reopened. For more permanent settings, a third-party tool like EarTrumpet can offer better persistence and control.
Why can’t I see an app in the Volume Mixer?
An app only appears in the Volume Mixer if it is currently playing audio or has an active audio session. If you don’t see an app listed, try playing a sound or video within it, then check the mixer again.
Can I adjust the volume of individual browser tabs in Windows 11?
Yes. While the Windows Volume Mixer treats your browser as one app, most modern browsers (Chrome, Edge, Firefox) let you right-click a specific tab and choose “Mute Tab” to silence just that tab. Some browser extensions also offer full per-tab volume sliders for more granular control.
Does this feature work the same way on Windows 10?
Windows 10 has a similar Volume Mixer, but it’s accessed differently (usually by right-clicking the speaker icon and selecting “Open Volume Mixer,” with a more dated interface). Windows 11’s version is redesigned with a cleaner layout and added device-switching options built directly into the mixer.
Conclusion
Windows 11 has significantly improved how users can manage sound, and per-app volume control is one of its most practical, everyday-useful features. Whether you use the built-in Volume Mixer for quick adjustments, dive into App Volume and Device Preferences for more detailed routing, rely on app-specific mute shortcuts, or install a third-party tool like EarTrumpet or Voicemeeter for advanced control, you now have several reliable ways to fine-tune exactly what you hear and how loud.
For most users, the native Volume Mixer (Method 1) will be more than enough — it’s fast, built-in, and requires no extra downloads. But if you’re a gamer, streamer, or content creator who needs more precision, the additional methods covered here give you plenty of room to build a setup that fits your workflow.
Once you’ve customized your audio the way you like it, you’ll wonder how you ever managed without independent control over every app’s volume.