Olivia Harper
Power and Sleep settings in Windows 11 help you control how your computer manages energy usage when it’s idle. By adjusting these settings, you can choose how long the display stays on, when the PC goes to sleep, what happens when you close the laptop lid, and how your computer behaves when running on battery or plugged into a power source.
Windows 11 includes several power management options designed to balance performance, battery life, and energy efficiency. For laptop users, optimizing these settings can significantly extend battery life, while desktop users may prefer longer sleep timers or maximum performance. Incorrect Power and Sleep settings can also cause issues such as the computer sleeping too quickly, the screen turning off unexpectedly, or the PC never entering sleep mode.

Fortunately, Windows 11 offers multiple ways to customize Power and Sleep settings through the Settings app, Control Panel, Power Options, Group Policy, and Command Prompt. This guide covers all the available methods so you can configure your computer exactly the way you want.
Why Adjust Power and Sleep Settings?
Changing Power and Sleep settings allows you to customize how your computer behaves when it’s inactive.
Some common reasons include:
- Improve battery life.
- Prevent the PC from sleeping during downloads.
- Keep the display on longer.
- Reduce power consumption.
- Improve laptop performance.
- Stop the screen from turning off too quickly.
- Prevent unwanted sleep while giving presentations.
- Customize power behavior for battery and AC power.
- Reduce wear on laptop batteries.
- Optimize energy usage.
Depending on how you use your computer, you may prefer different settings for battery power and when plugged in.
Method 1: Adjust Power and Sleep Settings Using Settings
The easiest way to change Power and Sleep options is through the Windows Settings app.
Steps
Press Windows + I to open Settings.
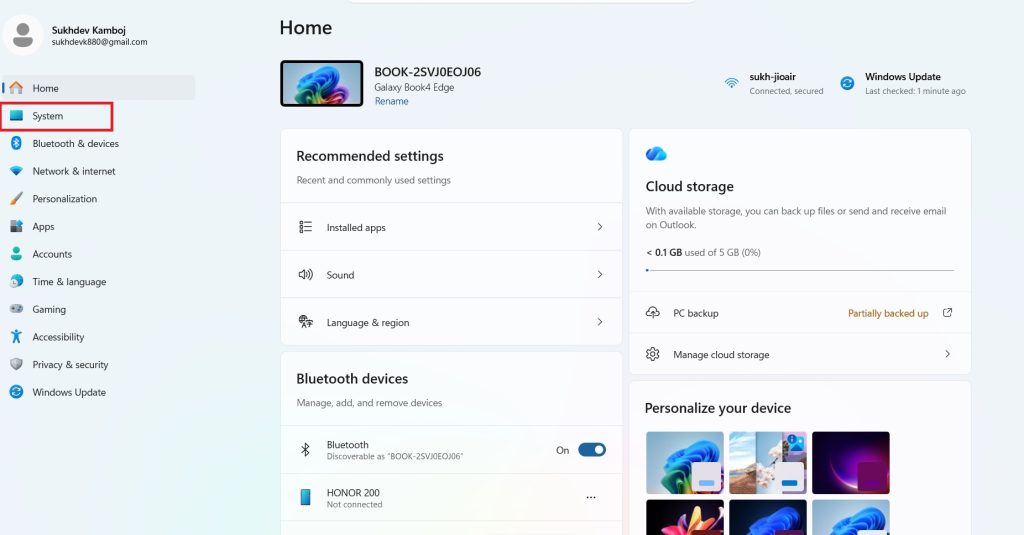
Select System.
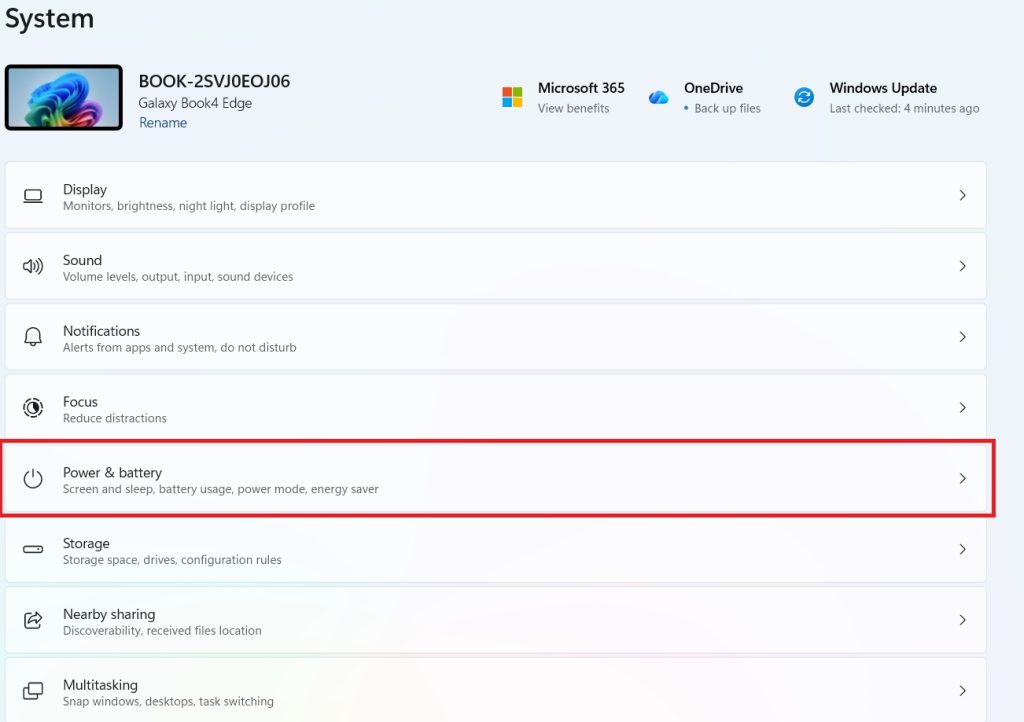
Click Power & battery.
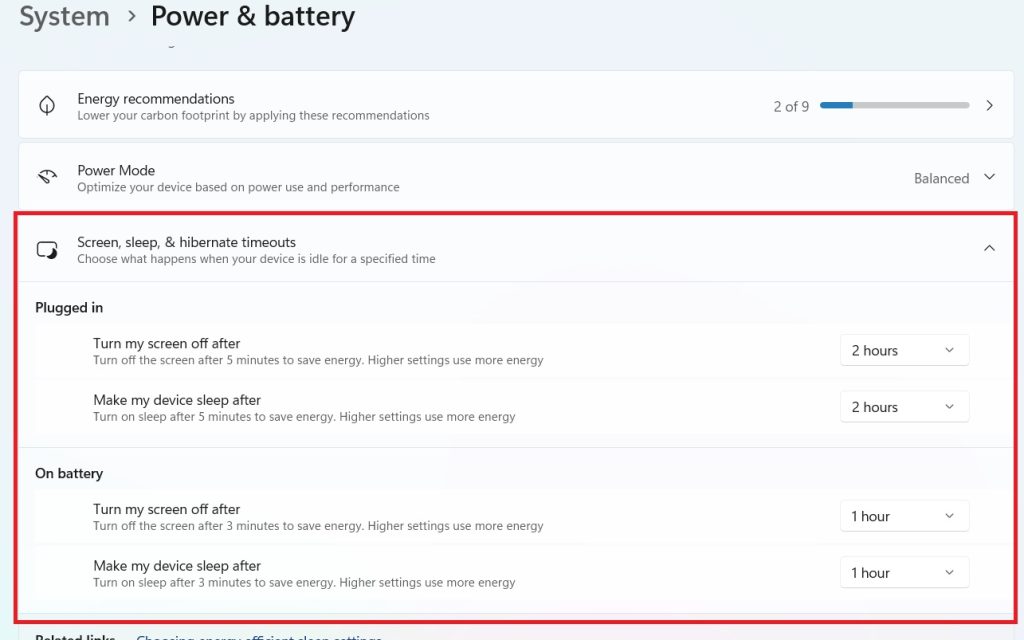
Expand Screen, sleep, & Hibernate Timeout.
Configure the following options as needed:
- Turn off my screen after (On battery)
- Turn off my screen after (Plugged in)
- Put my device to sleep after (On battery)
- Put my device to sleep after (Plugged in)
Close Settings after making your changes.
The new settings take effect immediately.
Method 2: Change Sleep Settings from Control Panel
The classic Control Panel still provides access to detailed power settings.
Steps
- Press Windows + R.
- Type:
control- Press Enter.
- Click Hardware and Sound.
- Select Power Options.
- Click Change plan settings next to your active power plan.
- Choose new times for:
- Turn off the display
- Put the computer to sleep
- Click Save changes.
This method offers the same functionality with the familiar Control Panel interface.
Method 3: Choose a Different Power Mode
Windows 11 lets you prioritize battery life or system performance using Power Mode.
Steps
- Open Settings.
- Go to System > Power & battery.
- Under Power mode, select one of the following:
- Best power efficiency
- Balanced
- Best performance
- Close Settings.
Changing the power mode affects overall system performance and energy consumption.
Method 4: Customize Advanced Power Settings
Advanced Power Options allow you to configure additional settings beyond basic sleep timers.
Steps
- Open Control Panel.
- Navigate to Hardware and Sound > Power Options.
- Click Change plan settings.
- Select Change advanced power settings.
- Modify settings such as:
- Hard disk
- Sleep
- USB settings
- Power buttons
- PCI Express
- Processor power management
- Display
- Battery
- Click Apply.
- Click OK.
These options provide more detailed control over your computer’s power behavior.
Method 5: Change What Closing the Lid Does
Laptop users can customize what happens when the lid is closed.
Steps
- Open Control Panel.
- Go to Hardware and Sound > Power Options.
- Click Choose what closing the lid does.
- Select the desired action for:
- On battery
- Plugged in
- Available options include:
- Do nothing
- Sleep
- Hibernate
- Shut down
- Click Save changes.
This setting is only available on laptops and tablets with built-in displays.
Method 6: Configure the Power Button
You can choose what happens when you press your computer’s physical power button.
Steps
- Open Control Panel.
- Navigate to Power Options.
- Click Choose what the power buttons do.
- Select an action for the power button.
- Click Save changes.
Available actions include Sleep, Hibernate, Shut down, or Do nothing.
Method 7: Enable or Disable Hibernate
Hibernate saves your current session to disk before turning off the computer, allowing you to resume where you left off while using virtually no power.
Steps
- Open Control Panel.
- Go to Power Options.
- Click Choose what the power buttons do.
- Select Change settings that are currently unavailable.
- Check or uncheck Hibernate under Shutdown settings.
- Click Save changes.
If Hibernate isn’t listed, it may need to be enabled using Command Prompt.
Method 8: Enable Hibernate Using Command Prompt
If the Hibernate option is missing, you can enable it manually.
Steps
- Open Command Prompt as Administrator.
- Run:
powercfg /hibernate on- Press Enter.
- Restart your computer.
To disable Hibernate later, run:
powercfg /hibernate offMethod 9: Prevent the Computer from Sleeping
If you frequently run long downloads, backups, or presentations, you may want to prevent the PC from entering sleep mode.
Steps
- Open Settings.
- Navigate to System > Power & battery.
- Expand Screen and sleep.
- Set Put my device to sleep after to Never for both battery and plugged-in modes if available.
- Close Settings.
Remember that preventing sleep may increase power consumption.
Method 10: Restore Default Power Plan Settings
If your current power settings are causing problems, restoring the default configuration can help.
Steps
- Open Control Panel.
- Navigate to Power Options.
- Click Change plan settings.
- Select Restore default settings for this plan.
- Confirm the action.
- Click Save changes.
Windows restores the original settings for the selected power plan.
Conclusion
Power and Sleep settings in Windows 11 allow you to customize how your computer manages energy consumption, display timeouts, and sleep behavior. Whether your goal is to maximize battery life, improve performance, or prevent your PC from sleeping during important tasks, Windows provides flexible options through the Settings app, Control Panel, Power Options, and advanced management tools.
By selecting the appropriate power mode, adjusting sleep timers, configuring power button actions, and customizing advanced power settings, you can create a setup that matches your workflow while balancing performance and energy efficiency.
Frequently Asked Questions
What is the difference between Sleep and Hibernate?
Sleep stores your current session in memory and uses a small amount of power, allowing your PC to resume quickly. Hibernate saves your session to the hard drive and completely powers off the computer, using virtually no battery or electricity.
Why doesn’t my Windows 11 PC go to sleep?
This can happen because of background applications, active downloads, connected devices, outdated drivers, or customized power settings that prevent Windows from entering sleep mode.
Can I prevent my computer from sleeping?
Yes. Open Settings > System > Power & battery > Screen and sleep and set the sleep timeout to Never for the desired power mode.
Does changing the power mode affect performance?
Yes. Best performance prioritizes speed and responsiveness, while Best power efficiency reduces energy consumption to extend battery life. The Balanced mode provides a compromise between the two.