
 Geeksdigit Team
Printing in black and white is fine for everyday documents, but sometimes you need your photos, charts, presentations, or flyers to come out in full color. If you’ve ever hit “Print” only to find your vibrant document turned into a grayscale copy, you’re not alone. This is a common issue that trips up many Windows users, and thankfully, it’s almost always easy to fix.
Color printing problems in Windows 11 and Windows 10 usually come down to one of a few things: a print setting quietly switched to grayscale or “black ink only,” an outdated or incorrect printer driver, incorrect default settings at the system level, or a hardware issue like an empty color cartridge. The good news is that in most cases, you don’t need any technical expertise to solve this. It’s simply a matter of knowing where to look.

This guide walks you through the most reliable methods for enabling color printing on Windows 11 and Windows 10, whether you’re printing from a specific application, adjusting system-wide settings, or troubleshooting driver issues. We’ll also cover common questions people run into along the way, so by the end of this article, you should be able to get vibrant, accurate color prints every time.
Before diving into the methods, it helps to understand that Windows itself doesn’t usually restrict color printing — that control almost always lives either in the application you’re printing from or in your printer’s own driver settings. Windows acts more like a messenger, passing your print job along to the printer software, which then decides how the job actually gets printed. That’s why the fixes below focus heavily on printer preferences and driver settings rather than deep Windows system settings.
Let’s get into the methods.
Method 1: Check and Adjust Print Settings in the Application
The very first place to check when your prints are coming out in black and white is the application you’re printing from — whether that’s Microsoft Word, Adobe Acrobat, a web browser, or a photo editor. Many apps have their own print dialog boxes that include color options separate from your printer’s default driver settings, and it’s surprisingly common for these to default to grayscale or “black and white” without you realizing it.
Here’s how to check and fix this:
Open the print dialog. In most applications, you can do this by pressing Ctrl + P, or by going to File > Print.
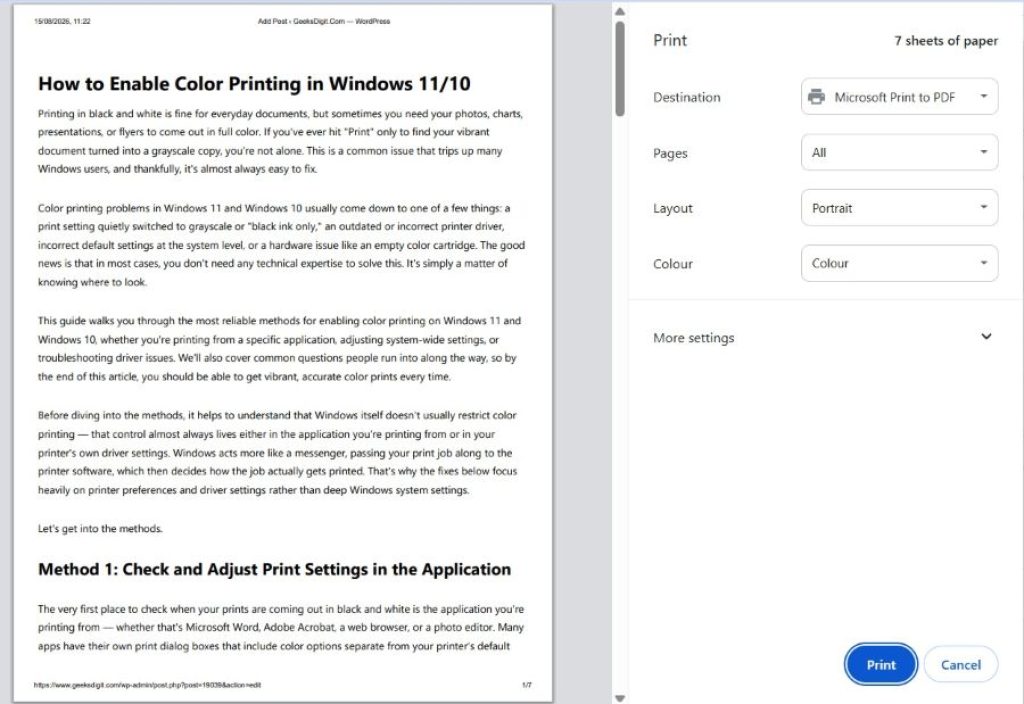
Look for a “Color” or “Grayscale” dropdown. This is often located near the printer name or under “Preferences,” “Properties,” or “More Settings.” Depending on the app, it might say “Color,” “Black and White,” “Grayscale,” or “Print in color.”
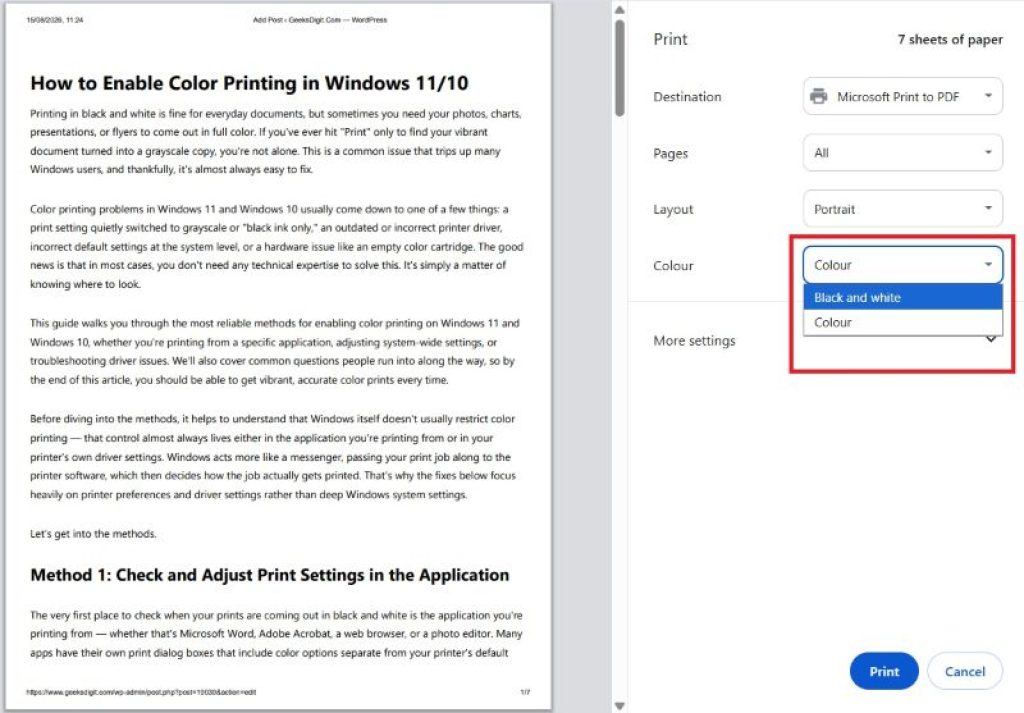
Select the color option. If it’s currently set to grayscale or black and white, switch it to color. Sometimes this is a simple checkbox, other times it’s a dropdown menu.
Check the printer properties from within the dialog. Most print dialogs have a “Printer Properties” or “Preferences” button that opens a more detailed settings window specific to your printer driver. Look for a “Color” tab or section here as well, since this is a second layer of settings independent of the application-level toggle.
Apply and print a test page. Once you’ve made changes, apply them and print a small test document to confirm the color option is working as expected.
This method resolves the issue more often than people expect, because it’s easy to accidentally toggle grayscale printing when trying to save ink, especially if you or someone else previously adjusted these settings to conserve colored ink for an important job.
It’s worth noting that some applications, particularly PDF readers and browsers, have their own independent color management settings that override what’s set elsewhere. If you print fine from Word but not from a browser, or vice versa, this application-specific setting is almost certainly the cause, and checking each app individually is the fastest path to a fix.
Method 2: Adjust Printer Preferences Through Windows Settings
If checking the application’s print dialog didn’t solve the issue, or if you want to fix the color setting at the system level so it applies across all apps, you’ll want to dig into your printer’s preferences directly through Windows.
On Windows 11:
- Click the Start button and open Settings.
- Navigate to Bluetooth & devices > Printers & scanners.
- Select your printer from the list.
- Click Printing preferences.
- A new window will open specific to your printer’s driver. Look for tabs like “Color,” “Advanced,” “Paper/Quality,” or “Layout.”
- Find the color setting — it may be labeled “Color,” “Grayscale,” “Black & White,” or something similar depending on your printer manufacturer (HP, Canon, Epson, Brother, etc.).
- Select the color option and click Apply, then OK.
On Windows 10:
- Click Start and open Settings.
- Go to Devices > Printers & scanners.
- Select your printer and click Manage.
- Click Printing preferences.
- As with Windows 11, locate the color settings tab within the driver window and switch it to color.
- Apply the changes.
It’s important to distinguish between two similarly named windows here: “Printer properties” and “Printing preferences.” Printing preferences typically control the default settings used for every print job sent to that printer, which is exactly what you want to adjust if color printing isn’t working consistently. Printer properties, on the other hand, deals more with hardware configuration, sharing settings, and ports.
Because every printer manufacturer designs its own driver interface, the exact wording and layout of these menus can vary quite a bit. HP printers, for example, often have a clearly labeled “Color” tab, while Canon printers may use a “Main” tab with a color/grayscale radio button, and Epson printers sometimes bury this setting under “Advanced” or “Mode” options. If you can’t immediately find the setting, look for anything mentioning “ink,” “grayscale,” “monochrome,” or “color mode,” as these are the most common keywords used.
Method 3: Update or Reinstall Your Printer Driver
Outdated, corrupted, or mismatched printer drivers are a frequent cause of color printing problems, especially after a Windows update. Sometimes Windows automatically installs a generic driver for your printer that doesn’t support full functionality, including proper color management. Updating to the correct, manufacturer-specific driver often resolves this.
Steps to update your printer driver:
- Press
Windows + Xand select Device Manager. - Expand the Printers or Print queues category.
- Right-click your printer and select Update driver.
- Choose Search automatically for drivers. Windows will search your computer and the internet for an updated driver.
- If an update is found, follow the prompts to install it, then restart your computer.
If Windows doesn’t find a newer driver, it’s often more effective to go directly to the manufacturer’s website (HP, Canon, Epson, Brother, etc.), search for your exact printer model, and download the latest full driver package rather than relying on the basic driver installed automatically. Manufacturer-provided drivers typically come bundled with the full printing software suite, including proper color management tools, which the generic Windows driver often lacks.
Steps to reinstall your printer driver completely:
- Go to Settings > Bluetooth & devices > Printers & scanners (Windows 11) or Settings > Devices > Printers & scanners (Windows 10).
- Select your printer and click Remove device.
- Restart your computer.
- Download the latest driver from the manufacturer’s official website.
- Run the installer and follow the on-screen instructions to reinstall the printer.
- Once reinstalled, open printing preferences again and confirm the color settings are available and correctly set.
A full reinstall is particularly effective if your printer was working fine in color before a Windows update and stopped afterward, since Windows updates sometimes overwrite manufacturer drivers with generic ones. Reinstalling with the correct driver restores the full feature set, including accurate color settings and ink-level monitoring.
Method 4: Check for Hardware and Ink/Toner Issues
If your settings all look correct and the driver is up to date, but you’re still not getting color prints, the issue might not be a software setting at all — it could be a hardware problem with your printer itself.
Here’s what to check:
- Ink or toner levels. Open your printer’s companion app or check the printer’s own display panel to verify that the color cartridges (cyan, magenta, yellow) aren’t empty. A printer with an empty color cartridge will often default to black and white printing automatically, sometimes without any warning or error message.
- Cartridge installation. Make sure color cartridges are properly seated and locked into place. A loose or improperly installed cartridge can cause the printer to skip color entirely.
- Print head clogging. Inkjet printers, in particular, can develop clogged print heads if they haven’t been used for a while, which can cause colors to print faintly or not at all. Most printers have a built-in cleaning cycle you can run from the printer’s control panel or its companion software on your PC.
- Printer self-test page. Nearly all printers allow you to print a diagnostic or nozzle-check page directly from the printer’s control panel, without needing a computer. This can quickly tell you whether the issue is with the printer hardware or with Windows.
- Genuine vs. third-party cartridges. In rare cases, some printers restrict full functionality, including color accuracy, when using non-genuine or refilled cartridges. If you’re using third-party ink, this is worth investigating as a potential cause.
If a self-test print comes out fine in color directly from the printer, but documents sent from your PC still print in black and white, this strongly points back to a software or driver setting on the Windows side rather than a hardware fault, and it’s worth revisiting Methods 1 through 3. On the other hand, if even the self-test page prints in black and white, the issue is very likely hardware-related, and you may need to run a cleaning cycle, replace a cartridge, or contact the manufacturer’s support team.
Frequently Asked Questions
1. Why does my printer default to black and white even though I have color ink installed?
This usually happens because either the application or the driver has “grayscale” or “black ink only” selected as the default printing mode, often to save on more expensive color ink. Check both the app’s print dialog and the printer’s own preferences window, as described in Methods 1 and 2, to switch this back to color.
2. Does Windows itself control whether I print in color, or is that the printer’s job?
Windows generally doesn’t restrict color printing on its own. It passes the print job along to your printer’s driver, which then determines how the document is actually rendered. This is why color settings are usually found within “Printing preferences” or the specific app’s print dialog, rather than in a general Windows system setting.
3. I updated my printer driver, but color printing still isn’t working. What should I do next?
If updating didn’t help, try a full driver reinstall as described in Method 3, removing the printer completely and reinstalling using the latest driver package from the manufacturer’s website rather than relying on Windows’ built-in driver search. If that still doesn’t resolve it, move on to Method 4 and check for hardware issues like low ink or clogged print heads.
4. How do I know if my color printing problem is caused by software or hardware?
A simple way to test this is to print a self-test or diagnostic page directly from the printer’s own control panel, without going through your computer. If that test page prints correctly in color, the issue is on the software or driver side. If it also prints in black and white, the problem is likely hardware-related, such as low ink or a clogged print head.
Conclusion
Getting color printing working properly in Windows 11 or Windows 10 is, in the vast majority of cases, a straightforward fix rather than a deep technical problem. The key is knowing where to look. Start with the simplest and most common cause — checking the color settings within the application you’re printing from — since this alone resolves the issue for many users. From there, move on to adjusting the printer preferences at the system level through Windows Settings, which ensures your color setting applies consistently across all your documents and applications.
If those steps don’t resolve the problem, updating or fully reinstalling your printer driver is often the next most effective solution, particularly if the issue began right after a Windows update. Drivers installed automatically by Windows are sometimes generic and lack full color management support, whereas manufacturer-specific drivers usually restore complete functionality.
Finally, if all software-side settings check out and you’re still not getting color output, it’s worth investigating potential hardware issues, such as low ink levels, improperly seated cartridges, or a clogged print head. A quick self-test print directly from the printer is a fast, reliable way to separate a hardware problem from a software one.





