Geeksdigit Team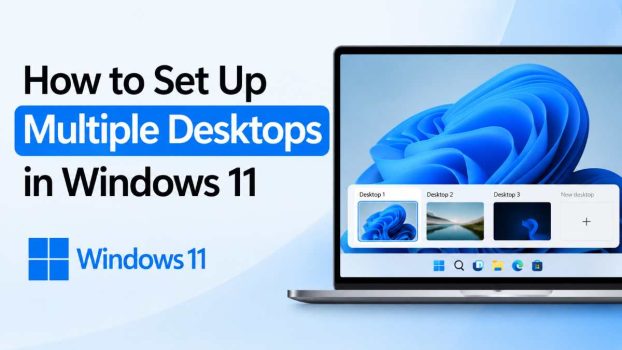
If you’ve ever had a cluttered taskbar with a dozen windows open at once — browser tabs for research, a spreadsheet for work, a chat app, and a music player — you know how quickly a single desktop can start to feel chaotic. Windows 11 solves this problem with a built-in feature called Virtual Desktops, which lets you create multiple, separate desktop workspaces on a single monitor without needing any extra hardware or third-party software.
Think of virtual desktops as parallel versions of your screen. Each one can hold its own set of open apps and windows, and you can switch between them instantly. For example, you might dedicate one desktop entirely to work tasks, another to personal browsing, and a third to a creative project. This kind of separation helps you stay focused, reduces visual clutter, and makes multitasking far more manageable — especially if you’re someone who juggles several projects throughout the day.

The good news is that Windows 11 makes this feature more accessible and visually intuitive than it was in Windows 10. It’s built directly into the Task View interface, and setting it up takes only a few clicks. In this guide, we’ll walk through everything you need to know: how to create new desktops, switch between them, customize each one, move apps around, and eventually close desktops you no longer need. We’ll also answer some of the most common questions people have about using this feature effectively.
Whether you’re a student organizing coursework, a remote worker separating client projects, or just someone who wants a tidier digital workspace, learning to use virtual desktops in Windows 11 can genuinely change the way you work. Let’s get started.
Methods for Setting Up Multiple Desktops in Windows 11
There are several ways to create, manage, and switch between virtual desktops in Windows 11. Below are the most practical methods, ranging from mouse-based navigation to keyboard shortcuts for power users.
Method 1: Using Task View to Create a New Desktop
The simplest and most visual way to manage virtual desktops is through the Task View button.
- Open Task View. Click the Task View icon on your taskbar (it looks like two overlapping rectangles), or press Windows key + Tab on your keyboard.
- View existing desktops. A row of desktop thumbnails will appear near the top of your screen, labeled “Desktop 1,” “Desktop 2,” and so on.
- Add a new desktop. Click the “+ New Desktop” button located at the end of the row of thumbnails. A new, empty desktop will appear instantly.
- Switch to it. Click on the new desktop thumbnail to switch to it. You now have a completely blank workspace to open new apps and windows.
You can repeat this process as many times as you like, creating as many desktops as your workflow requires. There’s no strict limit, though for practical purposes, most users find that two to five desktops cover their needs comfortably.
Method 2: Switching Between Desktops Quickly
Once you have multiple desktops set up, moving between them efficiently becomes important. Windows 11 offers a few different ways to do this:
- Using Task View: Open Task View (Windows key + Tab) and click on the desktop you want to switch to.
- Using keyboard shortcuts: Press Ctrl + Windows key + Left Arrow or Ctrl + Windows key + Right Arrow to cycle through your desktops in order. This is by far the fastest method once you get used to it, since it requires no mouse movement at all.
- Using touchpad gestures (on laptops): If your laptop has a precision touchpad, you can swipe left or right with three or four fingers to move between desktops, depending on your touchpad settings.
Getting comfortable with the keyboard shortcut in particular can save you a significant amount of time if you switch contexts often throughout the day.
Method 3: Naming and Customizing Desktops
By default, Windows labels your desktops “Desktop 1,” “Desktop 2,” and so on — which isn’t very descriptive once you have three or four open. Renaming them can help you keep track of what each one is for.
- Open Task View (Windows key + Tab).
- Hover over the desktop thumbnail you want to rename.
- Click on the current name (it becomes an editable text field).
- Type a new name, such as “Work,” “Research,” or “Personal,” and press Enter.
You can also set a different desktop background (wallpaper) for each virtual desktop, which is a great visual cue to help you instantly recognize which workspace you’re on:
- Open Task View.
- Right-click on the desktop thumbnail you want to customize.
- Select “Choose background” and pick an image for that specific desktop.
This small touch makes a surprisingly big difference when switching quickly between desktops, since your brain can rely on color and imagery rather than reading labels.
Method 4: Moving Windows and Apps Between Desktops
Sometimes you’ll open an app on the wrong desktop, or decide midway through a task that a window belongs somewhere else. Windows 11 makes it easy to relocate windows:
- Open Task View to see all your desktops and the open windows on your current one.
- Right-click on the window you want to move (you’ll see its thumbnail under the current desktop).
- Select “Move to” and choose the desktop you’d like to send it to.
Alternatively, you can simply drag and drop a window’s thumbnail from Task View directly onto the desktop thumbnail you want to move it to.
If you want an app to appear on all desktops simultaneously (useful for things like a music player or chat app you always want visible), right-click the window in Task View and choose “Show this window on all desktops.”
Method 5: Closing a Desktop
When you’re done with a virtual desktop, closing it is straightforward:
- Open Task View.
- Hover over the desktop thumbnail you want to close.
- Click the small X that appears in the corner of the thumbnail.
Any windows that were open on that desktop won’t be closed — they’ll automatically be moved to the adjacent desktop (usually the one to the left), so you won’t lose any unsaved work by closing a desktop. This is one of the more thoughtful design choices in the feature, since it removes the fear of accidentally losing progress.
Method 6: Adjusting Virtual Desktop Settings
Windows 11 also gives you some control over how virtual desktops and the taskbar behave across desktops:
- Go to Settings > System > Multitasking.
- Scroll down to the “Desktops” section.
- Here you can control whether the taskbar shows open windows from all desktops, or only the one you’re currently on, along with similar preferences for Alt+Tab behavior.
Adjusting these settings can make switching between desktops feel more seamless, particularly if you prefer a taskbar that only reflects your current context rather than everything running across every desktop.
Conclusion
Virtual desktops in Windows 11 are one of those features that seem minor at first glance but can meaningfully improve how you work once you build them into your routine. By separating tasks into distinct desktops — one for work, one for personal browsing, one for a side project — you reduce visual clutter, minimize distractions, and make it easier to pick up exactly where you left off on any given task.
The setup process itself takes only a minute: open Task View, click “New Desktop,” and you’re off. From there, learning a few keyboard shortcuts, customizing backgrounds, and understanding how to move windows between desktops will help you get the most out of the feature. Whether you’re managing multiple client projects, separating work from personal life on a single laptop, or just trying to declutter your workspace, virtual desktops are a simple, no-cost way to work smarter within Windows 11.
FAQ
1. Is there a limit to how many virtual desktops I can create in Windows 11? There’s no strict built-in limit displayed to users, but practically speaking, performance and usability start to degrade if you create an excessive number (dozens) of desktops. Most users find that two to five desktops are more than enough to stay organized without becoming overwhelming to navigate.
2. Will closing a virtual desktop close the apps and windows on it? No. When you close a virtual desktop, any open windows on it are automatically moved to an adjacent desktop rather than being closed. This means you won’t lose unsaved work simply by closing a desktop you no longer need.
3. Can I use different wallpapers for each virtual desktop? Yes. Windows 11 allows you to assign a unique background image to each virtual desktop. This is done by right-clicking a desktop’s thumbnail in Task View and selecting “Choose background,” which makes it easier to visually distinguish between desktops at a glance.
4. What’s the fastest way to switch between virtual desktops without using a mouse? The quickest method is the keyboard shortcut Ctrl + Windows key + Left Arrow or Ctrl + Windows key + Right Arrow, which cycles through your desktops in order. This avoids the need to open Task View manually and is especially useful for anyone who switches contexts frequently throughout the day.



![How to Boot into Windows 11 Safe Mode [5 Easy Methods]](https://www.geeksdigit.com/wp-content/uploads/2026/09/How-to-Boot-into-Windows-11-Safe-Mode-336x220.jpg)