
 Sukhdev Kamboj
If you’ve ever tried to install the Windows Subsystem for Linux (WSL2), run Android apps through the Windows Subsystem for Android, or set up a virtual machine using Hyper-V or third-party tools like VMware Workstation, you’ve likely encountered a setting called Virtual Machine Platform. This optional Windows feature is a foundational component that allows your PC to create and manage virtualized environments — essentially letting one physical computer run isolated, self-contained “guest” operating systems or subsystems on top of your main Windows installation.
Virtual Machine Platform is different from Hyper-V, though the two are closely related. While Hyper-V is Microsoft’s full-fledged hypervisor and virtualization management tool, Virtual Machine Platform is a lighter-weight component that provides the underlying virtualization infrastructure needed by WSL2 and other lightweight virtualization scenarios. In many cases, you don’t need to enable Hyper-V at all — just Virtual Machine Platform — to get WSL2 or similar tools running smoothly.
Enabling this feature is usually quick and painless, but it does require a few specific steps, and there are some prerequisites worth understanding before you dive in. Your PC’s processor needs to support hardware virtualization (Intel VT-x or AMD-V), and this capability typically needs to be turned on in your BIOS or UEFI firmware settings. Without that, Windows won’t be able to properly activate Virtual Machine Platform, even if you toggle the feature on within Windows itself.
In this guide, we’ll walk through four different methods for enabling Virtual Machine Platform in Windows 11: through the Windows Features dialog, via PowerShell, using the Command Prompt with DISM, and through Windows Terminal with WSL’s built-in installer. Each method achieves the same result, so you can pick whichever feels most comfortable for your skill level and workflow. We’ll also cover how to verify the feature is properly enabled, troubleshoot common issues, and answer some frequently asked questions.
Before You Begin: Checking Prerequisites
Before enabling Virtual Machine Platform, it’s worth confirming that your system actually supports hardware virtualization. Here’s how to check:
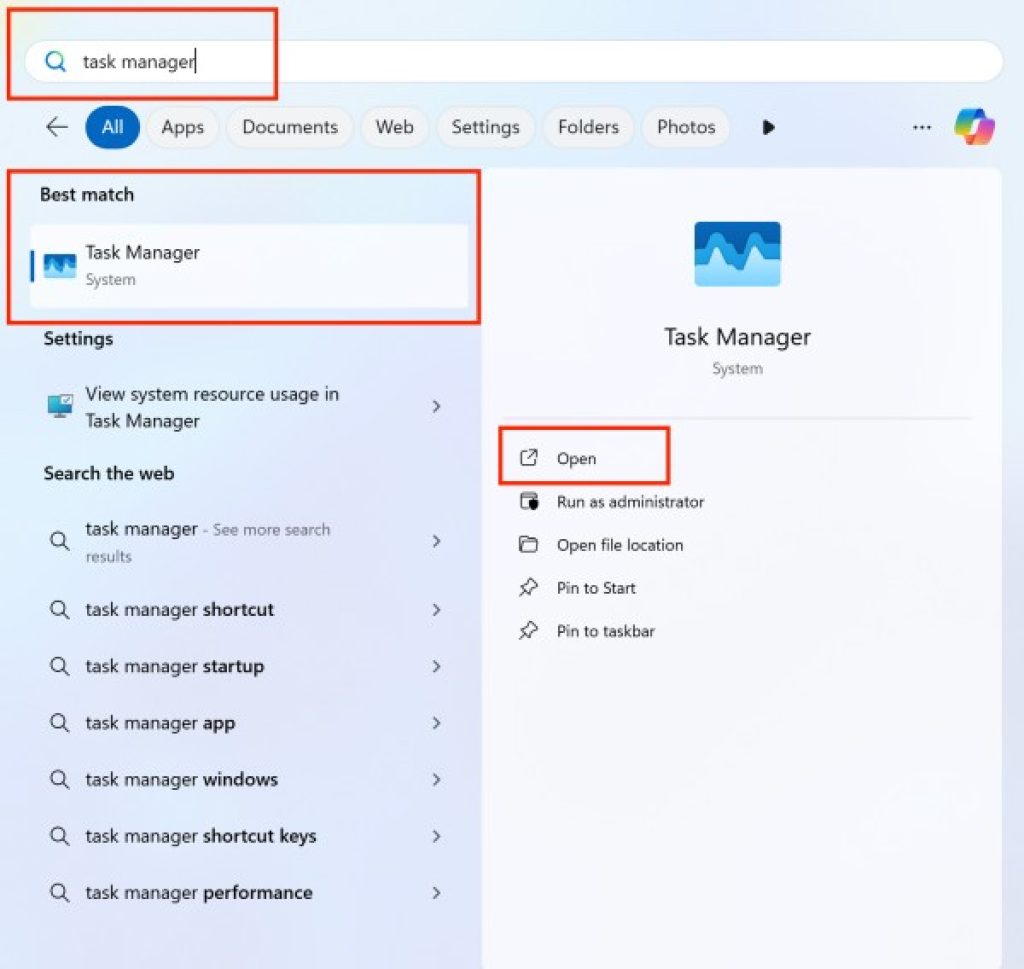
Open Task Manager (right-click the Start button or press Ctrl+Shift+Esc).
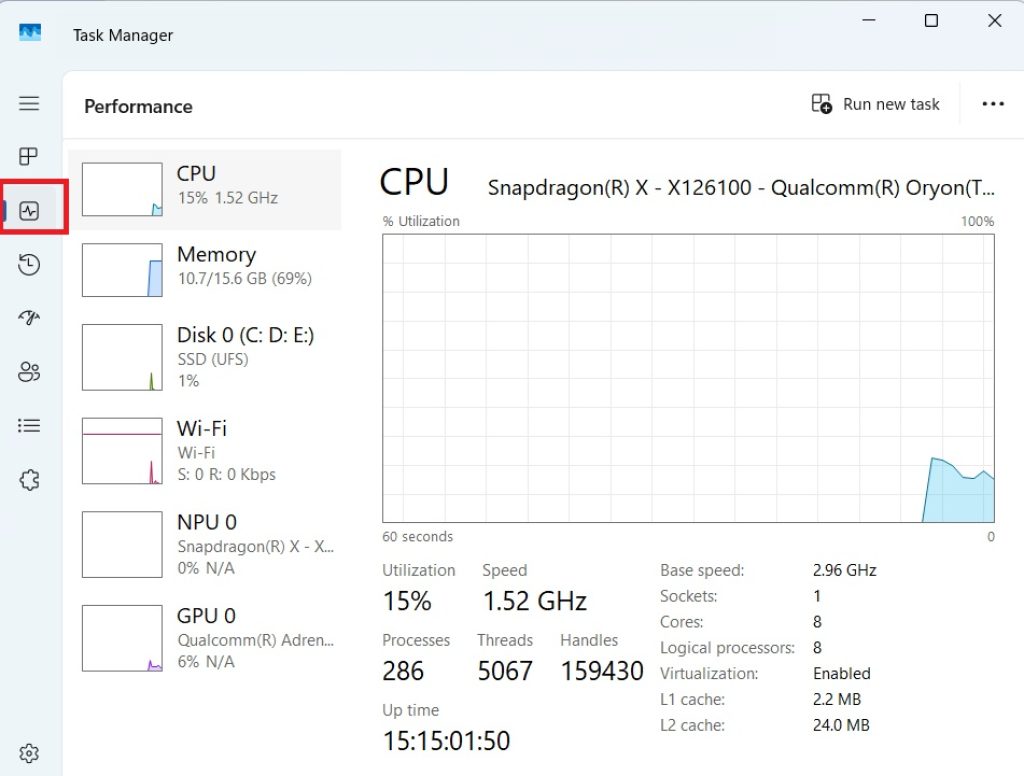
Click the Performance tab.
Select CPU on the left-hand side.
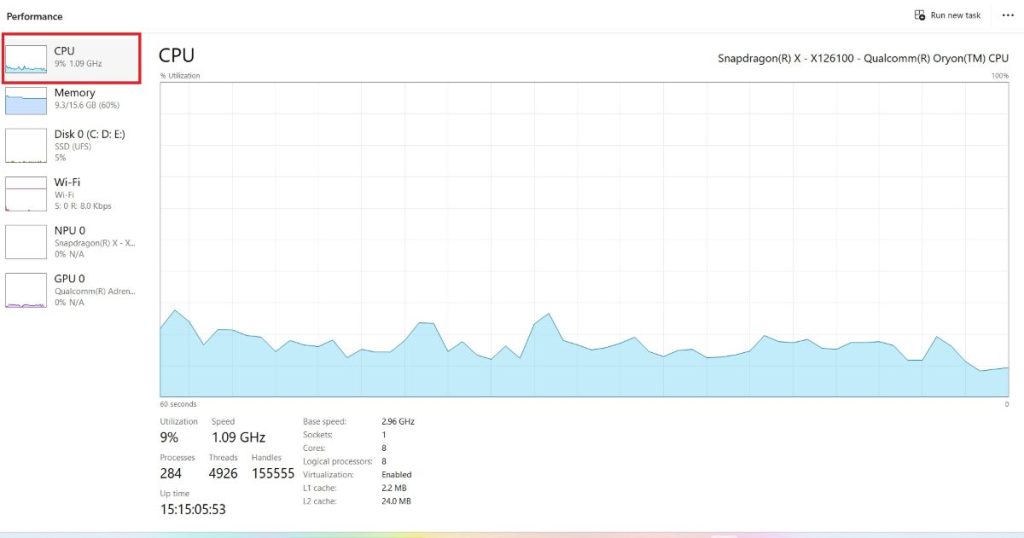
Look for Virtualization near the bottom of the panel. It should say Enabled.
If it says Disabled, you’ll need to restart your computer, enter the BIOS/UEFI setup (usually by pressing a key like F2, F10, Del, or Esc during boot), and look for a setting named something like Intel VT-x, Intel Virtualization Technology, AMD-V, or SVM Mode. Enable it, save your changes, and reboot into Windows before proceeding.
You should also make sure your version of Windows 11 is reasonably up to date, since older builds occasionally have inconsistencies in how optional features are packaged. Checking for updates through Settings > Windows Update is a good habit before making system-level changes like this.
Method 1: Enable Virtual Machine Platform via Windows Features (GUI)
This is the most beginner-friendly method, since it uses a simple checkbox interface rather than typing commands.
Press Windows key + R to open the Run dialog.
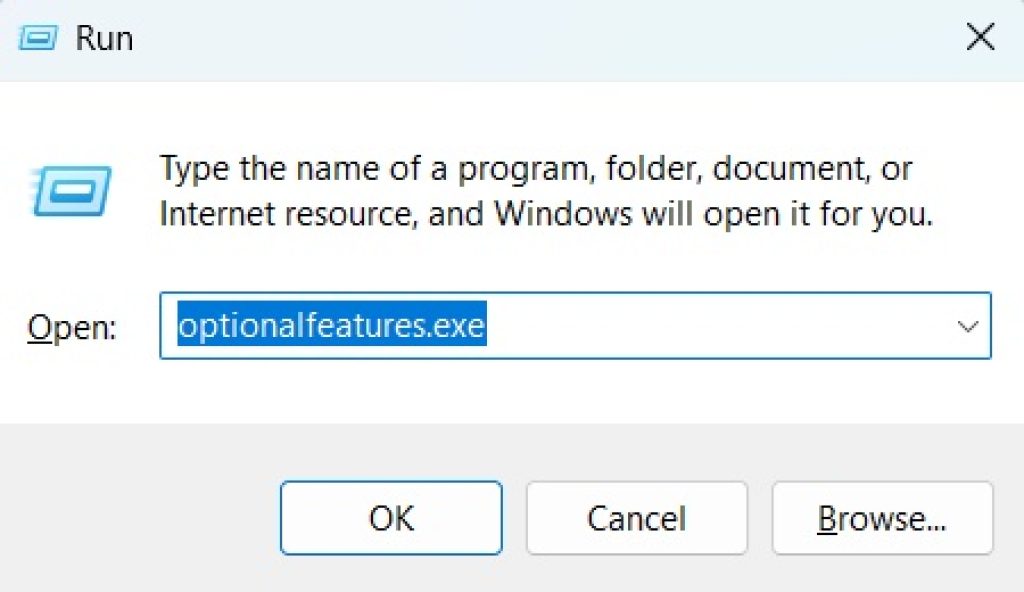
Type optionalfeatures.exe and press Enter. This opens the Windows Features window.
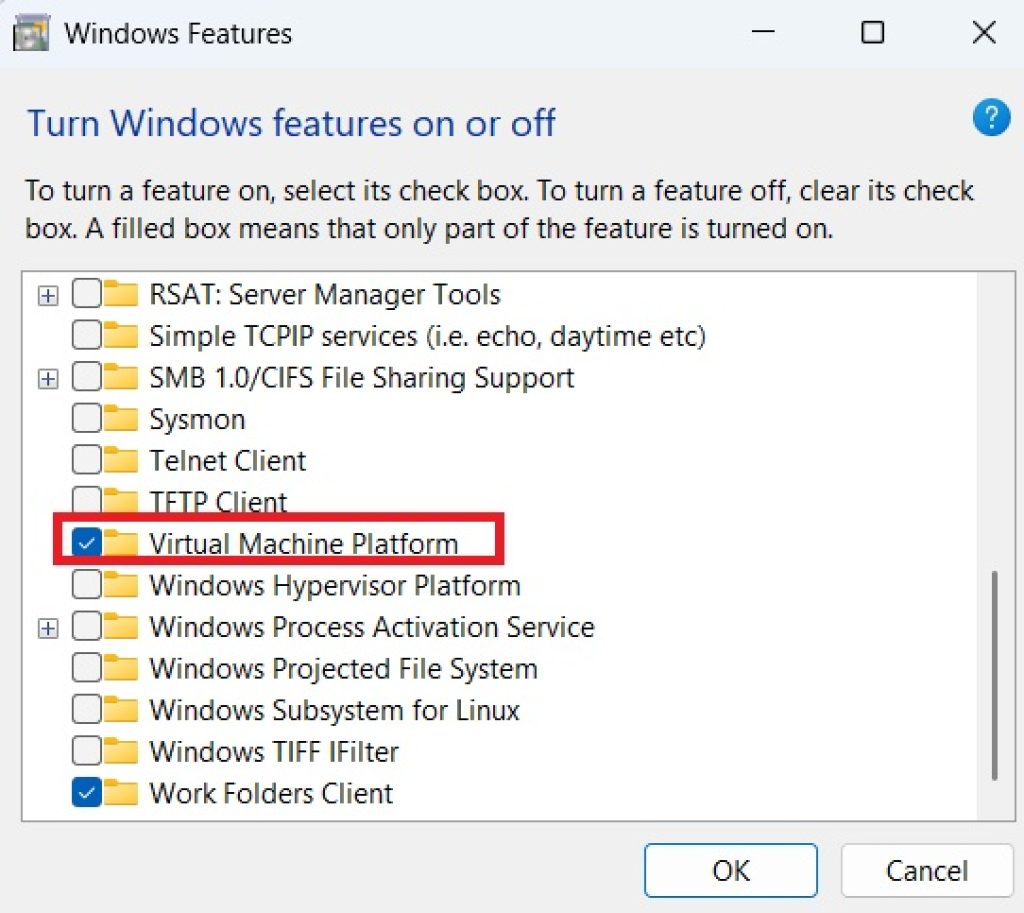
Scroll down the list until you find Virtual Machine Platform.
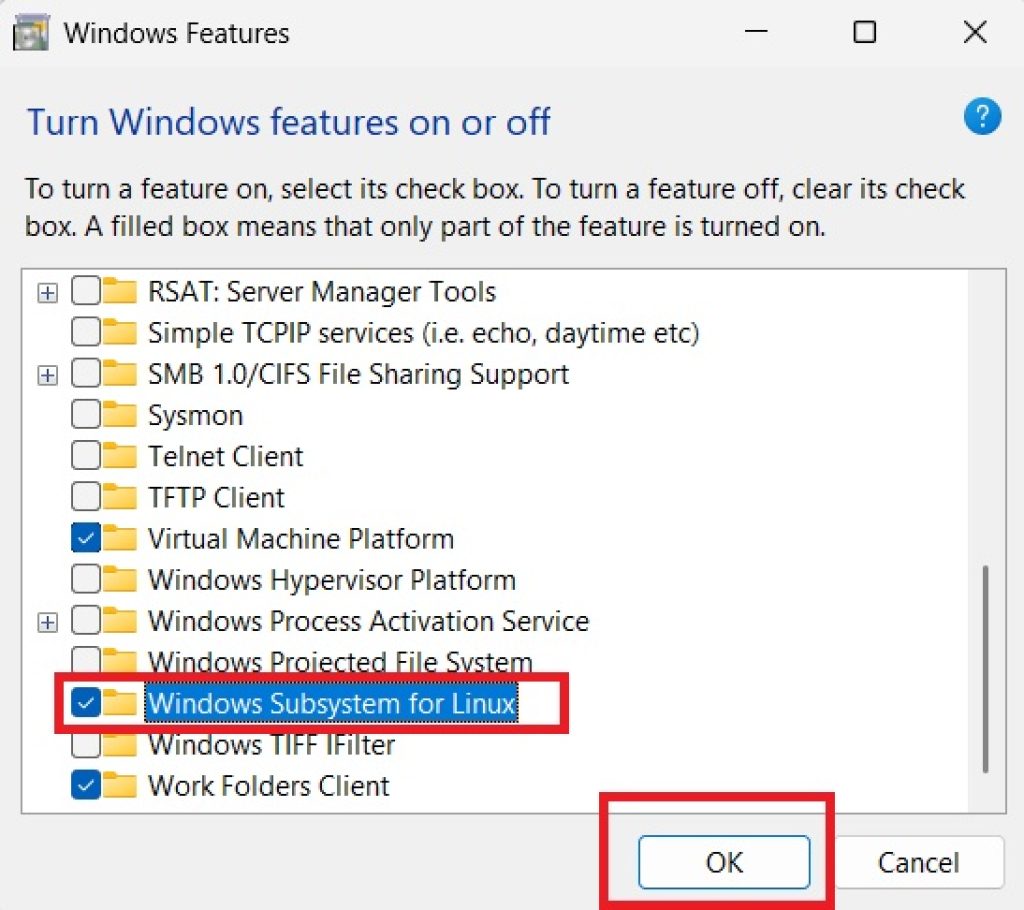
Check the box next to it.
While you’re in this menu, it’s also common to enable Windows Subsystem for Linux at the same time if that’s your end goal, since the two are often required together.
Click OK.
Windows will search for the required files and apply the changes. This may take a minute or two.
When prompted, click Restart now to complete the installation. Your computer must restart for the feature to take effect.
This method is ideal if you prefer a visual interface and don’t want to deal with the command line at all. The downside is that it’s slightly slower than the command-line alternatives and doesn’t provide much feedback if something goes wrong.
Method 2: Enable Virtual Machine Platform via PowerShell
PowerShell offers a faster, more precise way to enable the feature, and it’s especially useful if you’re scripting a setup process or configuring multiple machines.
- Click the Start menu, type
PowerShell, right-click Windows PowerShell, and select Run as administrator. Approve the User Account Control (UAC) prompt if it appears. - In the PowerShell window, type the following command and press Enter:
powershell
Enable-WindowsOptionalFeature -Online -FeatureName VirtualMachinePlatform -All
- PowerShell will process the request and show a progress indicator. Once complete, it will typically return a status showing
RestartNeeded : True. - Restart your computer to finalize the change. You can do this immediately from PowerShell with:
powershell
Restart-Computer
If you also need WSL2 support, you can enable the Windows Subsystem for Linux feature in the same session:
powershell
Enable-WindowsOptionalFeature -Online -FeatureName Microsoft-Windows-Subsystem-Linux -AllPowerShell is a great choice if you’re comfortable with basic command-line usage and want a bit more control and clarity than the graphical interface offers.
Method 3: Enable Virtual Machine Platform via Command Prompt (DISM)
If you prefer the traditional Command Prompt or you’re working in an environment where PowerShell isn’t your default shell, the Deployment Image Servicing and Management tool (DISM) can accomplish the same task.
- Click Start, type
cmd, right-click Command Prompt, and choose Run as administrator. - Enter the following command:
dism.exe /online /enable-feature /featurename:VirtualMachinePlatform /all /norestart
- Wait for the operation to reach 100% and confirm the message reads The operation completed successfully.
- Restart your PC manually, or run:
shutdown /r /t 0
to restart immediately.
DISM is a robust tool that’s frequently used by IT administrators for deploying and managing Windows images at scale, so this method is particularly handy if you’re setting up several machines with identical configurations, or integrating the step into a broader deployment script.
Method 4: Enable Virtual Machine Platform Automatically via WSL Install Command
If your ultimate goal is to use the Windows Subsystem for Linux, Microsoft has simplified the entire process into a single command that handles Virtual Machine Platform, WSL, and the Linux kernel update automatically.
- Open Windows Terminal or Command Prompt as an administrator.
- Run the following command:
wsl --install
- This single command enables the required optional components (including Virtual Machine Platform and Windows Subsystem for Linux), downloads and installs the latest Linux kernel, sets WSL2 as the default version, and installs a default Linux distribution (typically Ubuntu) — all in one step.
- Restart your computer when prompted.
- After rebooting, a terminal window will open automatically to finish setting up your Linux distribution, where you’ll create a Unix username and password.
This method is by far the most convenient if your primary goal is running WSL2, since it eliminates the need to manually toggle individual features. However, if you specifically need Virtual Machine Platform for a different purpose — such as certain third-party virtualization software or Windows Sandbox — one of the first three methods will give you more targeted control.
Verifying That Virtual Machine Platform Is Enabled
After restarting, it’s a good idea to confirm the feature is active. You can check this a couple of ways:
- Reopen
optionalfeatures.exeand confirm the checkbox next to Virtual Machine Platform is filled in. - Run this PowerShell command:
powershell
Get-WindowsOptionalFeature -Online -FeatureName VirtualMachinePlatform
Look for State : Enabled in the output.
If you installed WSL, you can also simply run wsl --status or wsl -l -v in a terminal to confirm your distributions are running under WSL version 2, which depends on Virtual Machine Platform being active.
Troubleshooting Common Issues
Occasionally, enabling this feature doesn’t go smoothly. A few common culprits include:
- Virtualization disabled in BIOS/UEFI: As mentioned earlier, this is the most frequent cause of WSL2 or VM errors even after enabling the Windows feature. Double-check your firmware settings.
- Conflicting virtualization software: Some older versions of VirtualBox or VMware can conflict with Hyper-V-based virtualization. Updating to the latest version of that software usually resolves the conflict.
- Group Policy restrictions: On managed or corporate devices, an administrator may have restricted the ability to enable certain Windows features. In this case, you’ll need to contact your IT department.
- Pending Windows Updates: If an update is stuck or pending, it can sometimes block optional feature installation. Running Windows Update and rebooting before retrying often clears this up.
Conclusion
Enabling Virtual Machine Platform in Windows 11 is a straightforward process, whether you choose the point-and-click simplicity of the Windows Features dialog, the precision of PowerShell, the administrative familiarity of DISM in Command Prompt, or the all-in-one convenience of the wsl --install command. Each method leads to the same outcome: unlocking the underlying virtualization infrastructure that powers WSL2, Windows Sandbox, Hyper-V-based tools, and various third-party virtualization applications.
The most important thing to remember is that Virtual Machine Platform depends on hardware-level virtualization support being enabled in your BIOS or UEFI firmware — without that, none of the software-side steps above will fully take effect. Once you’ve confirmed virtualization is active at the hardware level and enabled the feature using one of the four methods, a simple restart is all it takes to get your system ready for virtualized workloads.
Whether you’re a developer setting up a Linux environment for coding, a hobbyist experimenting with virtual machines, or an IT professional deploying configurations across multiple devices, Virtual Machine Platform is a small but essential building block that makes modern Windows virtualization possible.
Frequently Asked Questions
1. Do I need to enable Hyper-V separately, or is Virtual Machine Platform enough?
It depends on your use case. For WSL2, Windows Sandbox, and many lightweight virtualization scenarios, Virtual Machine Platform alone is sufficient. However, if you want to use Hyper-V Manager to create and manage full traditional virtual machines with a graphical interface, you’ll need to separately enable the Hyper-V feature as well. Both features can be enabled at the same time without conflict.
2. Why does Windows say virtualization is enabled, but WSL2 still won’t work?
This usually points to one of two issues: either the Virtual Machine Platform feature itself hasn’t been enabled in Windows (separate from the BIOS-level setting), or your Windows build is outdated and missing components WSL2 depends on. Try running wsl --update in an administrator terminal, and confirm the feature status using the Get-WindowsOptionalFeature PowerShell command described above.
3. Can I disable Virtual Machine Platform later if I no longer need it?
Yes. You can disable it the same way you enabled it — through the Windows Features dialog by unchecking the box, or via PowerShell with Disable-WindowsOptionalFeature -Online -FeatureName VirtualMachinePlatform. Keep in mind that disabling it will also break WSL2, Windows Sandbox, and any other tools relying on it, so only do this if you’re certain you won’t need those features.
4. Does enabling Virtual Machine Platform slow down my computer?
Simply enabling the feature has a negligible effect on system performance when it’s not actively in use. Virtualization components generally consume system resources (CPU, memory) only when you’re actually running a virtual machine, WSL2 session, or sandboxed application. That said, running virtualized environments alongside your regular workload will use additional RAM and CPU cycles, so on lower-spec machines you may notice a performance impact while a VM or WSL instance is actively running.





