
 Sukhdev Kamboj
Windows 11 usually takes care of driver installation on its own. Plug in a printer, a webcam, or a new graphics card, and Windows Update quietly finds and installs the right software in the background. Most of the time, this “just works” and you never have to think about it.
But sometimes it doesn’t work. You might be setting up a piece of older hardware that Windows no longer recognizes automatically, testing a beta driver from a manufacturer’s website, working on an offline or air-gapped machine that can’t reach Windows Update, or fixing a device that shows up in Device Manager with the dreaded yellow warning triangle. In situations like these, you need to install the driver manually — and that usually means working directly with an .INF file.
An .INF file is a text-based “setup information” file that tells Windows how to install a particular driver: which files to copy, which registry entries to create, and which hardware IDs the driver supports. Every driver package, whether it comes from Windows Update, a manufacturer’s website, or a hardware CD, is built around one of these files. When you “manually install a driver,” what you’re really doing is pointing Windows at the correct .INF file and letting it take over from there.
The good news is that Windows 11 gives you several ways to do this, ranging from simple point-and-click methods to command-line tools that are useful for troubleshooting or scripting. This guide walks through the most reliable methods, in order of simplicity, so you can pick the one that fits your situation.
Before you start, keep a few things in mind:
- You’ll usually need administrator rights to install a driver.
- Make sure you’ve downloaded the correct driver package for your exact device model and for Windows 11 (not just “Windows” generically, and not a driver meant for an older or newer OS version).
- Extract the driver package fully if it’s a ZIP or self-extracting archive — you need access to the actual
.inffile, not just an installer.exe. - It’s a good idea to create a System Restore point first, especially when installing unsigned or beta drivers.
With that out of the way, let’s go through the methods.
Method 1: Install via Device Manager
This is the most common and beginner-friendly approach, especially when the device is already connected but showing an error or using a generic driver.
Right-click the Start button and select Device Manager.
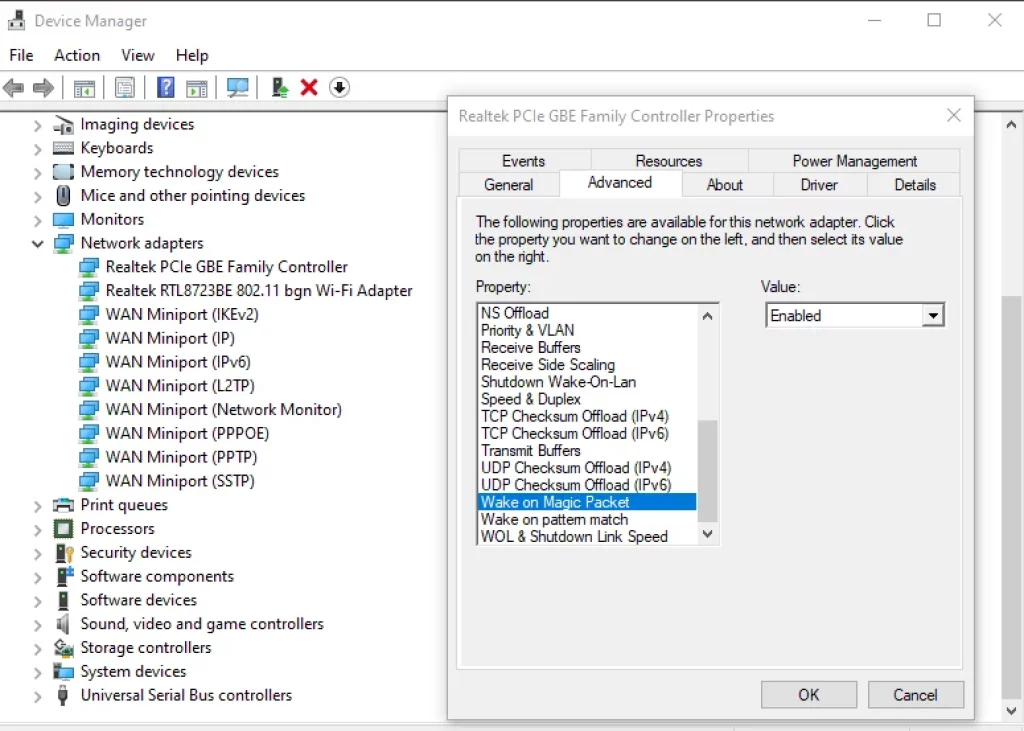
Locate the device you want to update. If it’s not working correctly, it will often appear under “Other devices” with a yellow exclamation mark.
Right-click the device and choose Update driver.
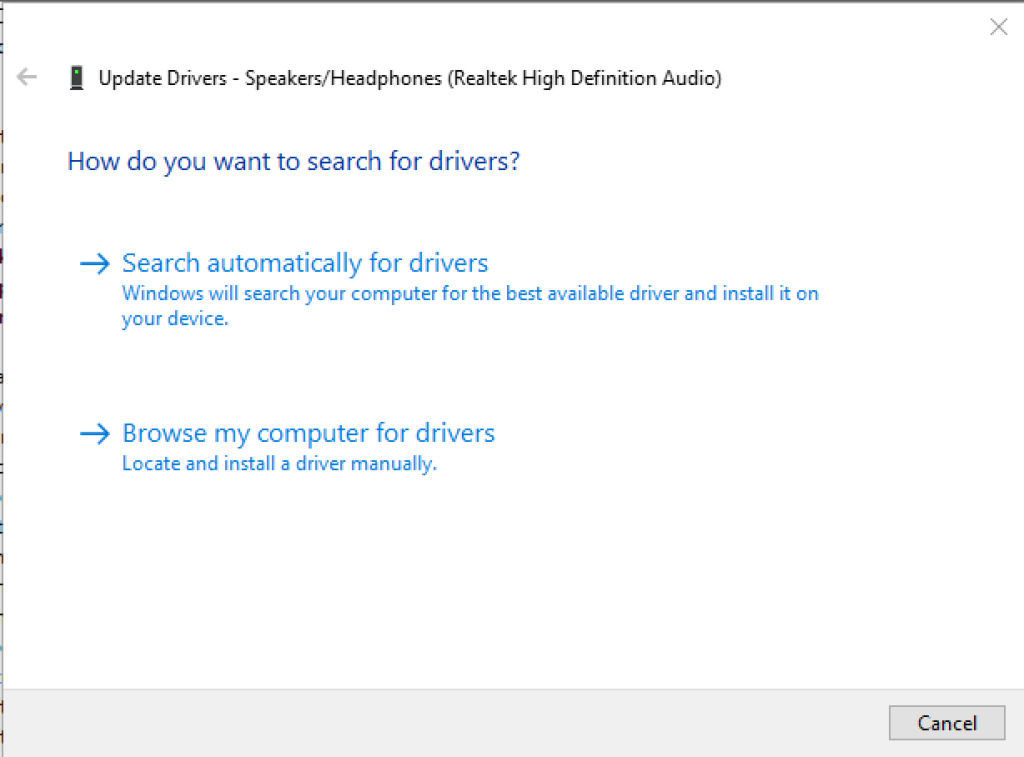
Select Browse my computer for drivers.
Click Browse and navigate to the folder containing your .inf file (and its accompanying files — don’t move the .inf file by itself, since it depends on other files in the same folder).
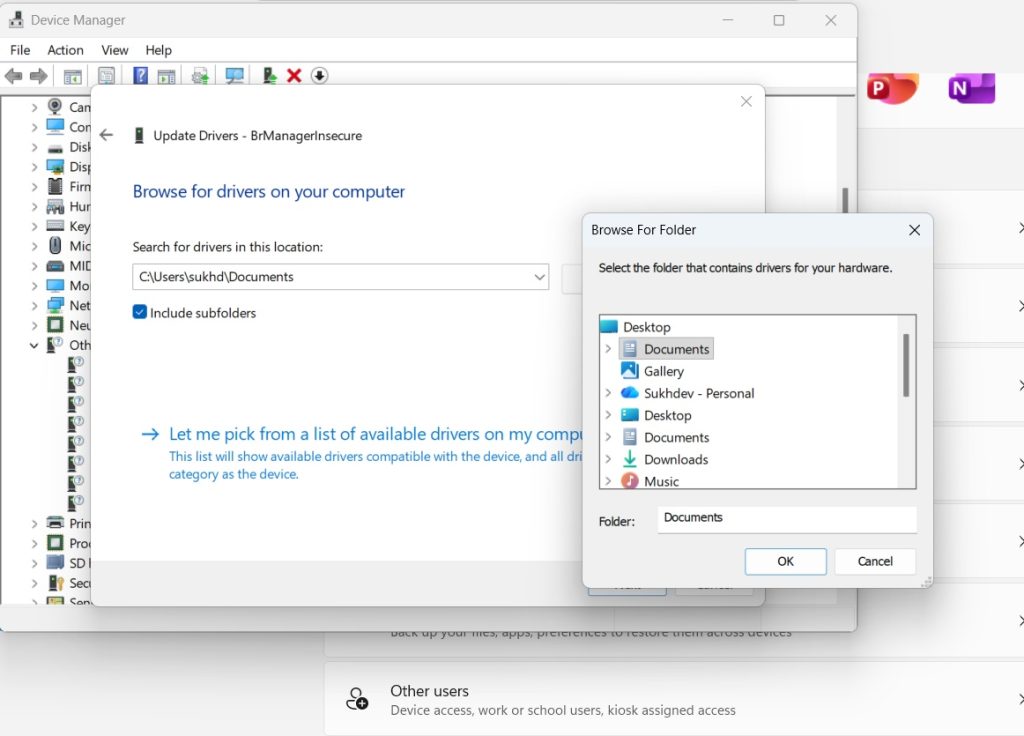
Make sure Include subfolders is checked, then click Next.
Windows will scan the folder, match the hardware ID in the .inf file to your device, and install the driver.
If prompted with a driver signature warning, review it carefully before proceeding (see the FAQ section below for more on this).
Restart your computer if prompted.
This method works well because Device Manager already knows which hardware IDs it’s looking for, so it will only offer to install drivers whose .inf file actually lists your device.
If Windows says “The best drivers for your device are already installed” but you know you have a newer or more appropriate driver, you can force the issue: on the “Update Driver” screen, choose Let me pick from a list of available drivers on my computer, then click Have Disk and browse directly to the .inf file. This bypasses Windows’ own recommendation and installs exactly the one you selected.
Method 2: Right-Click “Install” on the .INF File
If the driver isn’t tied to a specific piece of currently connected hardware — for example, you’re pre-staging a driver, or dealing with a virtual device — you can install it directly from the file itself.
- Open File Explorer and navigate to the folder containing the
.inffile. - Right-click the
.inffile. - If your system supports it, you’ll see an option labeled Install. Click it.
- Windows will process the file and install the driver package into the Driver Store, associating it with the hardware IDs listed inside.
This method is quick, but it has a limitation: it doesn’t always report errors clearly. If something goes wrong, you may not get a helpful message explaining why. For that reason, Method 1 or Method 3 are usually better if you’re troubleshooting a problem rather than just pre-loading a driver.
Note that on some systems, the Install context-menu option may not appear if the .inf file is a “class” or “co-installer” file rather than a primary device driver. In that case, use Method 1 or Method 3 instead.
Method 3: Use PnPUtil (Command Line)
For more control — or when you need to script the process, work with multiple drivers at once, or manage drivers on a system without a GUI — Windows 11 includes a built-in command-line tool called PnPUtil.
- Open Windows Terminal or Command Prompt as Administrator (right-click Start, choose “Terminal (Admin)” or “Command Prompt (Admin)”).
- To add a driver package to the Driver Store without installing it on a specific device yet, run:
pnputil /add-driver C:\Path\To\Driver\example.inf
- To add the driver and immediately install it on any matching connected hardware, add the
/installflag:
pnputil /add-driver C:\Path\To\Driver\example.inf /install
- If you have a folder full of driver packages (common with multi-device driver bundles), you can add them all at once using a wildcard and the
/subdirsflag:
pnputil /add-driver C:\Path\To\Drivers\*.inf /subdirs /install
- To confirm the driver is now in the Driver Store, list all third-party drivers with:
pnputil /enum-drivers
This shows each driver’s published name (something like oem12.inf), original file name, provider, class, and version — useful for confirming the install worked or for finding a driver you need to remove later.
- If you ever need to remove a driver, first find its published name from the command above, then run:
pnputil /delete-driver oem12.inf /uninstall /force
PnPUtil is especially valuable in enterprise or IT-support contexts, where drivers often need to be deployed across many machines identically, or where you’re preparing a driver for injection into a Windows image before deployment.
Method 4: Update Driver via Manufacturer’s Setup Tool (When Available)
Technically, this isn’t “manual” in the strictest sense, but it’s worth mentioning because many hardware manufacturers wrap their .inf-based drivers in a setup executable that handles the Device Manager steps for you. If you’ve downloaded a driver package and it includes a setup.exe, install.exe, or similar file alongside the .inf, running that installer will typically call the same underlying .inf installation process automatically, plus install any additional software (control panels, monitoring utilities, etc.) that the raw .inf file alone wouldn’t include.
If you want purely the driver with none of the extra bundled software, stick with Methods 1 through 3 and point Windows directly at the .inf file instead of running the full installer.
Conclusion
Manually installing a driver from an .inf file might sound intimidating if you’ve never done it before, but Windows 11 makes the process fairly approachable once you know where to look. For most people, Device Manager’s “Update driver” wizard is the simplest and safest route, since it automatically checks that the driver actually matches your hardware. If you need more precision or you’re managing several machines, PnPUtil gives you scriptable, repeatable control from the command line. And in a pinch, simply right-clicking the .inf file can get a driver installed in seconds.
Whichever method you choose, the fundamentals stay the same: get the correct driver for your exact hardware and Windows version, keep all the files from the driver package together, run the installation with administrator privileges, and create a restore point beforehand if you’re working with anything unsigned or experimental. Following these basics will save you most of the headaches that come with manual driver installation — and give you the confidence to fix hardware issues that Windows Update alone can’t solve.
FAQ
1. What’s the difference between an .INF file and a full driver installer (.exe)? An .inf file is the core instruction set Windows uses to install a driver — it lists the hardware IDs it supports, the files to copy, and the registry settings to configure. A .exe installer is usually a wrapper built by the manufacturer that runs this same .inf-based process automatically, often bundling in extra software like control panels or diagnostic tools. Installing directly from the .inf file gives you just the driver, with none of the extras.
2. Windows says the driver is “not digitally signed.” Is it safe to install anyway? Digital signatures confirm that a driver hasn’t been tampered with and comes from a verified publisher. Unsigned drivers aren’t automatically dangerous — many legitimate beta or open-source drivers are unsigned — but installing one does carry more risk, since Windows can’t verify its origin. Only proceed if you trust the source, ideally the hardware manufacturer’s own website, and consider creating a System Restore point first in case the installation causes instability.
3. I installed the driver, but Device Manager still shows the old one or an error. What now? This usually means the new driver wasn’t actually matched to your device, or a cached version is still active. Try uninstalling the existing driver first (right-click the device in Device Manager, choose “Uninstall device,” and check “Delete the driver software for this device” if available), restart your computer, and then reinstall using Method 1 or Method 3. Also double-check that the .inf file you’re using genuinely lists your device’s hardware ID — you can confirm this by viewing the device’s Hardware IDs under the “Details” tab in its Device Manager properties and comparing them against the entries in the .inf file.
4. Can I install a driver this way if Windows can’t detect the hardware at all? Yes, in most cases. In Device Manager, go to Action > Add legacy hardware, which lets you manually select a device type and then point to your driver’s .inf file, even if Windows hasn’t detected any new hardware. This is particularly useful for older or virtual devices that don’t trigger Windows’ automatic detection process.





