Sukhdev Kamboj
Typing a password every time you wake your laptop gets old fast. Passwords are also easy to forget, easy to steal, and easy to reuse in ways that put your accounts at risk. Windows 11 offers a better option: Windows Hello Face, a biometric sign-in feature that unlocks your PC by recognizing your face in about a second.
Windows Hello doesn’t work like a photo filter or a simple webcam snapshot. It uses an infrared (IR) camera to build a depth-aware map of your face, which is why it works in low light and can’t be fooled by a printed photo. Your facial data is converted into an encrypted mathematical representation and stored locally on your device. It isn’t uploaded to Microsoft’s servers or shared with apps.

This guide covers what you need before you start, several ways to set up and manage facial recognition, how to improve accuracy, and how to fix common problems. It ends with a short FAQ.
What You Need Before You Start
Not every Windows 11 PC supports facial sign-in, so check these requirements first.
1. A compatible camera. Windows Hello Face requires a camera with infrared capability, often labeled “Windows Hello compatible.” Most standard webcams do not qualify, because they lack the IR sensor that makes the feature secure. Many business laptops and higher-end consumer laptops (Surface devices, Dell XPS, Lenovo ThinkPad, HP Elite and Spectre lines) include one.
2. Windows 11 with current updates. Windows Hello is built into all editions of Windows 11, but updates often include camera and biometric driver fixes. Open Settings > Windows Update and install anything pending.
3. A PIN. Windows requires you to create a PIN as a backup before you can enroll your face. If the camera can’t recognize you, you’ll use the PIN instead.
4. Up-to-date drivers. The camera driver matters more than you might expect. If the option is missing or fails, an outdated or corrupted driver is a common cause.
5. A well-lit spot for enrollment. Even though the IR camera works in the dark, enrolling in a neutral, reasonably lit environment gives the system a good baseline.
To check whether your PC supports it, go to Settings > Accounts > Sign-in options. If you see Facial recognition (Windows Hello) and it isn’t grayed out, you’re ready.
Method 1: Set Up Facial Recognition Through Settings
This is the standard route and the one most people will use.
Press Windows + I to open Settings.
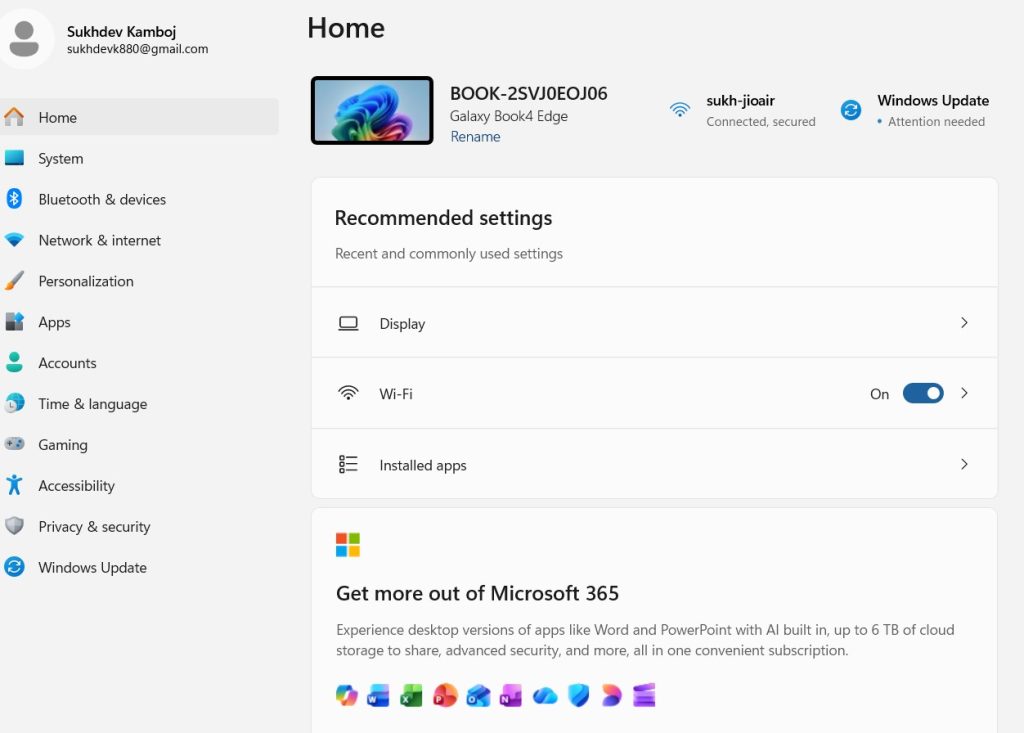
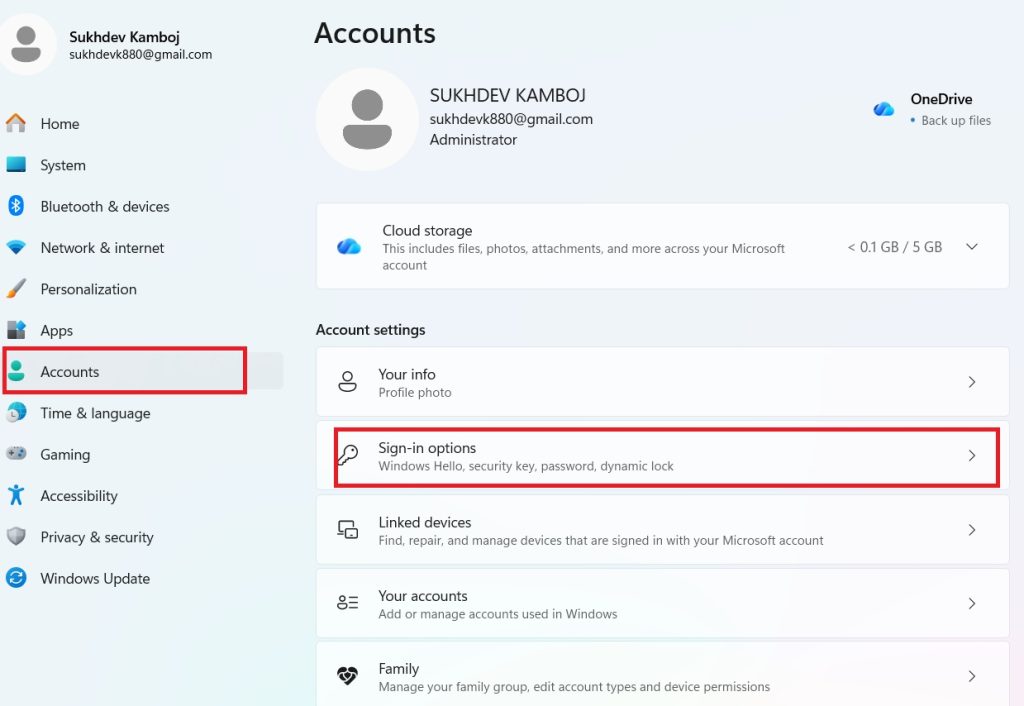
Select Accounts from the left sidebar, then click Sign-in options.
Under “Ways to sign in,” click Facial recognition (Windows Hello) to expand it.
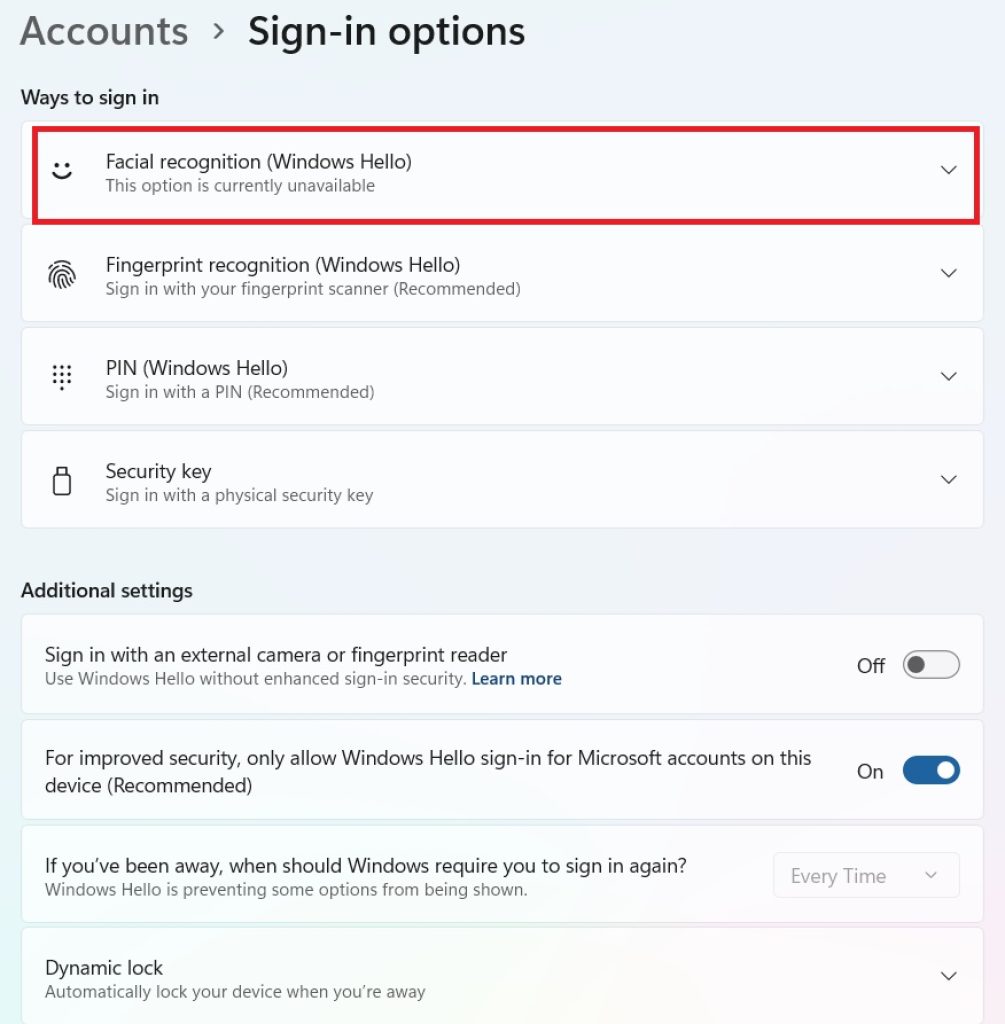
Click Set up. If prompted, click Get started on the Windows Hello welcome screen.
Enter your PIN to verify it’s you. If you haven’t created one, Windows will walk you through making one first.
Look directly at the camera. A progress indicator will show while Windows scans your face. Keep your face centered and hold still until it finishes.
When you see the “All set!” message, click Close. You’ll also see an option to Improve recognition, which is covered in Method 3.
From now on, when you reach the lock screen, Windows will scan your face automatically. Once it recognizes you, the screen unlocks without a click or keystroke.
Tip: If you wear glasses regularly, keep them on during your first scan. Windows will then be ready for your usual look.
Method 2: Set Up Face Sign-In During Windows Setup
If you’re setting up a new PC, or resetting one, you can enable facial recognition during the out-of-box experience (OOBE), before you ever reach the desktop.
- Follow the initial setup steps (region, keyboard layout, network connection).
- Sign in with your Microsoft account or create a local account, depending on your edition and setup path.
- When Windows asks you to create a PIN, complete that step.
- On supported hardware, you’ll then be offered Windows Hello. Choose Face and follow the on-screen prompts.
This method saves time because you don’t have to dig through Settings later. If you skip the offer, you can always return to Method 1 at any point.
Method 3: Improve Recognition After Setup
Sometimes Windows Hello works well on day one and then struggles when your appearance changes or lighting varies. The Improve recognition feature lets Windows learn additional variations of your face.
- Go to Settings > Accounts > Sign-in options > Facial recognition (Windows Hello).
- Click Improve recognition.
- Verify with your PIN if asked.
- Complete another scan.
Use this when:
- You wear glasses sometimes but not always. Scan once with them and once without.
- You’ve grown or shaved a beard, or changed your hairstyle significantly.
- You often sign in under very bright or very dim lighting.
- Your camera sits at a different angle than before, such as after switching to a laptop stand or external monitor.
You can run it as many times as you need. Windows adds the new data to your existing profile, and it often improves recognition more than a full reset would.
Method 4: Use an External Camera
If your laptop or desktop lacks a built-in IR camera, you can add a compatible external one. This is a good route for desktop PCs.
- Purchase a camera advertised as Windows Hello compatible (look for IR support specifically). Not every webcam with a “Windows Hello” label in the marketing copy is equivalent, so check the product’s specifications.
- Connect it via USB and let Windows install the driver. If it doesn’t install automatically, download the manufacturer’s driver.
- Position the camera at eye level, facing you directly.
- Follow the steps in Method 1 to enroll your face.
Keep in mind that regular RGB-only webcams don’t work with Windows Hello Face. If the “Set up” button is grayed out or you see a message that your device isn’t compatible, the camera is usually the reason.
Method 5: Enable Enhanced Sign-in Security
On supported hardware, Windows 11 offers Enhanced Sign-in Security (ESS), which adds a layer of protection to biometric data. It isolates the processing of your facial data from the main operating system using virtualization-based security, making it harder for malware to interfere with or intercept it.
To see whether it’s available on your device:
- Open Settings > Accounts > Sign-in options.
- Look for a setting labeled Sign in with an external camera or fingerprint reader or a related enhanced-security option. Its presence depends on your device and the version of Windows you run.
ESS requires specific hardware and firmware support, so many PCs don’t offer it. If you use a business or school device, your organization may control it. If you use a personal device and it’s available, leaving it on is a sensible security choice.
Method 6: Manage Windows Hello Through Group Policy (Pro, Enterprise, and Education)
If you administer a PC or a fleet of them, you can control how Windows Hello behaves.
- Press Windows + R, type
gpedit.msc, and press Enter. - Navigate to Computer Configuration > Administrative Templates > Windows Components > Windows Hello for Business.
- Configure policies such as enabling or disabling Windows Hello for Business, PIN complexity requirements, and biometric usage.
Note that Group Policy Editor isn’t available in Windows 11 Home. Home users manage Windows Hello entirely through Settings.
How to Sign In Once It’s Set Up
Signing in with your face is almost effortless:
- Wake your PC by pressing a key or moving the mouse.
- Look at the screen from a natural distance (roughly 1 to 2 feet works well).
- Wait for the “Hello, [your name]” message. The lock screen dismisses on its own.
If Windows doesn’t recognize you, click Sign-in options on the login screen to choose your PIN or password instead. If you see a Windows Hello face icon, you can also click it to retry.
Troubleshooting Common Problems
The “Set up” button is grayed out. Your device may not have a compatible camera, or a driver issue is blocking it. Open Device Manager, expand Biometric devices or Cameras, and check for warning icons. Update or reinstall the driver from the manufacturer’s site.
Windows Hello can’t find your camera. Confirm the camera isn’t disabled in your device’s BIOS/UEFI or blocked by a physical privacy shutter. Also check Settings > Privacy & security > Camera to make sure camera access is on.
Recognition is slow or unreliable. Clean the camera lens, run Improve recognition, and check that nothing (like a cover or sticker) blocks the IR sensor. If it still fails, remove your face data and enroll again.
It stopped working after an update. Feature updates sometimes reset biometric drivers. Check Windows Update for optional driver updates, or restart and re-enroll.
To remove your face data. Go to Settings > Accounts > Sign-in options > Facial recognition (Windows Hello) and click Remove. Then choose Set up to start fresh.
Security and Privacy Notes
Windows Hello is designed with privacy in mind. Your face data stays on your device, is stored in encrypted form, and is never converted into an image that can be reconstructed. The IR depth sensing makes it resistant to simple spoofing attempts such as holding up a photo.
That said, no security method is perfect. Keep your PIN private and reasonably complex, since it’s the fallback. Keep Windows updated so security patches for biometric components arrive promptly. If your device is lost or stolen, use your Microsoft account’s device management tools to lock or wipe it.
Conclusion
Logging in to Windows 11 with facial recognition takes a few minutes to set up and saves you time every day. The essentials are a compatible IR camera, a PIN as a fallback, and a short enrollment scan through Settings > Accounts > Sign-in options. From there, you can refine accuracy with Improve recognition, add an external camera if your PC lacks one, and explore advanced options like Enhanced Sign-in Security or Group Policy if your setup supports them.
If something goes wrong, the fixes are usually simple: update the camera driver, check privacy permissions, clean the lens, or re-enroll your face. With those covered, Windows Hello gives you a sign-in that’s faster than a password and stronger than a weak one.
Frequently Asked Questions
1. Can I use Windows Hello Face with a regular webcam?
Generally no. Windows Hello Face requires a camera with infrared sensing to create a secure depth map of your face. A standard RGB webcam can’t provide that, which is why the option is often unavailable on PCs without an IR camera. If you want facial sign-in on such a PC, buy an external camera that explicitly supports Windows Hello.
2. Is facial recognition on Windows 11 secure?
It’s considered a strong sign-in method. Face data is processed and stored locally in encrypted form rather than in the cloud, and the IR depth sensing resists photo-based spoofing. For best results, keep Windows updated, use a strong PIN as your backup, and enable Enhanced Sign-in Security if your hardware supports it.
3. What happens if Windows Hello doesn’t recognize me?
You can always fall back on your PIN or password. On the sign-in screen, click Sign-in options and choose another method. If recognition fails regularly, run Improve recognition in Settings, clean your camera lens, or remove and re-enroll your face.
4. Can multiple people use facial recognition on the same PC?
Yes, but each person must set it up on their own Windows account. Windows Hello enrolls one face profile per user account, so family members or coworkers sharing a PC each sign in to their own account and complete the setup there. Face data isn’t shared between accounts.