
 Sukhdev Kamboj
A Windows 11 update is supposed to make your PC better — faster, safer, more stable. But sometimes it does the opposite. A driver stops working, an app crashes on launch, your Wi-Fi disappears, or the whole system just feels slower and buggier than before. When that happens, the fastest fix is often to undo the update and go back to the version of Windows that was working fine.
The good news is that Windows 11 has several built-in ways to roll back an update, ranging from a simple settings toggle to a full System Restore. The catch is timing: most of these options only exist for a short window after the update installs, because Windows deletes the old files to free up disk space. Below are the main methods, from easiest to most involved, along with what each one actually undoes.
Methods to Roll Back or Downgrade a Windows 11 Update
1. Uninstall a Quality (Monthly) Update
If a recent monthly cumulative update caused the problem — not a full feature update — this is the quickest fix.
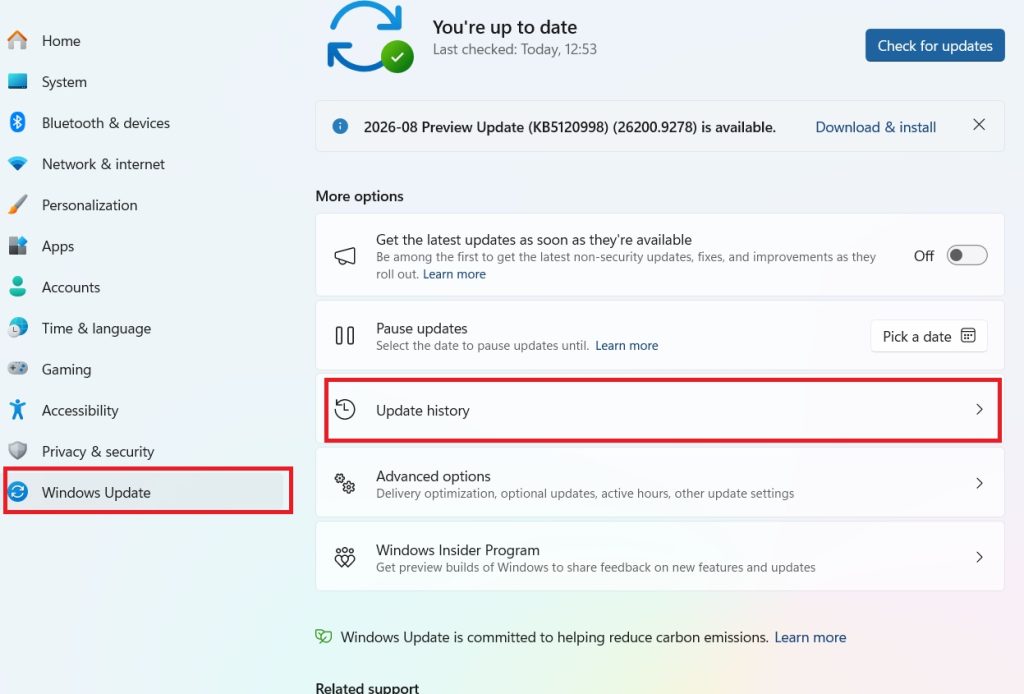
Open Settings → Windows Update → Update history
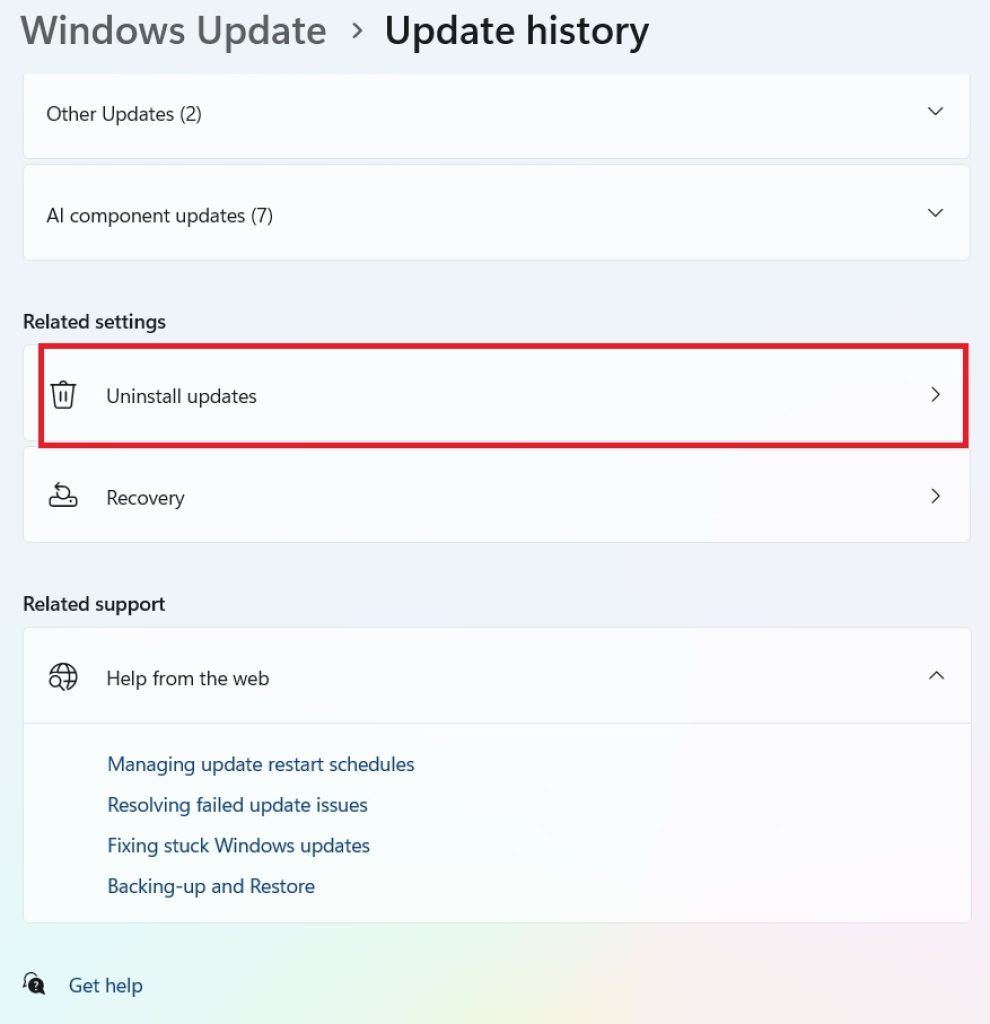
Scroll down and click Uninstall updates
Find the problematic update in the list and click Uninstall
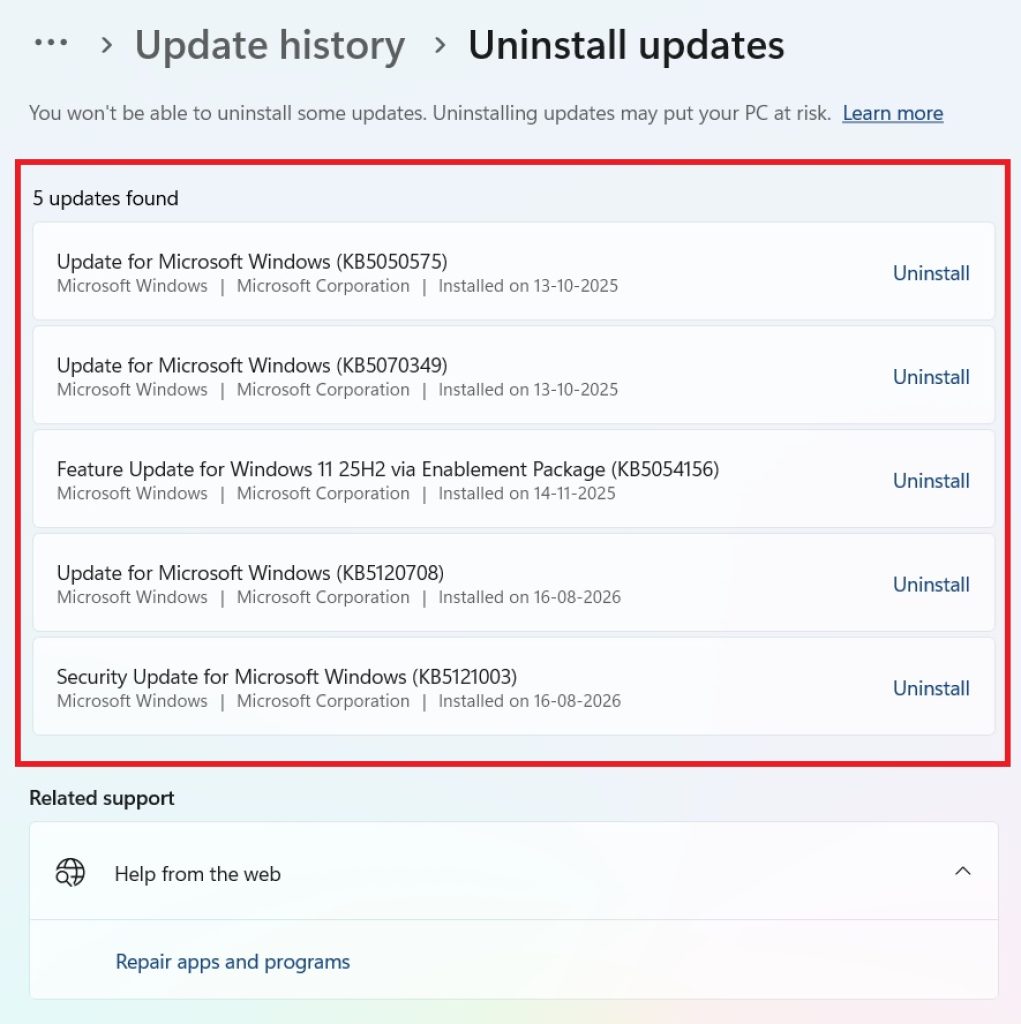
Restart your PC when prompted
This removes just that one patch and leaves the rest of your system untouched.
2. Use “Go Back” to the Previous Feature Update
This is the method for undoing a full feature update (for example, going back from 25H2 to 24H2, or from Windows 11 back to Windows 10).
- Open Settings → System → Recovery
- Under Recovery options, find Go back and click it
- Choose a reason for leaving, then click Next
- When asked to check for updates first, select No, thanks (unless you’d rather try an update fix)
- Click Next, then Go back to earlier build to confirm
This option requires the C:\Windows.old folder to still be present, and it isn’t available if you did a clean install rather than an in-place upgrade. It restores the exact installation that was replaced — it won’t let you pick an arbitrary older version, and it’s normally only available for about 10 days after the upgrade.
If your old password still applies to that installation, be ready to use it — if you changed your password since upgrading, you’ll need to remember the old one to log back in.
3. Roll Back from the Windows Recovery Environment (WinRE)
If your PC won’t boot normally after an update, or Settings is inaccessible, use the recovery environment instead:
- Restart your PC and let it boot into WinRE (or go to Settings → System → Recovery → Advanced startup → Restart now)
- Select Troubleshoot → Advanced options → Uninstall Updates
- Choose to uninstall either the latest quality update or the latest feature update
- Follow the prompts and let the PC restart
If your PC fails to boot several times in a row, Windows will automatically drop into this recovery environment on its own.
4. Use System Restore
If the “Go back” option has expired or isn’t available, System Restore can undo system-level changes (though not always full feature updates) using a restore point created before the update.
- Search for Create a restore point in the Start menu and open it
- Click System Restore
- Choose a restore point dated before the update installed
- Follow the wizard to complete the restore and restart
This won’t touch your personal files, but it can affect recently installed apps and drivers.
5. Clean Install an Older Version
If none of the built-in rollback options are available anymore — the window has closed, or you did a clean install — the last resort is downloading an older Windows 11 ISO (or the Windows 10 ISO, if you’re downgrading OS versions entirely) from Microsoft and doing a fresh install. This wipes the drive, so back up your files first, and you’ll need to reinstall your apps afterward.
Conclusion
Rolling back a Windows 11 update is usually straightforward as long as you act within the first 10 days: Settings > System > Recovery > Go back handles feature updates, while Update history > Uninstall updates handles smaller monthly patches. If the PC won’t boot, the Windows Recovery Environment offers the same “uninstall updates” option from outside Windows. Once the rollback window closes, System Restore or a clean install become your fallback options. Whichever method you use, back up important files first, and keep your PC plugged into power during the process since it can restart several times before finishing.
FAQs
1. How long do I have to roll back a Windows 11 update? In most cases you have 10 days after the upgrade to go back, since the files needed for rollback are only kept for that long. After that, the “Go back” option disappears from Settings.
2. Will rolling back delete my personal files? No — the “Go back” feature normally returns you to the previous installation while keeping personal files, though it can remove apps and drivers installed after the update and undo later setting changes. Even so, it’s wise to back up important files first in case the process runs into trouble.
3. Why is the “Go back” option greyed out on my PC? This usually means the rollback window has expired, the Windows.old folder was deleted or is missing, you performed a clean install instead of an upgrade, or Windows has already cleaned up the old files to save disk space. In these cases, System Restore or a clean install of an older version are your remaining options.
4. Should I roll back an update, or just wait for a fix? It depends on the impact. Rolling back is generally worth doing only if the update actually broke system stability or app compatibility — otherwise, it’s often better to live with minor annoyances than to run an unpatched system that’s more exposed to security risks. If it’s a critical issue (can’t boot, key hardware not working), roll back immediately; if it’s minor and cosmetic, consider pausing updates for a few weeks and waiting for Microsoft’s fix instead.





