
 Sukhdev Kamboj
Realtek audio drivers power the sound systems on the vast majority of Windows laptops and desktop motherboards. They’re generally reliable, but a surprising number of users run into a frustrating problem right after installing or updating these drivers: the sound simply stops working. You plug in your headphones, click play on a video, or join a call, and nothing happens — no audio, no error message, just silence.
This issue can show up in several different ways. Sometimes Windows shows a red “X” over the speaker icon in the taskbar, indicating no audio device is detected at all. Other times, the speaker icon looks completely normal, the volume slider moves, and Windows reports that sound is playing, yet no audio comes out of the speakers or headphones. In some cases, the problem is isolated to specific applications, while system sounds still work fine. In others, an entire audio device disappears from the Sound settings menu after the driver installation completes.
The good news is that this is a well-documented problem with a manageable set of causes. Most of the time, it comes down to one of the following: a corrupted or incompatible driver installation, a mismatch between the Realtek driver version and your motherboard or laptop hardware, a Windows service that failed to restart properly, an audio enhancement setting conflicting with the new driver, or a simple case of the wrong playback device being selected as default. Occasionally, it’s related to a Windows Update that interacts poorly with the freshly installed Realtek software, or a BIOS/UEFI audio setting that got disabled somewhere along the way.
This guide walks through the most effective fixes in order, starting with the fastest and least invasive options before moving to more advanced steps like manual driver rollbacks and registry-level fixes. Whether your sound disappeared moments after installing a new driver from Realtek’s site, from your motherboard manufacturer’s support page, or via Windows Update, one of the methods below should get your audio working again.
Methods to Fix No Sound After Installing Realtek Audio Drivers
Method 1: Restart Your PC and Check Basic Connections
It sounds almost too simple, but a large percentage of “no sound after driver install” cases resolve with a full restart rather than just closing and reopening applications. Driver installations often require a complete reboot to properly register with Windows Audio services, and a partial restart or sleep/wake cycle isn’t the same thing.
- Fully shut down your computer (not just sleep or restart from a locked screen) and power it back on.
- While you’re at it, check your physical connections. Make sure headphones or speakers are plugged into the correct jack — on desktop motherboards, the green jack is typically for front-panel output, while the rear panel has separate line-out and headphone ports depending on your Realtek configuration.
- If you’re using HDMI or a DisplayPort monitor with built-in speakers, confirm the correct output device is selected (more on this in Method 3).
If sound still doesn’t work after a clean restart, move on to checking the Windows Audio services.
Method 2: Restart the Windows Audio Services
Realtek’s driver installer sometimes fails to properly restart the underlying Windows services it depends on, leaving the audio stack in a broken state even though the driver itself installed correctly.
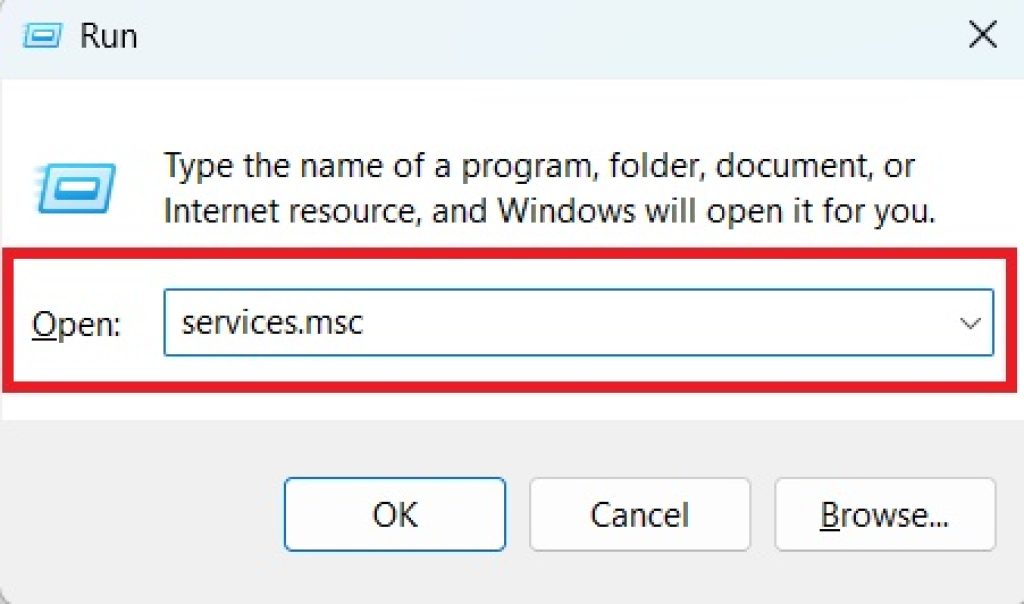
Press Windows + R, type services.msc, and press Enter.
Locate Windows Audio in the list. Right-click it and select Restart. If the option is grayed out, right-click and choose Start instead.
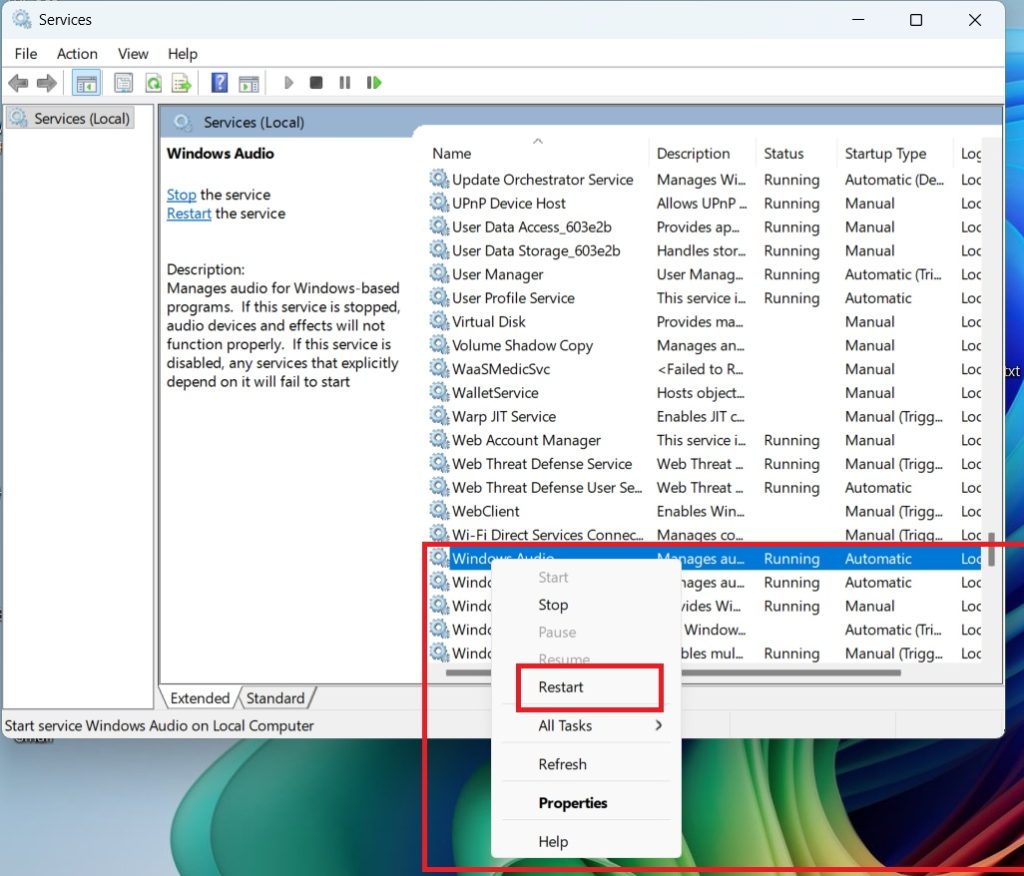
Do the same for Windows Audio Endpoint Builder and Remote Procedure Call (RPC), which the audio service depends on.
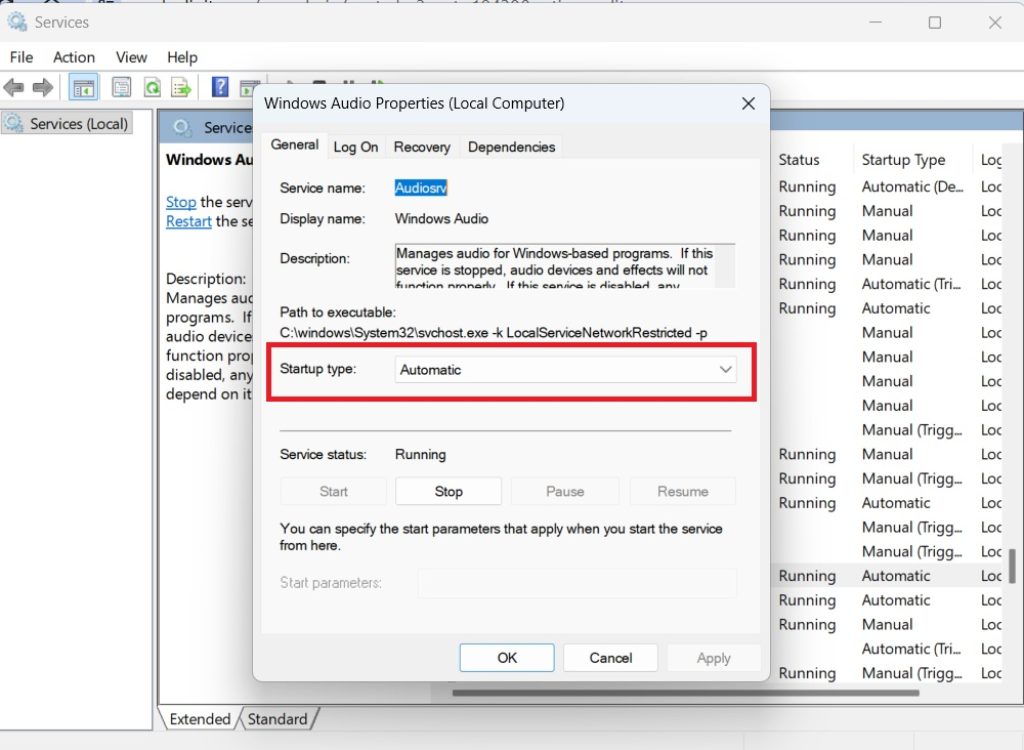
Set all three services to Automatic startup type by double-clicking each one and selecting Automatic from the dropdown, then click Apply.
Restart your computer once more to confirm the services launch correctly on boot.
Method 3: Check and Set the Correct Default Playback Device
A fresh Realtek driver installation can sometimes reset your default audio device, especially if you have multiple outputs available (speakers, headphones, HDMI audio, or a USB headset).
- Right-click the speaker icon in the taskbar and select Sound settings.
- Under “Output,” check the dropdown menu and make sure the device you actually want to use is selected. If you see multiple Realtek entries, try switching between them.
- Scroll down and click More sound settings to open the classic Sound control panel.
- On the Playback tab, right-click in the empty space and check the boxes for Show Disabled Devices and Show Disconnected Devices. Sometimes your correct device is hiding here, disabled by the new driver.
- Right-click your intended playback device and select Enable, then Set as Default Device.
Method 4: Roll Back or Reinstall the Realtek Driver
If the sound issue started immediately after installation, the driver package itself may be incompatible with your specific hardware revision or Windows 11 build.
To roll back:
- Open Device Manager (right-click Start, select Device Manager).
- Expand Sound, video and game controllers.
- Right-click your Realtek device, choose Properties, then go to the Driver tab.
- If the Roll Back Driver button is available, click it and follow the prompts. This reverts to the previously installed driver version.
If rollback isn’t available, do a clean reinstall:
- In Device Manager, right-click the Realtek audio device and select Uninstall device. Check the box for “Delete the driver software for this device” if prompted.
- Restart your PC. Windows will often reinstall a generic driver automatically.
- Visit your laptop or motherboard manufacturer’s official support page (not just Realtek’s generic site) and download the driver version specifically listed for your exact model and Windows 11 build, since generic Realtek packages sometimes lack model-specific configuration files.
- Install the manufacturer-specific package and restart again.
Method 5: Disable Audio Enhancements
Realtek installations often enable “audio enhancements” by default, and these occasionally conflict with certain speakers, headsets, or virtual audio setups, resulting in silence rather than distorted sound.
- Go to Settings > System > Sound.
- Click your output device, then Device properties.
- Look for Additional device properties and open it.
- On the Enhancements tab, check Disable all enhancements or Disable all sound effects.
- Click Apply, then test your audio.
Method 6: Run the Windows Audio Troubleshooter
Windows 11 includes a built-in troubleshooter that can automatically detect and fix several common causes of audio failure, including some driver registration issues that are tedious to diagnose manually.
- Go to Settings > System > Troubleshoot > Other troubleshooters.
- Find Playing Audio and click Run.
- Follow the on-screen prompts, and select your output device if asked to specify which one is having issues.
- Let it apply any suggested fixes automatically, then restart your PC to confirm the change stuck.
Method 7: Update Windows and Check for Conflicting Updates
Sometimes the timing is coincidental: a Windows Update installs in the background around the same time as the Realtek driver, and one interferes with the other’s registration in the system.
- Go to Settings > Windows Update and click Check for updates. Install anything pending, including optional driver updates.
- Check Update history for any updates installed the same day the sound broke. If a suspicious update appears, you can uninstall it from Update history > Uninstall updates to test whether that resolves things.
- After any update changes, restart and retest your audio.
Method 8: Check BIOS/UEFI Audio Settings (Desktop Motherboards)
On desktop systems, it’s possible for onboard audio to be disabled at the firmware level, either from a previous troubleshooting attempt or an unrelated BIOS update.
- Restart your PC and enter BIOS/UEFI setup (commonly by pressing Delete, F2, or F10 during boot — check your motherboard manual for the exact key).
- Navigate to the Advanced or Onboard Devices section.
- Confirm that Onboard Audio or HD Audio Controller is set to Enabled.
- Save changes and exit, then boot into Windows and retest.
Conclusion
Losing sound right after a Realtek driver installation is a common but solvable problem. In most cases, the fix is quick: a full restart, restarting the Windows Audio service, or correcting the default playback device resolves the issue within minutes. When those simple steps don’t work, rolling back to the previous driver or doing a clean reinstall using the manufacturer-specific package (rather than a generic one) resolves the vast majority of remaining cases, since driver-hardware mismatches are the single most frequent root cause. Audio enhancement conflicts, pending Windows Updates, and disabled BIOS audio settings account for most of what’s left.
Work through the methods above in order, testing your audio after each step before moving to the next. Keeping a record of which driver version was installed when the problem started can also save time if you need to roll back or reach out to your manufacturer’s support team. With a methodical approach, this is very rarely a hardware failure and almost always a fixable software or configuration issue.
Frequently Asked Questions
1. Why did my sound stop working immediately after installing a Realtek driver?
This usually happens because the new driver version is either corrupted during download/installation, incompatible with your specific hardware revision, or it failed to properly restart the Windows Audio service during setup. Downloading a generic Realtek driver instead of the one customized for your exact laptop or motherboard model is one of the most common culprits, since manufacturers often modify Realtek’s base drivers to match their specific audio hardware.
2. Should I download Realtek drivers directly from Realtek’s website or from my manufacturer’s site?
In almost all cases, you should get the driver from your laptop or motherboard manufacturer’s support page rather than Realtek’s generic site. Manufacturers customize the driver package with configuration files specific to their audio hardware layout, and installing a mismatched generic version is a frequent cause of the exact “no sound” problem covered in this guide.
3. How do I know if the problem is the driver or a hardware issue?
Check Device Manager first. If your Realtek device shows a yellow warning icon or an error code in Properties, that points to a driver-level problem, which is fixable with the methods above. If the device doesn’t appear in Device Manager at all even after uninstalling and restarting, or if you’ve tested with multiple different headphones/speakers and different audio jacks with no success, that points more toward a hardware fault, which may require professional repair or a replacement audio device.
4. Will rolling back the driver cause other problems later?
Rolling back is generally safe and simply restores the previously working driver version, without affecting your files or other installed programs. The main trade-off is that you’ll temporarily miss out on any new features or hardware-compatibility fixes included in the newer driver until a more stable update becomes available. If you roll back and audio works fine, it’s reasonable to stay on that version until you have a specific reason to update again, at which point you can check the manufacturer’s release notes for any known audio-related fixes before reinstalling.





