Sukhdev Kamboj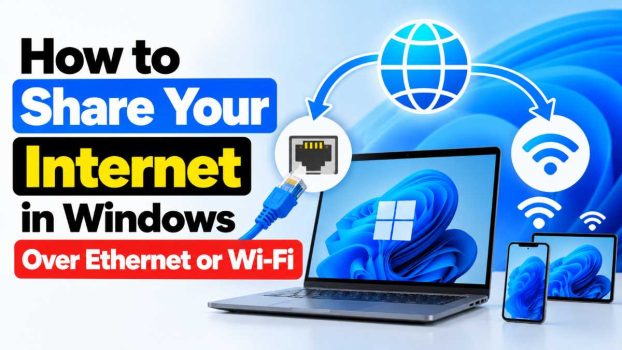
Sharing your internet connection in Windows is one of the most practical tricks every computer user should know. Whether you’re at home, in a hotel room with a single Ethernet port, or on a job site with only one device that has a working internet connection, Windows gives you built-in tools to share that connection with other devices. You don’t need to buy an extra router or install complicated third-party software — Windows 10 and Windows 11 both come with native features that let you turn your PC into a personal hotspot or a bridge between two networks.
Internet Connection Sharing (ICS) has existed in Windows for years, but many users still don’t realize how flexible it is. You can share a Wi-Fi connection with a device connected over Ethernet, share an Ethernet connection wirelessly with your phone or laptop, or even share your mobile hotspot data with a second PC. This is especially useful for gamers who want a lag-free wired connection while other devices use Wi-Fi, remote workers who need to get a smart TV or printer online, or anyone troubleshooting a device that lacks its own Wi-Fi adapter.

In this guide, we’ll walk through four reliable methods to share your internet connection in Windows, covering both Ethernet and Wi-Fi scenarios. We’ll also answer some of the most common questions people have about sharing internet on Windows, including security concerns, speed impacts, and compatibility with Windows 10 and Windows 11. By the end, you’ll be able to pick the method that best matches your hardware setup and get your devices connected in just a few minutes.
Method 1: Share Internet Using the Windows Mobile Hotspot Feature
The simplest and most user-friendly way to share your internet connection is through the built-in Mobile Hotspot feature. This works whether your PC is connected to the internet via Wi-Fi or Ethernet, and it broadcasts that connection wirelessly so nearby devices like phones, tablets, and laptops can join.
Steps to enable Mobile Hotspot:
Open Settings by pressing Windows + I.
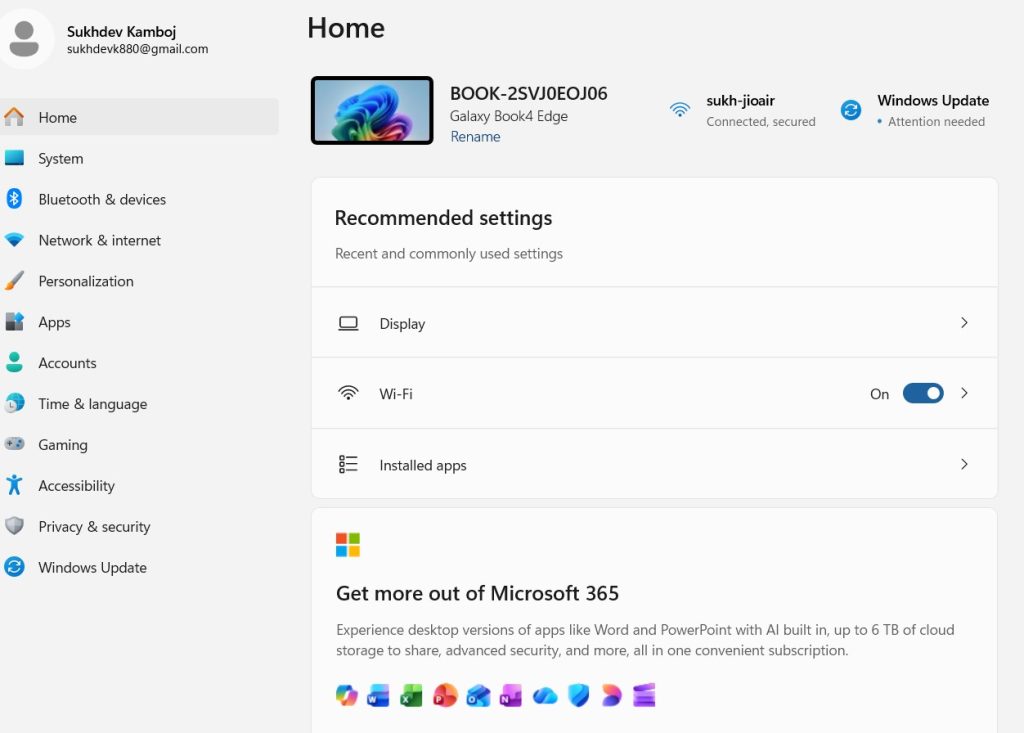
Navigate to Network & Internet.
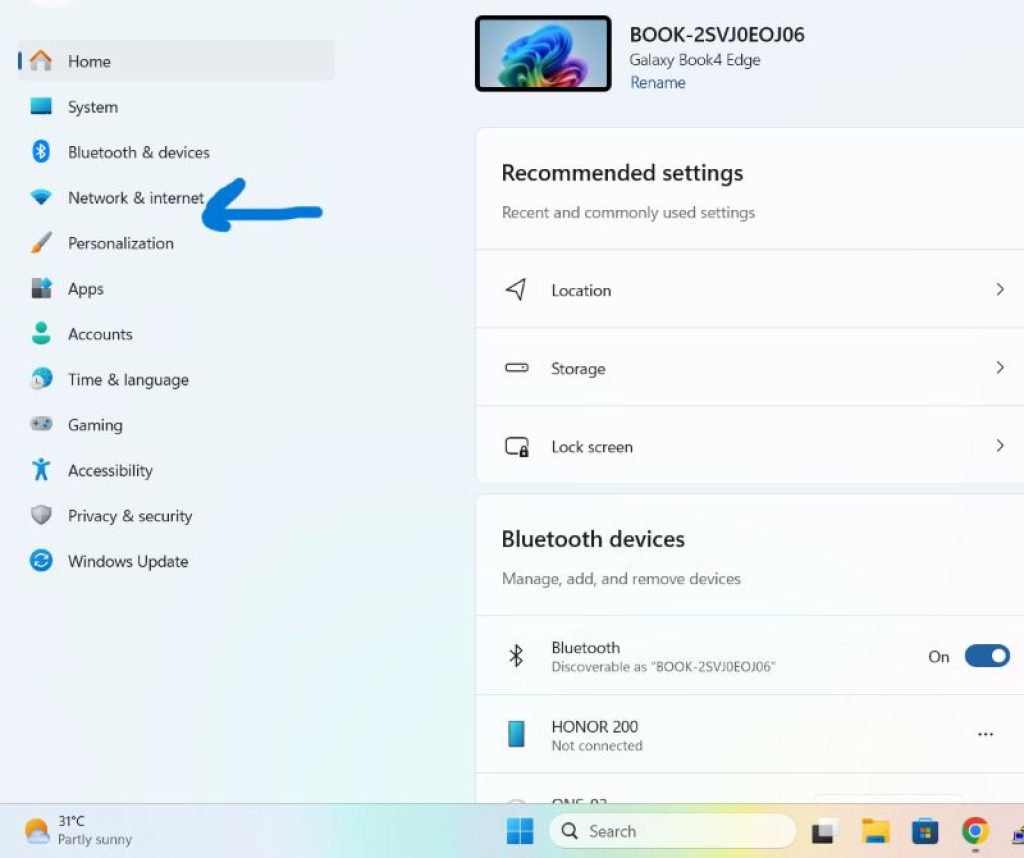
Click on Mobile hotspot in the left-hand menu (Windows 11) or the sidebar (Windows 10).
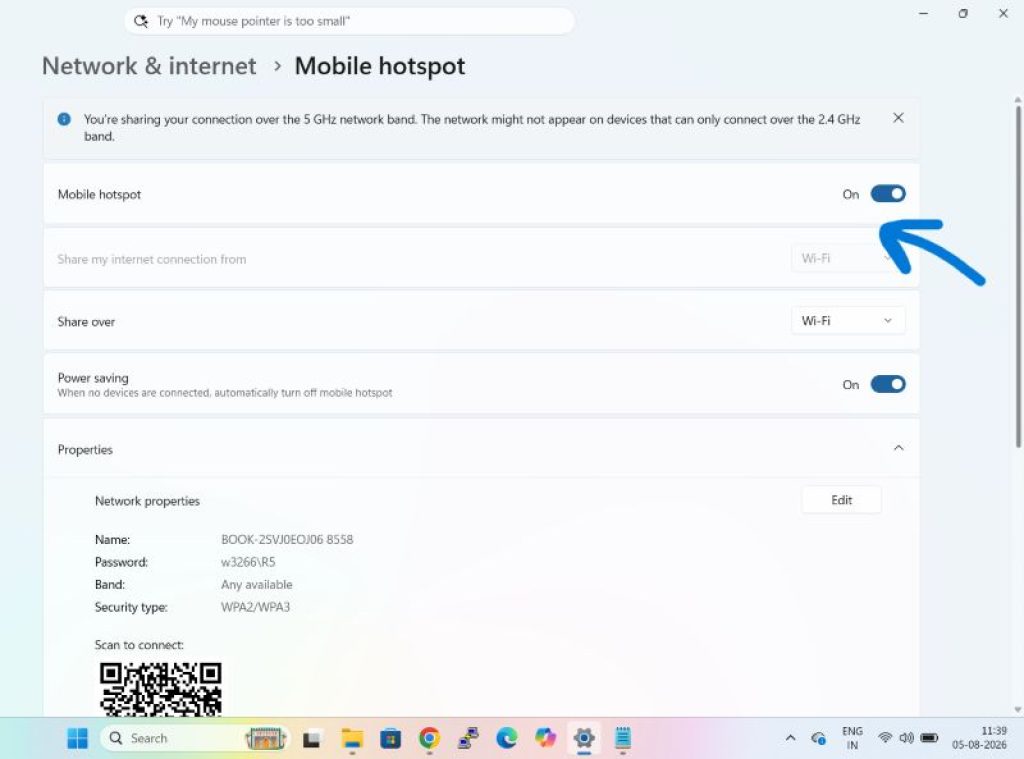
Toggle the Mobile hotspot switch to On.
Under “Share my internet connection from,” select the network your PC is currently using (Wi-Fi or Ethernet).
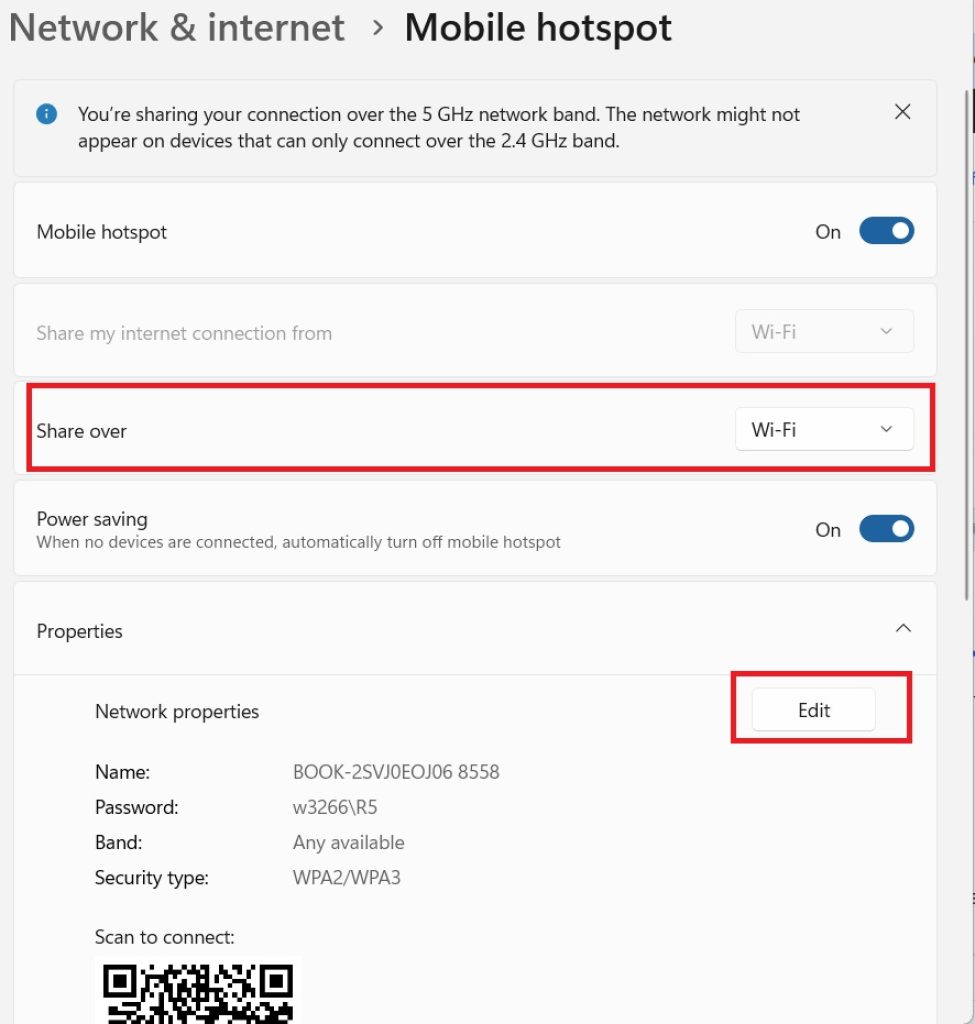
Note the network name (SSID) and password shown on the screen, or click Edit to customize them.
On the device you want to connect, search for available Wi-Fi networks and select the one matching your hotspot’s name, then enter the password.
This method is ideal for sharing an internet connection with multiple devices at once, since it essentially turns your Windows PC into a wireless router. The main limitation is that it depends on your PC’s Wi-Fi adapter supporting hotspot mode, which is standard on virtually all modern laptops but can occasionally be missing on older desktop Wi-Fi cards. Battery drain is also a consideration on laptops, since broadcasting a Wi-Fi signal continuously uses more power.
Method 2: Share Ethernet Internet Connection via Network Adapter Properties (ICS)
If you want to share an Ethernet connection with another device without broadcasting Wi-Fi — for example, connecting a second PC directly through a network cable — you can use the classic Internet Connection Sharing (ICS) feature through the Network Connections panel.
Steps to set up ICS:
- Press
Windows + R, typencpa.cpl, and press Enter to open Network Connections. - Right-click the network adapter that has internet access (for example, your Wi-Fi adapter) and select Properties.
- Go to the Sharing tab.
- Check the box labeled Allow other network users to connect through this computer’s internet connection.
- From the dropdown menu, select the adapter you want to share the connection with (typically your Ethernet adapter).
- Click OK to confirm.
- Connect the second device to your PC using an Ethernet cable. It should automatically receive an IP address and gain internet access.
This method is particularly useful for older desktops, smart TVs, or gaming consoles that only have an Ethernet port and no Wi-Fi capability. It essentially turns your Windows PC into a two-port router, using the shared connection as the WAN and the Ethernet port as the LAN. Keep in mind that ICS assigns IP addresses in the 192.168.137.x range by default, and it may briefly disconnect and reconnect your primary internet connection during setup.
Method 3: Share Wi-Fi Internet Over Ethernet Using a USB Adapter or Docking Station
Sometimes you need the reverse setup: your PC gets internet through Wi-Fi, but you need to feed that connection into an Ethernet-only device such as a network-attached storage (NAS) unit, a desktop without Wi-Fi, or an older smart device. If your Windows PC doesn’t have a built-in Ethernet port, you can use a USB-to-Ethernet adapter alongside ICS.
Steps for this setup:
- Plug in your USB-to-Ethernet adapter and connect the Ethernet cable to the target device.
- Open Network Connections (
ncpa.cpl) as described in Method 2. - Right-click your Wi-Fi adapter (the one connected to the internet) and open Properties.
- Under the Sharing tab, enable Allow other network users to connect through this computer’s internet connection.
- In the dropdown, choose the USB Ethernet adapter as the connection to share to.
- Click OK, then check the target device to confirm it has received internet access.
This approach is a lifesaver in situations like hotel rooms that only provide Wi-Fi through a captive portal login, but you need to get a device online that only accepts a wired connection. Since only the PC authenticates with the Wi-Fi network, the connected Ethernet device doesn’t need to deal with login pages or portal restrictions at all — it simply rides on the PC’s already-authenticated connection.
Method 4: Share Internet Using Command Prompt (netsh) for Advanced Control
For users who prefer command-line control, or who need to script the hotspot setup for repeated use, Windows offers the netsh command to create a virtual Wi-Fi hotspot. This method predates the modern Mobile Hotspot toggle and still works well on Windows 10 and Windows 11, especially when you want more granular control over the hosted network.
Steps using Command Prompt:
- Open Command Prompt as Administrator (search “cmd,” right-click, choose Run as administrator).
- Run the following command to set up the hosted network, replacing the values with your desired network name and password:
netsh wlan set hostednetwork mode=allow ssid=MyHotspot key=MyPassword123
- Start the hosted network with:
netsh wlan start hostednetwork
- Open Network Connections (
ncpa.cpl), right-click your main internet-connected adapter, go to Sharing, and enable sharing to the Microsoft Hosted Network Virtual Adapter. - Nearby devices can now find and connect to “MyHotspot” using the password you set.
- To stop the hotspot later, run:
netsh wlan stop hostednetwork
This method is favored by power users and IT professionals because it can be scripted into batch files for quick activation, integrated into automated setups, or used on systems where the graphical Mobile Hotspot toggle is missing or malfunctioning. It does require administrative privileges and a Wi-Fi adapter that supports “hosted network” mode, which almost all modern adapters do.
Conclusion
Sharing your internet connection in Windows doesn’t have to involve extra hardware or complicated configurations. Depending on your situation, you can use the simple Mobile Hotspot toggle for quick wireless sharing, rely on Internet Connection Sharing through the Network Connections panel for wired setups, add a USB Ethernet adapter to bridge Wi-Fi to a wired device, or use the netsh command for advanced, scriptable control. Each method serves a slightly different purpose, so the right choice comes down to your hardware and how many devices you need online at once.
Whichever method you choose, always double-check your firewall and antivirus settings afterward, since some security software can interfere with shared connections. And if you’re sharing internet in a public space like a coffee shop or airport, make sure to set a strong password on your hotspot to prevent unauthorized users from piggybacking on your connection.
Frequently Asked Questions
1. Does sharing my internet connection slow down my own internet speed?
Yes, to some extent. When you share your connection, the total bandwidth is divided among all connected devices. The impact depends on how many devices are connected and what they’re doing — a device streaming video or downloading large files will consume more bandwidth than one just browsing or checking email. For light use with one or two additional devices, most users won’t notice a significant slowdown.
2. Can I share a mobile hotspot connection from my phone through my Windows PC?
Yes. If your PC connects to your phone’s mobile hotspot over Wi-Fi or USB tethering, you can still use Internet Connection Sharing (Method 2) to pass that connection along to another device over Ethernet, or use the Mobile Hotspot feature to rebroadcast it wirelessly. This effectively lets one phone’s data plan supply internet to multiple devices through your PC.
3. Is it safe to share my internet connection with other devices?
Sharing your connection is generally safe as long as you set a strong password on your hotspot or shared network and only share it with trusted devices. Since your PC acts as the gateway, it’s a good idea to keep your firewall enabled and your antivirus software updated, since shared connections can expose your PC to devices you don’t fully control.
4. Why isn’t the Mobile Hotspot option showing up on my Windows PC?
This usually happens when your Wi-Fi adapter driver doesn’t support “hosted network” mode, or when the driver is outdated. Try updating your Wi-Fi adapter driver through Device Manager or the manufacturer’s website. If your PC has no Wi-Fi adapter at all (common on some desktops), you’ll need Method 2 or Method 3 instead, since those work through Ethernet and USB adapters rather than relying on a wireless radio.