
 Sukhdev Kamboj
Wires have a way of ruining a good movie night. You finally get comfortable on the couch, and then you remember the HDMI cable is still coiled up in a drawer three rooms away. Miracast solves that problem entirely. It turns your Windows 11 PC into a wireless transmitter that beams your screen straight to a TV, projector, or monitor — no cable required.
If you’ve never used it before, Miracast can feel like one of those “hidden” Windows features that nobody explains properly. This guide walks you through exactly what Miracast is, how to check if your PC supports it, and every method you can use to set it up and start casting in minutes.
What Is Miracast, Exactly?
Miracast is a wireless display standard that lets one device send its screen — video, audio, and everything else — directly to another screen over a peer-to-peer Wi-Fi connection called Wi-Fi Direct. Think of it as an invisible HDMI cable. There’s no router required, no app to sign into, and no internet connection needed once the two devices are paired.
Windows has supported Miracast natively since Windows 8.1, and Windows 11 builds on that with a more polished Cast experience, better discoverability, and tighter integration with Quick Settings. It works in two directions:
- Casting from your PC to a Miracast-capable TV, projector, or streaming adapter.
- Projecting to your PC, where another device (like a phone, tablet, or laptop) sends its screen to your Windows 11 machine.
This makes Miracast genuinely useful for movie nights, wireless presentations in meeting rooms, mirroring a phone screen for testing an app, or turning a spare monitor into an ad-hoc second display.
Before You Start: Check Miracast Compatibility
Not every PC and not every display supports Miracast, so it’s worth confirming compatibility before you start troubleshooting a setup that was never going to work.
Check your PC’s Wi-Fi and graphics drivers
- Press Win + R, type
cmd, and press Enter to open Command Prompt. - Type
netsh wlan show driversand hit Enter. - Look for the line Wireless Display Supported. If it says Yes, your PC’s wireless adapter supports Miracast.
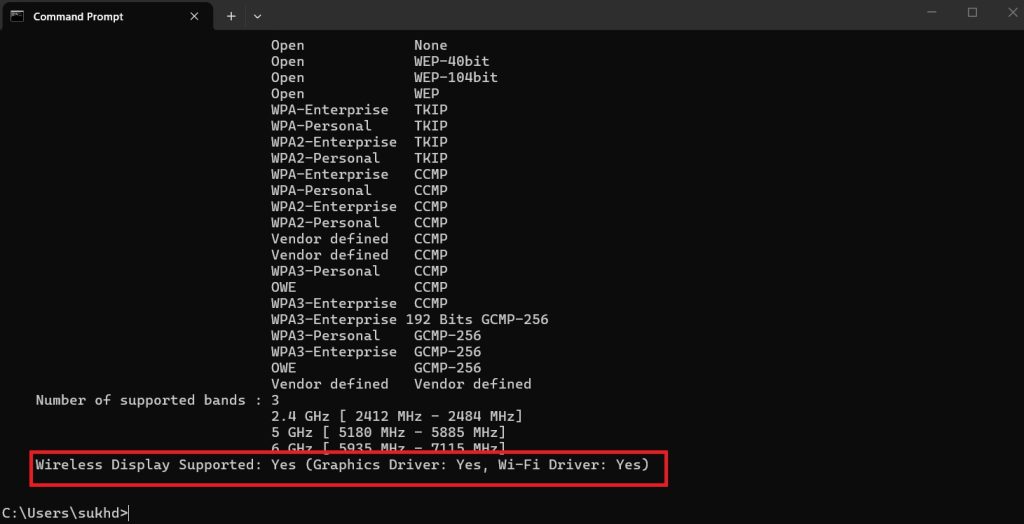
You can also run dxdiag (Win + R, then type dxdiag) to double-check your graphics driver is current, since outdated GPU drivers are one of the most common reasons Miracast connections fail or stutter.
Check your TV or display
Most Smart TVs made in the last several years support Miracast natively, though manufacturers often rebrand it as “Screen Mirroring,” “Cast,” or “Wireless Display” in their settings menus. If your TV or projector doesn’t support it out of the box, a small Miracast HDMI dongle (sometimes called a wireless display adapter) plugs into any HDMI port and adds the capability for a relatively low cost.
Method 1: Cast From Your PC Using the Windows + K Shortcut
This is the fastest way to project your Windows 11 screen to a wireless display, and it’s the method most people end up using day to day.
- Turn on your TV, projector, or Miracast adapter and make sure it’s on the correct HDMI input if you’re using a dongle.
- On your PC, press Windows key + K. This instantly opens the Cast panel and starts scanning for nearby wireless displays.
- From the list of detected devices, select the display you want to connect to.
- Your TV or projector may show a confirmation prompt asking whether to accept the connection — accept it there if asked.
- Windows will finish pairing, and your screen should appear on the external display within a few seconds.
Once connected, a small Cast icon appears near the system tray, which you can click at any time to check connection status or disconnect.
Method 2: Cast Using Quick Settings (Action Center)
If you prefer clicking through the interface rather than using a keyboard shortcut, Quick Settings gets you to the same place.
- Click the network, sound, or battery icons in the taskbar (or press Win + A) to open Quick Settings.
- Select Cast (sometimes labeled as a small monitor icon).
- Windows searches for nearby Miracast-compatible devices and lists them.
- Tap the display you want to connect to and confirm on the receiving device if prompted.
This method is handy because it’s discoverable — if you forget the keyboard shortcut, the Cast button in Quick Settings is always right there.
Method 3: Set Up “Projecting to This PC” (Receiving a Cast)
Sometimes you want the reverse setup: casting a phone, tablet, or another laptop to your Windows 11 PC. For that, your PC needs to be configured to accept incoming projections.
- Go to Start > Settings > System > Projecting to this PC.
- If you see a prompt about the Wireless Display optional feature, select Optional features, then Add a feature, search for “wireless display,” and install it.
- Once installed, configure the projection options on this page — you can choose who’s allowed to project (everyone nearby, or only devices with a PIN), and whether your PC always requires confirmation before accepting a connection.
- On the sending device (an Android phone, for example), open its screen mirroring or Smart View feature, look for your PC’s name in the list of nearby devices, and select it.
- Approve the connection request that appears on your Windows 11 PC.
This is especially useful in offices or classrooms where multiple people need to project from their own devices onto a shared screen without swapping cables.
Method 4: Set Display Mode With Windows + P
Once a Miracast connection is active — in either direction — you’ll usually want to control exactly how the screen behaves. That’s where the classic Win + P shortcut comes in.
- With your devices connected, press Windows key + P.
- Choose from the four projection modes:
- PC screen only — the external display stays blank.
- Duplicate — mirrors your PC screen exactly onto the external display.
- Extend — treats the external display as additional desktop space, great for presentations with speaker notes.
- Second screen only — sends everything to the external display and turns off your PC’s own screen.
- Select the mode that fits what you’re doing, and Windows applies it instantly.
If the picture looks stretched or the wrong resolution, right-click the desktop, choose Display settings, and adjust resolution or orientation for the connected display from there.
Troubleshooting Common Miracast Problems
Even with everything set up correctly, wireless casting can be finicky. A few quick fixes solve most issues:
- Device not showing up in the Cast list — make sure both devices are on and that Wi-Fi is turned on (Miracast uses Wi-Fi Direct, but your PC’s Wi-Fi radio still needs to be active). Move the devices closer together, since walls and distance weaken the peer-to-peer signal.
- Connection drops randomly — update your Wi-Fi adapter and graphics drivers through Device Manager or the manufacturer’s website. Outdated drivers are the single most common cause of dropped Miracast sessions.
- “Your PC doesn’t support Miracast” message — this usually means your wireless adapter doesn’t support Wi-Fi Direct. A USB Miracast adapter can sometimes work around this limitation.
- Audio plays but video lags — try switching from “Extend” to “Duplicate” mode, or lower your PC’s display resolution, since Miracast performance depends heavily on available Wi-Fi bandwidth.
- Won’t connect to a specific TV brand — some Smart TVs bury their screen mirroring toggle inside a “Source” or “Apps” menu rather than the main settings, so check the TV’s own input list if Windows can’t find it.
Conclusion
Miracast turns any Windows 11 PC into a genuinely capable wireless display system, whether you’re mirroring a laptop for a boardroom presentation, streaming a movie to the living room TV, or turning your phone into a second screen. The setup takes only a few minutes once you know where to look: confirm your hardware supports it, use Win + K to cast out or Settings > System > Projecting to this PC to receive, and fine-tune the display mode with Win + P. Once it’s configured, casting becomes as effortless as plugging in a cable — minus the cable.
Frequently Asked Questions
1. Does every Windows 11 PC support Miracast? Not automatically. Miracast requires a wireless adapter and graphics driver that support Wi-Fi Direct. You can confirm support by running netsh wlan show drivers in Command Prompt and checking the “Wireless Display Supported” line. If your PC doesn’t support it natively, a USB Miracast adapter can add the functionality.
2. Do I need Wi-Fi or internet access to use Miracast? You need your PC’s Wi-Fi radio turned on, but you don’t need an active internet connection or a router. Miracast connects devices directly to each other over Wi-Fi Direct, which is a peer-to-peer connection separate from your home network.
3. Why does my Miracast connection keep disconnecting or lagging? This is usually caused by outdated Wi-Fi or graphics drivers, physical distance between devices, or interference from other wireless signals. Updating drivers, moving devices closer together, and switching to “Duplicate” mode instead of “Extend” often resolves lag and drops.
4. Can I use Miracast to cast from an iPhone to Windows 11? No — Apple devices don’t support Miracast; they use AirPlay instead, which isn’t natively compatible with Windows 11’s built-in Cast feature. Android phones and tablets, along with most Windows laptops, support Miracast directly, so casting works smoothly between those devices.





