Sukhdev Kamboj
Windows 11 includes several built-in power plans designed to balance performance and energy consumption. While most users rely on the default Balanced power plan, Windows also offers a hidden Ultimate Performance power plan that prioritizes maximum system performance by reducing power-saving features and minimizing hardware latency. Originally introduced for Windows Workstations, this power plan is now available on many Windows 11 systems and can also be enabled manually on devices where it isn’t visible by default.
The Ultimate Performance power plan is especially useful for power users, gamers, video editors, software developers, engineers, and anyone running demanding applications that require the highest possible system responsiveness. It allows the processor, storage devices, and other hardware components to remain in a high-performance state, helping reduce delays caused by aggressive power management.

Although this power plan can improve responsiveness in certain workloads, it also increases power consumption and may reduce battery life on laptops. For desktop computers connected to continuous power, these drawbacks are generally less noticeable.
In this guide, you’ll learn several ways to enable the Ultimate Performance power plan in Windows 11, switch to it, customize its settings, and restore it if it is missing from your computer.
What Is the Ultimate Performance Power Plan?
Ultimate Performance is a Windows power plan designed to maximize system performance by minimizing the small delays introduced by power-saving technologies. Instead of allowing hardware components to enter lower-power states whenever possible, it keeps them operating at higher performance levels.
Compared to the Balanced and Power Saver plans, Ultimate Performance focuses entirely on speed and responsiveness. It reduces latency by preventing unnecessary power throttling for supported hardware components, which can benefit workloads that require consistent high performance.
This power plan is most beneficial for:
- Gaming PCs
- High-end desktop workstations
- Video editing
- 3D rendering
- Software development
- Virtual machines
- Engineering applications
- Scientific computing
For everyday activities such as web browsing, watching videos, or working with office documents, the performance difference is usually minimal.
Method 1: Enable Ultimate Performance Using Command Prompt
The easiest and most reliable way to enable the Ultimate Performance power plan is by using the powercfg command.
Step 1
Press Windows + S.
Step 2
Type:
Command PromptStep 3
Select Run as administrator.
Step 4
Type the following command:
powercfg -duplicatescheme e9a42b02-d5df-448d-aa00-03f14749eb61Press Enter.
Step 5
If the command runs successfully, Windows creates a new Ultimate Performance power plan.
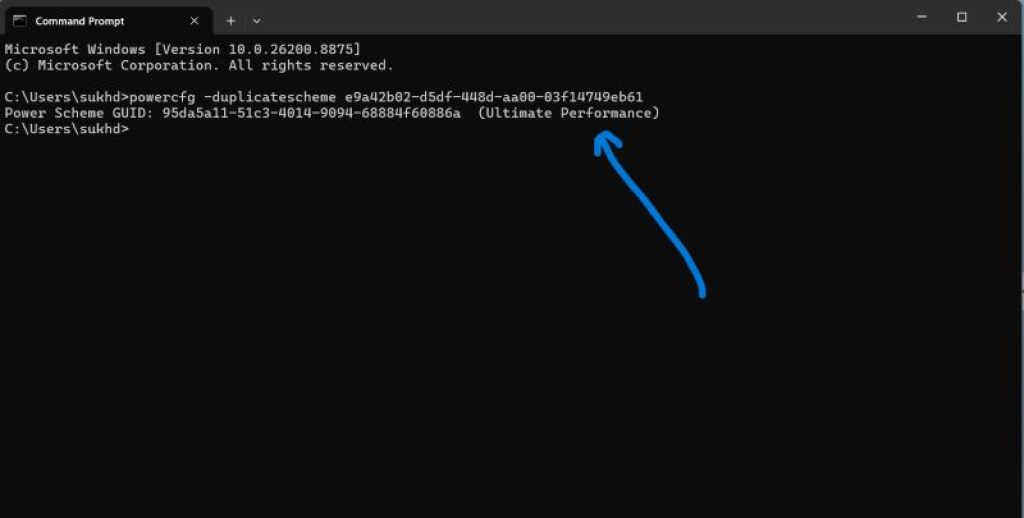
You should see a message similar to:
Power Scheme GUID: xxxxxxxx-xxxx-xxxx-xxxx-xxxxxxxxxxxxThis confirms that the Ultimate Performance plan has been added to your computer.
The command works by duplicating Microsoft’s built-in Ultimate Performance template using its predefined GUID.
If the plan already exists, Windows may simply indicate that the power scheme is available.
This method works on most editions of Windows 11, including Home, Pro, Enterprise, and Pro for Workstations.
Method 2: Enable Ultimate Performance Using Windows Terminal
Windows Terminal provides another convenient way to run the same command.
Step 1
Right-click the Start button.
Step 2
Choose:
Terminal (Admin)Approve the User Account Control prompt if it appears.
Step 3
Run:
powercfg -duplicatescheme e9a42b02-d5df-448d-aa00-03f14749eb61Step 4
Wait for Windows to complete the command.
The Ultimate Performance plan is now added to the available power plans.
Windows Terminal supports both Command Prompt and PowerShell, so the same command works regardless of the default shell.
Many advanced users prefer Terminal because it combines multiple command-line environments into a single application.
Method 3: Show Ultimate Performance in Control Panel
After creating the power plan, you’ll need to select it.
Step 1
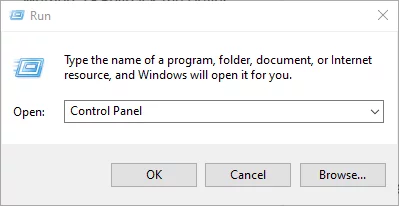
Press Windows + R.
Step 2
Type:
control or control panelClick OK.
Step 3
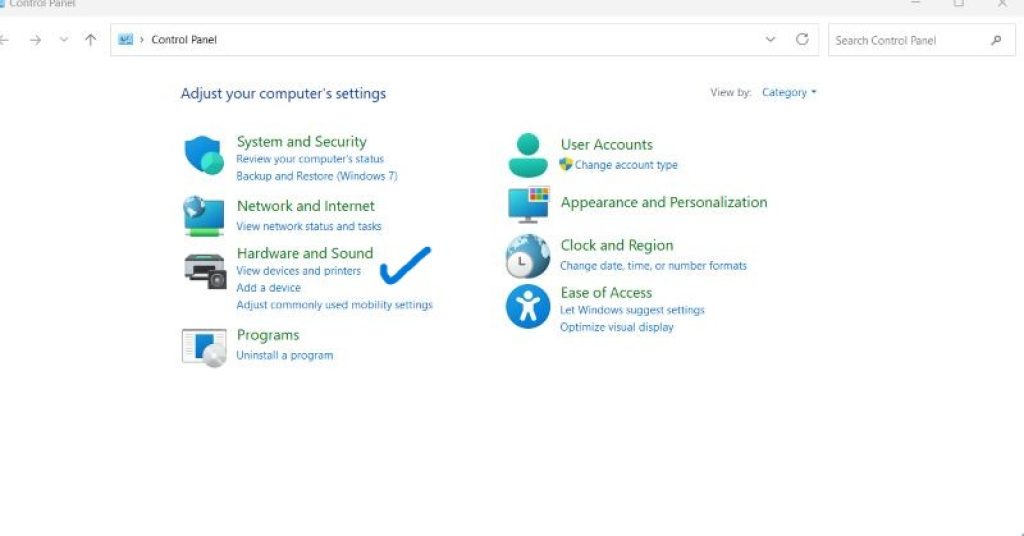
Open:
Hardware and Sound
Step 4
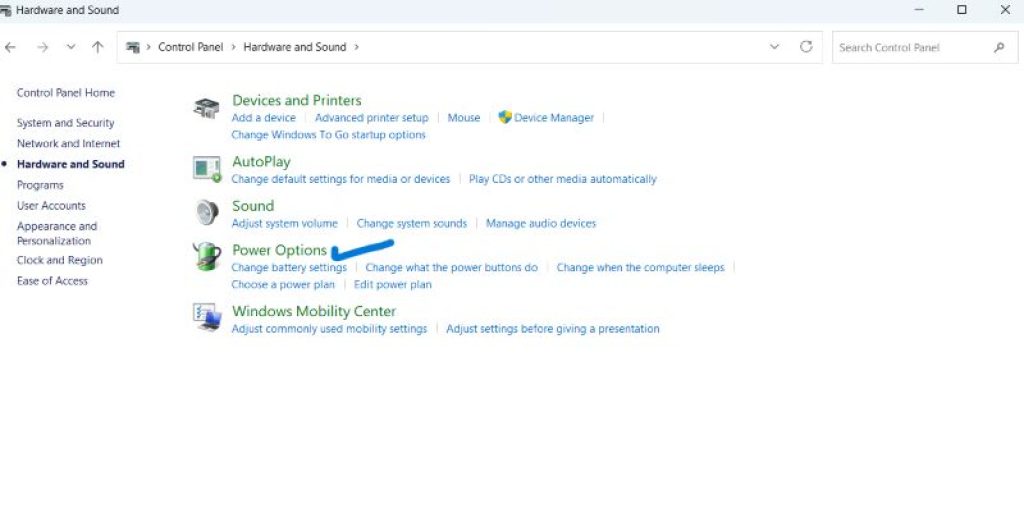
Click:
Power Options
Step 5
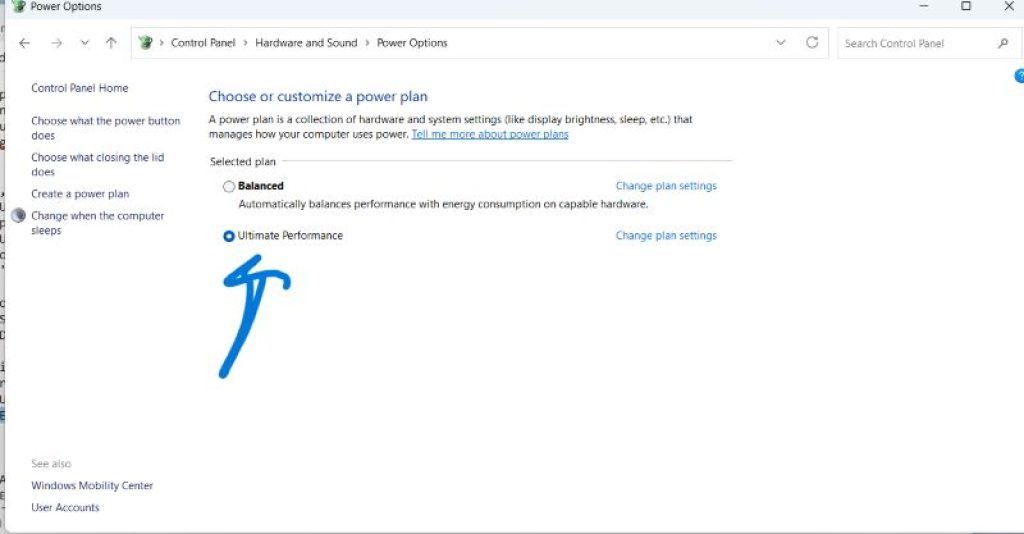
If the plan isn’t immediately visible, click:
Show additional plansYou should now see:
- Balanced
- Power Saver (if available)
- High Performance (if available)
- Ultimate Performance
Click Ultimate Performance to activate it.
Once selected, Windows immediately begins using the new power configuration.
No restart is required.
Method 4: Switch to the Ultimate Performance Power Plan
If Ultimate Performance already exists on your computer, you only need to make it the active power plan.
Step 1
Open Control Panel.
Step 2
Navigate to:
Hardware and Sound > Power Options
Step 3
Locate:
Ultimate PerformanceStep 4
Select the radio button next to it.
Windows switches to the Ultimate Performance power plan immediately.
To confirm the change, reopen Power Options and verify that the radio button remains selected.
You can also confirm the active plan using Command Prompt.
Run:
powercfg /getactiveschemeThe output should list Ultimate Performance as the active power scheme.
Once activated, Windows prioritizes performance over power efficiency. The processor is less likely to reduce its operating frequency during idle periods, storage devices remain more responsive, and certain hardware components stay in higher-performance states for faster access.
While these optimizations may improve responsiveness during demanding tasks, they also increase energy consumption. Desktop users typically experience the greatest benefits because their systems remain connected to AC power, whereas laptop users may notice reduced battery life when using this power plan.
Method 5: Enable Ultimate Performance on Laptops
The Ultimate Performance power plan is primarily intended for desktop computers and workstations. On many Windows 11 laptops, especially those running on battery power, this power plan may be hidden by default to help preserve battery life. However, if your laptop supports it, you can usually enable it using the same powercfg command.
Step 1
Connect your laptop to its AC power adapter.
Using the Ultimate Performance plan while plugged in provides the best balance between performance and power usage.
Step 2
Open Command Prompt or Windows Terminal as an administrator.
Step 3
Run:
powercfg -duplicatescheme e9a42b02-d5df-448d-aa00-03f14749eb61Step 4
Open:
Control Panel > Hardware and Sound > Power Options
If available, select Ultimate Performance.
Some laptop manufacturers customize Windows power management and may replace or hide certain Microsoft power plans. In these cases, the Ultimate Performance plan may not appear even after running the command.
Additionally, Windows may automatically switch to a more energy-efficient mode when the laptop is running on battery. This behavior helps extend battery life and prevent excessive heat generation.
For everyday portable use, the Balanced power plan is usually the better choice. Consider using Ultimate Performance only when your laptop is connected to a charger and performing demanding tasks such as video editing, compiling software, rendering 3D models, or gaming.
Method 6: Enable Ultimate Performance Using PowerShell
PowerShell provides another convenient way to create the Ultimate Performance power plan.
Step 1
Press Windows + X.
Step 2
Select:
Terminal (Admin)or
Windows PowerShell (Admin)Step 3
Run the following command:
powercfg -duplicatescheme e9a42b02-d5df-448d-aa00-03f14749eb61Step 4
Wait for the command to finish.
Windows creates the Ultimate Performance power plan if it doesn’t already exist.
Step 5
To activate it immediately, first list all available power plans:
powercfg /listLocate the GUID associated with Ultimate Performance.
Then run:
powercfg /setactive GUIDReplace GUID with the actual identifier shown in your results.
PowerShell is especially useful for system administrators and advanced users who manage multiple computers or automate Windows configuration tasks.
Method 7: Verify That Ultimate Performance Is Active
After enabling the power plan, it’s a good idea to confirm that Windows is actually using it.
Step 1
Open Command Prompt or Windows Terminal.
Step 2
Run:
powercfg /getactiveschemeStep 3
Windows displays the currently active power plan.
For example:
Power Scheme GUID: xxxxxxxx-xxxx-xxxx-xxxx-xxxxxxxxxxxx (Ultimate Performance)If another plan such as Balanced or High Performance is shown instead, you’ll need to return to Power Options and select Ultimate Performance manually.
You can also verify the active power plan by opening:
Control Panel > Hardware and Sound > Power Options
The selected radio button indicates the currently active plan.
Verifying the active plan ensures that Windows is applying the intended power settings.
Method 8: Customize the Ultimate Performance Power Plan
Although the Ultimate Performance plan is already optimized for maximum performance, Windows allows you to customize many of its settings.
Step 1
Open:
Control Panel > Hardware and Sound > Power Options
Step 2
Next to Ultimate Performance, click:
Change plan settingsStep 3
Select:
Change advanced power settingsThe Power Options dialog appears.
Step 4
Here you can configure settings such as:
- Hard disk
- Sleep
- USB settings
- PCI Express
- Processor power management
- Display
- Multimedia settings
- Wireless Adapter Settings
For desktop users seeking maximum performance, you may choose to:
- Prevent the computer from sleeping automatically.
- Disable USB selective suspend if required by specific peripherals.
- Keep the processor’s minimum performance state at a higher value.
- Prevent hard disks from powering down after short periods of inactivity.
Be cautious when changing advanced settings, as incorrect configurations can increase power consumption or affect system stability. If you’re unsure about a particular option, leaving the default Ultimate Performance settings is generally the best approach.
Method 9: Restore Missing Power Plans
Sometimes the default Windows power plans become corrupted or disappear due to system changes, third-party utilities, or incorrect configurations.
Fortunately, Windows can restore the default power plans.
Step 1
Open Command Prompt as Administrator.
Step 2
Run:
powercfg -restoredefaultschemesStep 3
Press Enter.
Windows restores the default power plans, including:
- Balanced
- Power Saver
- High Performance (where available)
Because this command removes custom power plans, you’ll need to recreate the Ultimate Performance plan afterward.
Run:
powercfg -duplicatescheme e9a42b02-d5df-448d-aa00-03f14749eb61Once recreated, return to Power Options and activate it.
This method is particularly helpful if the Ultimate Performance plan has disappeared after a major Windows update or system repair.
Method 10: Remove the Ultimate Performance Power Plan (Optional)
If you decide you no longer need the Ultimate Performance plan, you can remove it from Windows.
Step 1
Open Command Prompt as Administrator.
Step 2
List all available power plans:
powercfg /listStep 3
Copy the GUID associated with Ultimate Performance.
Step 4
Run:
powercfg /delete GUIDReplace GUID with the actual identifier of the Ultimate Performance plan.
Windows removes the custom power plan immediately.
Before deleting it, make sure another power plan such as Balanced is active. Windows won’t allow you to delete the currently active plan.
If you ever want Ultimate Performance again, simply recreate it using the duplicate scheme command shown earlier in this guide.
Best Practices for Using Ultimate Performance
While the Ultimate Performance power plan can improve responsiveness during demanding workloads, it’s not necessary for every situation. Following a few best practices can help you get the most benefit while avoiding unnecessary power consumption.
Use the Ultimate Performance plan primarily for resource-intensive tasks such as gaming, 4K video editing, software development, 3D rendering, virtualization, or running engineering and scientific applications. During everyday activities like browsing the web, streaming videos, or working with office documents, the Balanced power plan typically provides similar responsiveness while consuming less power.
Desktop computers connected to continuous AC power benefit the most from Ultimate Performance because increased energy usage is generally not a concern. Laptop users, on the other hand, should switch back to Balanced mode when running on battery to maximize battery life and reduce heat generation.
It’s also a good idea to keep Windows 11, chipset drivers, graphics drivers, and BIOS or UEFI firmware updated. Modern hardware and drivers often include performance improvements that work alongside the Ultimate Performance power plan to deliver the best overall experience.
Conclusion
The Ultimate Performance power plan is one of the most powerful built-in features available in Windows 11 for users who want to maximize their computer’s performance. By reducing aggressive power-saving mechanisms and keeping hardware components operating at higher performance levels, it can improve system responsiveness during demanding workloads such as gaming, video editing, 3D rendering, software development, virtualization, and other resource-intensive tasks.
Although the Ultimate Performance plan is hidden on many Windows 11 systems, enabling it is straightforward using the powercfg command. Once created, you can activate it through the Power Options window, verify that it is the active power plan, and even customize its advanced settings to better suit your workflow. If the power plan disappears or becomes unavailable, Windows also provides commands to restore the default power plans and recreate the Ultimate Performance profile.
However, it’s important to understand that Ultimate Performance is not always the best choice for every user. For everyday activities such as browsing the internet, streaming media, checking email, or working with office applications, the default Balanced power plan typically delivers excellent responsiveness while consuming less electricity. Laptop users should also be aware that Ultimate Performance can significantly reduce battery life because it prioritizes speed over energy efficiency.
By choosing the appropriate power plan for your workload and switching to Ultimate Performance only when maximum performance is needed, you can enjoy faster system responsiveness while maintaining a good balance between performance, power consumption, and hardware longevity.
Frequently Asked Questions
Does Ultimate Performance make Windows 11 faster?
Yes, but primarily during demanding workloads. The Ultimate Performance power plan reduces power-saving delays and keeps hardware operating at higher performance levels. For everyday tasks such as web browsing or document editing, the difference compared to the Balanced plan is usually minimal.
Is Ultimate Performance available in Windows 11 Home?
Yes. Although it may not appear by default, Windows 11 Home users can usually enable it by running the following command in an elevated Command Prompt or Windows Terminal:
powercfg -duplicatescheme e9a42b02-d5df-448d-aa00-03f14749eb61Does Ultimate Performance reduce battery life?
Yes. Because it minimizes power-saving features and keeps hardware running at higher performance states, it consumes more power than the Balanced plan. Laptop users should consider using it only when connected to AC power.
Can I switch back to the Balanced power plan?
Yes. Open Control Panel > Hardware and Sound > Power Options, then select Balanced. You can switch between power plans at any time without restarting your computer.