Sukhdev Kamboj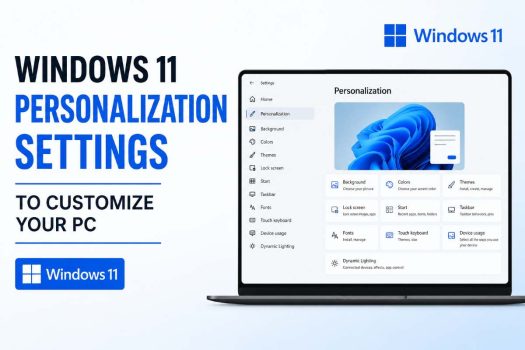
Windows 11 offers a wide range of personalization options that let you customize the appearance and behavior of your computer to match your preferences. Whether you want to change the desktop wallpaper, apply a new theme, adjust colors, personalize the Start menu, or customize the taskbar, Windows 11 provides built-in tools to make your PC look and feel unique. These settings not only improve the visual appearance of your system but can also enhance productivity by organizing frequently used apps and creating a workspace that suits your daily tasks.
Unlike previous versions of Windows, Windows 11 introduces a cleaner interface with redesigned personalization options that are easier to access and manage. Most customization features are available in the Personalization section of the Settings app, allowing you to preview changes instantly without installing additional software. You can switch between light and dark modes, customize accent colors, use slideshow wallpapers, configure lock screen backgrounds, and even personalize the touch keyboard if you use a touchscreen device.

In this guide, you’ll learn how to use Windows 11 personalization settings to customize your PC using the built-in options available in the operating system.
What Are Personalization Settings in Windows 11?
Personalization settings allow you to customize the visual appearance and certain interface elements of Windows 11. These options help you create a desktop environment that reflects your style while improving usability and accessibility.
The Personalization section includes settings for:
- Background
- Colors
- Themes
- Lock screen
- Start
- Taskbar
- Fonts
- Touch keyboard
- Device usage
- Dynamic lighting (supported devices)
Most customization changes take effect immediately, making it easy to experiment with different designs until you find the look that suits you best.
Method 1: Change the Desktop Background
One of the simplest ways to personalize Windows 11 is by changing the desktop wallpaper.
Step 1
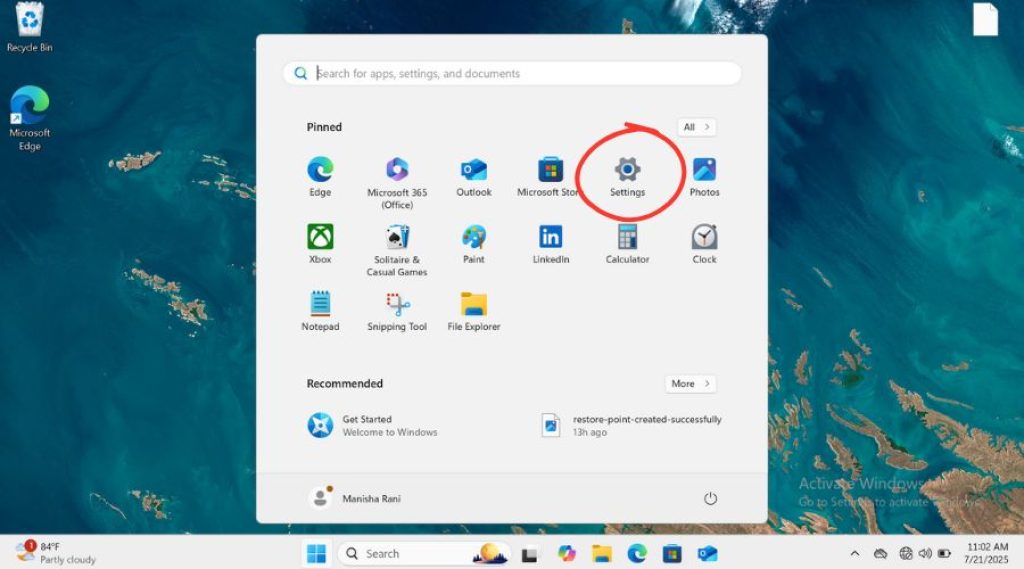
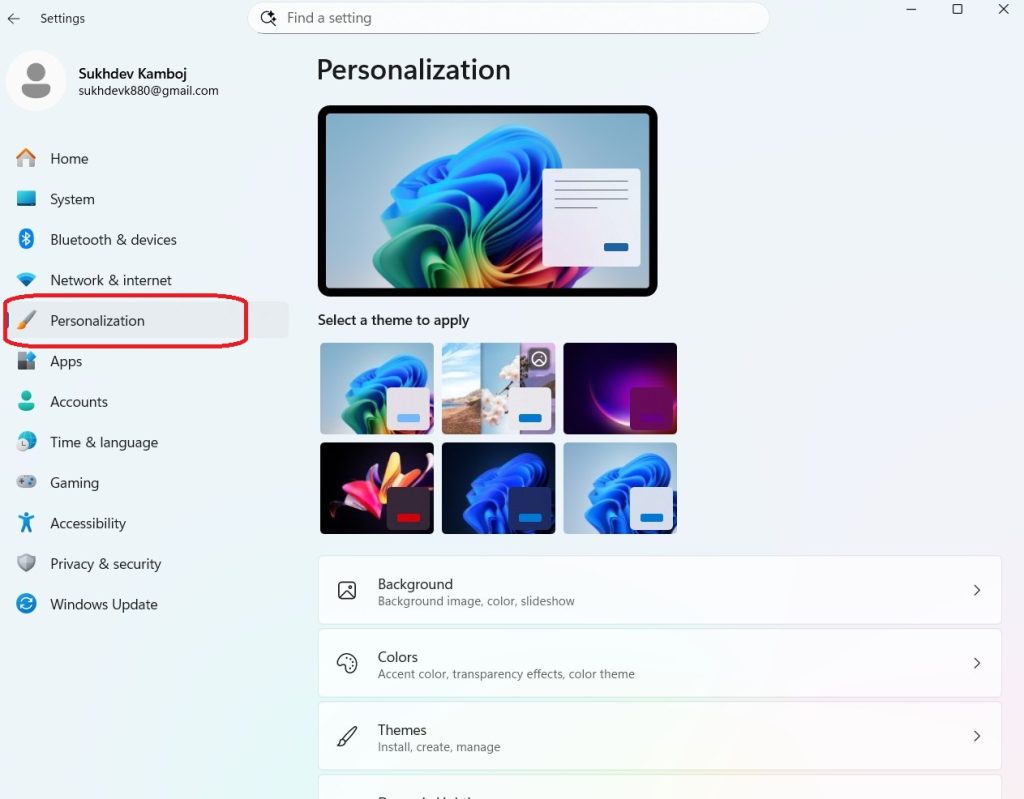
Press Windows + I to open Settings.
Step 2
Select:
Personalization
Step 3
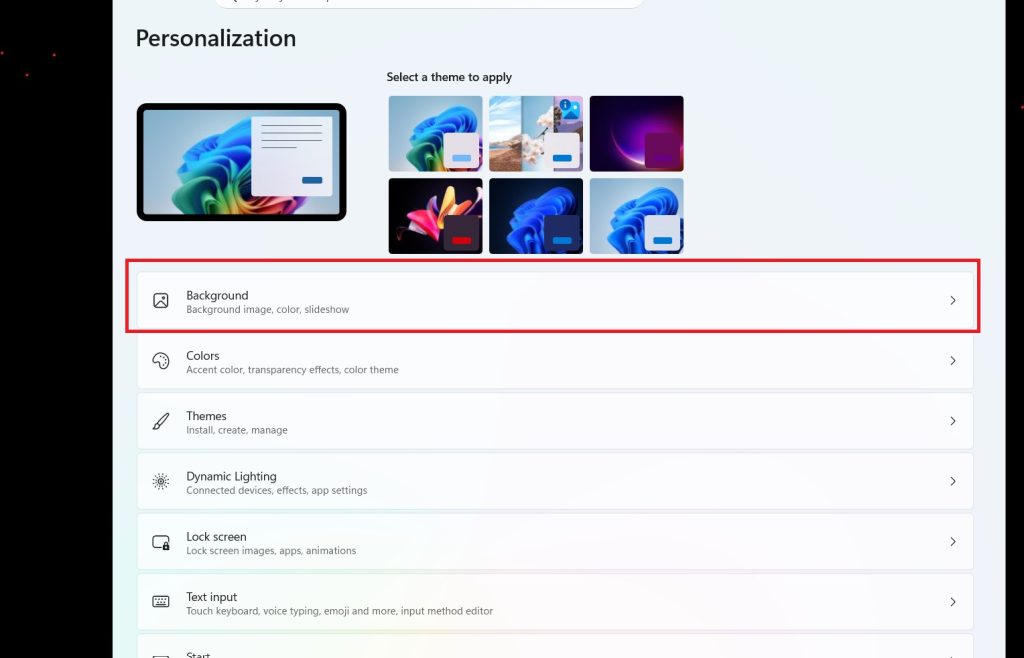
Click:
Background
Step 4
Choose one of the available background types:
- Picture
- Solid color
- Slideshow
- Windows Spotlight
Step 5
If you select Picture, click Browse photos.
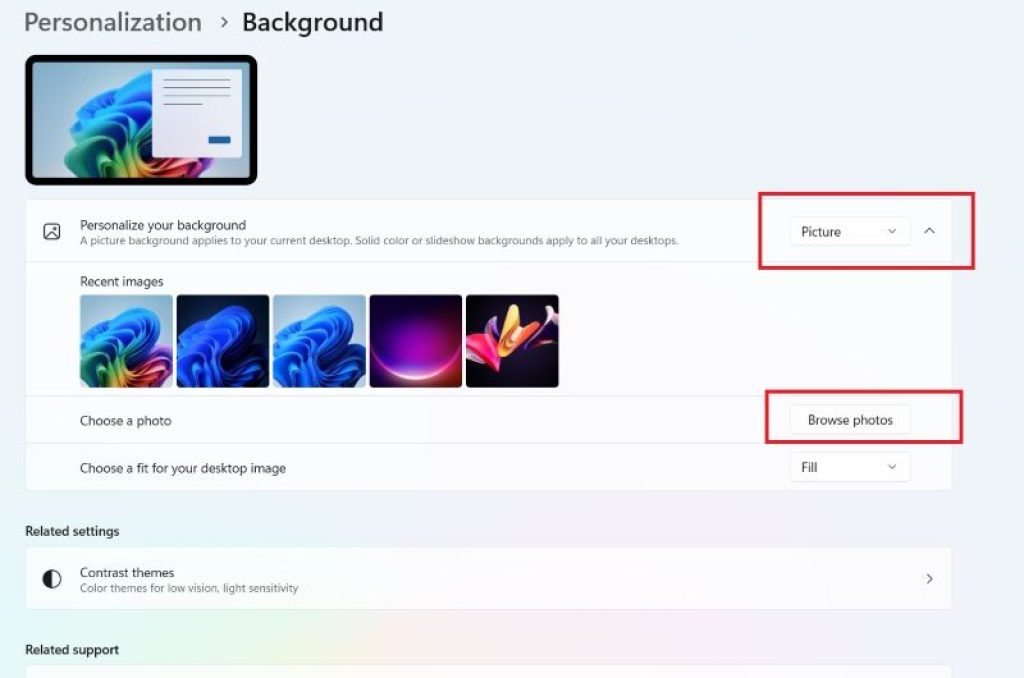
Choose your preferred image.
Windows immediately applies the new wallpaper.
You can also select how the image fits your screen:
- Fill
- Fit
- Stretch
- Tile
- Center
- Span
Choosing the correct fit option helps prevent images from appearing distorted, especially on large or ultrawide monitors.
If you enjoy changing wallpapers automatically, choose Slideshow and select a folder containing your favorite images. Windows will rotate through the pictures at intervals you specify.
Windows Spotlight is another popular option that automatically downloads beautiful images from Microsoft and displays a different background regularly.
Method 2: Customize Colors
Windows 11 lets you personalize colors throughout the operating system.
Step 1
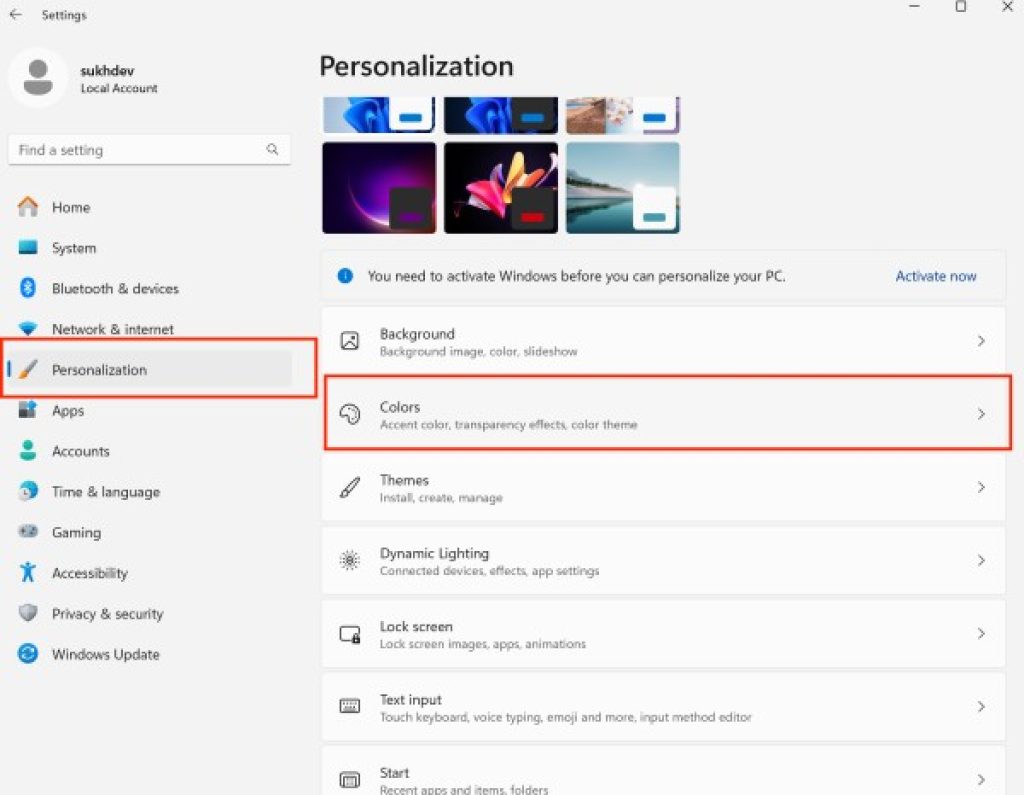
Open:
Settings > Personalization > Colors
Step 2
Choose your preferred mode.
Available options include:
- Light
- Dark
- Custom
The Light theme provides a bright interface suitable for well-lit environments.
The Dark theme reduces bright backgrounds and is often preferred for working at night or in low-light conditions.
The Custom option allows you to use different color modes for Windows and applications.
Step 3
Choose an Accent color.
You can:
- Let Windows choose automatically
- Select a predefined color
- Pick a custom color
Accent colors appear in various interface elements, including buttons, menus, and highlights.
Step 4
Optionally enable:
- Show accent color on Start and taskbar
- Show accent color on title bars and window borders
These options create a more personalized appearance throughout Windows.
Selecting colors that complement your wallpaper often results in a more polished desktop.
Method 3: Apply Themes
Themes combine several personalization settings into a single package, allowing you to change multiple visual elements at once.
Step 1
Open:
Settings > Personalization
Step 2
Click:
Themes
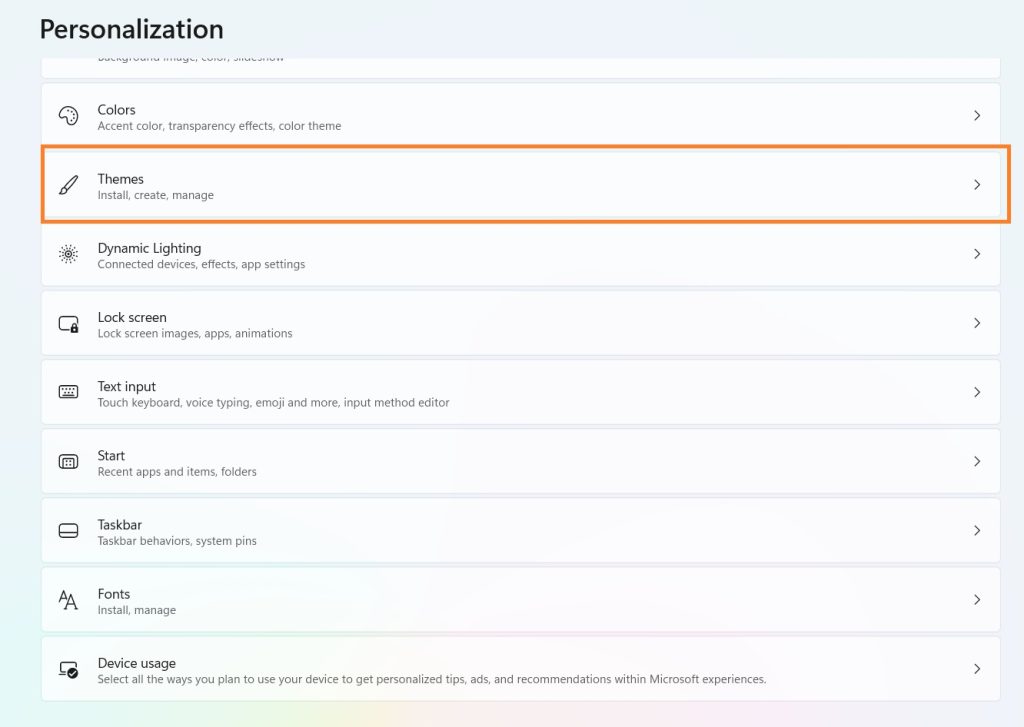
Step 3
Windows displays installed themes.
Each theme may include:
- Wallpaper
- Accent colors
- Mouse cursor
- System sounds
Step 4
Click any theme.
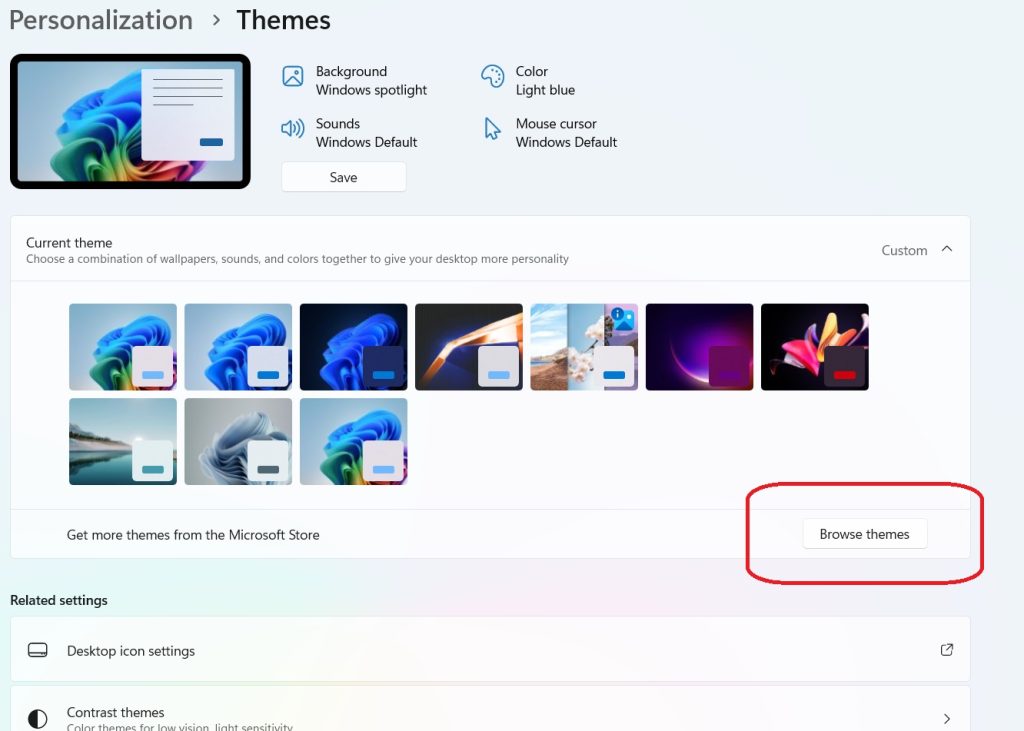
Windows immediately applies it.
Step 5
To customize an existing theme, change individual settings such as:
- Background
- Colors
- Sounds
- Mouse cursor
When you’re satisfied with your changes, select:
Save theme
Give your customized theme a name.
Saving personalized themes allows you to switch between different desktop styles whenever you want.
For example, you might create:
- Work Theme
- Gaming Theme
- Dark Theme
- Minimal Theme
Each can use different wallpapers and colors without requiring you to reconfigure everything manually.
Method 4: Personalize the Lock Screen
The Lock Screen is one of the first things you see after turning on your computer.
Windows 11 provides several ways to customize it.
Step 1
Open:
Settings > Personalization > Lock screen
Step 2
Choose a background type.
Available options include:
- Windows Spotlight
- Picture
- Slideshow
Windows Spotlight automatically updates the lock screen with new images.
Picture lets you select a single image.
Slideshow rotates through multiple photos.
Step 3
If you choose Picture, click:
Browse photos
Select your preferred image.
Step 4
Customize the Lock Screen status.
You can display information from supported apps, such as:
- Weather
- Calendar
- Other supported notifications
Step 5
Enable or disable:
Show the lock screen background picture on the sign-in screenEnabling this option provides a consistent appearance between the Lock Screen and the sign-in screen.
A personalized Lock Screen not only improves the visual appeal of your PC but also provides quick access to useful information before you sign in.
Whether you prefer a favorite photograph, scenic landscape, or automatically changing images from Windows Spotlight, the Lock Screen can be customized to match your preferences.
Method 5: Customize the Start Menu
The redesigned Start menu is one of the most noticeable changes in Windows 11. It allows you to pin your favorite apps, organize shortcuts, and control what appears in the Recommended section.
Step 1
Open:
Settings > Personalization > Start
Step 2
You’ll find several customization options, including:
- Show recently added apps
- Show most used apps
- Show recently opened items in Start, Jump Lists, and File Explorer
Turn these options on or off according to your preference.
Step 3
To pin an application, open the Start menu.
Locate the app, right-click it, and choose:
Pin to StartThe application now appears in the Pinned section.
Step 4
To remove an app, right-click its icon and select:
Unpin from StartStep 5
To rearrange apps, simply drag and drop pinned icons into your preferred order.
Organizing similar applications together can make the Start menu easier to navigate. For example, you might keep productivity apps on one page and entertainment or gaming apps on another.
A well-organized Start menu reduces the time spent searching for frequently used programs.
Method 6: Personalize the Taskbar
The taskbar gives you quick access to applications, system controls, and notifications. Windows 11 includes several customization options that let you tailor it to your workflow.
Step 1
Open:
Settings > Personalization > Taskbar
Step 2
Expand Taskbar items.
You can show or hide icons such as:
- Search
- Task View
- Widgets
- Copilot (if available)
- Chat (on supported versions)
Disable any icons you don’t use to create a cleaner taskbar.
Step 3
Expand Taskbar corner icons.
Enable or disable icons depending on the connected hardware and installed applications.
Step 4
Expand Taskbar behaviors.
Here you can customize options including:
- Automatically hide the taskbar
- Show badges on taskbar apps
- Show flashing on taskbar apps
- Select multiple displays behavior
- Show desktop by clicking the far corner of the taskbar
Automatically hiding the taskbar provides additional screen space, especially on smaller displays.
Step 5
Pin frequently used applications.
Open the Start menu, right-click an application, then choose:
Pin to taskbarPinned applications remain accessible even after closing them, allowing you to launch your favorite programs with a single click.
Method 7: Change Fonts
Windows 11 includes numerous fonts and lets you install additional ones to personalize documents, graphics, and supported applications.
Step 1
Open:
Settings > Personalization > Fonts
Step 2
Browse the installed font collection.
Click any font to preview:
- Characters
- Styles
- Variants
- Supported languages
Step 3
To install a new font, download a compatible font file such as:
- .TTF
- .OTF
Drag the font file into the Add fonts section.
Alternatively, right-click the font file and select:
InstallStep 4
After installation, supported applications such as Microsoft Word, PowerPoint, Photoshop, and many design programs can use the new font.
Installing fonts from trusted sources helps avoid compatibility or security issues.
Although Windows doesn’t allow changing the default system font through Settings, installing additional fonts gives you more options for creative and professional projects.
Method 8: Personalize the Touch Keyboard
If your Windows 11 device includes a touchscreen, you can customize the appearance of the on-screen keyboard.
Step 1
Open:
Settings > Personalization > Touch keyboard
Step 2
Browse the available keyboard themes.
Windows provides several built-in designs featuring different colors and styles.
Step 3
Click a theme to apply it.
The touch keyboard updates immediately.
Step 4
To create your own design, choose:
Custom themeHere you can modify elements such as:
- Key colors
- Background image
- Key transparency
- Text colors
- Window appearance
Step 5
Open the touch keyboard to preview your changes.
Custom keyboard themes help personalize tablets and touchscreen laptops while making typing more enjoyable.
Method 9: Configure Device Usage
Windows 11 includes Device Usage settings that allow Windows to personalize recommendations based on how you use your computer.
Step 1
Open:
Settings > Personalization > Device usage
Step 2
Enable the categories that best describe how you use your PC.
Available options may include:
- Gaming
- Creativity
- Entertainment
- Family
- School
- Business
Step 3
Windows uses these selections to provide:
- Personalized recommendations
- Suggested applications
- Relevant Microsoft services
- Feature suggestions
These settings don’t change the appearance of Windows directly, but they can influence the recommendations and tips you receive over time.
If you prefer a less personalized experience, you can simply leave these options disabled.
Method 10: Enable Dynamic Lighting (Supported Devices)
Windows 11 includes built-in Dynamic Lighting controls for supported RGB devices, eliminating the need for separate lighting software in many cases.
Step 1
Open:
Settings > Personalization
Step 2
Select:
Dynamic Lighting
If the option doesn’t appear, your computer or connected accessories may not support the feature.
Step 3
Enable:
Use Dynamic Lighting on my devicesStep 4
Choose your preferred lighting options.
Depending on the hardware, you may be able to customize:
- Brightness
- Lighting effects
- Color
- Speed
- Direction
- Synchronization across devices
Step 5
Preview the selected lighting effect.
Compatible keyboards, mice, headsets, and other RGB accessories update automatically.
Using the built-in Dynamic Lighting controls can reduce the need for multiple manufacturer utilities while providing a consistent lighting experience across supported devices.
Additional Tips for Personalizing Windows 11
Beyond the built-in personalization settings, a few simple habits can help you create a cleaner, more enjoyable desktop environment.
Keep your desktop organized by removing unnecessary shortcuts and grouping frequently used files into folders. A clutter-free desktop not only looks better but also makes it easier to locate important items.
Choose wallpapers and accent colors that complement each other for a consistent visual theme. If you use your computer throughout the day, consider enabling Dark mode during evening hours to reduce glare in low-light environments.
You can also pin your most-used apps to both the Start menu and taskbar, reducing the number of clicks required to launch them. If you regularly switch between work and personal activities, creating multiple custom themes allows you to change the appearance of Windows with just a few clicks.
Finally, revisit the Personalization settings after major Windows updates. Microsoft occasionally introduces new customization features, themes, and options that can further enhance your Windows 11 experience.
Conclusion
Windows 11 offers a wide range of personalization features that make it easy to create a desktop environment that reflects your style while improving your overall computing experience. From changing the desktop background and applying custom themes to personalizing the Start menu, taskbar, colors, and lock screen, nearly every aspect of the Windows interface can be tailored to suit your preferences. These built-in customization options allow you to create a workspace that is both visually appealing and practical for your daily tasks.
Beyond appearance, personalization can also improve productivity. Pinning frequently used applications to the Start menu or taskbar, organizing shortcuts, choosing comfortable color schemes, and enabling features like Dynamic Lighting on supported hardware can help you work more efficiently while making your PC feel uniquely yours. Windows 11 also includes options for customizing fonts, the touch keyboard, and device usage recommendations, giving you even greater control over your computing environment.
The best part is that all of these settings are available directly within the Personalization section of the Settings app, so you don’t need third-party software to make meaningful changes. Most adjustments take effect immediately, allowing you to experiment with different wallpapers, themes, colors, and layouts until you find the combination that works best for you.
Whether you’re setting up a brand-new computer, refreshing the look of an existing installation, or simply exploring Windows 11’s customization features, taking a few minutes to personalize your PC can make it more enjoyable to use every day. By exploring the personalization settings covered in this guide, you can create a Windows 11 experience that is both attractive and tailored to your individual needs.
Frequently Asked Questions
Where can I find Personalization settings in Windows 11?
Open Settings by pressing Windows + I, then select Personalization from the left pane. Here you’ll find options for backgrounds, themes, colors, the lock screen, Start menu, taskbar, fonts, touch keyboard, and more.
Can I create my own custom theme in Windows 11?
Yes. After customizing your wallpaper, colors, sounds, and mouse cursor, go to Settings > Personalization > Themes and choose Save theme. This allows you to switch back to your personalized setup whenever you want.
Does changing personalization settings affect system performance?
Most personalization settings, such as wallpapers, themes, and accent colors, have little to no noticeable impact on performance. However, features like slideshow backgrounds or Dynamic Lighting on compatible RGB devices may use a small amount of additional system resources, though the effect is generally minimal on modern computers.
Can I switch between Light mode and Dark mode?
Yes. Open Settings > Personalization > Colors, then choose Light, Dark, or Custom under Choose your mode. The change is applied immediately without requiring you to restart your computer.