
 Sukhdev Kamboj
If you’ve ever squinted at tiny text on your monitor, struggled to hear notification sounds, or wished you could control your PC without touching a mouse, Windows 11 has a set of built-in tools designed exactly for that. Microsoft originally called this collection of features “Ease of Access” in Windows 10, but in Windows 11 the section has been renamed Accessibility. If you’re following an older tutorial or a Windows 10 guide that mentions “Ease of Access,” know that it’s describing the same category of settings — they’ve simply moved and been rebranded.
These settings aren’t just for people with permanent disabilities. They’re useful for anyone dealing with eye strain after a long day, a temporary hand injury, a noisy environment where you can’t hear alerts, or simply a preference for a cleaner, higher-contrast interface. Windows 11 groups its accessibility tools into three broad categories — Vision, Hearing, and Interaction — each addressing a different way people experience and control their computer.
In this guide, we’ll walk through exactly how to find these settings, what each major feature does, and how to configure the ones most people find useful. By the end, you’ll know how to make text larger, turn on screen readers, add captions to audio, control your PC with your voice, and much more. We’ll close with a quick recap and answer some of the most common questions people have about accessibility on Windows 11.
Methods
Method 1: Open Accessibility Settings via the Settings App
The most direct way to reach these settings is through the Settings app itself.
Press Windows key + I to open Settings directly, or click the Start button and select the gear-shaped Settings icon.
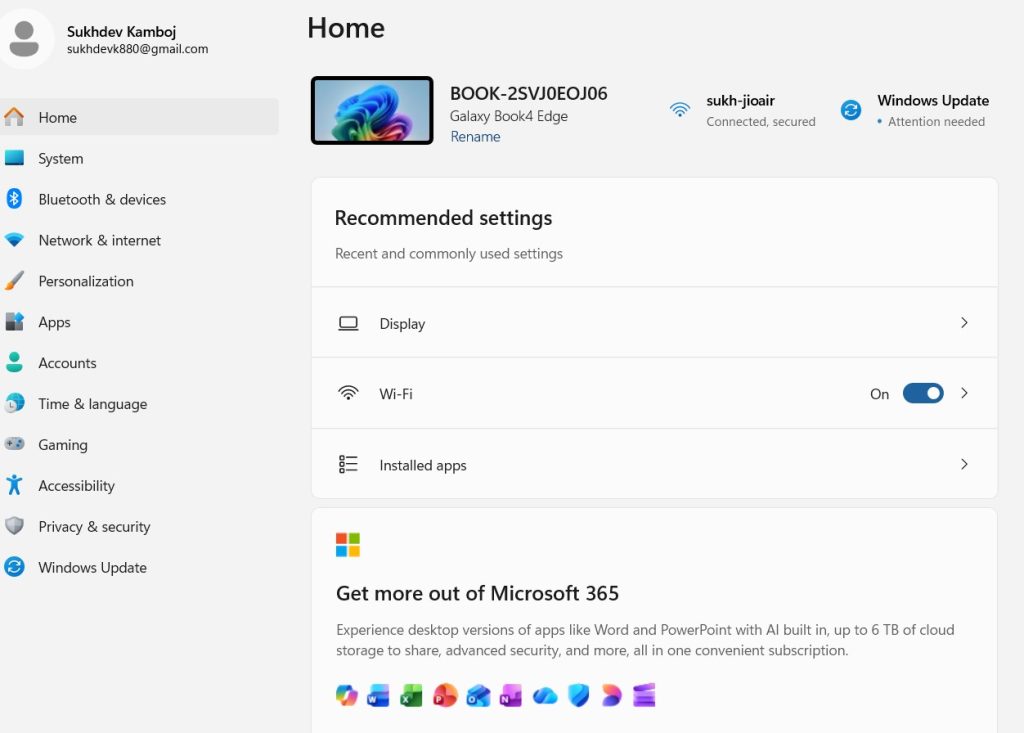
In the left-hand navigation panel, click Accessibility.
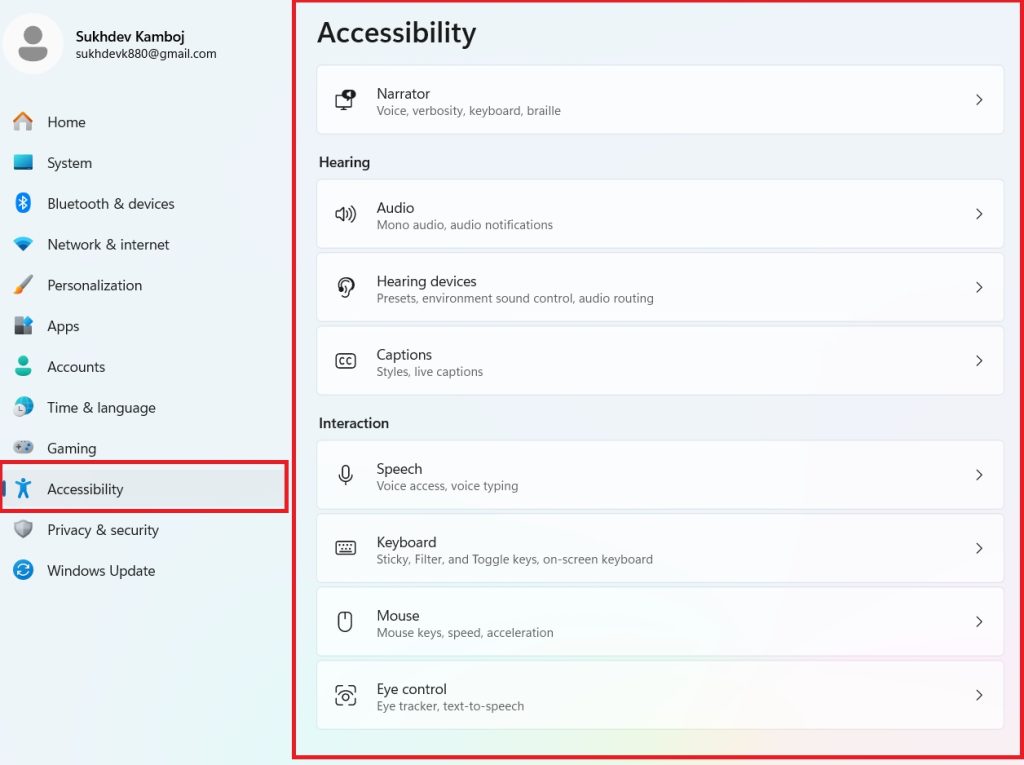
You’ll see the settings organized under three headings: Vision, Hearing, and Interaction. Click any category to expand its options.
This is the recommended path for most users because it shows every available toggle in one organized location, with live previews for many settings.
Method 2: Use the Windows + U Keyboard Shortcut
If you want to skip the Start menu entirely, Windows 11 includes a dedicated shortcut.
- Press Windows key + U from anywhere in Windows.
- This opens the Accessibility page in Settings directly, bypassing the need to navigate through menus.
This shortcut is worth memorizing if you adjust these settings often, or if you’re helping someone else quickly locate them.
Method 3: Search for Accessibility Settings
Windows Search is often the fastest option if you already have your hands on the keyboard.
- Click the search icon on the taskbar, or press Windows key + S.
- Type “Accessibility settings” or the older term “Ease of Access.”
- Select the top result to jump straight into the settings page.
Windows recognizes both the new and old terminology, so typing “Ease of Access” still works even though the interface itself now says “Accessibility.”
Method 4: Use the Sign-In Screen Accessibility Icon
You don’t need to log in to adjust some accessibility features — useful if you need larger text or Narrator turned on before you can even see your password field clearly.
- On the Windows 11 lock or sign-in screen, look for the accessibility icon in the bottom-right corner.
- Click it to reveal quick toggles for options like Narrator, Magnifier, on-screen keyboard, and Sticky Keys.
Method 5: Use the Quick Settings Accessibility Panel
For fast, on-the-fly toggling without opening the full Settings app:
- Click the network/sound/battery icons in the taskbar to open Quick Settings, or press Windows key + A.
- Select Accessibility from the Quick Settings panel.
- Toggle features like Color filters, Sticky Keys, or the on-screen keyboard directly, or click More accessibility settings to reach the full page.
Configuring Vision Settings
Once inside the Accessibility page, the Vision category covers everything related to how content appears on screen:
- Text size: Increase the size of text and labels across apps without shrinking or distorting the rest of the interface. Go to Accessibility > Text size, drag the slider, and preview the change before applying it.
- Visual effects: Turn off animations and transparency effects, which can reduce visual clutter and improve performance on older machines.
- Mouse pointer and touch: Change pointer size and color, and add a pointer trail or a “shake to find” indicator.
- Text cursor: Adjust the size and color of the blinking text cursor for better visibility, and enable the cursor indicator that highlights it briefly whenever it moves.
- Magnifier: A built-in screen magnifier that zooms into any part of the display. Turn it on and set your preferred zoom level, magnification style (full screen, lens, or docked), and starting zoom increment.
- Color filters: Apply filters for various types of color blindness, including options calibrated for deuteranopia and tritanopia, or use grayscale and inverted color modes.
- Contrast themes: Switch to a high-contrast theme that makes text and UI elements stand out sharply against the background — helpful for low vision or bright environments.
- Narrator: Windows 11’s built-in screen reader reads on-screen text, menus, and notifications aloud. Turn it on with Windows key + Ctrl + Enter, and configure its voice, speed, and verbosity from the Narrator settings page.
Configuring Hearing Settings
The Hearing category addresses audio accessibility:
- Audio: Enable mono audio to combine left and right channels into one — useful for anyone with hearing loss in one ear — or turn on visual notifications that flash the screen for sounds like alarms.
- Captions: Customize the size, color, background, and style of closed captions for video content.
- Live captions: One of Windows 11’s standout accessibility features, Live Captions automatically generates real-time captions for any audio playing on your PC — including video calls, streaming video, and podcasts — even if the content doesn’t have built-in captions. Turn it on with Windows key + Ctrl + L.
Configuring Interaction Settings
The Interaction category covers alternative ways to control your PC:
- Speech: Enable Voice Access, which lets you control your entire PC — opening apps, clicking buttons, dictating text — using only your voice. This is separate from Voice Typing, which focuses specifically on dictating text into any text field (launch it with Windows key + H).
- Keyboard: Configure Sticky Keys (press modifier keys one at a time instead of holding them down), Filter Keys (ignore brief or repeated keystrokes), Toggle Keys (play a sound when Caps Lock, Num Lock, or Scroll Lock is pressed), and the on-screen keyboard for typing without a physical keyboard.
- Mouse: Turn on Mouse Keys to control the pointer using the numeric keypad instead of a physical mouse.
- Eye control: If you have compatible eye-tracking hardware, this lets you operate the mouse, keyboard, and text-to-speech functions using only eye movement.
A Note on the Classic Control Panel
Some legacy accessibility tools are still accessible through the traditional Control Panel, which some longtime Windows users find more familiar:
- Press Windows key + R to open the Run dialog.
- Type control and press Enter.
- Select Ease of Access to open the older-style control center.
While most day-to-day adjustments are best made in the modern Settings app, this route can be useful for certain assistive-technology setups or troubleshooting.
Conclusion
Windows 11’s Accessibility settings — what many still call “Ease of Access” — bring together a genuinely comprehensive toolkit for adjusting how you see, hear, and interact with your PC. Whether you need larger text, a screen reader, live captions on unlabeled video content, or full voice control of your desktop, the tools are built in and free to use, with no extra software required.
The easiest way to remember how to reach them is the shortcut Windows key + U, which drops you directly into the Accessibility page from anywhere. From there, the three-part structure — Vision, Hearing, and Interaction — makes it straightforward to find the specific feature you’re looking for, whether you’re setting things up for yourself or helping a family member or colleague get a more comfortable experience on their PC. Many of these settings, like Magnifier, high-contrast themes, and Voice Typing, are also genuinely handy for anyone, disability or not, making them well worth exploring even out of simple curiosity.
FAQ
1. Why can’t I find “Ease of Access” in Windows 11 Settings? Microsoft renamed the section to “Accessibility” in Windows 11, though the underlying features are the same ones from Windows 10’s Ease of Access menu. If you’re following an older guide, just look for “Accessibility” in the Settings app instead. Searching for “Ease of Access” in Windows Search still works, since Windows recognizes both terms.
2. What’s the fastest way to open Accessibility settings? Press Windows key + U from anywhere on your PC. This opens the Accessibility page directly without needing to navigate through the Settings app or Start menu.
3. What’s the difference between Voice Access and Voice Typing? Voice Access lets you control your entire computer by voice — opening apps, clicking buttons, and navigating menus — while Voice Typing (launched with Windows key + H) is narrower in scope and focused purely on dictating text into whatever field is currently active, like a document or search box.
4. Can I turn on accessibility features before signing in to Windows? Yes. On the lock or sign-in screen, click the accessibility icon in the bottom-right corner to enable features like Narrator, Magnifier, Sticky Keys, or the on-screen keyboard before you even enter your password.





